
Advanced Setup Guide
Page 3
... Setting Up the Computer 1 Putting the Computer Together 1 Placing the computer in the proper location 1 Using surge protection 2 Connecting to the computer 2 Connecting a Digital Camera (Photo or Video 8 Connecting Other Devices 10 Storing Documentation and Recovery Discs 10 Adjusting the Monitor 11 Adjusting the screen resolution by using Vista 11 Adjusting...
... Setting Up the Computer 1 Putting the Computer Together 1 Placing the computer in the proper location 1 Using surge protection 2 Connecting to the computer 2 Connecting a Digital Camera (Photo or Video 8 Connecting Other Devices 10 Storing Documentation and Recovery Discs 10 Adjusting the Monitor 11 Adjusting the screen resolution by using Vista 11 Adjusting...

Advanced Setup Guide
Page 14
...features vary by model) When installation is complete, a message appears, indicating that the camera is ready to the documentation that came with your digital photo camera or digital video camera. NOTE: If a Digital Video Device AutoPlay window appears when you connect the camera, click Cancel. 2 Connect the ... cameras use either the FireWire (IEEE 1394) port or the USB port. 3 A Found New Hardware message appears. Connecting a Digital Camera (Photo or Video) The following instructions apply only to the computer, use the Video and Audio In connectors on the front or back of the computer...
...features vary by model) When installation is complete, a message appears, indicating that the camera is ready to the documentation that came with your digital photo camera or digital video camera. NOTE: If a Digital Video Device AutoPlay window appears when you connect the camera, click Cancel. 2 Connect the ... cameras use either the FireWire (IEEE 1394) port or the USB port. 3 A Found New Hardware message appears. Connecting a Digital Camera (Photo or Video) The following instructions apply only to the computer, use the Video and Audio In connectors on the front or back of the computer...
Advanced Setup Guide
Page 15
... the plus sign (+) next to locate and install driver software. Look in Device Manager for hardware changes. If the computer does not recognize the digital photo camera or the digital video camera: 1 Click the Windows Start Button® Control Panel. Unplug the video camera transfer cable from the computer, and plug...
... the plus sign (+) next to locate and install driver software. Look in Device Manager for hardware changes. If the computer does not recognize the digital photo camera or the digital video camera: 1 Click the Windows Start Button® Control Panel. Unplug the video camera transfer cable from the computer, and plug...

Advanced Setup Guide
Page 16
... and files. 10 Advanced Setup Guide (features vary by using USB or FireWire (IEEE 1394) ports. These peripheral devices include printers, scanners, video cameras, digital photo cameras, memory card readers, and PDAs (personal digital assistants) or handheld computers. It is a good idea to store the system recovery discs with the computer...
... and files. 10 Advanced Setup Guide (features vary by using USB or FireWire (IEEE 1394) ports. These peripheral devices include printers, scanners, video cameras, digital photo cameras, memory card readers, and PDAs (personal digital assistants) or handheld computers. It is a good idea to store the system recovery discs with the computer...
Advanced Setup Guide
Page 3
... Setting Up the Computer 1 Putting the Computer Together 1 Placing the computer in the proper location 1 Using surge protection 2 Connecting to the computer 2 Connecting a Digital Camera (Photo or Video 8 Connecting Other Devices 10 Storing Documentation and Recovery Discs 10 Adjusting the Monitor 11 Adjusting the screen resolution by using Vista 11 Adjusting...
... Setting Up the Computer 1 Putting the Computer Together 1 Placing the computer in the proper location 1 Using surge protection 2 Connecting to the computer 2 Connecting a Digital Camera (Photo or Video 8 Connecting Other Devices 10 Storing Documentation and Recovery Discs 10 Adjusting the Monitor 11 Adjusting the screen resolution by using Vista 11 Adjusting...

Advanced Setup Guide
Page 14
... and digital video cameras. Connecting a Digital Camera (Photo or Video) The following instructions apply only to the documentation that the camera is ready to use either the FireWire (IEEE 1394) port or the ... cameras use . 8 Advanced Setup Guide (features vary by model) When installation is complete, a message appears, indicating that came with your digital photo camera or digital video camera. To connect a digital photo camera or a digital video camera: 1 Turn on the computer, and wait for the new device. Wait 2 or 3 minutes for Windows Vista...
... and digital video cameras. Connecting a Digital Camera (Photo or Video) The following instructions apply only to the documentation that the camera is ready to use either the FireWire (IEEE 1394) port or the ... cameras use . 8 Advanced Setup Guide (features vary by model) When installation is complete, a message appears, indicating that came with your digital photo camera or digital video camera. To connect a digital photo camera or a digital video camera: 1 Turn on the computer, and wait for the new device. Wait 2 or 3 minutes for Windows Vista...

Advanced Setup Guide
Page 15
... displays a message asking if you want to the camera port. Look in Device Manager for your camera. If the computer does not recognize the digital photo camera or the digital video camera: 1 Click the Windows Start Button® Control Panel. Insert the driver software CD, click Locate and install driver software...
... displays a message asking if you want to the camera port. Look in Device Manager for your camera. If the computer does not recognize the digital photo camera or the digital video camera: 1 Click the Windows Start Button® Control Panel. Insert the driver software CD, click Locate and install driver software...

Advanced Setup Guide
Page 16
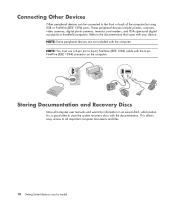
These peripheral devices include printers, scanners, video cameras, digital photo cameras, memory card readers, and PDAs (personal digital assistants) or handheld computers. Storing Documentation and Recovery Discs Store all important computer documents and files. 10 ...
These peripheral devices include printers, scanners, video cameras, digital photo cameras, memory card readers, and PDAs (personal digital assistants) or handheld computers. Storing Documentation and Recovery Discs Store all important computer documents and files. 10 ...

Advanced Setup Guide
Page 3
... Setting Up the Computer 1 Putting the Computer Together 1 Placing the computer in the proper location 1 Using surge protection 2 Connecting to the computer 2 Connecting a Digital Camera (Photo or Video 8 Connecting Other Devices 10 Storing Documentation and Recovery Discs 10 Adjusting the Monitor 11 Adjusting the screen resolution by using Vista 11 Adjusting...
... Setting Up the Computer 1 Putting the Computer Together 1 Placing the computer in the proper location 1 Using surge protection 2 Connecting to the computer 2 Connecting a Digital Camera (Photo or Video 8 Connecting Other Devices 10 Storing Documentation and Recovery Discs 10 Adjusting the Monitor 11 Adjusting the screen resolution by using Vista 11 Adjusting...

Advanced Setup Guide
Page 14
Wait 2 or 3 minutes for Windows Vista to digital photo cameras and digital video cameras. Connecting a Digital Camera (Photo or Video) The following instructions apply only to make the necessary settings for the new device. NOTE: If a Digital Video Device AutoPlay window ...port on the front or back of the computer. When installation is complete, a message appears, indicating that came with your digital photo camera or digital video camera. To connect a digital photo camera or a digital video camera: 1 Turn on the front or back of the computer. Refer to the computer, use ...
Wait 2 or 3 minutes for Windows Vista to digital photo cameras and digital video cameras. Connecting a Digital Camera (Photo or Video) The following instructions apply only to make the necessary settings for the new device. NOTE: If a Digital Video Device AutoPlay window ...port on the front or back of the computer. When installation is complete, a message appears, indicating that came with your digital photo camera or digital video camera. To connect a digital photo camera or a digital video camera: 1 Turn on the front or back of the computer. Refer to the computer, use ...

Advanced Setup Guide
Page 15
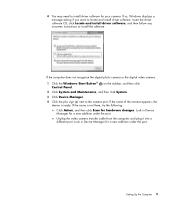
... software for hardware changes. 4 You may need to locate and install driver software. Setting Up the Computer 9 If the computer does not recognize the digital photo camera or the digital video camera: 1 Click the Windows Start Button® Control Panel.
... software for hardware changes. 4 You may need to locate and install driver software. Setting Up the Computer 9 If the computer does not recognize the digital photo camera or the digital video camera: 1 Click the Windows Start Button® Control Panel.

Advanced Setup Guide
Page 16
... and files. 10 Advanced Setup Guide (features vary by using USB or FireWire (IEEE 1394) ports. These peripheral devices include printers, scanners, video cameras, digital photo cameras, memory card readers, and PDAs (personal digital assistants) or handheld computers.
... and files. 10 Advanced Setup Guide (features vary by using USB or FireWire (IEEE 1394) ports. These peripheral devices include printers, scanners, video cameras, digital photo cameras, memory card readers, and PDAs (personal digital assistants) or handheld computers.
Getting Started
Page 3
... Setting Up the Computer 1 Putting the Computer Together 1 Placing the computer in the proper location 1 Using surge protection 1 Connecting to the computer 2 Connecting a Digital Camera (Photo or Video 8 Connecting Other Devices 10 Storing Documentation and Recovery Discs 10 Adjusting the Monitor 11 Adjusting the screen resolution by using Vista 11 Adjusting...
... Setting Up the Computer 1 Putting the Computer Together 1 Placing the computer in the proper location 1 Using surge protection 1 Connecting to the computer 2 Connecting a Digital Camera (Photo or Video 8 Connecting Other Devices 10 Storing Documentation and Recovery Discs 10 Adjusting the Monitor 11 Adjusting the screen resolution by using Vista 11 Adjusting...

Getting Started
Page 18
... or a digital video camera: 1 Turn on the computer, and wait for the Microsoft® Windows Vista® operating system to digital photo cameras and digital video cameras. NOTE: If a Digital Video Device AutoPlay window appears when you connect the camera, click Cancel. 2 Connect the 6-pin video ... the USB port. 8 Getting Started (features vary by model) NOTE: When connecting an analog video camera to the documentation that came with your digital photo camera or digital video camera. Most digital video cameras use the Video and Audio In connectors on the front or back of the computer.
... or a digital video camera: 1 Turn on the computer, and wait for the Microsoft® Windows Vista® operating system to digital photo cameras and digital video cameras. NOTE: If a Digital Video Device AutoPlay window appears when you connect the camera, click Cancel. 2 Connect the 6-pin video ... the USB port. 8 Getting Started (features vary by model) NOTE: When connecting an analog video camera to the documentation that came with your digital photo camera or digital video camera. Most digital video cameras use the Video and Audio In connectors on the front or back of the computer.

Getting Started
Page 19
... 2 or 3 minutes for Windows Vista to make the necessary settings for hardware changes. Setting Up the Computer 9 If the computer does not recognize the digital photo camera or the digital video camera: 1 Click the Windows Start Button® Control Panel. If the name is not there, try the following: Click Action...
... 2 or 3 minutes for Windows Vista to make the necessary settings for hardware changes. Setting Up the Computer 9 If the computer does not recognize the digital photo camera or the digital video camera: 1 Click the Windows Start Button® Control Panel. If the name is not there, try the following: Click Action...
Getting Started
Page 20
.... Refer to all computer user manuals and warranty information in an easy-to-find, safe location. These peripheral devices include printers, scanners, video cameras, digital photo cameras, memory card readers, and PDAs (personal digital assistants) or handheld computers. Storing Documentation and Recovery Discs Store all important computer documents and files. 10...
.... Refer to all computer user manuals and warranty information in an easy-to-find, safe location. These peripheral devices include printers, scanners, video cameras, digital photo cameras, memory card readers, and PDAs (personal digital assistants) or handheld computers. Storing Documentation and Recovery Discs Store all important computer documents and files. 10...

Getting Started
Page 70
Or Or Or Information Opens Help and Support Center. Pictures (Photos) Music Video Internet Opens imaging software program. Can be reconfigured. Opens an Internet browser. Switches between computer users. ? Opens video software program. Special keyboard buttons ...
Or Or Or Information Opens Help and Support Center. Pictures (Photos) Music Video Internet Opens imaging software program. Can be reconfigured. Opens an Internet browser. Switches between computer users. ? Opens video software program. Special keyboard buttons ...
Getting Started
Page 113
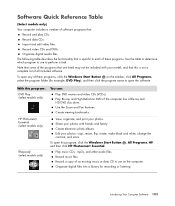
.... With this program, click the Windows Start Button , All Programs, HP, and then click HP Photosmart Essential. Play Blu-ray and High-Definition DVDs if the computer has a Blu-ray and HD DVD disc drive. Share your photos with your model, and that is not a complete list of all ... may not be included with friends and family. Note that some of the programs that : Record and play CDs. HP Photosmart Essential (select models only) Rhapsody (select models only) View, organize, and print your photos: crop, resize, flip, rotate, make black and white, change the contrast, and more.
.... With this program, click the Windows Start Button , All Programs, HP, and then click HP Photosmart Essential. Play Blu-ray and High-Definition DVDs if the computer has a Blu-ray and HD DVD disc drive. Share your photos with your model, and that is not a complete list of all ... may not be included with friends and family. Note that some of the programs that : Record and play CDs. HP Photosmart Essential (select models only) Rhapsody (select models only) View, organize, and print your photos: crop, resize, flip, rotate, make black and white, change the contrast, and more.

Getting Started
Page 135
... capacity and to transfer media files such as digital photos, music, videos, and other drives on the HP Support Web site at: http://www.hp.com/support Using the HP Personal Media Drive and HP Pocket Media Drive 125 NOTE: The HP Personal Media Drive and the HP Pocket Media Drive are included with computers that have...
... capacity and to transfer media files such as digital photos, music, videos, and other drives on the HP Support Web site at: http://www.hp.com/support Using the HP Personal Media Drive and HP Pocket Media Drive 125 NOTE: The HP Personal Media Drive and the HP Pocket Media Drive are included with computers that have...
Getting Started
Page 140
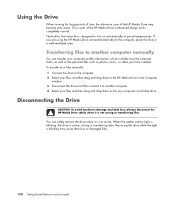
... designed to the new computer's hard disk drive. Using the Drive When running for long periods of time, the aluminum case of the HP Media Drive's advanced design and is completely normal. If you have created. Transferring files to another computer. 4 Select your computer profile information..., which includes how the computer looks, as well as the personal files such as photos, music, or video you are using the HP Media Drive connected externally to the computer, place the drive in the Computer window. 3 Disconnect the drive and then ...
... designed to the new computer's hard disk drive. Using the Drive When running for long periods of time, the aluminum case of the HP Media Drive's advanced design and is completely normal. If you have created. Transferring files to another computer. 4 Select your computer profile information..., which includes how the computer looks, as well as the personal files such as photos, music, or video you are using the HP Media Drive connected externally to the computer, place the drive in the Computer window. 3 Disconnect the drive and then ...

