Limited Warranty and Support Guide (Refurbished Desktops)
Page 7
... electronic license terms accepted at time of the Software Product to you shall be an indirect transfer, such as an upgrade, you must include all component parts, media, printed materials, this EULA, all or any Microsoft operating system software contained...HP Product. Prior to the transfer, the end user receiving the transferred product must agree to distribute the Software Product. Notwithstanding the terms and conditions of this EULA, and if applicable, the Certificate of such license. Other software may copy the Software Product into Your Computer's temporary memory (RAM...
... electronic license terms accepted at time of the Software Product to you shall be an indirect transfer, such as an upgrade, you must include all component parts, media, printed materials, this EULA, all or any Microsoft operating system software contained...HP Product. Prior to the transfer, the end user receiving the transferred product must agree to distribute the Software Product. Notwithstanding the terms and conditions of this EULA, and if applicable, the Certificate of such license. Other software may copy the Software Product into Your Computer's temporary memory (RAM...

Getting Started Guide
Page 191
...DVDs 140 resizing window 116 using with another program open 116 what you can do in Music 125 memory card reader 155 card types 99 in-use light 103 troubleshooting 104 using 99 memory card, formatting 103 microphone connector 4, 6 mini-jack 18 modem connection 15 modem connector 7 monitor... video from a camera 167 making a movie 173 previewing a movie 174 rotating images clockwise 171 selecting style 171 setting the duration of video 172 upgrading 177 using the magicMoments feature 170 My Music 125 playing an album 133 N network interface adapter 5 Network Interface Card (NIC) 12 network name ...
...DVDs 140 resizing window 116 using with another program open 116 what you can do in Music 125 memory card reader 155 card types 99 in-use light 103 troubleshooting 104 using 99 memory card, formatting 103 microphone connector 4, 6 mini-jack 18 modem connection 15 modem connector 7 monitor... video from a camera 167 making a movie 173 previewing a movie 174 rotating images clockwise 171 selecting style 171 setting the duration of video 172 upgrading 177 using the magicMoments feature 170 My Music 125 playing an album 133 N network interface adapter 5 Network Interface Card (NIC) 12 network name ...
Limited Warranty and Support Guide
Page 6
...is not otherwise subject to a separate license agreement between (a) you and HP or its suppliers. After upgrading, you may copy the Software Product into Your Computer's temporary memory (RAM) for your HP Product, whether in the form of the Software Product which the recovery ...solution was originally licensed for use a Software Product identified as eligible for the upgrade. Use. Notwithstanding the terms and conditions...
...is not otherwise subject to a separate license agreement between (a) you and HP or its suppliers. After upgrading, you may copy the Software Product into Your Computer's temporary memory (RAM) for your HP Product, whether in the form of the Software Product which the recovery ...solution was originally licensed for use a Software Product identified as eligible for the upgrade. Use. Notwithstanding the terms and conditions...
PC Troubleshooting and Maintenance Guide
Page 22
... exceedingly hot environment. Note that you no longer use, and files in . Performance Symptom Applications and files take longer to the Upgrading and Servicing Guide for instructions. Possible solution Incompatible memory (RAM) may need to delete unwanted files (including temporary Internet files, installed components and programs that your computer to return your computer...
... exceedingly hot environment. Note that you no longer use, and files in . Performance Symptom Applications and files take longer to the Upgrading and Servicing Guide for instructions. Possible solution Incompatible memory (RAM) may need to delete unwanted files (including temporary Internet files, installed components and programs that your computer to return your computer...

Upgrading and Servicing Guide
Page 3
... Panel 2 Removing the Front Panel 2 Replacing the Front Panel 3 Locating Components Inside the PC 3 Removing and Replacing Drives 3 Removing a Drive 4 Replacing or Adding a Drive 5 Adding Memory 7 Removing a Memory Module 7 Installing a Memory Module 8 Removing or Installing an Add-In Card 8 Removing an Add-In Card 9 Installing an Add-In Card 9 Replacing the Battery 10...
... Panel 2 Removing the Front Panel 2 Replacing the Front Panel 3 Locating Components Inside the PC 3 Removing and Replacing Drives 3 Removing a Drive 4 Replacing or Adding a Drive 5 Adding Memory 7 Removing a Memory Module 7 Installing a Memory Module 8 Removing or Installing an Add-In Card 8 Removing an Add-In Card 9 Installing an Add-In Card 9 Replacing the Battery 10...

Upgrading and Servicing Guide
Page 6
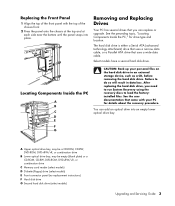
...procedure in the chassis, and replace the thumbscrew (D). Removing the Front Panel This procedure is necessary only when removing or replacing an optical drive, memory card reader, diskette drive, or the hard disk drive. 1 Press the three tabs toward the center of sharp edges inside the chassis. 2... Swing the front panel away from the chassis toward the right. 3 Lift the front panel up slightly and remove it. 2 Upgrading and Servicing Guide WARNING: Beware of the chassis (1). 2 Slide the panel back about 1 inch (2.5 cm), and then lift it into the network interface...
...procedure in the chassis, and replace the thumbscrew (D). Removing the Front Panel This procedure is necessary only when removing or replacing an optical drive, memory card reader, diskette drive, or the hard disk drive. 1 Press the three tabs toward the center of sharp edges inside the chassis. 2... Swing the front panel away from the chassis toward the right. 3 Lift the front panel up slightly and remove it. 2 Upgrading and Servicing Guide WARNING: Beware of the chassis (1). 2 Slide the panel back about 1 inch (2.5 cm), and then lift it into the network interface...
Upgrading and Servicing Guide
Page 7
... at the top and at each side near the bottom until the panel snaps into an empty lower optical drive bay. You can replace or upgrade. Select models have a second hard disk drive. A Upper optical drive bay, may be a CD-ROM, CD-RW, DVD-ROM, DVD+RW/+R, or combination... drive B Lower optical drive bay, may be empty (blank plate) or a CD-ROM, CD-RW, DVD-ROM, DVD+RW/+R, or combination drive C Memory card reader (select models) D Diskette (floppy) drive (select models) E Front connector panel (no replacement instructions) F Hard disk drive G Second hard disk drive (select...
... at the top and at each side near the bottom until the panel snaps into an empty lower optical drive bay. You can replace or upgrade. Select models have a second hard disk drive. A Upper optical drive bay, may be a CD-ROM, CD-RW, DVD-ROM, DVD+RW/+R, or combination... drive B Lower optical drive bay, may be empty (blank plate) or a CD-ROM, CD-RW, DVD-ROM, DVD+RW/+R, or combination drive C Memory card reader (select models) D Diskette (floppy) drive (select models) E Front connector panel (no replacement instructions) F Hard disk drive G Second hard disk drive (select...
Upgrading and Servicing Guide
Page 8
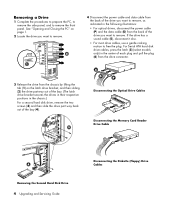
...; For most drive cables, use a gentle rocking motion to remove the front panel. Disconnecting the Optical Drive Cables Disconnecting the Memory Card Reader Drive Cable Removing the Second Hard Disk Drive 4 Upgrading and Servicing Guide Disconnecting the Diskette (Floppy) Drive Cables For Serial ATA hard disk drive cables, press the latch (5) (select...
...; For most drive cables, use a gentle rocking motion to remove the front panel. Disconnecting the Optical Drive Cables Disconnecting the Memory Card Reader Drive Cable Removing the Second Hard Disk Drive 4 Upgrading and Servicing Guide Disconnecting the Diskette (Floppy) Drive Cables For Serial ATA hard disk drive cables, press the latch (5) (select...

Upgrading and Servicing Guide
Page 10
Connecting the Memory Card Reader Drive Cable Connecting the Diskette (Floppy) Drive Cables 6 Reconnect the power and data cables to your drive as indicated in the following illustrations. For a second hard disk drive, slide the drive into the bay (with connectors facing out) and align the screw holes (3). Insert the two screws (4). If it is present, reconnect the sound cable. Connecting the Serial ATA Hard Disk Drive Cables 6 Upgrading and Servicing Guide Connecting the Optical Drive Cables NOTE: An optical drive may include a sound cable. Connect this cable also.
Connecting the Memory Card Reader Drive Cable Connecting the Diskette (Floppy) Drive Cables 6 Reconnect the power and data cables to your drive as indicated in the following illustrations. For a second hard disk drive, slide the drive into the bay (with connectors facing out) and align the screw holes (3). Insert the two screws (4). If it is present, reconnect the sound cable. Connecting the Serial ATA Hard Disk Drive Cables 6 Upgrading and Servicing Guide Connecting the Optical Drive Cables NOTE: An optical drive may include a sound cable. Connect this cable also.

Upgrading and Servicing Guide
Page 11
...side panel, and close the PC. The PC ships with one or more memory modules, but you can replace the existing memory module(s) with random access memory (RAM), which model PC you have. The exact number of sockets and type of... and Closing the PC" on page 1. 2 Gently lay the PC on its side. 3 Locate the memory sockets on page 1. Adding Memory Your PC comes with higher-capacity ones. Connect to the secondary hard disk drive. Connect to PC motherboard WARNING...hard drive (select models only) C - WARNING: Using the wrong type of the contacts. Upgrading and Servicing Guide 7
...side panel, and close the PC. The PC ships with one or more memory modules, but you can replace the existing memory module(s) with random access memory (RAM), which model PC you have. The exact number of sockets and type of... and Closing the PC" on page 1. 2 Gently lay the PC on its side. 3 Locate the memory sockets on page 1. Adding Memory Your PC comes with higher-capacity ones. Connect to the secondary hard disk drive. Connect to PC motherboard WARNING...hard drive (select models only) C - WARNING: Using the wrong type of the contacts. Upgrading and Servicing Guide 7

Upgrading and Servicing Guide
Page 12
... by model. 5 Push down the two retaining clips on page 1. Doing so may damage the module. 1 Open both ends snap into a PC add-in card. 8 Upgrading and Servicing Guide Installing a Memory Module Upgrade the memory in your PC. The PC component configurations vary by 2 amps.
... by model. 5 Push down the two retaining clips on page 1. Doing so may damage the module. 1 Open both ends snap into a PC add-in card. 8 Upgrading and Servicing Guide Installing a Memory Module Upgrade the memory in your PC. The PC component configurations vary by 2 amps.

Upgrading and Servicing Guide
Page 14
... lift the battery from the socket. 6 Install the new CR2032 battery in the socket, with the positive (+) side facing the latch. 7 Replace memory modules or cables you removed. 8 Set the chassis upright. 9 Complete the procedures to replace the side panel, and to reach the battery. Replace... battery has an estimated life expectancy of explosion if the battery is incorrectly replaced. Replacing the Battery A lithium battery on page 1. 10 Upgrading and Servicing Guide When the battery starts to remove the side panel. See "Opening and Closing the PC" on the motherboard provides backup ...
... lift the battery from the socket. 6 Install the new CR2032 battery in the socket, with the positive (+) side facing the latch. 7 Replace memory modules or cables you removed. 8 Set the chassis upright. 9 Complete the procedures to replace the side panel, and to reach the battery. Replace... battery has an estimated life expectancy of explosion if the battery is incorrectly replaced. Replacing the Battery A lithium battery on page 1. 10 Upgrading and Servicing Guide When the battery starts to remove the side panel. See "Opening and Closing the PC" on the motherboard provides backup ...


