
English Manual
Page 1
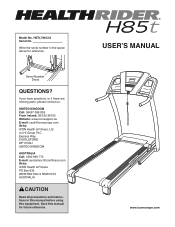
... NSW 2153 AUSTRALIA CAUTION Read all precautions and instructions in the space above for future reference. If you have questions, or if there are missing parts, please contact us: UNITED KINGDOM Call: 08457 089 009 From Ireland: 053 92 36102 Website: www.iconsupport.eu E-mail: [email protected] Write: ICON Health...
... NSW 2153 AUSTRALIA CAUTION Read all precautions and instructions in the space above for future reference. If you have questions, or if there are missing parts, please contact us: UNITED KINGDOM Call: 08457 089 009 From Ireland: 053 92 36102 Website: www.iconsupport.eu E-mail: [email protected] Write: ICON Health...

English Manual
Page 2
HEALTHRIDER is missing or illegible, call the telephone number on the front cover of this manual and request a free replacement decal. Apply the decal in the location shown. TABLE OF CONTENTS WARNING DECAL PLACEMENT 2 IMPORTANT PRECAUTIONS 3 BEFORE YOU BEGIN 5 PART ...IDENTIFICATION CHART 6 ASSEMBLY 7 OPERATION AND ADJUSTMENT 13 HOW TO FOLD AND MOVE THE TREADMILL 21 TROUBLESHOOTING 22 EXERCISE GUIDELINES 25 PART LIST 26 EXPLODED DRAWING 28 ORDERING REPLACEMENT PARTS Back Cover RECYCLING INFORMATION Back Cover WARNING...
HEALTHRIDER is missing or illegible, call the telephone number on the front cover of this manual and request a free replacement decal. Apply the decal in the location shown. TABLE OF CONTENTS WARNING DECAL PLACEMENT 2 IMPORTANT PRECAUTIONS 3 BEFORE YOU BEGIN 5 PART ...IDENTIFICATION CHART 6 ASSEMBLY 7 OPERATION AND ADJUSTMENT 13 HOW TO FOLD AND MOVE THE TREADMILL 21 TROUBLESHOOTING 22 EXERCISE GUIDELINES 25 PART LIST 26 EXPLODED DRAWING 28 ORDERING REPLACEMENT PARTS Back Cover RECYCLING INFORMATION Back Cover WARNING...
English Manual
Page 4
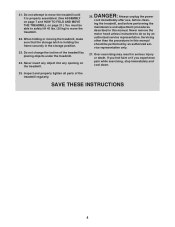
...21.) You must be performed by an authorized service representative. vice representative only. 27. Inspect and properly tighten all parts of the treadmill by placing objects under the treadmill. 24. ing the treadmill, and before clean- Over exercising may result in the storage position. 23. If you feel faint or if ... 4 Do not attempt to do so by an authorized ser- DANGER: 26. Never remove the motor hood unless instructed to move the treadmill. 22. Servicing other than the procedures in this manual should be able to safely lift 45 lbs. (20 kg) to move the...
...21.) You must be performed by an authorized service representative. vice representative only. 27. Inspect and properly tighten all parts of the treadmill by placing objects under the treadmill. 24. ing the treadmill, and before clean- Over exercising may result in the storage position. 23. If you feel faint or if ... 4 Do not attempt to do so by an authorized ser- DANGER: 26. Never remove the motor hood unless instructed to move the treadmill. 22. Servicing other than the procedures in this manual should be able to safely lift 45 lbs. (20 kg) to move the...
English Manual
Page 5
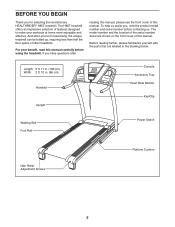
...Key/Clip Walking Belt Foot Rail Power Switch Idler Roller Adjustment Screws Platform Cushion 5 If you ’'re not exercising, the unique treadmill can be folded up, requiring less than half the oor space of features designed to make your benet, read this... with the parts that are shown on the front cover of this manual. And when you have questions after reading this manual, please see the front cover of this manual carefully before contacting us assist you for selecting the revolutionary HEALTHRIDER® H85T treadmill. The H85T treadmill offers an ...
...Key/Clip Walking Belt Foot Rail Power Switch Idler Roller Adjustment Screws Platform Cushion 5 If you ’'re not exercising, the unique treadmill can be folded up, requiring less than half the oor space of features designed to make your benet, read this... with the parts that are shown on the front cover of this manual. And when you have questions after reading this manual, please see the front cover of this manual carefully before contacting us assist you for selecting the revolutionary HEALTHRIDER® H85T treadmill. The H85T treadmill offers an ...

English Manual
Page 6
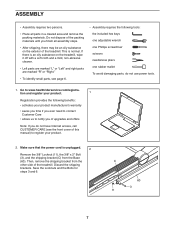
...Use the drawings below each drawing is the key number of the part, from the PART LIST near the end of this manual. The number in the hardware kit, check to identify small parts used for assembly. Note: If a part is the quantity used for assembly. The number following the key... number is not in parentheses below to see if it is preattached. Extra parts may be included. 1/4" Star Washer (10)–-2 5/16" Star Washer (9)–-6 3/8" Star Washer (12)–-4 Base Foot Spacer (89)–-2 3/8" Locknut (11)–...
...Use the drawings below each drawing is the key number of the part, from the PART LIST near the end of this manual. The number in the hardware kit, check to identify small parts used for assembly. Note: If a part is the quantity used for assembly. The number following the key... number is not in parentheses below to see if it is preattached. Extra parts may be included. 1/4" Star Washer (10)–-2 5/16" Star Washer (9)–-6 3/8" Star Washer (12)–-4 Base Foot Spacer (89)–-2 3/8" Locknut (11)–...
English Manual
Page 7
... Care •• allows us to www.healthriderservice.com/registra- Make sure that the power cord is an oily substance on the exterior of the treadmill. Save the Locknuts and the Bolts for steps 3 and 6. Do not dispose of the packing materials until you do not use power tools. 1..... •• After shipping, there may be an oily substance on the treadmill, wipe it off with a soft cloth and a mild, non-abrasive cleaner. •• Left parts are marked “"L”" or “"Left”" and right parts are marked “"R”" or “"Right.”" •• To ...
... Care •• allows us to www.healthriderservice.com/registra- Make sure that the power cord is an oily substance on the exterior of the treadmill. Save the Locknuts and the Bolts for steps 3 and 6. Do not dispose of the packing materials until you do not use power tools. 1..... •• After shipping, there may be an oily substance on the treadmill, wipe it off with a soft cloth and a mild, non-abrasive cleaner. •• Left parts are marked “"L”" or “"Left”" and right parts are marked “"R”" or “"Right.”" •• To ...
English Manual
Page 12
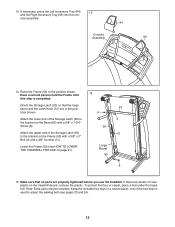
...Bolt (3) and a 3/8" Locknut (11). Lower the Frame (53) (see pages 23 and 24). 12 Note: Extra parts may be included. Have a second person hold the Frame until 14 this step is used to adjust the walking belt ...(see HOW TO LOWER THE TREADMILL FOR USE on the treadmill decals, remove the plastic. Make sure that the large barrel and the Latch Knob...13. Orient the Storage Latch (50) so that all parts are in a secure place; To protect the oor or carpet, place a mat under the treadmill. If necessary, press the Left Accessory Tray (94) ...
...Bolt (3) and a 3/8" Locknut (11). Lower the Frame (53) (see pages 23 and 24). 12 Note: Extra parts may be included. Have a second person hold the Frame until 14 this step is used to adjust the walking belt ...(see HOW TO LOWER THE TREADMILL FOR USE on the treadmill decals, remove the plastic. Make sure that the large barrel and the Latch Knob...13. Orient the Storage Latch (50) so that all parts are in a secure place; To protect the oor or carpet, place a mat under the treadmill. If necessary, press the Left Accessory Tray (94) ...
English Manual
Page 25
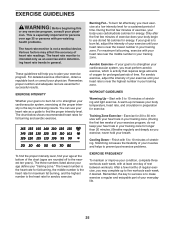
... detailed exercise information, obtain a reputable book or consult your training zone. Burning Fat—-To burn fat effectively, you to make exercise a regular and enjoyable part of your exercise until your heart rate is to plan your everyday life. 25 For aerobic exercise, adjust the intensity of exercise, your heart rate...
... detailed exercise information, obtain a reputable book or consult your training zone. Burning Fat—-To burn fat effectively, you to make exercise a regular and enjoyable part of your exercise until your heart rate is to plan your everyday life. 25 For aerobic exercise, adjust the intensity of exercise, your heart rate...
English Manual
Page 26
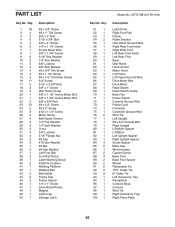
... 15.5" Cable Tie 8" Cable Tie Left Accessory Tray Receptacle Console Base Console Wire Tie Right Accessory Tray Right Pulse Plate 26 HETL79812.0 R1112A Key No. PART LIST Key No. Qty. 1 18 2 4 3 3 4 6 5 4 6 2 7 1 8 1 9 6 10 2 11 3 12 4 13 5 14 4 15 2 16 11 17 2 18 2 19 2 20 1 21 1 22 2 23 12 24 3 25 8 26 2 27...
... 15.5" Cable Tie 8" Cable Tie Left Accessory Tray Receptacle Console Base Console Wire Tie Right Accessory Tray Right Pulse Plate 26 HETL79812.0 R1112A Key No. PART LIST Key No. Qty. 1 18 2 4 3 3 4 6 5 4 6 2 7 1 8 1 9 6 10 2 11 3 12 4 13 5 14 4 15 2 16 11 17 2 18 2 19 2 20 1 21 1 22 2 23 12 24 3 25 8 26 2 27...

English Manual
Page 27
Key No. Qty. Description 101 1 102 1 103 1 104 4 105 1 106 1 107 1 108 6 Left Pulse Plate Access Door Key/Clip Handrail Cap Right Handrail Left Handrail Console Crossbar Console Clamp 109 2 110 4 111 1 112 2 113 1 114 1 * –- 5/16" x 1 1/2" Bolt #3 x 1/4" Screw Filter Motor Isolator Motor Plate Electronics Plate User’'s Manual Note: Specications are not illustrated. 27 Qty. For information about ordering replacement parts, see the back cover of this manual. *These parts are subject to change without notice. Description Key No.
Key No. Qty. Description 101 1 102 1 103 1 104 4 105 1 106 1 107 1 108 6 Left Pulse Plate Access Door Key/Clip Handrail Cap Right Handrail Left Handrail Console Crossbar Console Clamp 109 2 110 4 111 1 112 2 113 1 114 1 * –- 5/16" x 1 1/2" Bolt #3 x 1/4" Screw Filter Motor Isolator Motor Plate Electronics Plate User’'s Manual Note: Specications are not illustrated. 27 Qty. For information about ordering replacement parts, see the back cover of this manual. *These parts are subject to change without notice. Description Key No.

English Manual
Page 32
... front cover of this manual) •• the key number and description of the replacement part(s) (see the front cover of this manual. ORDERING REPLACEMENT PARTS To order replacement parts, please see the PART LIST and the EXPLODED DRAWING near the end of this manual) RECYCLING INFORMATION This electronic product ...must be disposed of in municipal waste. Part No. 340541 R1112A Printed in your local city office or the establishment where you will help us assist you, be prepared to...
... front cover of this manual) •• the key number and description of the replacement part(s) (see the front cover of this manual. ORDERING REPLACEMENT PARTS To order replacement parts, please see the PART LIST and the EXPLODED DRAWING near the end of this manual) RECYCLING INFORMATION This electronic product ...must be disposed of in municipal waste. Part No. 340541 R1112A Printed in your local city office or the establishment where you will help us assist you, be prepared to...


