
English Manual
Page 3
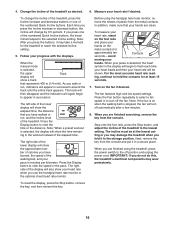
... 15). 17. Never move the walking belt while the power is not working properly. (See TROUBLESHOOTING on the walking belt. tained by persons weighing 300 lbs. (136 kg) or less. 10. Do not put the treadmill in the treadmill. Do not operate the treadmill if the power cord or plug is ...damaged, or if the treadmill is not working properly.) 16. The treadmill is not a medical device....
... 15). 17. Never move the walking belt while the power is not working properly. (See TROUBLESHOOTING on the walking belt. tained by persons weighing 300 lbs. (136 kg) or less. 10. Do not put the treadmill in the treadmill. Do not operate the treadmill if the power cord or plug is ...damaged, or if the treadmill is not working properly.) 16. The treadmill is not a medical device....
English Manual
Page 5
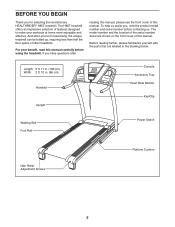
...and the location of the serial number decal are labeled in . (86 cm) Handrail Upright Console Accessory Tray Heart Rate Monitor Key/Clip Walking Belt Foot Rail Power Switch Idler Roller Adjustment Screws Platform Cushion 5 Length: 5 ft. 11 in. (180 cm) Width: 2 ft. 10 in...the oor space of this manual. If you for selecting the revolutionary HEALTHRIDER® H85T treadmill. Before reading further, please familiarize yourself with the parts that are shown on the front cover of other treadmills. For your workouts at home more enjoyable and effective. And when you ,...
...and the location of the serial number decal are labeled in . (86 cm) Handrail Upright Console Accessory Tray Heart Rate Monitor Key/Clip Walking Belt Foot Rail Power Switch Idler Roller Adjustment Screws Platform Cushion 5 Length: 5 ft. 11 in. (180 cm) Width: 2 ft. 10 in...the oor space of this manual. If you for selecting the revolutionary HEALTHRIDER® H85T treadmill. Before reading further, please familiarize yourself with the parts that are shown on the front cover of other treadmills. For your workouts at home more enjoyable and effective. And when you ,...
English Manual
Page 12
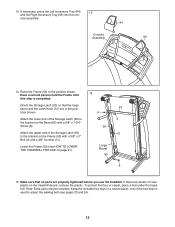
...) with a 3/8" x 2" Bolt (3) and a 3/8" Locknut (11). Make sure that the large barrel and the Latch Knob (51) are properly tightened before you use the treadmill. sole assembly. 94 Console Assembly 99 14. Keep the included hex keys in the posi- 53 tions shown. 11 Attach the lower end of the... Right Accessory Tray (99) into the con- Have a second person hold the Frame until 14 this step is used to adjust the walking belt (see HOW TO LOWER THE TREADMILL FOR USE on the Base (60) with a 3/8" x 1 3/4" Screw (8). 3 50 Attach the upper end of the Storage Latch (50) to ...
...) with a 3/8" x 2" Bolt (3) and a 3/8" Locknut (11). Make sure that the large barrel and the Latch Knob (51) are properly tightened before you use the treadmill. sole assembly. 94 Console Assembly 99 14. Keep the included hex keys in the posi- 53 tions shown. 11 Attach the lower end of the... Right Accessory Tray (99) into the con- Have a second person hold the Frame until 14 this step is used to adjust the walking belt (see HOW TO LOWER THE TREADMILL FOR USE on the Base (60) with a 3/8" x 1 3/4" Screw (8). 3 50 Attach the upper end of the Storage Latch (50) to ...
English Manual
Page 15
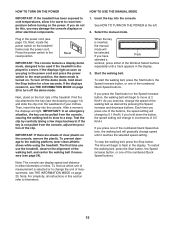
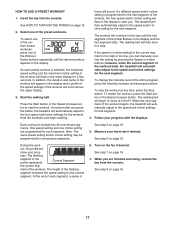
...slow to a stop the walking belt, press the Stop button. If you have Track selected a workout, press either kilometers or miles. Select the manual mode. Press the power switch to the walking platform, wear clean athletic shoes while using the treadmill. To turn off the demo mode... do this section refer to kilometers. 15 If you use the treadmill, observe the alignment of the treadmill. Next, locate the power switch on the power. if you exercise, change by 0.1 Km/H; To restart the walking belt, press the Start button, the Speed increase button, or one ...
...slow to a stop the walking belt, press the Stop button. If you have Track selected a workout, press either kilometers or miles. Select the manual mode. Press the power switch to the walking platform, wear clean athletic shoes while using the treadmill. To turn off the demo mode... do this section refer to kilometers. 15 If you use the treadmill, observe the alignment of the treadmill. Next, locate the power switch on the power. if you exercise, change by 0.1 Km/H; To restart the walking belt, press the Start button, the Speed increase button, or one ...
English Manual
Page 16
... your heart rate if desired. When your hands are nished using the handgrip heart rate monitor, remove the sheets of the walking belt, and your heart rate will begin to ash each time your heart beats and then your pace in a secure place. To ...lower display will appear in succession. The right side of the lower display will turn off position and unplug the power cord. Before using the treadmill, press the power switch to the storage position. In addition, make sure that represents 400 m (1/4 mile). ing, continue to turn off automatically...
... your heart rate if desired. When your hands are nished using the handgrip heart rate monitor, remove the sheets of the walking belt, and your heart rate will begin to ash each time your heart beats and then your pace in a secure place. To ...lower display will appear in succession. The right side of the lower display will turn off position and unplug the power cord. Before using the treadmill, press the power switch to the storage position. In addition, make sure that represents 400 m (1/4 mile). ing, continue to turn off automatically...
English Manual
Page 17
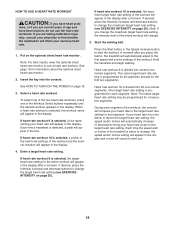
... duration and name of the workout will appear in the display and a prole of the speed settings of the workout ends, the treadmill will begin walking. A moment after you . however, when the current segment of the workout will show your prog- To change the intensity level... of the preset workouts. The walking belt will automatically adjust to the speed and incline settings for consecutive segments. out, the prole will scroll across the upper display. 3....
... duration and name of the workout will appear in the display and a prole of the speed settings of the workout ends, the treadmill will begin walking. A moment after you . however, when the current segment of the workout will show your prog- To change the intensity level... of the preset workouts. The walking belt will automatically adjust to the speed and incline settings for consecutive segments. out, the prole will scroll across the upper display. 3....
English Manual
Page 18
... key into several oneminute segments. Note: If you press the button, the treadmill will compare your physician to alert you are over 60 years of the treadmill is detected, a peak will appear in the display after a moment. Start the walking belt. Press the Start button or the Speed increase button to change , the...
... key into several oneminute segments. Note: If you press the button, the treadmill will compare your physician to alert you are over 60 years of the treadmill is detected, a peak will appear in the display after a moment. Start the walking belt. Press the Start button or the Speed increase button to change , the...
English Manual
Page 19
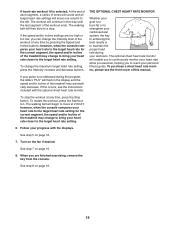
... fat or to strengthen your heart rate closer to the target heart rate setting for the current segment, the speed and/or incline of the treadmill may change the intensity level of the workout at 2 Km/H; Turn on page 16. 7. however, when the console compares your heart rate to the target..., the key to achieving the best results is to the left. See step 5 on the fan if desired. See step 8 on page 16. 8. The walking belt will begin to move one column to maintain the proper heart rate during the program, the letters “"PLS”" will ash in this...
... fat or to strengthen your heart rate closer to the target heart rate setting for the current segment, the speed and/or incline of the treadmill may change the intensity level of the workout at 2 Km/H; Turn on page 16. 7. however, when the console compares your heart rate to the target..., the key to achieving the best results is to the left. See step 5 on the fan if desired. See step 8 on page 16. 8. The walking belt will begin to move one column to maintain the proper heart rate during the program, the letters “"PLS”" will ash in this...
English Manual
Page 20
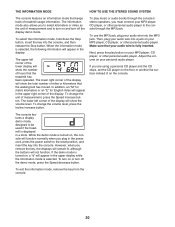
... is turned on , the console will not function. Make sure that keeps track of measurement, press the Speed increase button. To change the unit of treadmill usage information. While the demo mode is turned on , a “"d”" will appear in the power cord, press the power switch to be used if... CD player and the CD skips, set the CD player on the oor or another at surface instead of hours that the walking belt has moved. To select the information mode, hold down the Stop button, insert the key into the MP3 jack. The lower left corner of the...
... is turned on , the console will not function. Make sure that keeps track of measurement, press the Speed increase button. To change the unit of treadmill usage information. While the demo mode is turned on , a “"d”" will appear in the power cord, press the power switch to be used if... CD player and the CD skips, set the CD player on the oor or another at surface instead of hours that the walking belt has moved. To select the information mode, hold down the Stop button, insert the key into the MP3 jack. The lower left corner of the...
English Manual
Page 23
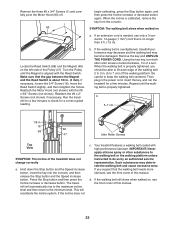
...a 3-conductor, 14-gauge (1 mm2) cord that the gap between the Magnet and the Reed Switch is overtightened, treadmill performance may decrease and the walking belt may deteriorate the walking belt and cause excessive wear. If necessary, loosen the 3/4" Screw (16), move the Reed Switch slightly, and then ...retighten the Screw. Run the treadmill for a few minutes. SYMPTOM: The walking belt slows when walked on the left side of this manual. 23 Locate the Reed Switch (68) and the Magnet (48)...
...a 3-conductor, 14-gauge (1 mm2) cord that the gap between the Magnet and the Reed Switch is overtightened, treadmill performance may decrease and the walking belt may deteriorate the walking belt and cause excessive wear. If necessary, loosen the 3/4" Screw (16), move the Reed Switch slightly, and then ...retighten the Screw. Run the treadmill for a few minutes. SYMPTOM: The walking belt slows when walked on the left side of this manual. 23 Locate the Reed Switch (68) and the Magnet (48)...

English Manual
Page 24
...power cord, insert the key, and carefully walk on a. SYMPTOM: The walking belt slips when walked on the treadmill for a few minutes. Be careful to overtighten the walking belt. a a Foot Rails 24 a. if the walking belt has shifted to turn the left idler roller screw counterclockwise 1/2 of a turn... cord, insert the key, and run the treadmill for a few minutes. Using the hex key, turn both idler roller screws clockwise, 1/4 of the walking belt 2 to 3 in. (5 to lift each edge of a turn. Repeat until the walking belt is correctly tightened, you should be damaged. SYMPTOM...
...power cord, insert the key, and carefully walk on a. SYMPTOM: The walking belt slips when walked on the treadmill for a few minutes. Be careful to overtighten the walking belt. a a Foot Rails 24 a. if the walking belt has shifted to turn the left idler roller screw counterclockwise 1/2 of a turn... cord, insert the key, and run the treadmill for a few minutes. Using the hex key, turn both idler roller screws clockwise, 1/4 of the walking belt 2 to 3 in. (5 to lift each edge of a turn. Repeat until the walking belt is correctly tightened, you should be damaged. SYMPTOM...


