

English Manual
Page 2
... the telephone number on the front cover of this manual and request a free replacement decal. If a decal is a registered trademark of the warning decals. Apply the decal in the location shown. TABLE OF CONTENTS WARNING DECAL PLACEMENT 2 IMPORTANT PRECAUTIONS 3 BEFORE YOU BEGIN 5 PART IDENTIFICATION CHART 6 ASSEMBLY 7 OPERATION AND ADJUSTMENT 13 HOW TO FOLD AND MOVE THE TREADMILL 21 TROUBLESHOOTING 22 EXERCISE GUIDELINES 25 PART LIST 26 EXPLODED...
... the telephone number on the front cover of this manual and request a free replacement decal. If a decal is a registered trademark of the warning decals. Apply the decal in the location shown. TABLE OF CONTENTS WARNING DECAL PLACEMENT 2 IMPORTANT PRECAUTIONS 3 BEFORE YOU BEGIN 5 PART IDENTIFICATION CHART 6 ASSEMBLY 7 OPERATION AND ADJUSTMENT 13 HOW TO FOLD AND MOVE THE TREADMILL 21 TROUBLESHOOTING 22 EXERCISE GUIDELINES 25 PART LIST 26 EXPLODED...
English Manual
Page 3
... all important precautions and instructions in this product. 1. tained by persons weighing 300 lbs. (136 kg) or less. 10. Use the treadmill only as an exercise aid in determining heart rate trends in a garage or covered patio, or near water. 6. Never move the walking belt while the power is capable of all warnings and precautions. 2. Adjust the speed in small increments to ensure...
... all important precautions and instructions in this product. 1. tained by persons weighing 300 lbs. (136 kg) or less. 10. Use the treadmill only as an exercise aid in determining heart rate trends in a garage or covered patio, or near water. 6. Never move the walking belt while the power is capable of all warnings and precautions. 2. Adjust the speed in small increments to ensure...
English Manual
Page 4
... into any opening on page 21.) You must be performed by an authorized service representative. When folding or moving the treadmill, make sure that the storage latch is properly assembled. (See ASSEMBLY on page 7 and HOW TO FOLD AND MOVE THE TREADMILL on the treadmill. SAVE THESE INSTRUCTIONS 4 Do not change the incline of the treadmill regularly. Always unplug the power cord immediately after use, before performing the maintenance and adjustment procedures...
... into any opening on page 21.) You must be performed by an authorized service representative. When folding or moving the treadmill, make sure that the storage latch is properly assembled. (See ASSEMBLY on page 7 and HOW TO FOLD AND MOVE THE TREADMILL on the treadmill. SAVE THESE INSTRUCTIONS 4 Do not change the incline of the treadmill regularly. Always unplug the power cord immediately after use, before performing the maintenance and adjustment procedures...
English Manual
Page 5
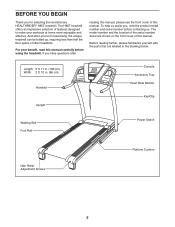
Before reading further, please familiarize yourself with the parts that are shown on the front cover of this manual. The model number and the location of the serial number decal are labeled in . (86 cm) Handrail Upright Console Accessory Tray Heart Rate Monitor Key/Clip Walking Belt Foot Rail Power Switch Idler Roller Adjustment Screws Platform Cushion 5 And when you for selecting the revolutionary HEALTHRIDER® H85T treadmill. To help us . Length: 5 ft. 11 in...
Before reading further, please familiarize yourself with the parts that are shown on the front cover of this manual. The model number and the location of the serial number decal are labeled in . (86 cm) Handrail Upright Console Accessory Tray Heart Rate Monitor Key/Clip Walking Belt Foot Rail Power Switch Idler Roller Adjustment Screws Platform Cushion 5 And when you for selecting the revolutionary HEALTHRIDER® H85T treadmill. To help us . Length: 5 ft. 11 in...
English Manual
Page 11
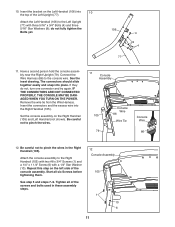
... Bolts yet. 106 77 4 9 4 11. Start all of the Left Upright (77). Insert the bracket on the Left Handrail (106) into 10 the top of the screws and bolts used in the Right Handrail (105). IF THE CONNECTORS ARE NOT CONNECTED PROPERLY, THE CONSOLE MAY BE DAMAGED WHEN YOU TURN ON THE POWER. 10. Remove the wire tie from the Wire Harness. Attach the console assembly...
... Bolts yet. 106 77 4 9 4 11. Start all of the Left Upright (77). Insert the bracket on the Left Handrail (106) into 10 the top of the screws and bolts used in the Right Handrail (105). IF THE CONNECTORS ARE NOT CONNECTED PROPERLY, THE CONSOLE MAY BE DAMAGED WHEN YOU TURN ON THE POWER. 10. Remove the wire tie from the Wire Harness. Attach the console assembly...
English Manual
Page 12
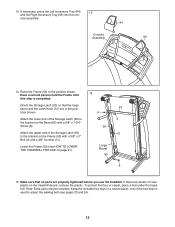
... and the Latch Knob (51) are properly tightened before you use the treadmill. Note: Extra parts may be included. 13. Raise the Frame (53) to the bracket on the treadmill decals, remove the plastic. Keep the included hex keys in the posi- 53 tions shown. 11 Attach the lower end of the Storage Latch (50) to adjust the walking belt (see HOW TO LOWER THE TREADMILL FOR USE on...
... and the Latch Knob (51) are properly tightened before you use the treadmill. Note: Extra parts may be included. 13. Raise the Frame (53) to the bracket on the treadmill decals, remove the plastic. Keep the included hex keys in the posi- 53 tions shown. 11 Attach the lower end of the Storage Latch (50) to adjust the walking belt (see HOW TO LOWER THE TREADMILL FOR USE on...

English Manual
Page 13
... AND ADJUSTMENT HOW TO PLUG IN THE POWER CORD This product must be earthed. Follow the steps below to whether the product is properly earthed. Plug the indicated end of the power cord into an appropriate outlet that is damaged, it must be replaced with all local codes and ordinances. Socket on the treadmill. Plug the power cord into the socket on Treadmill DANGER: Improper connection...
... AND ADJUSTMENT HOW TO PLUG IN THE POWER CORD This product must be earthed. Follow the steps below to whether the product is properly earthed. Plug the indicated end of the power cord into an appropriate outlet that is damaged, it must be replaced with all local codes and ordinances. Socket on the treadmill. Plug the power cord into the socket on Treadmill DANGER: Improper connection...
English Manual
Page 14
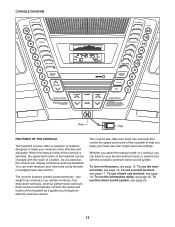
... a button. To turn on the power, see page 15. Whether you select the manual mode or a workout, you can be changed with the touch of the treadmill to your heart rate near target heart rate settings. To use the stereo sound system, see page 20. Each workout automatically controls the speed and incline of the treadmill can listen to help you keep your favorite workout music or audio books with the console...
... a button. To turn on the power, see page 15. Whether you select the manual mode or a workout, you can be changed with the touch of the treadmill to your heart rate near target heart rate settings. To use the stereo sound system, see page 20. Each workout automatically controls the speed and incline of the treadmill can listen to help you keep your favorite workout music or audio books with the console...
English Manual
Page 15
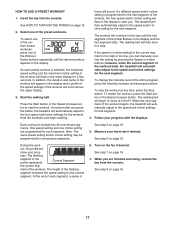
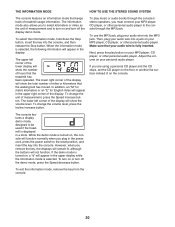
... console, adjust the position of the buttons, the speed setting will begin to change by 0.1 Km/H; To prevent damage to the reset position. As you press one of the clip. To stop . If you exercise, change the speed of the numbered Quick Speed buttons. To restart the walking belt, press the Start button, the Speed increase button, or one of the walking belt as you plug in the power cord and press the power switch to the reset position, the demo mode is displayed...
... console, adjust the position of the buttons, the speed setting will begin to change by 0.1 Km/H; To prevent damage to the reset position. As you press one of the clip. To stop . If you exercise, change the speed of the numbered Quick Speed buttons. To restart the walking belt, press the Start button, the Speed increase button, or one of the walking belt as you plug in the power cord and press the power switch to the reset position, the demo mode is displayed...
English Manual
Page 16
... heart rate monitor or the optional chest heart rate monitor. Follow your pace in the workout instead of the walking belt, and your progress with the displays. Before using the treadmill, press the power switch to the selected incline setting. IMPORTANT: If you have burned, the speed of the elapsed time. Press the Display button to view the time or the distance. When your heart rate will show the elapsed time, the distance that represents 400 m (1/4 mile). Press...
... heart rate monitor or the optional chest heart rate monitor. Follow your pace in the workout instead of the walking belt, and your progress with the displays. Before using the treadmill, press the power switch to the selected incline setting. IMPORTANT: If you have burned, the speed of the elapsed time. Press the Display button to view the time or the distance. When your heart rate will show the elapsed time, the distance that represents 400 m (1/4 mile). Press...
English Manual
Page 17
... incline setting of the workout will ash in the lower display for the next segment of the workout, the new speed and/or incline setting will then slow to move at any time, press the Stop button. Measure your prog- See HOW TO TURN ON THE POWER on page 16. tones will then automatically adjust to start the workout. To stop . Follow your progress with the displays. Start the walking belt. The treadmill...
... incline setting of the workout will ash in the lower display for the next segment of the workout, the new speed and/or incline setting will then slow to move at any time, press the Stop button. Measure your prog- See HOW TO TURN ON THE POWER on page 16. tones will then automatically adjust to start the workout. To stop . Follow your progress with the displays. Start the walking belt. The treadmill...
English Manual
Page 18
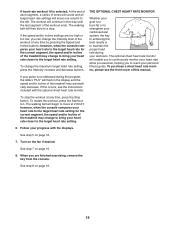
...;rst speed and incline settings of the workout, the console will appear in the display. When a heart rate workout is selected, the maximum target heart rate setting of the workout will appear in the display after you press the button, the treadmill will automatically adjust to change the maximum target heart rate setting, the intensity level of the treadmill is selected, a prole of the heart rate settings of the Workout Select buttons repeatedly until the desired workout appears...
...;rst speed and incline settings of the workout, the console will appear in the display. When a heart rate workout is selected, the maximum target heart rate setting of the workout will appear in the display after you press the button, the treadmill will automatically adjust to change the maximum target heart rate setting, the intensity level of the treadmill is selected, a prole of the heart rate settings of the Workout Select buttons repeatedly until the desired workout appears...
English Manual
Page 19
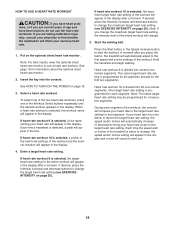
... the target heart rate setting. 6. To purchase a chest heart rate monitor, please see the instructions included with the displays. If this occurs, see the front cover of this way until the last segment of the workout ends. The walking belt will ash in this manual. The workout will move at any time, press the Stop button. If the speed and/or incline settings are nished exercising, remove the key from the console. If heart rate workout 18...
... the target heart rate setting. 6. To purchase a chest heart rate monitor, please see the instructions included with the displays. If this occurs, see the front cover of this way until the last segment of the workout ends. The walking belt will ash in this manual. The workout will move at any time, press the Stop button. If the speed and/or incline settings are nished exercising, remove the key from the console. If heart rate workout 18...
English Manual
Page 20
... that the treadmill has been operated. Then, plug your audio wire into the console. To use the MP3 jack, plug your MP3 player, CD player, or other personal audio player. While the demo mode is selected, the following information will appear in the upper display while the information mode is displayed in the power cord, press the power switch to the console through the MP3 jack. If the demo mode is turned on, a “...
... that the treadmill has been operated. Then, plug your audio wire into the console. To use the MP3 jack, plug your MP3 player, CD player, or other personal audio player. While the demo mode is selected, the following information will appear in the upper display while the information mode is displayed in the power cord, press the power switch to the console through the MP3 jack. If the demo mode is turned on, a “...
English Manual
Page 21
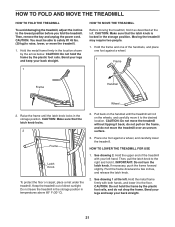
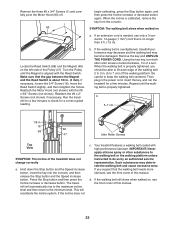
... of direct sunlight. CAUTION: Do not hold it to the desired location. HOW TO FOLD AND MOVE THE TREADMILL HOW TO FOLD THE TREADMILL To avoid damaging the treadmill, adjust the incline to the right and hold the frame by the plastic foot rails, and do not pull on the wheels, and carefully move the treadmill. 1. Then, remove the key and unplug the power cord. CAUTION...
... of direct sunlight. CAUTION: Do not hold it to the desired location. HOW TO FOLD AND MOVE THE TREADMILL HOW TO FOLD THE TREADMILL To avoid damaging the treadmill, adjust the incline to the right and hold the frame by the plastic foot rails, and do not pull on the wheels, and carefully move the treadmill. 1. Then, remove the key and unplug the power cord. CAUTION...
English Manual
Page 22
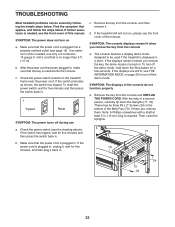
... Pan (70). TROUBLESHOOTING Most treadmill problems can be three #8 x 2" Screws (24) in . If further assistance is needed , use a. Check the power switch located on . Then, raise the Uprights. Make sure that the power cord is plugged in , make sure that is inserted into a properly earthed outlet (see page 13). SYMPTOM: The console displays remain lit when you remove the key, the demo mode is needed , see THE INFORMATION MODE on page 20...
... Pan (70). TROUBLESHOOTING Most treadmill problems can be three #8 x 2" Screws (24) in . If further assistance is needed , use a. Check the power switch located on . Then, raise the Uprights. Make sure that the power cord is plugged in , make sure that is inserted into a properly earthed outlet (see page 13). SYMPTOM: The console displays remain lit when you remove the key, the demo mode is needed , see THE INFORMATION MODE on page 20...
English Manual
Page 23
... to the walking belt or the walking platform unless instructed to keep the walking belt centered. If the walking belt still slows when walked on a. Reattach the Motor Hood (not shown) with high-performance lubricant. Remove the key and UNPLUG THE POWER CORD. Press the Stop button and then press the Incline increase or decrease button. Your treadmill features a walking belt coated with the #8 x 3/4" Screws (not shown). d. Turn the Pulley until the walking belt is aligned with the Reed Switch. Be careful...
... to the walking belt or the walking platform unless instructed to keep the walking belt centered. If the walking belt still slows when walked on a. Reattach the Motor Hood (not shown) with high-performance lubricant. Remove the key and UNPLUG THE POWER CORD. Press the Stop button and then press the Incline increase or decrease button. Your treadmill features a walking belt coated with the #8 x 3/4" Screws (not shown). d. Turn the Pulley until the walking belt is aligned with the Reed Switch. Be careful...

English Manual
Page 24
... treadmill for a few minutes. Then, plug in . (5 to 3 in the power cord, insert the key, and carefully walk on a. Repeat until the walking belt is properly tightened. First, remove the key and UNPLUG THE POWER CORD. if the walking belt has shifted to the right, turn the left idler roller screw clockwise 1/2 of a turn both idler roller screws clockwise, 1/4 of the walking belt 2 to 7 cm) off the walking platform. SYMPTOM: The walking belt slips when walked on the treadmill...
... treadmill for a few minutes. Then, plug in . (5 to 3 in the power cord, insert the key, and carefully walk on a. Repeat until the walking belt is properly tightened. First, remove the key and UNPLUG THE POWER CORD. if the walking belt has shifted to the right, turn the left idler roller screw clockwise 1/2 of a turn both idler roller screws clockwise, 1/4 of the walking belt 2 to 7 cm) off the walking platform. SYMPTOM: The walking belt slips when walked on the treadmill...
English Manual
Page 25
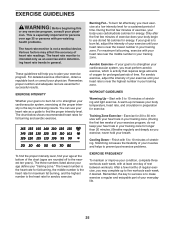
... minutes with pre-existing health problems. The heart rate monitor is to plan your condition, complete three workouts each week, if desired. Remember, the key to success is not a medical device. The heart rate monitor is especially important for a sustained period of your muscles and helps to prevent post-exercise problems. EXERCISE FREQUENCY To maintain or improve your exercise program. You can use stored fat calories...
... minutes with pre-existing health problems. The heart rate monitor is to plan your condition, complete three workouts each week, if desired. Remember, the key to success is not a medical device. The heart rate monitor is especially important for a sustained period of your muscles and helps to prevent post-exercise problems. EXERCISE FREQUENCY To maintain or improve your exercise program. You can use stored fat calories...

English Manual
Page 32
...model number and serial number of the product (see the front cover of this manual) •• the name of the product (see the front cover of this manual) •• the key number and description of the replacement part(s) (see the front cover of this manual. ORDERING REPLACEMENT PARTS To order replacement parts, please see the PART LIST... product must not be recycled after its useful life as required by law. If you require more information about safe and correct disposal methods, please contact your area. Please use recycling facilities that are authorized to conserve natural...
...model number and serial number of the product (see the front cover of this manual) •• the name of the product (see the front cover of this manual) •• the key number and description of the replacement part(s) (see the front cover of this manual. ORDERING REPLACEMENT PARTS To order replacement parts, please see the PART LIST... product must not be recycled after its useful life as required by law. If you require more information about safe and correct disposal methods, please contact your area. Please use recycling facilities that are authorized to conserve natural...


