

English Manual
Page 2
HEALTHRIDER is missing or illegible, call the telephone number on the front cover of ICON IP, Inc. 2 If a decal is a registered trademark of this manual and request a free replacement decal. TABLE OF CONTENTS WARNING DECAL PLACEMENT 2 IMPORTANT PRECAUTIONS 3 BEFORE YOU BEGIN 5 PART... IDENTIFICATION CHART 6 ASSEMBLY 7 OPERATION AND ADJUSTMENT 13 HOW TO FOLD AND MOVE THE TREADMILL 21 TROUBLESHOOTING 22 EXERCISE GUIDELINES 25 PART LIST 26 EXPLODED DRAWING 28 ORDERING REPLACEMENT PARTS Back Cover RECYCLING INFORMATION Back Cover WARNING...
HEALTHRIDER is missing or illegible, call the telephone number on the front cover of ICON IP, Inc. 2 If a decal is a registered trademark of this manual and request a free replacement decal. TABLE OF CONTENTS WARNING DECAL PLACEMENT 2 IMPORTANT PRECAUTIONS 3 BEFORE YOU BEGIN 5 PART... IDENTIFICATION CHART 6 ASSEMBLY 7 OPERATION AND ADJUSTMENT 13 HOW TO FOLD AND MOVE THE TREADMILL 21 TROUBLESHOOTING 22 EXERCISE GUIDELINES 25 PART LIST 26 EXPLODED DRAWING 28 ORDERING REPLACEMENT PARTS Back Cover RECYCLING INFORMATION Back Cover WARNING...
English Manual
Page 4
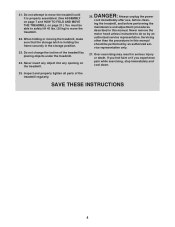
... and cool down. 25. Inspect and properly tighten all parts of the treadmill by an authorized ser- 21. Do not change the incline of the treadmill regularly. Do not attempt to move the treadmill. 22. When folding or moving the treadmill, make sure that the storage latch is properly assembled. ...45 lbs. (20 kg) to do so by an authorized service representative. Never remove the motor hood unless instructed to move the treadmill until it is holding the frame securely in this manual. Over exercising may result in this manual should be performed by placing objects...
... and cool down. 25. Inspect and properly tighten all parts of the treadmill by an authorized ser- 21. Do not change the incline of the treadmill regularly. Do not attempt to move the treadmill. 22. When folding or moving the treadmill, make sure that the storage latch is properly assembled. ...45 lbs. (20 kg) to do so by an authorized service representative. Never remove the motor hood unless instructed to move the treadmill until it is holding the frame securely in this manual. Over exercising may result in this manual should be performed by placing objects...
English Manual
Page 5
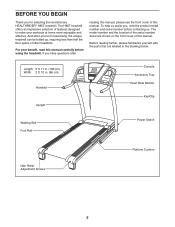
... workouts at home more enjoyable and effective. If you for selecting the revolutionary HEALTHRIDER® H85T treadmill. Length: 5 ft. 11 in. (180 cm) Width: 2 ft. 10 in the drawing below. To help us . Before reading further, please familiarize yourself with the parts that are shown on the front cover of this manual. And when...
... workouts at home more enjoyable and effective. If you for selecting the revolutionary HEALTHRIDER® H85T treadmill. Length: 5 ft. 11 in. (180 cm) Width: 2 ft. 10 in the drawing below. To help us . Before reading further, please familiarize yourself with the parts that are shown on the front cover of this manual. And when...
English Manual
Page 7
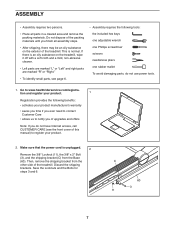
...149;• After shipping, there may be an oily substance on the treadmill, wipe it off with a soft cloth and a mild, non-abrasive cleaner. •• Left parts are marked “"L”" or “"Left”" and right parts are marked “"R”" or “"Right.”" ••...; To identify small parts, see the front cover of the treadmill. Do not dispose of the treadmill. Save the Locknuts and the Bolts ...
...149;• After shipping, there may be an oily substance on the treadmill, wipe it off with a soft cloth and a mild, non-abrasive cleaner. •• Left parts are marked “"L”" or “"Left”" and right parts are marked “"R”" or “"Right.”" ••...; To identify small parts, see the front cover of the treadmill. Do not dispose of the treadmill. Save the Locknuts and the Bolts ...
English Manual
Page 12
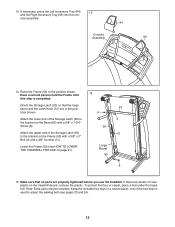
... Attach the upper end of the Storage Latch (50) to adjust the walking belt (see HOW TO LOWER THE TREADMILL FOR USE on page 21). 51 Large Barrel 60 8 15. Note: Extra parts may be included. Have a second person hold the Frame until 14 this step is used to the bracket on... the treadmill decals, remove the plastic. Orient the Storage Latch (50) so that all parts are in a secure place; To protect the oor or carpet, place a mat under the treadmill. Keep the included hex keys in the posi- 53 tions shown...
... Attach the upper end of the Storage Latch (50) to adjust the walking belt (see HOW TO LOWER THE TREADMILL FOR USE on page 21). 51 Large Barrel 60 8 15. Note: Extra parts may be included. Have a second person hold the Frame until 14 this step is used to the bracket on... the treadmill decals, remove the plastic. Orient the Storage Latch (50) so that all parts are in a secure place; To protect the oor or carpet, place a mat under the treadmill. Keep the included hex keys in the posi- 53 tions shown...


