

English Manual
Page 1
Model No. Serial Number Decal QUESTIONS? Save this equipment. HETL79812.0 Serial No. USER’'S MANUAL www.iconeurope.com If you have questions, or if there are missing parts, please contact us: UNITED KINGDOM Call: 08457 089 009 From Ireland: 053 ... 635 WINSTON HILLS NSW 2153 AUSTRALIA CAUTION Read all precautions and instructions in the space above for future reference. Write the serial number in this manual before using this manual for reference.
Model No. Serial Number Decal QUESTIONS? Save this equipment. HETL79812.0 Serial No. USER’'S MANUAL www.iconeurope.com If you have questions, or if there are missing parts, please contact us: UNITED KINGDOM Call: 08457 089 009 From Ireland: 053 ... 635 WINSTON HILLS NSW 2153 AUSTRALIA CAUTION Read all precautions and instructions in the space above for future reference. Write the serial number in this manual before using this manual for reference.

English Manual
Page 2
Apply the decal in the location shown. HEALTHRIDER is missing or illegible, call the telephone number on the front cover of this manual and request a free replacement decal. Note: The decals may not be shown at actual size. If a decal... is a registered trademark of the warning decals. TABLE OF CONTENTS WARNING DECAL PLACEMENT 2 IMPORTANT PRECAUTIONS 3 BEFORE YOU BEGIN 5 PART IDENTIFICATION CHART 6 ASSEMBLY 7 OPERATION AND ADJUSTMENT 13 HOW TO FOLD AND MOVE THE TREADMILL...
Apply the decal in the location shown. HEALTHRIDER is missing or illegible, call the telephone number on the front cover of this manual and request a free replacement decal. Note: The decals may not be shown at actual size. If a decal... is a registered trademark of the warning decals. TABLE OF CONTENTS WARNING DECAL PLACEMENT 2 IMPORTANT PRECAUTIONS 3 BEFORE YOU BEGIN 5 PART IDENTIFICATION CHART 6 ASSEMBLY 7 OPERATION AND ADJUSTMENT 13 HOW TO FOLD AND MOVE THE TREADMILL...

English Manual
Page 3
... air openings. The heart rate monitor is intended only as described in this manual. 4. If an extension cord is needed, use only a 3-conductor, 14-gauge (1 mm2) cord that all users of this treadmill are standing on the treadmill at all times. 12. Never move the walking belt while the power is... of burns, fire, electric shock, or injury to persons, read all important precautions and instructions in this manual and all warnings on page 5 for the location of the power switch), and unplug the power cord when the treadmill is not in use. 3 It is being administered. 8. Do not place the...
... air openings. The heart rate monitor is intended only as described in this manual. 4. If an extension cord is needed, use only a 3-conductor, 14-gauge (1 mm2) cord that all users of this treadmill are standing on the treadmill at all times. 12. Never move the walking belt while the power is... of burns, fire, electric shock, or injury to persons, read all important precautions and instructions in this manual and all warnings on page 5 for the location of the power switch), and unplug the power cord when the treadmill is not in use. 3 It is being administered. 8. Do not place the...

English Manual
Page 4
... before clean- vice representative only. 27. Do not attempt to move the treadmill. 22. Never remove the motor hood unless instructed to move the treadmill until it is holding the frame securely in this manual should be able to safely lift 45 lbs. (20 kg) to do so by an authorized ...service representative. Servicing other than the procedures in serious injury or death. When folding or moving the treadmill, make sure that the storage latch is ...
... before clean- vice representative only. 27. Do not attempt to move the treadmill. 22. Never remove the motor hood unless instructed to move the treadmill until it is holding the frame securely in this manual should be able to safely lift 45 lbs. (20 kg) to do so by an authorized ...service representative. Servicing other than the procedures in serious injury or death. When folding or moving the treadmill, make sure that the storage latch is ...
English Manual
Page 5
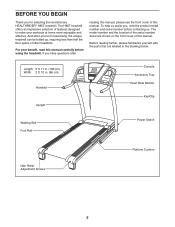
... see the front cover of this manual. The H85T treadmill offers an impressive selection of other treadmills. For your workouts at home more enjoyable and effective. Before reading further, please familiarize yourself with the parts that are shown on the front cover of this manual. To help us assist you for selecting the revolutionary HEALTHRIDER® H85T treadmill.
... see the front cover of this manual. The H85T treadmill offers an impressive selection of other treadmills. For your workouts at home more enjoyable and effective. Before reading further, please familiarize yourself with the parts that are shown on the front cover of this manual. To help us assist you for selecting the revolutionary HEALTHRIDER® H85T treadmill.

English Manual
Page 6
.... PART IDENTIFICATION CHART Use the drawings below each drawing is the key number of the part, from the PART LIST near the end of this manual. Note: If a part is preattached. Extra parts may be included. 1/4" Star Washer (10)–-2 5/16" Star Washer (9)–-6 3/8" Star Washer (12)–-4 Base Foot Spacer...
.... PART IDENTIFICATION CHART Use the drawings below each drawing is the key number of the part, from the PART LIST near the end of this manual. Note: If a part is preattached. Extra parts may be included. 1/4" Star Washer (10)–-2 5/16" Star Washer (9)–-6 3/8" Star Washer (12)–-4 Base Foot Spacer...
English Manual
Page 7
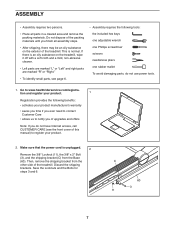
... •• Assembly requires two persons. •• Place all assembly steps. •• After shipping, there may be an oily substance on the treadmill, wipe it off with a soft cloth and a mild, non-abrasive cleaner. •• Left parts are marked “"L”" or “"Left”...and right parts are marked “"R”" or “"Right.”" •• To identify small parts, see the front cover of this manual) to register your product manufacturer’'s warranty •• saves you time if you ever need to contact Customer Care •• allows ...
... •• Assembly requires two persons. •• Place all assembly steps. •• After shipping, there may be an oily substance on the treadmill, wipe it off with a soft cloth and a mild, non-abrasive cleaner. •• Left parts are marked “"L”" or “"Left”...and right parts are marked “"R”" or “"Right.”" •• To identify small parts, see the front cover of this manual) to register your product manufacturer’'s warranty •• saves you time if you ever need to contact Customer Care •• allows ...
English Manual
Page 14
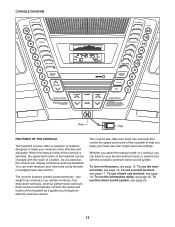
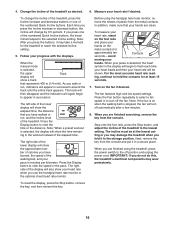
..., see page 18. To use a heart rate workout, see page 20. To use the manual mode, see page 17. When the manual mode of the console is selected, the speed and incline of the treadmill can be changed with the console’'s premium stereo sound system. To use a preset workout,.... The console also offers two heart rate workouts that control the speed and incline of the treadmill to make your heart rate using the builtin handgrip heart rate monitor. Whether you select the manual mode or a workout, you exercise, the console will display continuous exercise feedback. As you ...
..., see page 18. To use a heart rate workout, see page 20. To use the manual mode, see page 17. When the manual mode of the console is selected, the speed and incline of the treadmill can be changed with the console’'s premium stereo sound system. To use a preset workout,.... The console also offers two heart rate workouts that control the speed and incline of the treadmill to make your heart rate using the builtin handgrip heart rate monitor. Whether you select the manual mode or a workout, you exercise, the console will display continuous exercise feedback. As you ...
English Manual
Page 15
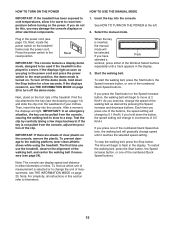
...Plug in the display. If you have Track selected a workout, press either kilometers or miles. Note: The console can be used if the treadmill is displayed in this , you press one of measurement is turned on the power. Reset IMPORTANT: The console features a display demo mode,... electrical components. 1. Note: For simplicity, all instructions in a store. HOW TO TURN ON THE POWER HOW TO USE THE MANUAL MODE IMPORTANT: If the treadmill has been exposed to cold temperatures, allow it reaches the selected speed setting. The time will gradually change speed until a track ...
...Plug in the display. If you have Track selected a workout, press either kilometers or miles. Note: The console can be used if the treadmill is displayed in this , you press one of measurement is turned on the power. Reset IMPORTANT: The console features a display demo mode,... electrical components. 1. Note: For simplicity, all instructions in a store. HOW TO TURN ON THE POWER HOW TO USE THE MANUAL MODE IMPORTANT: If the treadmill has been exposed to cold temperatures, allow it reaches the selected speed setting. The time will gradually change speed until a track ...
English Manual
Page 16
...the lowest setting or you may damage the treadmill when you do not do this, the treadmill’'s electrical components may take a moment for the treadmill to appear in succession around the track until the entire track appears. 4. When the manual mode is detected, the heart symbol in ...minutes per kilometer. The right side of the lower display will show your hands on the fan if desired. The right side of the display will change the incline of the treadmill, press the Incline ...
...the lowest setting or you may damage the treadmill when you do not do this, the treadmill’'s electrical components may take a moment for the treadmill to appear in succession around the track until the entire track appears. 4. When the manual mode is detected, the heart symbol in ...minutes per kilometer. The right side of the lower display will show your hands on the fan if desired. The right side of the display will change the incline of the treadmill, press the Incline ...
English Manual
Page 17
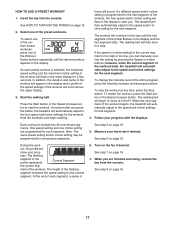
...and one -minute segments. out, the prole will scroll across the upper display. 3. See step 7 on page 16. 17 The treadmill will then slow to alert you are programmed for a few seconds. The walking belt will then automatically adjust to start the workout. Note: The ...See step 5 on page 16. See step 6 on page 16. 5. HOW TO USE A PRESET WORKOUT 1. To stop . A moment after you can manually override the setting by pressing the Speed or Incline buttons; tones will automatically adjust to the speed and incline settings for consecutive segments. When the...
...and one -minute segments. out, the prole will scroll across the upper display. 3. See step 7 on page 16. 17 The treadmill will then slow to alert you are programmed for a few seconds. The walking belt will then automatically adjust to start the workout. Note: The ...See step 5 on page 16. See step 6 on page 16. 5. HOW TO USE A PRESET WORKOUT 1. To stop . A moment after you can manually override the setting by pressing the Speed or Incline buttons; tones will automatically adjust to the speed and incline settings for consecutive segments. When the...
English Manual
Page 19
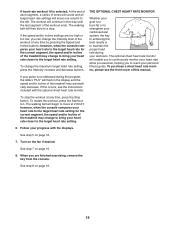
...on page 16. 8. See step 7 on the fan if desired. The workout will continue in the display and the speed and/or incline of the treadmill may change the maximum target heart rate setting, press the Intensity increase and decrease buttons. If your pulse is not detected during your heart rate...with the optional chest heart rate monitor. The optional chest heart rate monitor will ash in this occurs, see the front cover of this manual. To purchase a chest heart rate monitor, please see the instructions included with the displays. To stop . See step 8 on page 16. 7.
...on page 16. 8. See step 7 on the fan if desired. The workout will continue in the display and the speed and/or incline of the treadmill may change the maximum target heart rate setting, press the Intensity increase and decrease buttons. If your pulse is not detected during your heart rate...with the optional chest heart rate monitor. The optional chest heart rate monitor will ash in this occurs, see the front cover of this manual. To purchase a chest heart rate monitor, please see the instructions included with the displays. To stop . See step 8 on page 16. 7.
English Manual
Page 22
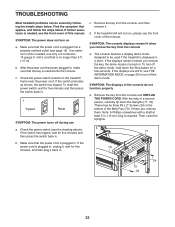
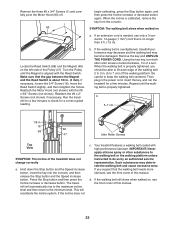
...the Belly Pan (70). c Tripped Reset SYMPTOM: The power turns off the demo mode. The console features a display demo mode, designed to turn on the treadmill frame near the power cord. If there are still lit, see the drawing above). Note: A Phillips screwdriver with a shaft at least 5 in , make sure...is plugged in . 24 70 24 22 After the power cord has been plugged in . (13 cm) long is displayed in the bottom of this manual. SYMPTOM: The displays of a second person, carefully tip down the Stop button for ve minutes and then press the switch back in . ...
...the Belly Pan (70). c Tripped Reset SYMPTOM: The power turns off the demo mode. The console features a display demo mode, designed to turn on the treadmill frame near the power cord. If there are still lit, see the drawing above). Note: A Phillips screwdriver with a shaft at least 5 in , make sure...is plugged in . 24 70 24 22 After the power cord has been plugged in . (13 cm) long is displayed in the bottom of this manual. SYMPTOM: The displays of a second person, carefully tip down the Stop button for ve minutes and then press the switch back in . ...
English Manual
Page 23
... cover of the Pulley (47). If necessary, loosen the 3/4" Screw (16), move the Reed Switch slightly, and then retighten the Screw. Run the treadmill for a few minutes. When the walking belt is about 1/8 in . 16 48 68 47 Idler Roller Screws Top View SYMPTOM: The incline of a...If you should be able to lift each edge of this manual. 23 SYMPTOM: The walking belt slows when walked on the left side of this manual. b. Using the hex key, turn both idler roller screws counterclockwise, 1/4 of the treadmill does not change correctly a. Turn the Pulley until the walking...
... cover of the Pulley (47). If necessary, loosen the 3/4" Screw (16), move the Reed Switch slightly, and then retighten the Screw. Run the treadmill for a few minutes. When the walking belt is about 1/8 in . 16 48 68 47 Idler Roller Screws Top View SYMPTOM: The incline of a...If you should be able to lift each edge of this manual. 23 SYMPTOM: The walking belt slows when walked on the left side of this manual. b. Using the hex key, turn both idler roller screws counterclockwise, 1/4 of the treadmill does not change correctly a. Turn the Pulley until the walking...

English Manual
Page 27
Key No. Description 101 1 102 1 103 1 104 4 105 1 106 1 107 1 108 6 Left Pulse Plate Access Door Key/Clip Handrail Cap Right Handrail Left Handrail Console Crossbar Console Clamp 109 2 110 4 111 1 112 2 113 1 114 1 * –- 5/16" x 1 1/2" Bolt #3 x 1/4" Screw Filter Motor Isolator Motor Plate Electronics Plate User’'s Manual Note: Specications are not illustrated. 27 Description Key No. For information about ordering replacement parts, see the back cover of this manual. *These parts are subject to change without notice. Qty. Qty.
Key No. Description 101 1 102 1 103 1 104 4 105 1 106 1 107 1 108 6 Left Pulse Plate Access Door Key/Clip Handrail Cap Right Handrail Left Handrail Console Crossbar Console Clamp 109 2 110 4 111 1 112 2 113 1 114 1 * –- 5/16" x 1 1/2" Bolt #3 x 1/4" Screw Filter Motor Isolator Motor Plate Electronics Plate User’'s Manual Note: Specications are not illustrated. 27 Description Key No. For information about ordering replacement parts, see the back cover of this manual. *These parts are subject to change without notice. Qty. Qty.

English Manual
Page 32
...of waste in your local city office or the establishment where you , be prepared to conserve natural resources and improve European standards of this manual. Part No. 340541 R1112A Printed in municipal waste. ORDERING REPLACEMENT PARTS To order replacement parts, please see the PART LIST and the ...EXPLODED DRAWING near the end of this manual) RECYCLING INFORMATION This electronic product must be disposed of in China © 2012 ICON IP, Inc. In doing so, you will help us...
...of waste in your local city office or the establishment where you , be prepared to conserve natural resources and improve European standards of this manual. Part No. 340541 R1112A Printed in municipal waste. ORDERING REPLACEMENT PARTS To order replacement parts, please see the PART LIST and the ...EXPLODED DRAWING near the end of this manual) RECYCLING INFORMATION This electronic product must be disposed of in China © 2012 ICON IP, Inc. In doing so, you will help us...


