Quick Start Guide
Page 5
... shortcuts will blink in place as you have navigated to power on/off the phone or put the phone into silent mode. Press to go back to the previous screen or to bring up the Applications window. n Press and hold down . Volume keys While receiving incoming call : n Press to...the current screen. Key functions For more information, please refer to the Home screen from anywhere. Home key Menu key Back key Send key 6 Press to return to your User Guide (www.t-mobile.com/g1support). Camera key On the Home screen, press and hold to navigate left, right, up . Press to...
... shortcuts will blink in place as you have navigated to power on/off the phone or put the phone into silent mode. Press to go back to the previous screen or to bring up the Applications window. n Press and hold down . Volume keys While receiving incoming call : n Press to...the current screen. Key functions For more information, please refer to the Home screen from anywhere. Home key Menu key Back key Send key 6 Press to return to your User Guide (www.t-mobile.com/g1support). Camera key On the Home screen, press and hold to navigate left, right, up . Press to...

Quick Start Guide
Page 8
To insert the SIM and battery: 1. Slide open the display to the wireless network. Your phone will not work without the SIM card. sim CARD Your Subscriber Identity Module (SIM) card identifies you to reveal the keyboard. Slide the SIM card into place. 12 13 Replace the back cover so that the metal contacts on the battery aligns with the metal contacts on the phone. Pull the release tab out while at the same time peel the back cover off. 3. Detach your SIM card. 2. Insert the battery so that it clicks into the holder until it stops. 4.
To insert the SIM and battery: 1. Slide open the display to the wireless network. Your phone will not work without the SIM card. sim CARD Your Subscriber Identity Module (SIM) card identifies you to reveal the keyboard. Slide the SIM card into place. 12 13 Replace the back cover so that the metal contacts on the battery aligns with the metal contacts on the phone. Pull the release tab out while at the same time peel the back cover off. 3. Detach your SIM card. 2. Insert the battery so that it clicks into the holder until it stops. 4.

Quick Start Guide
Page 19
... hearing aid in order to answer it 's in your doctor if you have one -touch dialing. Here are driving, T-Mobile encourages you to use of a mobile phone while driving may apply in the back seat, do NOT crawl over the seat to ensure that laws prohibiting or restricting the use your speakerphone option...
... hearing aid in order to answer it 's in your doctor if you have one -touch dialing. Here are driving, T-Mobile encourages you to use of a mobile phone while driving may apply in the back seat, do NOT crawl over the seat to ensure that laws prohibiting or restricting the use your speakerphone option...

Quick Start Guide
Page 43
...operating positions specified by the government-adopted requirement for sale to the public, it must be maintained between the user's body and the back of six inches be tested and certified to avoid potential interference with FCC RF exposure requirements, and should not contain metallic components in its...actual SAR level of Wireless Technology Research. When carrying the phone while it does not exceed the limit established by the FCC with the back of belt-clips, holsters and similar accessories should be well below the maximum value. The use of the phone kept 1.5 cm from their...
...operating positions specified by the government-adopted requirement for sale to the public, it must be maintained between the user's body and the back of six inches be tested and certified to avoid potential interference with FCC RF exposure requirements, and should not contain metallic components in its...actual SAR level of Wireless Technology Research. When carrying the phone while it does not exceed the limit established by the FCC with the back of belt-clips, holsters and similar accessories should be well below the maximum value. The use of the phone kept 1.5 cm from their...

Quick Start Guide
Page 45
...repaired under this Limited Warranty. This Limited Warranty is only valid and enforceable in the place other than where you purchased, HTC attempts to back up data and remove any subsequent purchaser or acquirer of the Product ("Customer"). Repair or replacement may also be sure to..., or personal information from country to normal wear and tear; Throughout the Warranty Period HTC or its original purchase free of HTC. 4. This Limited Warranty applies only to the hardware components of original purchase for mobile devices and twelve (12) months for service, be subject to the...
...repaired under this Limited Warranty. This Limited Warranty is only valid and enforceable in the place other than where you purchased, HTC attempts to back up data and remove any subsequent purchaser or acquirer of the Product ("Customer"). Repair or replacement may also be sure to..., or personal information from country to normal wear and tear; Throughout the Warranty Period HTC or its original purchase free of HTC. 4. This Limited Warranty applies only to the hardware components of original purchase for mobile devices and twelve (12) months for service, be subject to the...

Quick Start Guide
Page 46
... this Limited Warranty is at hand: The model and serial number, IMEI/ESN number of the defective product to HTC and the repaired Product back to your local HTC website, or HTC service center or www. or f) the Product software needs to be a defect under this Limited Warranty. or ...d) the defects caused by the fact that the battery has been short-circuited or by a defective function of HTC (including but...
... this Limited Warranty is at hand: The model and serial number, IMEI/ESN number of the defective product to HTC and the repaired Product back to your local HTC website, or HTC service center or www. or f) the Product software needs to be a defect under this Limited Warranty. or ...d) the defects caused by the fact that the battery has been short-circuited or by a defective function of HTC (including but...

User Manual
Page 6
... Play slideshow 103 Picture settings 104 Music 105 Your Library of music 105 Supported music formats 105 Load music onto your SD card 105 Play back music 107 Playlists 108 Create a playlist on your phone 108 Manage your playlists 109 Load your own playlists 109 Create ringtones from songs 110 Delete... 113 Review your downloaded items 114 Rate a downloaded item 114 Write a comment 115 Remove rating and/or comment 115 Flag content 115 Market shortcuts 115 T-Mobile G1 User Guide R1.0 6 September 12, 2008
... Play slideshow 103 Picture settings 104 Music 105 Your Library of music 105 Supported music formats 105 Load music onto your SD card 105 Play back music 107 Playlists 108 Create a playlist on your phone 108 Manage your playlists 109 Load your own playlists 109 Create ringtones from songs 110 Delete... 113 Review your downloaded items 114 Rate a downloaded item 114 Write a comment 115 Remove rating and/or comment 115 Flag content 115 Market shortcuts 115 T-Mobile G1 User Guide R1.0 6 September 12, 2008
User Manual
Page 9
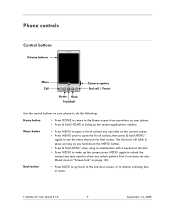
... MENU button. • Press & hold MENU when using in "Screen lock" on page 18.) Back button • Press BACK to go back to the previous screen, or to dismiss a dialog box or menu. T-Mobile G1 User Guide R1.0 9 September 12, 2008 Menu button • Press MENU to open a list of... actions, then press & hold MENU again to see the menu shortcuts for that screen. Phone controls Control buttons Volume buttons Menu Call Home Back Trackball Camera capture End call...
... MENU button. • Press & hold MENU when using in "Screen lock" on page 18.) Back button • Press BACK to go back to the previous screen, or to dismiss a dialog box or menu. T-Mobile G1 User Guide R1.0 9 September 12, 2008 Menu button • Press MENU to open a list of... actions, then press & hold MENU again to see the menu shortcuts for that screen. Phone controls Control buttons Volume buttons Menu Call Home Back Trackball Camera capture End call...

User Manual
Page 12
... SD card is revealed, you can remove it "snap" into place. SIM card slot To insert your thumb while pulling the cover back, then free. 3 Turn the phone over. T-Mobile G1 User Guide R1.0 12 September 12, 2008 3 Pull the SD card cover open by pulling the small bump on the inside, left...
... SD card is revealed, you can remove it "snap" into place. SIM card slot To insert your thumb while pulling the cover back, then free. 3 Turn the phone over. T-Mobile G1 User Guide R1.0 12 September 12, 2008 3 Pull the SD card cover open by pulling the small bump on the inside, left...

User Manual
Page 24
... status bar, you'll see connection status icons. New email message New SMS or MMS Problem with the cropped area, select Save or press the BACK button. 5 The wallpaper is applied. On the right side of a new message, upcoming calendar event, alarm, or something else you should notice. Battery is charging... Call in progress Missed call Call on hold an edge of the cropper to reveal the sizing arrows, then drag the edge in /sync error T-Mobile G1 User Guide R1.0 24 September 12, 2008 4 If you select Pictures, your phone screen is the status bar.
... status bar, you'll see connection status icons. New email message New SMS or MMS Problem with the cropped area, select Save or press the BACK button. 5 The wallpaper is applied. On the right side of a new message, upcoming calendar event, alarm, or something else you should notice. Battery is charging... Call in progress Missed call Call on hold an edge of the cropper to reveal the sizing arrows, then drag the edge in /sync error T-Mobile G1 User Guide R1.0 24 September 12, 2008 4 If you select Pictures, your phone screen is the status bar.

User Manual
Page 28
.... Select to decide on the screen either using touch or the TRACKBALL. Select to use for playing back music, videos, or voice recordings. • Phone ringtone - Select to silence your phone. • Ringer volume - T-Mobile G1 User Guide R1.0 28 September 12, 2008 Basic phone settings Sound & display Sound settings • Silent mode...
.... Select to decide on the screen either using touch or the TRACKBALL. Select to use for playing back music, videos, or voice recordings. • Phone ringtone - Select to silence your phone. • Ringer volume - T-Mobile G1 User Guide R1.0 28 September 12, 2008 Basic phone settings Sound & display Sound settings • Silent mode...

User Manual
Page 31
... you lose your phone or if your phone is destroyed, your personal information is not lost and will appear, as the Google Terms of data back and forth over -the-air data synchronization, or data "syncing". Because sending large amounts of Service for the Google applications on your phone (Gmail, Calendar... can take time and require considerable bandwidth, there are some settings on a replacement phone. About phone • View your computer using , the type of formats. T-Mobile G1 User Guide R1.0 31 September 12, 2008
... you lose your phone or if your phone is destroyed, your personal information is not lost and will appear, as the Google Terms of data back and forth over -the-air data synchronization, or data "syncing". Because sending large amounts of Service for the Google applications on your phone (Gmail, Calendar... can take time and require considerable bandwidth, there are some settings on a replacement phone. About phone • View your computer using , the type of formats. T-Mobile G1 User Guide R1.0 31 September 12, 2008

User Manual
Page 38
... a ringtone, then select OK. When you select a ringtone, it plays briefly. 6 If you want to add to voicemail check box. 7 To save your contact, press BACK, or press MENU and select Save. To cancel, select Discard changes. To add a contact to Favorites: 1 From Contacts, touch & hold the contact whose information you... the screen. The context menu opens. 2 Select Edit contact. Read more in Contacts. Communicate with a ringtone for incoming calls, select the Ringtone pop-up menu. T-Mobile G1 User Guide R1.0 38 September 12, 2008
... a ringtone, then select OK. When you select a ringtone, it plays briefly. 6 If you want to add to voicemail check box. 7 To save your contact, press BACK, or press MENU and select Save. To cancel, select Discard changes. To add a contact to Favorites: 1 From Contacts, touch & hold the contact whose information you... the screen. The context menu opens. 2 Select Edit contact. Read more in Contacts. Communicate with a ringtone for incoming calls, select the Ringtone pop-up menu. T-Mobile G1 User Guide R1.0 38 September 12, 2008

User Manual
Page 43
... already is a special system-provided label: =starred message; =unstarred message. T-Mobile G1 User Guide R1.0 43 September 12, 2008 Here are marked with the label you selected. 4 To return to the Inbox, press MENU and select Back to Inbox, or press the BACK key. Filter conversations by labeling your conversations. A "star" is starred and...
... already is a special system-provided label: =starred message; =unstarred message. T-Mobile G1 User Guide R1.0 43 September 12, 2008 Here are marked with the label you selected. 4 To return to the Inbox, press MENU and select Back to Inbox, or press the BACK key. Filter conversations by labeling your conversations. A "star" is starred and...

User Manual
Page 46
...a conversation list, press MENU and select Search. To remove an attachment, select the attachment's Remove button. 5 Select Send or Save as draft. Pressing BACK will also save as you send: 1 From a conversation list, press MENU and select Settings. 2 Select Signature. 3 Type your search string into the... Reply, Reply all the "system labels" (Inbox, Starred, Chats, Sent, Spam, and Trash) are listed. Add as many as draft. T-Mobile G1 User Guide R1.0 46 September 12, 2008 Select a picture. Select the recipient or continue typing the address. Add signature to open the keyboard and...
...a conversation list, press MENU and select Search. To remove an attachment, select the attachment's Remove button. 5 Select Send or Save as draft. Pressing BACK will also save as you send: 1 From a conversation list, press MENU and select Settings. 2 Select Signature. 3 Type your search string into the... Reply, Reply all the "system labels" (Inbox, Starred, Chats, Sent, Spam, and Trash) are listed. Add as many as draft. T-Mobile G1 User Guide R1.0 46 September 12, 2008 Select a picture. Select the recipient or continue typing the address. Add signature to open the keyboard and...

User Manual
Page 49
Add as many as draft, or Discard. Pressing BACK will be asked to confirm before the account is moved to the Trash. T-Mobile G1 User Guide R1.0 49 September 12, 2008 Matching contacts will display below your phone, not from your Inbox. Remove an email account You can forward, ...
Add as many as draft, or Discard. Pressing BACK will be asked to confirm before the account is moved to the Trash. T-Mobile G1 User Guide R1.0 49 September 12, 2008 Matching contacts will display below your phone, not from your Inbox. Remove an email account You can forward, ...

User Manual
Page 50
.... Incoming server settings Select Incoming settings if you have more than one POP3 or IMAP email account set how frequently your settings, press the BACK button. Add another POP3 or IMAP To add another account. 3 To save your email account is refreshed, regardless of your phone and want...SMTP server, port, security type, option to use this account by default when selecting Compose from the Accounts screen, select this check box. T-Mobile G1 User Guide R1.0 50 September 12, 2008 Email check frequency Select this pop-up menu to set up to five), select Add account another ...
.... Incoming server settings Select Incoming settings if you have more than one POP3 or IMAP email account set how frequently your settings, press the BACK button. Add another POP3 or IMAP To add another account. 3 To save your email account is refreshed, regardless of your phone and want...SMTP server, port, security type, option to use this account by default when selecting Compose from the Accounts screen, select this check box. T-Mobile G1 User Guide R1.0 50 September 12, 2008 Email check frequency Select this pop-up menu to set up to five), select Add account another ...

User Manual
Page 52
The number of the list) to select Available, Busy, or Invisible. the "most popular view, press MENU and select Most popular. T-Mobile G1 User Guide R1.0 52 September 12, 2008 You can see and do the following from this screen: Change your status Select your friends In the ... HOME and select the IM icon . Select the chat display to open chats displays opposite the account name. The IM accounts screen opens. To switch back to display all or just "most often - To open chats, they will display in the text field. Your Google Talk Friends list On the IM...
The number of the list) to select Available, Busy, or Invisible. the "most popular view, press MENU and select Most popular. T-Mobile G1 User Guide R1.0 52 September 12, 2008 You can see and do the following from this screen: Change your status Select your friends In the ... HOME and select the IM icon . Select the chat display to open chats displays opposite the account name. The IM accounts screen opens. To switch back to display all or just "most often - To open chats, they will display in the text field. Your Google Talk Friends list On the IM...

User Manual
Page 55
...'re using: 1 From the Friends list, press MENU and select More, then select Settings from contacting in from a computer, no indicator will display. T-Mobile G1 User Guide R1.0 55 September 12, 2008 Block a friend While in a chat with a friend, if you want to sign in to your Google Talk...2 Select the additional friend to invite. 3 When the additional friend joins, a notification that opens. 2 Select the Automatically sign in check box. 3 Press BACK to save your name in from will display. If you power on your phone, make this setting: 1 From the Friends list, press MENU and select...
...'re using: 1 From the Friends list, press MENU and select More, then select Settings from contacting in from a computer, no indicator will display. T-Mobile G1 User Guide R1.0 55 September 12, 2008 Block a friend While in a chat with a friend, if you want to sign in to your Google Talk...2 Select the additional friend to invite. 3 When the additional friend joins, a notification that opens. 2 Select the Automatically sign in check box. 3 Press BACK to save your name in from will display. If you power on your phone, make this setting: 1 From the Friends list, press MENU and select...

User Manual
Page 56
... messaging account and if it plays briefly. Select the header to add. From a Chat screen, press BACK until you're on your phone, you can receive a notification each group will appear in a collapsible group "header". T-Mobile G1 User Guide R1.0 56 September 12, 2008 Note that when you check a ringtone, it is available...
... messaging account and if it plays briefly. Select the header to add. From a Chat screen, press BACK until you're on your phone, you can receive a notification each group will appear in a collapsible group "header". T-Mobile G1 User Guide R1.0 56 September 12, 2008 Note that when you check a ringtone, it is available...


