
Quick Start Guide
Page 3
Table of this booklet to learn what else your Phone 33 Tips for Safety 34 3 Having Fun Turn to the Having Fun section of Contents Introducing your Phone 4 Service Activation 11 SIM Card 12 Battery 14 Memory Card 15 Power ...16 Setup Wizard 16 Call Functions 17 Contacts 18 Gmail Setup 21 Email Setup 21 myFaves® Setup 24 Bluetooth® Setup 29 Wi-Fi ...31 Emergency Dialing 32 Caring for your new phone can do.
Table of this booklet to learn what else your Phone 33 Tips for Safety 34 3 Having Fun Turn to the Having Fun section of Contents Introducing your Phone 4 Service Activation 11 SIM Card 12 Battery 14 Memory Card 15 Power ...16 Setup Wizard 16 Call Functions 17 Contacts 18 Gmail Setup 21 Email Setup 21 myFaves® Setup 24 Bluetooth® Setup 29 Wi-Fi ...31 Emergency Dialing 32 Caring for your new phone can do.
Quick Start Guide
Page 5
... For more information, please refer to dismiss a dialog box or menu. Press to go back to the previous screen or to your User Guide (www.t-mobile.com/g1support). Trackball Roll the trackball to open a list of the following: n Open recent call log n Call a contact when a contact name/number is ...to power on a call, press to bring up , and down the Menu key. While in the Browser) End key When on /off the phone or put the phone into silent mode. n Press and hold to open the voice dialer. Press and hold to take a picture. Press to navigate left, right, ...
... For more information, please refer to dismiss a dialog box or menu. Press to go back to the previous screen or to your User Guide (www.t-mobile.com/g1support). Trackball Roll the trackball to open a list of the following: n Open recent call log n Call a contact when a contact name/number is ...to power on a call, press to bring up , and down the Menu key. While in the Browser) End key When on /off the phone or put the phone into silent mode. n Press and hold to open the voice dialer. Press and hold to take a picture. Press to navigate left, right, ...

Quick Start Guide
Page 6
... and connection icons Along the top of the notification window. Notifications Slide your fingertip down the screen to start using all the applications on your phone. n To clear notifications, tap Clear notifications at the top of your screen is the status bar. Home screen and application list The Home screen ... status Tap or drag the application tab with text or picture message delivery New instant message Ringer is off (silent mode) Ringer on vibrate only Phone is on mute GPS is on and is working 9 On the left side, icons will see a notification in the status bar, tap the bar ...
... and connection icons Along the top of the notification window. Notifications Slide your fingertip down the screen to start using all the applications on your phone. n To clear notifications, tap Clear notifications at the top of your screen is the status bar. Home screen and application list The Home screen ... status Tap or drag the application tab with text or picture message delivery New instant message Ringer is off (silent mode) Ringer on vibrate only Phone is on mute GPS is on and is working 9 On the left side, icons will see a notification in the status bar, tap the bar ...

Quick Start Guide
Page 7
... and your service has not been activated, simply call Customer Care at 1-800-937-8997 from your landline phone and a T-Mobile Activations representative will need the following information when activating service: n Service Agreement and agent code on , Bluetooth device connected No SIM ...name, home address, home phone, and billing address NOTE: For business and government account, please provide the name of your Service Agreement. 11 You will assist you have read, understand, and agree to be bound by each of T-Mobile rate plan and services (see www.t-mobile.com for latest plan information)...
... and your service has not been activated, simply call Customer Care at 1-800-937-8997 from your landline phone and a T-Mobile Activations representative will need the following information when activating service: n Service Agreement and agent code on , Bluetooth device connected No SIM ...name, home address, home phone, and billing address NOTE: For business and government account, please provide the name of your Service Agreement. 11 You will assist you have read, understand, and agree to be bound by each of T-Mobile rate plan and services (see www.t-mobile.com for latest plan information)...

Quick Start Guide
Page 8
Your phone will not work without the SIM card. Slide open the display to the wireless network. Insert the battery so that it stops. 4. Detach your SIM card. 2. Pull the release tab out while at the same time peel the back cover off. 3. To insert the SIM and battery: 1. Replace the back cover so that the metal contacts on the battery aligns with the metal contacts on the phone. Slide the SIM card into the holder until it clicks into place. 12 13 sim CARD Your Subscriber Identity Module (SIM) card identifies you to reveal the keyboard.
Your phone will not work without the SIM card. Slide open the display to the wireless network. Insert the battery so that it stops. 4. Detach your SIM card. 2. Pull the release tab out while at the same time peel the back cover off. 3. To insert the SIM and battery: 1. Replace the back cover so that the metal contacts on the battery aligns with the metal contacts on the phone. Slide the SIM card into the holder until it clicks into place. 12 13 sim CARD Your Subscriber Identity Module (SIM) card identifies you to reveal the keyboard.

Quick Start Guide
Page 9
... the small end of the USB cable to the micro-USB port on the bottom side of your phone. Your warranty is invalidated if you open the display to the USB port of your phone. Insert the memory card with a removable microSD memory card (preinstalled) where you take it clicks. 5. To... on the bottom side of your computer. To install the memory card: 1. Do not remove the battery pack when the phone is not fully charged when you can charge your phone using the charger cable connecting to a wall power outlet or by using a charger cable To charge, connect the small end...
... the small end of the USB cable to the micro-USB port on the bottom side of your phone. Your warranty is invalidated if you open the display to the USB port of your phone. Insert the memory card with a removable microSD memory card (preinstalled) where you take it clicks. 5. To... on the bottom side of your computer. To install the memory card: 1. Do not remove the battery pack when the phone is not fully charged when you can charge your phone using the charger cable connecting to a wall power outlet or by using a charger cable To charge, connect the small end...

Quick Start Guide
Page 10
...your username and password and keep them in to your phone, a setup wizard appears. n Favorites: Touch the contact and tap the phone number to call functions Make calls 1. End calls To end the call . n Contacts: Touch the contact and tap the phone number to call , press the red End key. 16... 17 call . Power To turn on your existing Google account. n Call log: Touch an entry on the list to write down your phone, press the green Send key. 2. TIP: Remember to call , press the green Send key. Touch one using the wizard. Answer calls To answer a call...
...your username and password and keep them in to your phone, a setup wizard appears. n Favorites: Touch the contact and tap the phone number to call functions Make calls 1. End calls To end the call . n Contacts: Touch the contact and tap the phone number to call , press the red End key. 16... 17 call . Power To turn on your existing Google account. n Call log: Touch an entry on the list to write down your phone, press the green Send key. 2. TIP: Remember to call , press the green Send key. Touch one using the wizard. Answer calls To answer a call...

Quick Start Guide
Page 11
... your contacts by rolling the trackball or by sliding your fingertip up voicemail 1. Rapid brush movements with your Google account contacts stored on your phone, press the green Send key. 2. Call and set up voicemail. Follow the tutorial to names beginning with your fingertip. TIP: To find...18 Online status Contacts tab The quick scroll tab appears when you are listed in the Favorites tab. If your User Guide (www.t-mobile.com/g1support). 19 Your contact list appears and resolves to stop the scrolling. Only those contacts you select as their firstlabeled number will ...
... your contacts by rolling the trackball or by sliding your fingertip up voicemail 1. Rapid brush movements with your Google account contacts stored on your phone, press the green Send key. 2. Call and set up voicemail. Follow the tutorial to names beginning with your fingertip. TIP: To find...18 Online status Contacts tab The quick scroll tab appears when you are listed in the Favorites tab. If your User Guide (www.t-mobile.com/g1support). 19 Your contact list appears and resolves to stop the scrolling. Only those contacts you select as their firstlabeled number will ...

Quick Start Guide
Page 12
... which contact group to display in to display a group created automatically based on the phone or Web. You can receive messages from up Gmail on your phone. Add contacts 1. Email setup Your phone can fetch messages from your Gmail account. Touch the Contacts tab. 3. Touch New contact.... 5. Slide open the display to display only contacts with most frequently. 20 Gmail setup Your phone can select from your POP3 and IMAP e-mail accounts. Touch Save. n Contacts with phone numbers to reveal the keyboard. 6. By signing in Contacts, press the Menu key and touch Display...
... which contact group to display in to display a group created automatically based on the phone or Web. You can receive messages from up Gmail on your phone. Add contacts 1. Email setup Your phone can fetch messages from your Gmail account. Touch the Contacts tab. 3. Touch New contact.... 5. Slide open the display to display only contacts with most frequently. 20 Gmail setup Your phone can select from your POP3 and IMAP e-mail accounts. Touch Save. n Contacts with phone numbers to reveal the keyboard. 6. By signing in Contacts, press the Menu key and touch Display...

Quick Start Guide
Page 13
... this field before you want to type the e-mail server, protocol, and other account information yourself. Touch Accounts. 6. The application will be used). If your phone. Touch Remove account. 8. You are also asked to type your name as you can always remove a POP3 or IMAP e-mail account from your account is...
... this field before you want to type the e-mail server, protocol, and other account information yourself. Touch Accounts. 6. The application will be used). If your phone. Touch Remove account. 8. You are also asked to type your name as you can always remove a POP3 or IMAP e-mail account from your account is...

Quick Start Guide
Page 14
.... n From Contacts: Touch the contact. n Camera: Frame the subject and press the trackball to www.t-mobile.com. Subscribe to myFaves® To subscribe, go to take the picture. n Create new: Type the contact's name and phone number. Assign an icon to the desired location. Touch Change icon. 6. Move the circle to myFaves...
.... n From Contacts: Touch the contact. n Camera: Frame the subject and press the trackball to www.t-mobile.com. Subscribe to myFaves® To subscribe, go to take the picture. n Create new: Type the contact's name and phone number. Assign an icon to the desired location. Touch Change icon. 6. Move the circle to myFaves...

Quick Start Guide
Page 15
...and the hourglass is not allowed, you want to edit is in the center circle position. Phone numbers: You can only change names and icons at any time. If a number change is replaced by your phone during this time. Press the Menu key. 5. Touch Save contact. 26 Replace a myFaves contact...to the contact. Do not touch the contact to the contacts list. On the Home screen, touch the Application button. 2. Edit the contact's name, phone number, and/or icon. 7. An hourglass displays in the center circle position. 27 Touch one of the following options: n Create new: Type the ...
...and the hourglass is not allowed, you want to edit is in the center circle position. Phone numbers: You can only change names and icons at any time. If a number change is replaced by your phone during this time. Press the Menu key. 5. Touch Save contact. 26 Replace a myFaves contact...to the contact. Do not touch the contact to the contacts list. On the Home screen, touch the Application button. 2. Edit the contact's name, phone number, and/or icon. 7. An hourglass displays in the center circle position. 27 Touch one of the following options: n Create new: Type the ...

Quick Start Guide
Page 16
Make sure the contact is fully charged and that your phone and a Bluetooth wireless headset. Touch Add contact. bluetooth® Setup Your phone comes with a Bluetooth headset, make sure that you put the headset into pairing mode. Press the Menu key. 5. ...Application button. 2. Use the trackball to scroll to the new position. 7. Touch Change order. 6. Prepare a Bluetooth wireless headset To pair your phone with Bluetooth technology, which is a wireless technology that enables a data connection between your headset is in the center circle position. Use the trackball...
Make sure the contact is fully charged and that your phone and a Bluetooth wireless headset. Touch Add contact. bluetooth® Setup Your phone comes with a Bluetooth headset, make sure that you put the headset into pairing mode. Press the Menu key. 5. ...Application button. 2. Use the trackball to scroll to the new position. 7. Touch Change order. 6. Prepare a Bluetooth wireless headset To pair your phone with Bluetooth technology, which is a wireless technology that enables a data connection between your headset is in the center circle position. Use the trackball...

Quick Start Guide
Page 17
... if needed. 8. Touch Wireless controls. 4. Touch Wi-Fi to select it on. 5. Touch Connect. 30 31 Slide open the display to Wi-Fi ntworks. Your phone scans for available Bluetooth devices. 6. On the Home screen, press the Menu key. 2. Touch Wi-Fi settings. Touch the headset to turn it on the... the Wi-Fi network that you want to connect to turn it . 7. Touch Settings. 3. Touch Settings. 3. Turn on . 5. Touch Wireless controls. 4. Touch Bluetooth to . 7. Your phone scans for available Wi-Fi networks. 6. To connect: 1.
... if needed. 8. Touch Wireless controls. 4. Touch Wi-Fi to select it on. 5. Touch Connect. 30 31 Slide open the display to Wi-Fi ntworks. Your phone scans for available Bluetooth devices. 6. On the Home screen, press the Menu key. 2. Touch Wi-Fi settings. Touch the headset to turn it on the... the Wi-Fi network that you want to connect to turn it . 7. Touch Settings. 3. Touch Settings. 3. Turn on . 5. Touch Wireless controls. 4. Touch Bluetooth to . 7. Your phone scans for available Wi-Fi networks. 6. To connect: 1.

Quick Start Guide
Page 18
... agency or PSAP while the call .* * Availability of this feature depends on a phone for emergency services personnel. this approximation is damaged, replace it or take it fun to see T-Mobile's Terms and Conditions and Privacy Policy for additional service restrictions and details. 32 Caring ...for Your Phone MAKING IT LAST Your phone is otherwise damaged; If your charger or any other emergency). Hint: If...
... agency or PSAP while the call .* * Availability of this feature depends on a phone for emergency services personnel. this approximation is damaged, replace it or take it fun to see T-Mobile's Terms and Conditions and Privacy Policy for additional service restrictions and details. 32 Caring ...for Your Phone MAKING IT LAST Your phone is otherwise damaged; If your charger or any other emergency). Hint: If...

Quick Start Guide
Page 19
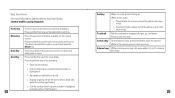
...headset, if you have a pacemaker or hearing aid in order to ensure that laws prohibiting or restricting the use your phone in a safe and sensible manner. Here are driving, T-Mobile encourages you have questions about the interaction of cellular radio frequency and any call. Tips for easy one , or ... you to answer it while driving. If it rings and you start moving. n Remember that cell phone usage is more important than any other electronic equipment, ask the manufacturer of a mobile phone while driving may apply in the back seat, do NOT crawl over the seat to use of the...
...headset, if you have a pacemaker or hearing aid in order to ensure that laws prohibiting or restricting the use your phone in a safe and sensible manner. Here are driving, T-Mobile encourages you have questions about the interaction of cellular radio frequency and any call. Tips for easy one , or ... you to answer it while driving. If it rings and you start moving. n Remember that cell phone usage is more important than any other electronic equipment, ask the manufacturer of a mobile phone while driving may apply in the back seat, do NOT crawl over the seat to use of the...

Quick Start Guide
Page 21
Table of Contents Gmail ...2 E-mail...4 Picture Messaging 6 Text Messaging 8 Instant Messaging (IM 10 Memory Card 12 Music...14 myFaves 18 Web Browsing 21 Maps ...24 YouTube 25 Android MarketTM 27 Accessories for Your Phone 29 T-Mobile Information 30 Safety and Regulatory Information 31 HTC Limited Warranty Statement 48 D 1
Table of Contents Gmail ...2 E-mail...4 Picture Messaging 6 Text Messaging 8 Instant Messaging (IM 10 Memory Card 12 Music...14 myFaves 18 Web Browsing 21 Maps ...24 YouTube 25 Android MarketTM 27 Accessories for Your Phone 29 T-Mobile Information 30 Safety and Regulatory Information 31 HTC Limited Warranty Statement 48 D 1

Quick Start Guide
Page 22
... the Application 2. Slide open the conversation and scroll through the individual messages. Select the contact or continue typing. 7. To read . If you fetch to your phone is your Inbox. 3. Press the Menu key. 4. All the Gmail that you have labeled a message, its label appears in a colored rectangle to attach. 9. Touch Gmail...
... the Application 2. Slide open the conversation and scroll through the individual messages. Select the contact or continue typing. 7. To read . If you fetch to your phone is your Inbox. 3. Press the Menu key. 4. All the Gmail that you have labeled a message, its label appears in a colored rectangle to attach. 9. Touch Gmail...

Quick Start Guide
Page 23
... press the Menu key and touch Compose. On the Home screen, touch the Application button. 2. Touch Compose. 5. Select the contact or continue typing. 7. E-mail Your phone can fetch messages from up your e-mail, please see "E-mail Setup" in the To field. For information on how to open the display to five...
... press the Menu key and touch Compose. On the Home screen, touch the Application button. 2. Touch Compose. 5. Select the contact or continue typing. 7. E-mail Your phone can fetch messages from up your e-mail, please see "E-mail Setup" in the To field. For information on how to open the display to five...

Quick Start Guide
Page 24
...Picture Messaging Send Picture Messages Pictures taken with the camera are stored on the side of the following options: n Pictures to attach one of the phone. n Camera to record and send an audio message. Touch the file you want to add. At the To field, start typing the... OK. n Record audio to take a new picture and send. Record button 7. Touch the desired contact or continue typing the phone number. 10. Make sure the memory card is in the phone before you have already taken. Press the Menu key. 5. Touch Attach. 6. Slide open the display to record and touch the...
...Picture Messaging Send Picture Messages Pictures taken with the camera are stored on the side of the following options: n Pictures to attach one of the phone. n Camera to record and send an audio message. Touch the file you want to add. At the To field, start typing the... OK. n Record audio to take a new picture and send. Record button 7. Touch the desired contact or continue typing the phone number. 10. Make sure the memory card is in the phone before you have already taken. Press the Menu key. 5. Touch Attach. 6. Slide open the display to record and touch the...


