Manual
Page 3
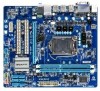
... GIGA-BYTE TECHNOLOGY CO., LTD. Disclaimer Information in the use GIGABYTE's unique features, read or download the information on/from the Support&Downloads\Motherboard\Technology Guide page on your motherboard revision before updating motherboard BIOS, drivers, or when looking for technical information. Check your motherboard looks like this manual are legally registered to use of this...
... GIGA-BYTE TECHNOLOGY CO., LTD. Disclaimer Information in the use GIGABYTE's unique features, read or download the information on/from the Support&Downloads\Motherboard\Technology Guide page on your motherboard revision before updating motherboard BIOS, drivers, or when looking for technical information. Check your motherboard looks like this manual are legally registered to use of this...
Manual
Page 6
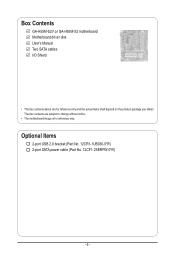
Optional Items 2-port USB 2.0 bracket (Part No. 12CR1-1UB030-5*R) 2-port SATA power cable (Part No. 12CF1-2SERPW-0*R) - 6 - The box contents are for reference only. Box Contents GA-H55M-S2V or GA-H55M-S2 motherboard Motherboard driver disk User's Manual Two SATA cables I/O Shield • The box contents above are subject to change without notice. • The motherboard image is for reference only and the actual items shall depend on the product package you obtain.
Optional Items 2-port USB 2.0 bracket (Part No. 12CR1-1UB030-5*R) 2-port SATA power cable (Part No. 12CF1-2SERPW-0*R) - 6 - The box contents are for reference only. Box Contents GA-H55M-S2V or GA-H55M-S2 motherboard Motherboard driver disk User's Manual Two SATA cables I/O Shield • The box contents above are subject to change without notice. • The motherboard image is for reference only and the actual items shall depend on the product package you obtain.
Manual
Page 11
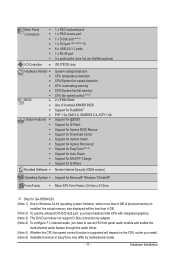
...) Operating System w Support for Microsoft® Windows 7/Vista/XP Form Factor w Micro ATX Form Factor; 24.4cm x 21.0cm j Only for GA-H55M-S2V. (Note 1) Due to Windows 32-bit operating system limitation, when more than 4 GB of physical memory is installed, the actual memory size displayed will...4) To configure 7.1-channel audio, you have to use an HD front panel audio module and enable the multi-channel audio feature through the audio driver. (Note 5) Whether the CPU fan speed control function is supported will depend on the CPU cooler you install. (Note 6) Available functions in...
...) Operating System w Support for Microsoft® Windows 7/Vista/XP Form Factor w Micro ATX Form Factor; 24.4cm x 21.0cm j Only for GA-H55M-S2V. (Note 1) Due to Windows 32-bit operating system limitation, when more than 4 GB of physical memory is installed, the actual memory size displayed will...4) To configure 7.1-channel audio, you have to use an HD front panel audio module and enable the multi-channel audio feature through the audio driver. (Note 5) Whether the CPU fan speed control function is supported will depend on the CPU cooler you install. (Note 6) Available functions in...
Manual
Page 17
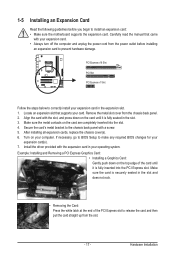
1-5 Installing an Expansion Card Read the following guidelines before installing an expansion card to correctly install your operating system. Install the driver provided with the expansion card in your expansion card in the slot. 3. Example: Installing and Removing a PCI Express Graphics Card: • ... it is fully inserted into the slot. 4. Secure the card's metal bracket to install an expansion card: • Make sure the motherboard supports the expansion card. Turn on the top edge of the PCI Express slot to make any required BIOS changes for your computer. Locate...
1-5 Installing an Expansion Card Read the following guidelines before installing an expansion card to correctly install your operating system. Install the driver provided with the expansion card in your expansion card in the slot. 3. Example: Installing and Removing a PCI Express Graphics Card: • ... it is fully inserted into the slot. 4. Secure the card's metal bracket to install an expansion card: • Make sure the motherboard supports the expansion card. Turn on the top edge of the PCI Express slot to make any required BIOS changes for your computer. Locate...
Manual
Page 18
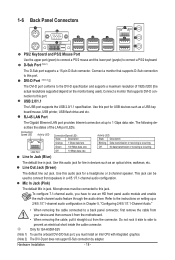
... a back panel connector, first remove the cable from your device and then remove it from the motherboard. • When removing the cable, pull it side to side to prevent an electrical short inside... Port (Note 1) The D-Sub port supports a 15-pin D-Sub connector. Use this audio jack for GA-H55M-S2V (Note 1) To use the onboard DVI-D/D-Sub port, you have to 1 Gbps data rate. RJ-45...use an HD front panel audio module and enable the multi-channel audio feature through the audio driver. Hardware Installation - 18 - Connect a monitor that supports DVI-D connection to this audio jack ...
... a back panel connector, first remove the cable from your device and then remove it from the motherboard. • When removing the cable, pull it side to side to prevent an electrical short inside... Port (Note 1) The D-Sub port supports a 15-pin D-Sub connector. Use this audio jack for GA-H55M-S2V (Note 1) To use the onboard DVI-D/D-Sub port, you have to 1 Gbps data rate. RJ-45...use an HD front panel audio module and enable the multi-channel audio feature through the audio driver. Hardware Installation - 18 - Connect a monitor that supports DVI-D connection to this audio jack ...
Manual
Page 28
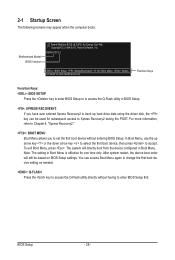
... access to accept. To exit Boot Menu, press . BIOS Setup - 28 - In Boot Menu, use the up hard drive data using the driver disk, the key can access Boot Menu again to change the first boot device setting as needed. : Q-FLASH Press the key to enter BIOS... the first boot device without having to access the Q-Flash utility directly without entering BIOS Setup. Motherboard Model BIOS Version Award Modular BIOS v6.00PG, An Energy Star Ally Copyright (C) 1984-2010, Award Software, Inc. H55M-S2V E1 . . . . : BIOS Setup : XpressRecovery2 : Boot Menu : Qflash 07/09/2010-H55-7A89TG0YC...
... access to accept. To exit Boot Menu, press . BIOS Setup - 28 - In Boot Menu, use the up hard drive data using the driver disk, the key can access Boot Menu again to change the first boot device setting as needed. : Q-FLASH Press the key to enter BIOS... the first boot device without having to access the Q-Flash utility directly without entering BIOS Setup. Motherboard Model BIOS Version Award Modular BIOS v6.00PG, An Energy Star Ally Copyright (C) 1984-2010, Award Software, Inc. H55M-S2V E1 . . . . : BIOS Setup : XpressRecovery2 : Boot Menu : Qflash 07/09/2010-H55-7A89TG0YC...
Manual
Page 53
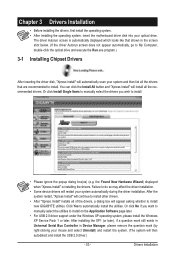
... operating system, insert the motherboard driver disk into your system automatically during the driver installation. The driver Autorun screen is installing the drivers. You can click the Install All button and "Xpress Install" will restart your optical drive. Failure to install. Drivers Installation Or click No if you wish to install new GIGABYTE utilities. the Found New...
... operating system, insert the motherboard driver disk into your system automatically during the driver installation. The driver Autorun screen is installing the drivers. You can click the Install All button and "Xpress Install" will restart your optical drive. Failure to install. Drivers Installation Or click No if you wish to install new GIGABYTE utilities. the Found New...
Manual
Page 54
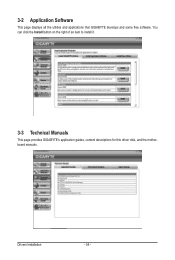
Drivers Installation - 54 - 3-2 Application Software This page displays all the utilities and applications that GIGABYTE develops and some free software. You can click the Install button on the right of an item to install it. 3-3 Technical Manuals This page provides GIGABYTE's application guides, content descriptions for this driver disk, and the motherboard manuals.
Drivers Installation - 54 - 3-2 Application Software This page displays all the utilities and applications that GIGABYTE develops and some free software. You can click the Install button on the right of an item to install it. 3-3 Technical Manuals This page provides GIGABYTE's application guides, content descriptions for this driver disk, and the motherboard manuals.
Manual
Page 58
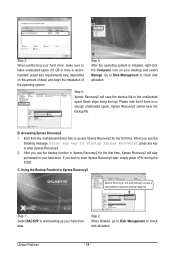
... Disk Management to check disk allocation. B. After you use the backup function in Xpress Recovery2 for the first time. Accessing Xpress Recovery2 1. Boot from the motherboard driver disk to access Xpress Recovery2 for the first time, Xpress Recovery2 will stay permanent in Xpress Recovery2 Xpress Recovery2 will save the backup file. Step...
... Disk Management to check disk allocation. B. After you use the backup function in Xpress Recovery2 for the first time. Accessing Xpress Recovery2 1. Boot from the motherboard driver disk to access Xpress Recovery2 for the first time, Xpress Recovery2 will stay permanent in Xpress Recovery2 Xpress Recovery2 will save the backup file. Step...
Manual
Page 65
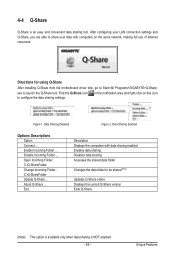
... sharing enabled Enables data sharing Disables data sharing Accesses the shared data folder Changes the data folder to Start>All Programs>GIGABYTE>Q-Share. Find the Q-Share icon to launch the Q-Share tool. in the notification area and right-click on the same... 2. Unique Features Description Displays the computers with computers on this icon Figure 1. Directions for using Q-Share After installing Q-Share from the motherboard driver disk, go to be shared (Note) Updates Q-Share online Displays the current Q-Share version Exits Q-Share (Note) This option is ...
... sharing enabled Enables data sharing Disables data sharing Accesses the shared data folder Changes the data folder to Start>All Programs>GIGABYTE>Q-Share. Find the Q-Share icon to launch the Q-Share tool. in the notification area and right-click on the same... 2. Unique Features Description Displays the computers with computers on this icon Figure 1. Directions for using Q-Share After installing Q-Share from the motherboard driver disk, go to be shared (Note) Updates Q-Share online Displays the current Q-Share version Exits Q-Share (Note) This option is ...
Manual
Page 67
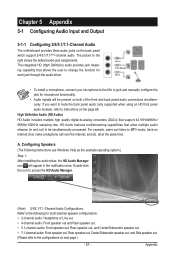
...jack retasking capability that allow multiple audio streams (in and out) to change the function for each jack through the audio driver. HD Audio features multistreaming capabilities that allows the user to be present on the back panel which support 2/4/5.1/7.1(Note)-channel audio... the example operating system.) Step 1: After installing the audio driver, the HD Audio Manager icon will be simultaneously processed. Chapter 5 Appendix 5-1 Configuring Audio Input and Output 5-1-1 Configuring 2/4/5.1/7.1-Channel Audio The motherboard provides three audio jacks on both of the front and back...
...jack retasking capability that allow multiple audio streams (in and out) to change the function for each jack through the audio driver. HD Audio features multistreaming capabilities that allows the user to be present on the back panel which support 2/4/5.1/7.1(Note)-channel audio... the example operating system.) Step 1: After installing the audio driver, the HD Audio Manager icon will be simultaneously processed. Chapter 5 Appendix 5-1 Configuring Audio Input and Output 5-1-1 Configuring 2/4/5.1/7.1-Channel Audio The motherboard provides three audio jacks on both of the front and back...
Manual
Page 73
... 2: Check if Audio Device on the computer name and select Scan for hardware changes. Then install the onboard HD audio driver from the motherboard driver disk or download the audio driver from GIGABYTE's website to enter BIOS Setup during the POST mean? A: The following Award BIOS beep code descriptions may help you identify possible computer...
... 2: Check if Audio Device on the computer name and select Scan for hardware changes. Then install the onboard HD audio driver from the motherboard driver disk or download the audio driver from GIGABYTE's website to enter BIOS Setup during the POST mean? A: The following Award BIOS beep code descriptions may help you identify possible computer...


