Manual
Page 3
...read or download the information on/from the Support&Downloads\Motherboard\Technology Guide page on your motherboard revision before updating motherboard BIOS, drivers, or when looking for technical information. Disclaimer Information in any form or by copyright laws and is 1.0. For example, "REV.... For instructions on how to their respective owners. For product-related information, check on our website at: http://www.gigabyte.com Identifying Your Motherboard Revision The revision number on our website. Example: Copyright © 2010 GIGA-BYTE TECHNOLOGY CO., LTD. ...
...read or download the information on/from the Support&Downloads\Motherboard\Technology Guide page on your motherboard revision before updating motherboard BIOS, drivers, or when looking for technical information. Disclaimer Information in any form or by copyright laws and is 1.0. For example, "REV.... For instructions on how to their respective owners. For product-related information, check on our website at: http://www.gigabyte.com Identifying Your Motherboard Revision The revision number on our website. Example: Copyright © 2010 GIGA-BYTE TECHNOLOGY CO., LTD. ...
Manual
Page 5
... 53 3-1 Installing Chipset Drivers 53 3-2 Application Software 54 3-3 Technical Manuals 54 3-4 Contact...55 3-5 System...55 3-6 Download Center 56 3-7 New Utilities...56 Chapter 4 Unique Features 57 4-1 Xpress Recovery2 57 4-2 BIOS ...
... 53 3-1 Installing Chipset Drivers 53 3-2 Application Software 54 3-3 Technical Manuals 54 3-4 Contact...55 3-5 System...55 3-6 Download Center 56 3-7 New Utilities...56 Chapter 4 Unique Features 57 4-1 Xpress Recovery2 57 4-2 BIOS ...
Manual
Page 6
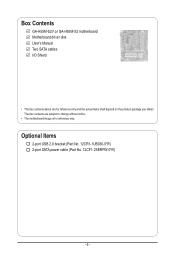
The box contents are for reference only. Optional Items 2-port USB 2.0 bracket (Part No. 12CR1-1UB030-5*R) 2-port SATA power cable (Part No. 12CF1-2SERPW-0*R) - 6 - Box Contents GA-H55M-S2V or GA-H55M-S2 motherboard Motherboard driver disk User's Manual Two SATA cables I/O Shield • The box contents above are subject to change without notice. • The motherboard image is for reference only and the actual items shall depend on the product package you obtain.
The box contents are for reference only. Optional Items 2-port USB 2.0 bracket (Part No. 12CR1-1UB030-5*R) 2-port SATA power cable (Part No. 12CF1-2SERPW-0*R) - 6 - Box Contents GA-H55M-S2V or GA-H55M-S2 motherboard Motherboard driver disk User's Manual Two SATA cables I/O Shield • The box contents above are subject to change without notice. • The motherboard image is for reference only and the actual items shall depend on the product package you obtain.
Manual
Page 11
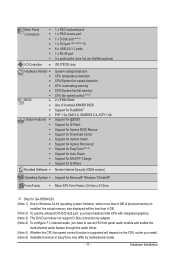
...) Operating System w Support for Microsoft® Windows 7/Vista/XP Form Factor w Micro ATX Form Factor; 24.4cm x 21.0cm j Only for GA-H55M-S2V. (Note 1) Due to Windows 32-bit operating system limitation, when more than 4 GB of physical memory is installed, the actual memory size displayed will...4) To configure 7.1-channel audio, you have to use an HD front panel audio module and enable the multi-channel audio feature through the audio driver. (Note 5) Whether the CPU fan speed control function is supported will depend on the CPU cooler you install. (Note 6) Available functions in...
...) Operating System w Support for Microsoft® Windows 7/Vista/XP Form Factor w Micro ATX Form Factor; 24.4cm x 21.0cm j Only for GA-H55M-S2V. (Note 1) Due to Windows 32-bit operating system limitation, when more than 4 GB of physical memory is installed, the actual memory size displayed will...4) To configure 7.1-channel audio, you have to use an HD front panel audio module and enable the multi-channel audio feature through the audio driver. (Note 5) Whether the CPU fan speed control function is supported will depend on the CPU cooler you install. (Note 6) Available functions in...
Manual
Page 17
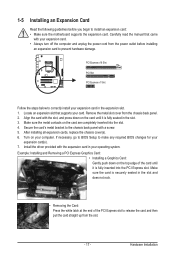
... completely inserted into the PCI Express slot. Locate an expansion slot that came with the slot, and press down on your operating system. Install the driver provided with a screw. 5. Secure the card's metal bracket to the chassis back panel with the expansion card in the slot and does not rock. •...
... completely inserted into the PCI Express slot. Locate an expansion slot that came with the slot, and press down on your operating system. Install the driver provided with a screw. 5. Secure the card's metal bracket to the chassis back panel with the expansion card in the slot and does not rock. •...
Manual
Page 18
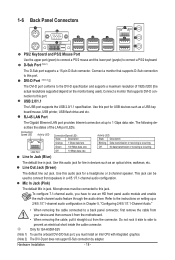
... support D-Sub connection by adapter. To configure 7.1-channel audio, you have to this audio jack for GA-H55M-S2V (Note 1) To use an HD front panel audio module and enable the multi-channel audio feature through the audio driver. Do not rock it straight out from the motherboard. • When removing the cable, pull...
... support D-Sub connection by adapter. To configure 7.1-channel audio, you have to this audio jack for GA-H55M-S2V (Note 1) To use an HD front panel audio module and enable the multi-channel audio feature through the audio driver. Do not rock it straight out from the motherboard. • When removing the cable, pull...
Manual
Page 28
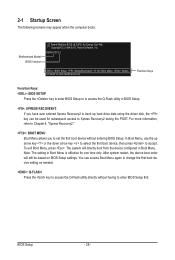
... to set the first boot device without having to Xpress Recovery2 during the POST. In Boot Menu, use the up hard drive data using the driver disk, the key can access Boot Menu again to change the first boot device setting as needed. : Q-FLASH Press the key to access the..., Inc. To exit Boot Menu, press . You can be based on BIOS Setup settings. 2-1 Startup Screen The following screens may appear when the computer boots. H55M-S2V E1 . . . . : BIOS Setup : XpressRecovery2 : Boot Menu : Qflash 07/09/2010-H55-7A89TG0YC-00 Function Keys Function Keys: : BIOS SETUP Press the key to enter...
... to set the first boot device without having to Xpress Recovery2 during the POST. In Boot Menu, use the up hard drive data using the driver disk, the key can access Boot Menu again to change the first boot device setting as needed. : Q-FLASH Press the key to access the..., Inc. To exit Boot Menu, press . You can be based on BIOS Setup settings. 2-1 Startup Screen The following screens may appear when the computer boots. H55M-S2V E1 . . . . : BIOS Setup : XpressRecovery2 : Boot Menu : Qflash 07/09/2010-H55-7A89TG0YC-00 Function Keys Function Keys: : BIOS SETUP Press the key to enter...
Manual
Page 43
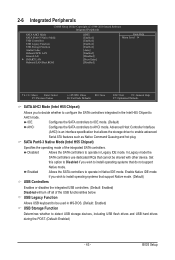
... Function Determines whether to operate in Native IDE mode. Set this option to Disabled if you wish to install operating systems that allows the storage driver to AHCI mode. USB Legacy Function Allows USB keyboard to be shared with other device. Advanced Host Controller Interface (AHCI) is an interface specification that...
... Function Determines whether to operate in Native IDE mode. Set this option to Disabled if you wish to install operating systems that allows the storage driver to AHCI mode. USB Legacy Function Allows USB keyboard to be shared with other device. Advanced Host Controller Interface (AHCI) is an interface specification that...
Manual
Page 53
... screen is installing the drivers. Failure to install. Or click No if you wish to install new GIGABYTE utilities. You can click the Install All button and "Xpress Install" will appear asking whether to install. • Please ignore the popup dialog box(es) (e.g. ...
... screen is installing the drivers. Failure to install. Or click No if you wish to install new GIGABYTE utilities. You can click the Install All button and "Xpress Install" will appear asking whether to install. • Please ignore the popup dialog box(es) (e.g. ...
Manual
Page 54
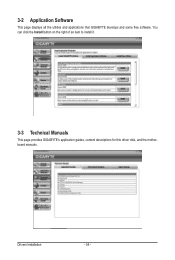
3-2 Application Software This page displays all the utilities and applications that GIGABYTE develops and some free software. Drivers Installation - 54 - You can click the Install button on the right of an item to install it. 3-3 Technical Manuals This page provides GIGABYTE's application guides, content descriptions for this driver disk, and the motherboard manuals.
3-2 Application Software This page displays all the utilities and applications that GIGABYTE develops and some free software. Drivers Installation - 54 - You can click the Install button on the right of an item to install it. 3-3 Technical Manuals This page provides GIGABYTE's application guides, content descriptions for this driver disk, and the motherboard manuals.
Manual
Page 55
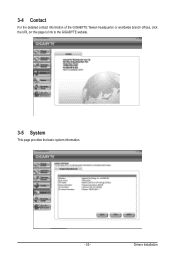
Drivers Installation 3-4 Contact For the detailed contact information of the GIGABYTE Taiwan headquarter or worldwide branch offices, click the URL on this page to link to the GIGABYTE website. 3-5 System This page provides the basic system information. - 55 -
Drivers Installation 3-4 Contact For the detailed contact information of the GIGABYTE Taiwan headquarter or worldwide branch offices, click the URL on this page to link to the GIGABYTE website. 3-5 System This page provides the basic system information. - 55 -
Manual
Page 56
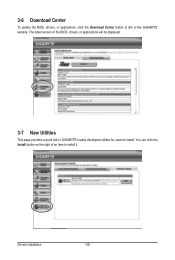
The latest version of an item to install it. Drivers Installation - 56 - You can click the Install button on the right of the BIOS, drivers, or applications will be displayed. 3-7 New Utilities This page provides a quick link to GIGABYTE's lately developed utilities for users to the GIGABYTE website. 3-6 Download Center To update the BIOS, drivers, or applications, click the Download Center button to link to install.
The latest version of an item to install it. Drivers Installation - 56 - You can click the Install button on the right of the BIOS, drivers, or applications will be displayed. 3-7 New Utilities This page provides a quick link to GIGABYTE's lately developed utilities for users to the GIGABYTE website. 3-6 Download Center To update the BIOS, drivers, or applications, click the Download Center button to link to install.
Manual
Page 57
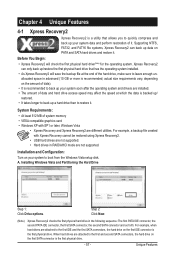
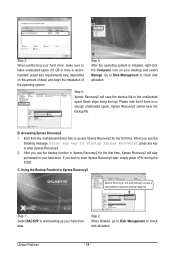
... takes longer to back up /restore the first physical hard drive that allows you to back up your system soon after the operating system and drivers are different utilities. Step 2: Click New. (Note Xpress Recovery2 checks the first physical hard drive in advanced (10 GB or more is recommended; Chapter 4 Unique...
... takes longer to back up /restore the first physical hard drive that allows you to back up your system soon after the operating system and drivers are different utilities. Step 2: Click New. (Note Xpress Recovery2 checks the first physical hard drive in advanced (10 GB or more is recommended; Chapter 4 Unique...
Manual
Page 58
... file. After you see the following message: Press any key to startup Xpress Recovery2, press any key to enter Xpress Recovery2. 2. B. Boot from the motherboard driver disk to check disk allocation. Step 4: After the operating system is no enough unallocated space, Xpress Recovery2 cannot save the backup file to store the...
... file. After you see the following message: Press any key to startup Xpress Recovery2, press any key to enter Xpress Recovery2. 2. B. Boot from the motherboard driver disk to check disk allocation. Step 4: After the operating system is no enough unallocated space, Xpress Recovery2 cannot save the backup file to store the...
Manual
Page 65
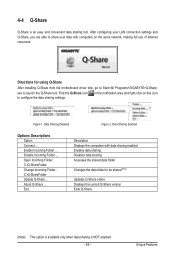
Directions for using Q-Share After installing Q-Share from the motherboard driver disk, go to launch the Q-Share tool. exe to Start>All Programs>GIGABYTE>Q-Share. Data Sharing Disabled Figure 2. Disable Incoming Folder ... Description Displays the computers with computers on this icon Figure 1. Open Incoming Folder : C:\Q-ShareFolder Change Incoming Folder : C:\Q-...
Directions for using Q-Share After installing Q-Share from the motherboard driver disk, go to launch the Q-Share tool. exe to Start>All Programs>GIGABYTE>Q-Share. Data Sharing Disabled Figure 2. Disable Incoming Folder ... Description Displays the computers with computers on this icon Figure 1. Open Incoming Folder : C:\Q-ShareFolder Change Incoming Folder : C:\Q-...
Manual
Page 67
...includes multiple high quality digital-to-analog converters (DACs) that allows the user to change the function for each jack through the audio driver. A. If you want to mute the back panel audio (only supported when using an HD front panel audio module), refer to ...(Note) 2/4/5.1/7.1-Channel Audio Configurations: Refer to the following instructions use Windows Vista as the example operating system.) Step 1: After installing the audio driver, the HD Audio Manager icon will appear in jack and manually configure the jack for multi-channel speaker configurations. • 2-channel audio: ...
...includes multiple high quality digital-to-analog converters (DACs) that allows the user to change the function for each jack through the audio driver. A. If you want to mute the back panel audio (only supported when using an HD front panel audio module), refer to ...(Note) 2/4/5.1/7.1-Channel Audio Configurations: Refer to the following instructions use Windows Vista as the example operating system.) Step 1: After installing the audio driver, the HD Audio Manager icon will appear in jack and manually configure the jack for multi-channel speaker configurations. • 2-channel audio: ...
Manual
Page 70
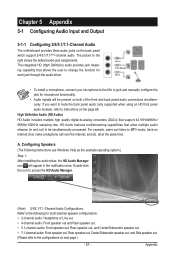
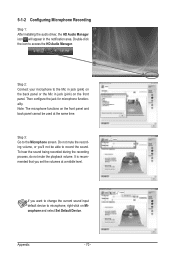
.... Appendix - 70 - Do not mute the recording volume, or you'll not be used at a middle level. 5-1-2 Configuring Microphone Recording Step 1: After installing the audio driver, the HD Audio Manager icon will appear in jack (pink) on the front panel. To hear the sound being recorded during the recording process, do...
.... Appendix - 70 - Do not mute the recording volume, or you'll not be used at a middle level. 5-1-2 Configuring Microphone Recording Step 1: After installing the audio driver, the HD Audio Manager icon will appear in jack (pink) on the front panel. To hear the sound being recorded during the recording process, do...
Manual
Page 73
... on Microsoft UAA Bus Driver for your motherboard, please go to show the advanced options. If yes, please disable this device. (If not, skip this , please turn off the computer and unplug the power cord). Step 4: In Device Manager, right-click on GIGABYTE's website. When the ...mouse still on after the computer shuts down ? If your speaker is present in My Computer > Properties > Gen- If not, please update it from GIGABYTE's website to My Computer > Properties > Hardware > Device Manager > System devices and right-click on . Then make sure Service Pack 1 or Service Pack...
... on Microsoft UAA Bus Driver for your motherboard, please go to show the advanced options. If yes, please disable this device. (If not, skip this , please turn off the computer and unplug the power cord). Step 4: In Device Manager, right-click on GIGABYTE's website. When the ...mouse still on after the computer shuts down ? If your speaker is present in My Computer > Properties > Gen- If not, please update it from GIGABYTE's website to My Computer > Properties > Hardware > Device Manager > System devices and right-click on . Then make sure Service Pack 1 or Service Pack...


