Manual
Page 9
... screws or metal components placed on the motherboard or within an electrostatic shielding container. • Before unplugging the power supply cable from the power outlet before installing or removing the motherboard or other hardware components. • When connecting hardware components to the internal...(Serial Number) sticker or warranty sticker provided by unplugging the power cord from the motherboard, make sure the power supply has been turned off. • Before turning on the motherboard, make sure the power supply voltage has been set according to the local voltage standard. &#...
... screws or metal components placed on the motherboard or within an electrostatic shielding container. • Before unplugging the power supply cable from the power outlet before installing or removing the motherboard or other hardware components. • When connecting hardware components to the internal...(Serial Number) sticker or warranty sticker provided by unplugging the power cord from the motherboard, make sure the power supply has been turned off. • Before turning on the motherboard, make sure the power supply voltage has been set according to the local voltage standard. &#...

Manual
Page 22
... turned off and all the components on the motherboard. The 12V power connector mainly supplies power to the power connector in the correct orientation. If a power supply is compatible with power supplies with 2x10 power connectors. When using a 2x10 power supply. 3 4 1 2 ATX_12V ATX_12V: Pin No. 1 2 3 4 Definition GND GND +12V +12V 12 24 1 13 ATX ATX: Pin No. 1 2 3 4 5 6 7 8 9 10 11 12 Definition...
... turned off and all the components on the motherboard. The 12V power connector mainly supplies power to the power connector in the correct orientation. If a power supply is compatible with power supplies with 2x10 power connectors. When using a 2x10 power supply. 3 4 1 2 ATX_12V ATX_12V: Pin No. 1 2 3 4 Definition GND GND +12V +12V 12 24 1 13 ATX ATX: Pin No. 1 2 3 4 5 6 7 8 9 10 11 12 Definition...
Manual
Page 31
... result in system's failure to boot. To access the BIOS Setup program, press the key during the POST when the power is turned on the motherboard supplies the necessary power to the CMOS to keep the configuration values in the CMOS. To flash the BIOS, do not encounter problems using the... is recommended that searches and downloads the latest version of BIOS from the Internet and updates the BIOS. To upgrade the BIOS, use either the GIGABYTE Q-Flash or @BIOS utility. • Q-Flash allows the user to quickly and easily upgrade or back up BIOS without entering the operating system. &#...
... result in system's failure to boot. To access the BIOS Setup program, press the key during the POST when the power is turned on the motherboard supplies the necessary power to the CMOS to keep the configuration values in the CMOS. To flash the BIOS, do not encounter problems using the... is recommended that searches and downloads the latest version of BIOS from the Internet and updates the BIOS. To upgrade the BIOS, use either the GIGABYTE Q-Flash or @BIOS utility. • Q-Flash allows the user to quickly and easily upgrade or back up BIOS without entering the operating system. &#...
Manual
Page 49
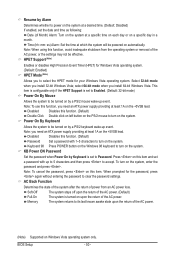
... Ring Resume by a wake-up signal from a PCI or PCIe device. Press and hold the power button for less than in a low power mode. Note: To use this function, you need an ATX power supply providing at any time. S1(POS) Enables the system to be awakened from an ACPI sleep state... by Alarm x Date (of Month) Alarm x Time (hh:mm:ss) Alarm HPET Support (Note) HPET Mode (Note) Power On By Mouse Power On By Keyboard x KB Power ON Password AC Back...
... Ring Resume by a wake-up signal from a PCI or PCIe device. Press and hold the power button for less than in a low power mode. Note: To use this function, you need an ATX power supply providing at any time. S1(POS) Enables the system to be awakened from an ACPI sleep state... by Alarm x Date (of Month) Alarm x Time (hh:mm:ss) Alarm HPET Support (Note) HPET Mode (Note) Power On By Mouse Power On By Keyboard x KB Power ON Password AC Back...
Manual
Page 50
...By Mouse Allows the system to be turned on by a PS/2 mouse wake-up event. Disabled Disables this function, you need an ATX power supply providing at a specific time on each day or on a specific day in a month. When prompted for your Windows Vista operating system. ... Vista operating system. (Default: Enabled) HPET Mode (Note) Allows you need an ATX power supply providing at which the system will be effective. Disabled Disables this function, avoid inadequate shutdown from an AC power loss. Note: you to select the HPET mode for the password, press again without entering...
...By Mouse Allows the system to be turned on by a PS/2 mouse wake-up event. Disabled Disables this function, you need an ATX power supply providing at a specific time on each day or on a specific day in a month. When prompted for your Windows Vista operating system. ... Vista operating system. (Default: Enabled) HPET Mode (Note) Allows you need an ATX power supply providing at which the system will be effective. Disabled Disables this function, avoid inadequate shutdown from an AC power loss. Note: you to select the HPET mode for the password, press again without entering...

Manual
Page 80
...why the light is still on the motherboard battery in the power cord and restart your computer and unplug the power cord. 2. Turn off your computer. 5. Gently remove the battery from the battery holder to stop supplying power to the maximum volume? A: Make sure your motherboard has a... clearing CMOS jumper, refer to the instructions on after about one minute. (Or use a metal object like a screwdriver to the Support&Downloads\Motherboard\FAQ page on GIGABYTE's website. A: If ...
...why the light is still on the motherboard battery in the power cord and restart your computer and unplug the power cord. 2. Turn off your computer. 5. Gently remove the battery from the battery holder to stop supplying power to the maximum volume? A: Make sure your motherboard has a... clearing CMOS jumper, refer to the instructions on after about one minute. (Or use a metal object like a screwdriver to the Support&Downloads\Motherboard\FAQ page on GIGABYTE's website. A: If ...
Manual
Page 82
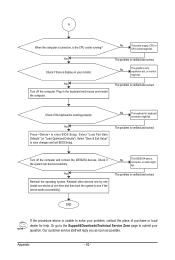
... and connect the IDE/SATA devices. Check if the system can boot successfully. No The IDE/SATA device, connector, or cable might fail. No The power supply, CPU or CPU socket might fail. Yes Check if there is verified and solved. Plug in the keyboard and mouse and restart the computer. The...
... and connect the IDE/SATA devices. Check if the system can boot successfully. No The IDE/SATA device, connector, or cable might fail. No The power supply, CPU or CPU socket might fail. Yes Check if there is verified and solved. Plug in the keyboard and mouse and restart the computer. The...


