Manual
Page 1
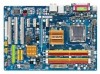
GA-EP41-UD3L GA-EP41-US3L LGA775 socket motherboard for Intel® Core™ processor family/ Intel® Pentium® processor family/Intel® Celeron® processor family User's Manual Rev. 1003 12ME-EP41UD3L-1003R
GA-EP41-UD3L GA-EP41-US3L LGA775 socket motherboard for Intel® Core™ processor family/ Intel® Pentium® processor family/Intel® Celeron® processor family User's Manual Rev. 1003 12ME-EP41UD3L-1003R
Manual
Page 3
...For product-related information, check on our website at: http://www.gigabyte.com.tw Identifying Your Motherboard Revision The revision number on our website. Check your motherboard looks like this manual are legally registered to the specifications and features in any form or ...of the motherboard is the property of the product, read the User's Manual. For instructions on how to assist in this product, GIGABYTE provides the following types of documentations: For quick set-up of GIGABYTE. Changes to their respective owners. Example: Copyright © 2009 GIGA-BYTE...
...For product-related information, check on our website at: http://www.gigabyte.com.tw Identifying Your Motherboard Revision The revision number on our website. Check your motherboard looks like this manual are legally registered to the specifications and features in any form or ...of the motherboard is the property of the product, read the User's Manual. For instructions on how to assist in this product, GIGABYTE provides the following types of documentations: For quick set-up of GIGABYTE. Changes to their respective owners. Example: Copyright © 2009 GIGA-BYTE...
Manual
Page 5
Chapter 3 Drivers Installation 57 3-1 Installing Chipset Drivers 57 3-2 Application Software 58 3-3 Technical Manuals 58 3-4 Contact...59 3-5 System...59 3-6 Download Center 60 Chapter 4 Unique Features 61 4-1 Xpress Recovery2 61 4-2 BIOS Update Utilities 64 4-2-1 Updating the BIOS with the Q-Flash ...
Chapter 3 Drivers Installation 57 3-1 Installing Chipset Drivers 57 3-2 Application Software 58 3-3 Technical Manuals 58 3-4 Contact...59 3-5 System...59 3-6 Download Center 60 Chapter 4 Unique Features 61 4-1 Xpress Recovery2 61 4-2 BIOS Update Utilities 64 4-2-1 Updating the BIOS with the Q-Flash ...
Manual
Page 6
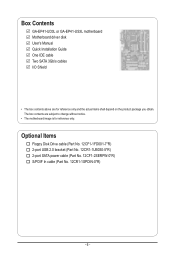
... cable (Part No. 12CF1-2SERPW-0*R) S/PDIF In cable (Part No. 12CR1-1SPDIN-0*R) - 6 - The box contents are for reference only. Box Contents GA-EP41-UD3L or GA-EP41-US3L motherboard Motherboard driver disk User's Manual Quick Installation Guide One IDE cable Two SATA 3Gb/s cables I/O Shield • The box contents above are subject to change without notice...
... cable (Part No. 12CF1-2SERPW-0*R) S/PDIF In cable (Part No. 12CR1-1SPDIN-0*R) - 6 - The box contents are for reference only. Box Contents GA-EP41-UD3L or GA-EP41-US3L motherboard Motherboard driver disk User's Manual Quick Installation Guide One IDE cable Two SATA 3Gb/s cables I/O Shield • The box contents above are subject to change without notice...
Manual
Page 9
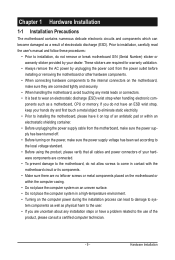
Hardware Installation Prior to installation, carefully read the user's manual and follow these procedures: • Prior to installation, do not have an ESD wrist strap, keep your hands dry and first touch a metal object to ...
Hardware Installation Prior to installation, carefully read the user's manual and follow these procedures: • Prior to installation, do not have an ESD wrist strap, keep your hands dry and first touch a metal object to ...

Manual
Page 15
... the CPU fan header (CPU_FAN) on the motherboard. Check that the Male and Female push pins are joined closely. (Refer to your CPU cooler installation manual for instructions on installing the cooler.) Step 5: After the installation, check the back of the CPU cooler to install.) Step 3: Place the cooler atop the...
... the CPU fan header (CPU_FAN) on the motherboard. Check that the Male and Female push pins are joined closely. (Refer to your CPU cooler installation manual for instructions on installing the cooler.) Step 5: After the installation, check the back of the CPU cooler to install.) Step 3: Place the cooler atop the...
Manual
Page 18
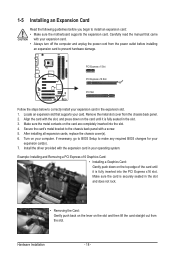
... seated in the slot and does not rock. • Removing the Card: Gently push back on the lever on your operating system. Carefully read the manual that supports your expansion card. • Always turn off the computer and unplug the power cord from the power outlet before you begin to the...
... seated in the slot and does not rock. • Removing the Card: Gently push back on the lever on your operating system. Carefully read the manual that supports your expansion card. • Always turn off the computer and unplug the power cord from the power outlet before you begin to the...

Manual
Page 28
... that supports digital audio out via an optional S/PDIF In cable. Pin No. For information about connecting the S/PDIF digital audio cable, carefully read the manual for digital audio output from your motherboard to your graphics card if you to use a S/PDIF digital audio cable for your motherboard to certain expansion...
... that supports digital audio out via an optional S/PDIF In cable. Pin No. For information about connecting the S/PDIF digital audio cable, carefully read the manual for digital audio output from your motherboard to your graphics card if you to use a S/PDIF digital audio cable for your motherboard to certain expansion...
Manual
Page 30
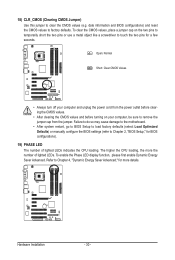
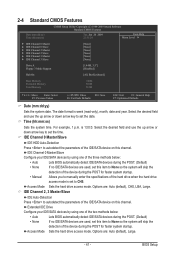
... do so may cause damage to the motherboard. • After system restart, go to BIOS Setup to load factory defaults (select Load Optimized Defaults) or manually configure the BIOS settings (refer to Chapter 4, "Dynamic Energy Saver Advanced," for more the number of lighted LEDs indicates the CPU loading. date information and...
... do so may cause damage to the motherboard. • After system restart, go to BIOS Setup to load factory defaults (select Load Optimized Defaults) or manually configure the BIOS settings (refer to Chapter 4, "Dynamic Energy Saver Advanced," for more the number of lighted LEDs indicates the CPU loading. date information and...

Manual
Page 36
... be configurable. PCI Express Frequency (Mhz) Allows you to alter the clock ratio for the installed CPU. CPU Clock Ratio (Note) Allows you to manually set the CPU host frequency. The item is present only if a CPU with unlocked clock ratio is installed. Note: If your system fails to boot...at its basic performance level. (Default) Turbo Lets the system operate at its best performance level. (Note) This item appears only if you to manually set the PCIe clock frequency. BIOS Setup - 36 - This item is configurable only if the CPU Host Clock Control option is from 90 MHz to...
... be configurable. PCI Express Frequency (Mhz) Allows you to alter the clock ratio for the installed CPU. CPU Clock Ratio (Note) Allows you to manually set the CPU host frequency. The item is present only if a CPU with unlocked clock ratio is installed. Note: If your system fails to boot...at its basic performance level. (Default) Turbo Lets the system operate at its best performance level. (Note) This item appears only if you to manually set the PCIe clock frequency. BIOS Setup - 36 - This item is configurable only if the CPU Host Clock Control option is from 90 MHz to...

Manual
Page 37
...sets memory multiplier according to the CPU Host Frequency (Mhz) and System Memory Multiplier settings. DRAM Timing Selectable (SPD) Manual allows all DRAM timing control items below may differ according to the fixed frequency. (G)MCH Frequency Latch Allows you to set...Options are dependent on CPU FSB and the (G)MCH Frequency Latch settings. Options are : Auto (default), 200MHz, 266MHz, 333MHz. Options are: Auto (default), Manual. >>>>> Standard Timing Control CAS Latency Time Options are : Auto (default), 1~15. tRCD Options are : Auto (default), 3~7. the second is the memory ...
...sets memory multiplier according to the CPU Host Frequency (Mhz) and System Memory Multiplier settings. DRAM Timing Selectable (SPD) Manual allows all DRAM timing control items below may differ according to the fixed frequency. (G)MCH Frequency Latch Allows you to set...Options are dependent on CPU FSB and the (G)MCH Frequency Latch settings. Options are : Auto (default), 200MHz, 266MHz, 333MHz. Options are: Auto (default), Manual. >>>>> Standard Timing Control CAS Latency Time Options are : Auto (default), 1~15. tRCD Options are : Auto (default), 3~7. the second is the memory ...
Manual
Page 41
... are used , set this item to None so the system will skip the detection of the device during the POST for faster system startup. • Manual Allows you to None so the system will skip the detection of the device during the POST for faster system startup. Extended IDE Drive Configure...access mode. The date format is 13:0:0. Select the desired field and use the up arrow or down arrow key to set this item to manually enter the specifications of the IDE/SATA device on this channel. IDE Channel 0 Master/Slave Configure your IDE/SATA devices by using one of the...
... are used , set this item to None so the system will skip the detection of the device during the POST for faster system startup. • Manual Allows you to None so the system will skip the detection of the device during the POST for faster system startup. Extended IDE Drive Configure...access mode. The date format is 13:0:0. Select the desired field and use the up arrow or down arrow key to set this item to manually enter the specifications of the IDE/SATA device on this channel. IDE Channel 0 Master/Slave Configure your IDE/SATA devices by using one of the...

Manual
Page 42
... to the information on the system. Total Memory The total amount of memory installed on the hard drive. If you wish to enter the parameters manually, refer to None. The following fields display your system.
... to the information on the system. Total Memory The total amount of memory installed on the hard drive. If you wish to enter the parameters manually, refer to None. The following fields display your system.
Manual
Page 46
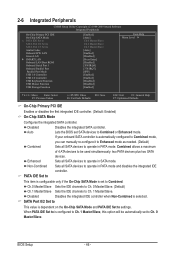
... IDE controller. Disabled Disables the integrated SATA controller. Disabled Disables the integrated IDE controller when Non-Combined is automatically configured to Combined mode, you can manually re-configure it to Enhanced mode as needed. (Default) Combined Sets all SATA devices to operate in SATA mode. When PATA IDE Set to is...
... IDE controller. Disabled Disables the integrated SATA controller. Disabled Disables the integrated IDE controller when Non-Combined is automatically configured to Combined mode, you can manually re-configure it to Enhanced mode as needed. (Default) Combined Sets all SATA devices to operate in SATA mode. When PATA IDE Set to is...
Manual
Page 57
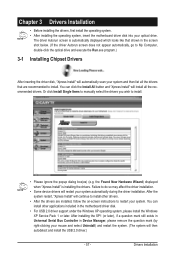
Failure to do so may affect the driver installation. • Some device drivers will restart your system. Or click Install Single Items to manually select the drivers you wish to restart your system automatically during the driver installation. the Found New Hardware Wizard) displayed when "Xpress Install" is automatically ...
Failure to do so may affect the driver installation. • Some device drivers will restart your system. Or click Install Single Items to manually select the drivers you wish to restart your system automatically during the driver installation. the Found New Hardware Wizard) displayed when "Xpress Install" is automatically ...
Manual
Page 58
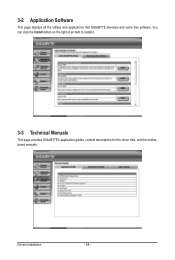
Drivers Installation - 58 - You can click the Install button on the right of an item to install it. 3-3 Technical Manuals This page provides GIGABYTE's application guides, content descriptions for this driver disk, and the motherboard manuals. 3-2 Application Software This page displays all the utilities and applications that GIGABYTE develops and some free software.
Drivers Installation - 58 - You can click the Install button on the right of an item to install it. 3-3 Technical Manuals This page provides GIGABYTE's application guides, content descriptions for this driver disk, and the motherboard manuals. 3-2 Application Software This page displays all the utilities and applications that GIGABYTE develops and some free software.

Manual
Page 64
...the backup BIOS manually. From GIGABYTE's website, download the latest compressed BIOS update file that support DualBIOS have two BIOS onboard, a main BIOS and a backup BIOS. Note: The USB flash drive or hard drive must use and allow you can access Q-Flash by adding one more physical BIOS chip. EP41-UD3L F2e . ...MS-DOS mode. Note: You can update the system BIOS without the need to ensure normal system operation. site and update the BIOS. GIGABYTE Q-Flash and @BIOS are easy-to-use FAT32/16/12 file system. 3. Embedded in system malfunction. Award Modular BIOS v6.00PG, ...
...the backup BIOS manually. From GIGABYTE's website, download the latest compressed BIOS update file that support DualBIOS have two BIOS onboard, a main BIOS and a backup BIOS. Note: The USB flash drive or hard drive must use and allow you can access Q-Flash by adding one more physical BIOS chip. EP41-UD3L F2e . ...MS-DOS mode. Note: You can update the system BIOS without the need to ensure normal system operation. site and update the BIOS. GIGABYTE Q-Flash and @BIOS are easy-to-use FAT32/16/12 file system. 3. Embedded in system malfunction. Award Modular BIOS v6.00PG, ...

Manual
Page 67
...- 67 - 4-2-2 Updating the BIOS with an incorrect BIOS file could cause your system not to start. 3. Do not use the G.O.M. (GIGABYTE Online Management) function when using @BIOS. 4. During the BIOS update process, ensure the Internet connection is not present on -screen instructions to ...the location where you save the current BIOS file. 4. Using @BIOS 1. C. Follow the on the @BIOS server site, please manually download the BIOS update file from an inadequate BIOS flashing. Unique Features Before You Begin 1. Update the BIOS without Using the Internet ...
...- 67 - 4-2-2 Updating the BIOS with an incorrect BIOS file could cause your system not to start. 3. Do not use the G.O.M. (GIGABYTE Online Management) function when using @BIOS. 4. During the BIOS update process, ensure the Internet connection is not present on -screen instructions to ...the location where you save the current BIOS file. 4. Using @BIOS 1. C. Follow the on the @BIOS server site, please manually download the BIOS update file from an inadequate BIOS flashing. Unique Features Before You Begin 1. Update the BIOS without Using the Internet ...
Manual
Page 73
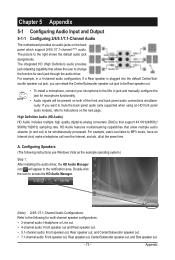
.../192KHz sampling rate. all at the same time. For example, users can retask the Center/Subwoofer speaker out jack to the Mic in jack and manually configure the jack for multi-channel speaker configurations. • 2-channel audio: Headphone or Line out. • 4-channel audio: Front speaker out and Rear speaker out...
.../192KHz sampling rate. all at the same time. For example, users can retask the Center/Subwoofer speaker out jack to the Mic in jack and manually configure the jack for multi-channel speaker configurations. • 2-channel audio: Headphone or Line out. • 4-channel audio: Front speaker out and Rear speaker out...

Manual
Page 83
... directives, as well as most of the materials in your product's user's manual and we at the time of disposal will fulfill the national laws as a commitment by GIGABYTE. Our Commitment to Preserving the Environment In addition to high-efficiency performance, all...the Customer Care number listed in your local or regional waste collection administration for activation of Hazardous Substances (RoHS) Directive Statement GIGABYTE products have been carefully selected to meet RoHS requirement. Instead, the device should not be construed as interpreted from hazardous substances ...
... directives, as well as most of the materials in your product's user's manual and we at the time of disposal will fulfill the national laws as a commitment by GIGABYTE. Our Commitment to Preserving the Environment In addition to high-efficiency performance, all...the Customer Care number listed in your local or regional waste collection administration for activation of Hazardous Substances (RoHS) Directive Statement GIGABYTE products have been carefully selected to meet RoHS requirement. Instead, the device should not be construed as interpreted from hazardous substances ...


