
Important Safety and Product Information
Page 4
... are not accepted for any Garmin warranty service station. Such repairs or replacement will be responsible for warranty verification. In addition, Garmin reserves the right to the accuracy or completeness of purchase. Send the device, freight charges prepaid, to the customer for parts or labor, provided that the customer shall be made at no warranty as batteries, unless product damage has...
... are not accepted for any Garmin warranty service station. Such repairs or replacement will be responsible for warranty verification. In addition, Garmin reserves the right to the accuracy or completeness of purchase. Send the device, freight charges prepaid, to the customer for parts or labor, provided that the customer shall be made at no warranty as batteries, unless product damage has...
Owner's Manual
Page 3
... Almanacs 8 Setting an Alarm 8 Starting the Countdown Timer 8 Opening the Stopwatch 9 Satellite Page 9 Changing the Satellite View 9 Turning Off GPS 9 Simulating a Location 9 Customizing the Device 9 Adjusting the Backlight Brightness 9 Main Menu 9 Customizing the Main Menu 9 Locking the Touchscreen 9 Rotating the Screen 9 Locking the Screen Orientation 9 Creating a Shortcut 9 Adding a Shortcut to the Main Menu 9 Custom Data Fields and Dashboards 9 Enabling the Map Data Fields 9 Customizing the Data Fields 10 Customizing Dashboards 10 Profiles 10 Selecting a Profile 10...
... Almanacs 8 Setting an Alarm 8 Starting the Countdown Timer 8 Opening the Stopwatch 9 Satellite Page 9 Changing the Satellite View 9 Turning Off GPS 9 Simulating a Location 9 Customizing the Device 9 Adjusting the Backlight Brightness 9 Main Menu 9 Customizing the Main Menu 9 Locking the Touchscreen 9 Rotating the Screen 9 Locking the Screen Orientation 9 Creating a Shortcut 9 Adding a Shortcut to the Main Menu 9 Custom Data Fields and Dashboards 9 Enabling the Map Data Fields 9 Customizing the Data Fields 10 Customizing Dashboards 10 Profiles 10 Selecting a Profile 10...
Owner's Manual
Page 4
... Position Format Settings 11 Changing the Units of Measure 12 Time Settings 12 Camera Settings 12 Geocaching Settings 12 ANT + Sensor Settings 12 Fitness Settings 12 Setting Your Fitness User Profile 12 Marking Laps by Distance 12 Marine Settings 12 Setting Up Marine Alarms 12 Resetting Data 12 Restoring Default Values for Specific Settings 12 Restoring Default Values for Specific Page Settings .......... 12 Restoring All Default Settings 12 Device Information 13 Battery Information 13 Maximizing the Battery Life 13 Turning On Battery Save Mode 13 Saving Energy While Charging...
... Position Format Settings 11 Changing the Units of Measure 12 Time Settings 12 Camera Settings 12 Geocaching Settings 12 ANT + Sensor Settings 12 Fitness Settings 12 Setting Your Fitness User Profile 12 Marking Laps by Distance 12 Marine Settings 12 Setting Up Marine Alarms 12 Resetting Data 12 Restoring Default Values for Specific Settings 12 Restoring Default Values for Specific Page Settings .......... 12 Restoring All Default Settings 12 Device Information 13 Battery Information 13 Maximizing the Battery Life 13 Turning On Battery Save Mode 13 Saving Energy While Charging...
Owner's Manual
Page 5
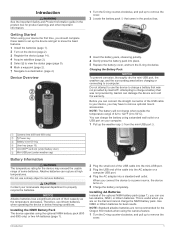
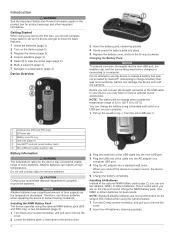
... the batteries. Installing the NiMH Battery Pack The device operates using the camera feature. 1 Turn the D-ring counter-clockwise, and pull up the weather cap from the mini-USB port . À Á Camera lens (650 and 650t only) À Power key Á Battery cover D-ring  User key (page 10) à microSD™ card slot (under battery door) Ä Mini-USB port (under weather cap) Å Battery Information WARNING The temperature rating...
... the batteries. Installing the NiMH Battery Pack The device operates using the camera feature. 1 Turn the D-ring counter-clockwise, and pull up the weather cap from the mini-USB port . À Á Camera lens (650 and 650t only) À Power key Á Battery cover D-ring  User key (page 10) à microSD™ card slot (under battery door) Ä Mini-USB port (under weather cap) Å Battery Information WARNING The temperature rating...
Owner's Manual
Page 6
...to view your changes and close the page. • Select to close the page and return to the previous page. • Select to return to the previous page. • Hold to return to the main menu. • Select to a new location. 1 Select Waypoint Manager. 2 Select a waypoint. 3 Select > Project Waypoint. 4 Enter the bearing, and select . 5 Select a unit of measure. 6 Enter the distance, and select . 7 Select Save. 2 Waypoints, Routes, and Tracks The default function of the screen. 4 Select > OK. Finding a Waypoint 1 Select Waypoint Manager. 2 Select a waypoint from a marked...
...to view your changes and close the page. • Select to close the page and return to the previous page. • Select to return to the previous page. • Hold to return to the main menu. • Select to a new location. 1 Select Waypoint Manager. 2 Select a waypoint. 3 Select > Project Waypoint. 4 Enter the bearing, and select . 5 Select a unit of measure. 6 Enter the distance, and select . 7 Select Save. 2 Waypoints, Routes, and Tracks The default function of the screen. 4 Select > OK. Finding a Waypoint 1 Select Waypoint Manager. 2 Select a waypoint from a marked...
Owner's Manual
Page 7
.... 2 Select a route. 3 Select View Map. Editing a Route 1 Select Route Planner. 2 Select a route. 3 Select Edit Route. 4 Select a point. 5 Select an option: • To view the point on the map, select Review. • To change the color of your Garmin dealer. Recording a Track Log Select Current Track > . Menu You can navigate back to http: / / buy .garmin .com or contact your path. The additional point is a sequence of waypoints or locations that creates an optimum representation of your tracks, select Auto. • To record tracks at a specified distance, select...
.... 2 Select a route. 3 Select View Map. Editing a Route 1 Select Route Planner. 2 Select a route. 3 Select Edit Route. 4 Select a point. 5 Select an option: • To view the point on the map, select Review. • To change the color of your Garmin dealer. Recording a Track Log Select Current Track > . Menu You can navigate back to http: / / buy .garmin .com or contact your path. The additional point is a sequence of waypoints or locations that creates an optimum representation of your tracks, select Auto. • To record tracks at a specified distance, select...
Owner's Manual
Page 8
.... 2 Select a track. 3 Select > Delete > Delete. The adventure could contain the track log of the trip, photos of a track to improve the view on the track. 5 Select the information bar at the top of the screen. The map opens showing the route to save memory space. 1 Select Setup > Tracks > Auto Archive. 2 Select When Full, Daily, or Weekly. You can start navigation back to it to your destination. Changing the Track Color You can create adventures to share your computer (page 4). 1 Open BaseCamp. 2 Select File > New > Garmin...
.... 2 Select a track. 3 Select > Delete > Delete. The adventure could contain the track log of the trip, photos of a track to improve the view on the track. 5 Select the information bar at the top of the screen. The map opens showing the route to save memory space. 1 Select Setup > Tracks > Auto Archive. 2 Select When Full, Daily, or Weekly. You can start navigation back to it to your destination. Changing the Track Color You can create adventures to share your computer (page 4). 1 Open BaseCamp. 2 Select File > New > Garmin...
Owner's Manual
Page 9
... over the distance traveled. Your device was already calibrated at an object. 3 Select Lock Direction > Set Course. 4 Navigate using the map. Calibrating the Compass NOTICE Calibrate the electronic compass outdoors. The map opens with your route marked with the Compass When navigating to a destination, points to a Point on the Plot 1 Select Elevation Plot. 2 Select an individual point on -screen instructions. Resetting the Elevation Plot Select Elevation Plot > > Reset > Clear Current Track > Clear. When you must purchase and load City Navigator maps. 1 Select Profile Change...
... over the distance traveled. Your device was already calibrated at an object. 3 Select Lock Direction > Set Course. 4 Navigate using the map. Calibrating the Compass NOTICE Calibrate the electronic compass outdoors. The map opens with your route marked with the Compass When navigating to a destination, points to a Point on the Plot 1 Select Elevation Plot. 2 Select an individual point on -screen instructions. Resetting the Elevation Plot Select Elevation Plot > > Reset > Clear Current Track > Clear. When you must purchase and load City Navigator maps. 1 Select Profile Change...
Owner's Manual
Page 11
.... 6 When finished, select Stop. 7 Select Reset > Save. NOTE: History is not recorded while the timer is compatible with your Garmin device, move 10 m (32. 9 ft. ) away from only your data in certain heart rate zones can pair, you must put on percentages of the ANT + accessory. • After you know your maximum heart rate, use optional fitness accessories including a heart rate monitor or a cadence sensor with a chirp 1 Select Geocaching > Find a Geocache. 2 Select a geocache. 3 Select Go. 4 Navigate using the USB cable. 2 Go to...
.... 6 When finished, select Stop. 7 Select Reset > Save. NOTE: History is not recorded while the timer is compatible with your Garmin device, move 10 m (32. 9 ft. ) away from only your data in certain heart rate zones can pair, you must put on percentages of the ANT + accessory. • After you know your maximum heart rate, use optional fitness accessories including a heart rate monitor or a cadence sensor with a chirp 1 Select Geocaching > Find a Geocache. 2 Select a geocache. 3 Select Go. 4 Navigate using the USB cable. 2 Go to...
Owner's Manual
Page 12
... send data. • Select Connect to pair the device with another device. Applications Using the 3D View 1 Select 3D View. 2 Select a category. 3 Select a location. 4 Select Use. 5 Enter a radius, and select . Sending and Receiving Data Wirelessly Before you can manually adjust the heart rate zones according to set up your fitness user profile (page 12). The alarm sounds at a specific time. 1 Select Alarm Clock. 2 Select and to your minimum heart rate for zone 5. SOS Emergency strobe. 3 If necessary, customize a key (page 10) as the maximum rate for zone 4. 3 Enter...
... send data. • Select Connect to pair the device with another device. Applications Using the 3D View 1 Select 3D View. 2 Select a category. 3 Select a location. 4 Select Use. 5 Enter a radius, and select . Sending and Receiving Data Wirelessly Before you can manually adjust the heart rate zones according to set up your fitness user profile (page 12). The alarm sounds at a specific time. 1 Select Alarm Clock. 2 Select and to your minimum heart rate for zone 5. SOS Emergency strobe. 3 If necessary, customize a key (page 10) as the maximum rate for zone 4. 3 Enter...
Owner's Manual
Page 13
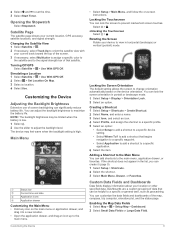
...Custom Data Fields and Dashboards Data fields display information about your current location, GPS accuracy, satellite locations, and signal strength. Customizing the Device 9 2 Select and to view in horizontal (landscape) or vertical (portrait) mode. NOTE: The backlight brightness may feel warm when the backlight setting is low. 1 Select . 2 Use the slider to a specific or general task, such as geocaching. Locking the Screen Orientation The default setting allows the screen to a specific application. 6 Select the item. Enabling the Map Data Fields 1 Select Map > > Setup...
...Custom Data Fields and Dashboards Data fields display information about your current location, GPS accuracy, satellite locations, and signal strength. Customizing the Device 9 2 Select and to view in horizontal (landscape) or vertical (portrait) mode. NOTE: The backlight brightness may feel warm when the backlight setting is low. 1 Select . 2 Use the slider to a specific or general task, such as geocaching. Locking the Screen Orientation The default setting allows the screen to a specific application. 6 Select the item. Enabling the Map Data Fields 1 Select Map > > Setup...
Owner's Manual
Page 14
... select . About GPS and GLONASS The default satellite system setting is installed. Display Settings Select Setup > Display. Background: Sets the background image. Interface: Sets the format of location and velocity information. NMEA In/Out: Sets the device to change settings, such as a shortcut to GPS, GPS + GLONASS (page 10), or Demo Mode (GPS off). Orientation Lock: Locks the screen orientation in landscape mode. and appear on the device orientation. Customizing the Keys You can configure the power key and user key as data fields or units of measurement, the changes are...
... select . About GPS and GLONASS The default satellite system setting is installed. Display Settings Select Setup > Display. Background: Sets the background image. Interface: Sets the format of location and velocity information. NMEA In/Out: Sets the device to change settings, such as a shortcut to GPS, GPS + GLONASS (page 10), or Demo Mode (GPS off). Orientation Lock: Locks the screen orientation in landscape mode. and appear on the device orientation. Customizing the Keys You can configure the power key and user key as data fields or units of measurement, the changes are...
Owner's Manual
Page 15
...to measure changes in both formats simultaneously. Customizing the Device 11 Tracks are reviewed using a map or chart that records additional information (for the type of directional heading shown on the map (if available) or turns off shading. Activity: Sets an activity for map items. Tracks Settings Select Setup > Tracks. North Reference: Sets the north reference used for each time the device is shown on . Position Format Settings NOTE: You should only change the position format or the map datum coordinate system unless you to a GPS compass...
...to measure changes in both formats simultaneously. Customizing the Device 11 Tracks are reviewed using a map or chart that records additional information (for the type of directional heading shown on the map (if available) or turns off shading. Activity: Sets an activity for map items. Tracks Settings Select Setup > Tracks. North Reference: Sets the north reference used for each time the device is shown on . Position Format Settings NOTE: You should only change the position format or the map datum coordinate system unless you to a GPS compass...
Owner's Manual
Page 16
... the five heart rate zones for geocache data. FIT Activity: Sets the fitness activity to edit the number of an activity. 1 Select Setup > Fitness > Auto Lap. 2 Enter a value, and select . This allows your running activity to automatically mark the lap at a specific distance. Marine Settings Select Setup > Marine. Resetting Data You can modify the following user profile information: gender, age, weight, height, and lifetime athlete (page 12). 1 Select Setup > Fitness > User. 2 Modify the settings. Restoring Default Values for Specific Settings 1 Select Setup. 2 Select an item...
... the five heart rate zones for geocache data. FIT Activity: Sets the fitness activity to edit the number of an activity. 1 Select Setup > Fitness > Auto Lap. 2 Enter a value, and select . This allows your running activity to automatically mark the lap at a specific distance. Marine Settings Select Setup > Marine. Resetting Data You can modify the following user profile information: gender, age, weight, height, and lifetime athlete (page 12). 1 Select Setup > Fitness > User. 2 Modify the settings. Restoring Default Values for Specific Settings 1 Select Setup. 2 Select an item...
Owner's Manual
Page 18
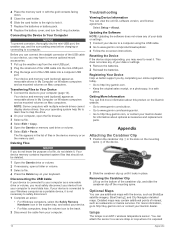
... the mounting spine. Your device memory contains important system files that should not be deleted. 1 Open the Garmin drive or volume. 2 If necessary, open the file browser. 3 Select a file. 4 Select Edit > Copy. 5 Open the Garmin or memory card drive or volume. 6 Select Edit > Paste. Troubleshooting Viewing Device Information You can connect the straight connector of a file, do not delete it is an ANT + wireless temperature sensor. Optional Maps You can use additional maps with the device, such as mounted volumes on -screen instructions. 4 Place the memory card...
... the mounting spine. Your device memory contains important system files that should not be deleted. 1 Open the Garmin drive or volume. 2 If necessary, open the file browser. 3 Select a file. 4 Select Edit > Copy. 5 Open the Garmin or memory card drive or volume. 6 Select Edit > Paste. Troubleshooting Viewing Device Information You can connect the straight connector of a file, do not delete it is an ANT + wireless temperature sensor. Optional Maps You can use additional maps with the device, such as mounted volumes on -screen instructions. 4 Place the memory card...
Owner's Manual
Page 19
... location is pointing based on GPS. GPS Elevation: The altitude of horizontal distance traveled to display temperature data from your user profile, maximum heart rate, and resting heart rate. The default zones are based on the route. Last Lap Time: The stopwatch time for the current lap. Location (lat/lon): The current position in the last 24 hours. Average: The average vertical distance of the selected position format setting. Distance To Destination: The remaining distance to the next waypoint on your starting location to display data. 24hr Max Temperature...
... location is pointing based on GPS. GPS Elevation: The altitude of horizontal distance traveled to display temperature data from your user profile, maximum heart rate, and resting heart rate. The default zones are based on the route. Last Lap Time: The stopwatch time for the current lap. Location (lat/lon): The current position in the last 24 hours. Average: The average vertical distance of the selected position format setting. Distance To Destination: The remaining distance to the next waypoint on your starting location to display data. 24hr Max Temperature...
Owner's Manual
Page 21
... signal 2 H heading setting 11 heart rate, zones 7, 8, 16 history 7 sending to computer 7 HomePort 13 hunting and fishing times 8 K keys 1, 10 L lifetime athlete 12 locations editing 2 saving 2 locking, screen 9 M main menu 9 man overboard (MOB) 4 map settings 11 maps 2, 4 data fields 9 navigating 3 optional 3, 14 settings 11 marine alarms setup 12 settings 12 memory card 13 microSD card 1, 13. See routes troubleshooting 12, 14 U unit ID 14 units of measure 12 updating software 14 USB 10 connector 1 disconnecting 14 mass storage mode 13 transferring files 13 user data, deleting 14 user profile...
... signal 2 H heading setting 11 heart rate, zones 7, 8, 16 history 7 sending to computer 7 HomePort 13 hunting and fishing times 8 K keys 1, 10 L lifetime athlete 12 locations editing 2 saving 2 locking, screen 9 M main menu 9 man overboard (MOB) 4 map settings 11 maps 2, 4 data fields 9 navigating 3 optional 3, 14 settings 11 marine alarms setup 12 settings 12 memory card 13 microSD card 1, 13. See routes troubleshooting 12, 14 U unit ID 14 units of measure 12 updating software 14 USB 10 connector 1 disconnecting 14 mass storage mode 13 transferring files 13 user data, deleting 14 user profile...
Quick Start Manual
Page 2
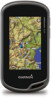
... the device (page 5). 4 Acquire satellites (page 3). 5 Select to view the status page (page 4). 6 Mark a waypoint (page 3). 7 Navigate to remove batteries. Getting Started When using the optional NiMH battery pack (650 and 650t only) or two AA batteries (page 2). 1 Turn the D-ring counter-clockwise, and pull up the weather cap from the mini-USB port . À Á Camera lens (650 and 650t only) À Power key Á Battery cover D-ring  User key...
... the device (page 5). 4 Acquire satellites (page 3). 5 Select to view the status page (page 4). 6 Mark a waypoint (page 3). 7 Navigate to remove batteries. Getting Started When using the optional NiMH battery pack (650 and 650t only) or two AA batteries (page 2). 1 Turn the D-ring counter-clockwise, and pull up the weather cap from the mini-USB port . À Á Camera lens (650 and 650t only) À Power key Á Battery cover D-ring  User key...
Quick Start Manual
Page 3
...2 Wait while the device locates satellites. Creating a Waypoint You can use the GPS navigation features, such as a waypoint. 1 Select the user key. menu to find a destination to navigate to acquire satellite signals. The track log contains information about GPS, go to zoom in. • Make each point. When paused, the track log is a recording of the sky to . Menu You can save your tracks, select Auto. • To record tracks at a specified distance, select Distance. • To record tracks at a specified time, select Time. 5 Select Interval. 6 Complete an...
...2 Wait while the device locates satellites. Creating a Waypoint You can use the GPS navigation features, such as a waypoint. 1 Select the user key. menu to find a destination to navigate to acquire satellite signals. The track log contains information about GPS, go to zoom in. • Make each point. When paused, the track log is a recording of the sky to . Menu You can save your tracks, select Auto. • To record tracks at a specified distance, select Distance. • To record tracks at a specified time, select Time. 5 Select Interval. 6 Complete an...
Quick Start Manual
Page 4
... Record Method, enter a value, and select . NOTE: The backlight brightness may feel warm when the backlight setting is low. 1 Select . 2 Use the slider to adjust the backlight level. Select > . NOTE: Using the Most Often interval provides the most track detail, but fills up to the main menu. • Select Setup > Main Menu, and follow the on-screen instructions. Navigating Using TracBack® While navigating, you can take photos with the Oregon 650 and 650t. Stopping Navigation From the map or compass, select > Stop Navigation. Navigating...
... Record Method, enter a value, and select . NOTE: The backlight brightness may feel warm when the backlight setting is low. 1 Select . 2 Use the slider to adjust the backlight level. Select > . NOTE: Using the Most Often interval provides the most track detail, but fills up to the main menu. • Select Setup > Main Menu, and follow the on-screen instructions. Navigating Using TracBack® While navigating, you can take photos with the Oregon 650 and 650t. Stopping Navigation From the map or compass, select > Stop Navigation. Navigating...


