Owner's Manual
Page 3
....garmin.com). Getting Started-introduces the main features of additional GPS 60 features, such as a calendar, best hunting and fishing times, sun and moon information, games, and more. Appendices-includes additional information about your GPS 60 handy and connect to keep your GPS 60 is lost, stolen, or needs service. Have the serial number of Contents, Garmin software license agreement, FCC compliance information, and safety warnings and precautions. This Owner's Manual...
....garmin.com). Getting Started-introduces the main features of additional GPS 60 features, such as a calendar, best hunting and fishing times, sun and moon information, games, and more. Appendices-includes additional information about your GPS 60 handy and connect to keep your GPS 60 is lost, stolen, or needs service. Have the serial number of Contents, Garmin software license agreement, FCC compliance information, and safety warnings and precautions. This Owner's Manual...

Owner's Manual
Page 4
... Key Functions 2 Start Up and Initialization 4 Initializing the GPS Receiver 4 The Main Page Sequence 5 Status Bar, Backlighting, and Contrast 6 The Satellite Page 7 GPS Navigation 7 The Map Page 8 Using the Map Page 8 Zooming and Panning 8 Changing the Map Page Display 9 Measuring Distance 11 Turning Declutter On/Off 11 The Compass Page 12 Using the Compass Page 12 The Trip Computer Page 14 Using the Trip Computer Page 14 iv The Main Menu Page 15 Waypoints 16 Creating Waypoints...
... Key Functions 2 Start Up and Initialization 4 Initializing the GPS Receiver 4 The Main Page Sequence 5 Status Bar, Backlighting, and Contrast 6 The Satellite Page 7 GPS Navigation 7 The Map Page 8 Using the Map Page 8 Zooming and Panning 8 Changing the Map Page Display 9 Measuring Distance 11 Turning Declutter On/Off 11 The Compass Page 12 Using the Compass Page 12 The Trip Computer Page 14 Using the Trip Computer Page 14 iv The Main Menu Page 15 Waypoints 16 Creating Waypoints...
Owner's Manual
Page 10
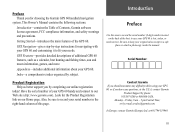
... page. Refer to the exclusion of safe driving practices. x Introduction Warnings and Precautions Important Because the Garmin GPS 60 can propel objects in an accident with the vehicle operating controls and safety devices, obstruct the driver's view of driving conditions, or cause damage or personal injury in a collision. Do not mount the unit in the vehicle owner's manual. WARNING: For use in vehicles...
... page. Refer to the exclusion of safe driving practices. x Introduction Warnings and Precautions Important Because the Garmin GPS 60 can propel objects in an accident with the vehicle operating controls and safety devices, obstruct the driver's view of driving conditions, or cause damage or personal injury in a collision. Do not mount the unit in the vehicle owner's manual. WARNING: For use in vehicles...

Owner's Manual
Page 11
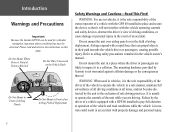
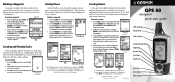
... fully charged batteries. To install batteries: 1. Locking Pin Slot USE BY: 2009 USE BY: 2009 Battery Compartment Getting Started Installing Batteries When replacing batteries, use of the cover to set the battery type). Storing batteries in the unit for prolonged periods may typically display lower capacity than disposable batteries. Rechargeable batteries may result in leaking and damage to lock. Do not incinerate used batteries, as internal materials may be used batteries. Remove the battery cover by connecting the bottom of backlighting...
... fully charged batteries. To install batteries: 1. Locking Pin Slot USE BY: 2009 USE BY: 2009 Battery Compartment Getting Started Installing Batteries When replacing batteries, use of the cover to set the battery type). Storing batteries in the unit for prolonged periods may typically display lower capacity than disposable batteries. Rechargeable batteries may result in leaking and damage to lock. Do not incinerate used batteries, as internal materials may be used batteries. Remove the battery cover by connecting the bottom of backlighting...

Owner's Manual
Page 14
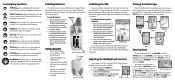
.... Once your GPS 60 has acquired satellites, your GPS 60 outside where it has a clear view of the sky and turn it on. To initialize the GPS 60: 1. Getting Started Start Up and Initialization Shows the status of the Shows the strength of each satellite Shows the position of each time you turn it on by pressing and releasing the POWER key. 2. The first time you initialize, the GPS 60 should initialize outdoors...
.... Once your GPS 60 has acquired satellites, your GPS 60 outside where it has a clear view of the sky and turn it on. To initialize the GPS 60: 1. Getting Started Start Up and Initialization Shows the status of the Shows the strength of each satellite Shows the position of each time you turn it on by pressing and releasing the POWER key. 2. The first time you initialize, the GPS 60 should initialize outdoors...

Owner's Manual
Page 16
... the screen contrast to change screen contrast. From any page, press and release the POWER key. 2. Screen Contrast Slider Screen Brightness Slider 6 Getting Started Status Bar, Backlighting, and Contrast Status Bar The Status Bar appears at the top of the each Main Page and contains icons that excessive use of backlighting can see below). Using Battery Power Using Auxiliary Power Acquiring Satellites 2-Dimensional Navigation 3-Dimensional Navigation Backlight is On Alarm is Set Connected with USB Status...
... the screen contrast to change screen contrast. From any page, press and release the POWER key. 2. Screen Contrast Slider Screen Brightness Slider 6 Getting Started Status Bar, Backlighting, and Contrast Status Bar The Status Bar appears at the top of the each Main Page and contains icons that excessive use of backlighting can see below). Using Battery Power Using Auxiliary Power Acquiring Satellites 2-Dimensional Navigation 3-Dimensional Navigation Backlight is On Alarm is Set Connected with USB Status...

Owner's Manual
Page 17
... Menu. Highlight 'Automatic' and press ENTER to let the GPS 60 determine your location, press ENTER. When you can tell the GPS 60 your position in coordinates appears at the bottom of the page. If you have trouble acquiring satellite signals, you can see a number of the page. Highlight 'Use Map' and press ENTER to point to your current location. GPS Navigation The Satellite Page The Satellite Page 7 An outlined bar means the GPS 60 is receiving...
... Menu. Highlight 'Automatic' and press ENTER to let the GPS 60 determine your location, press ENTER. When you can tell the GPS 60 your position in coordinates appears at the bottom of the page. If you have trouble acquiring satellite signals, you can see a number of the page. Highlight 'Use Map' and press ENTER to point to your current location. GPS Navigation The Satellite Page The Satellite Page 7 An outlined bar means the GPS 60 is receiving...

Owner's Manual
Page 22
... navigation. As you move , the dial rotates so you always know what direction is especially helpful when using a paper map along with your course of travel and keep headed toward your destination. This is North. You can customize which type of data you are traveling. The compass does not function as bearing, current speed, estimated arrival time, and more. You can choose between a Bearing Pointer or a Course Pointer...
... navigation. As you move , the dial rotates so you always know what direction is especially helpful when using a paper map along with your course of travel and keep headed toward your destination. This is North. You can customize which type of data you are traveling. The compass does not function as bearing, current speed, estimated arrival time, and more. You can choose between a Bearing Pointer or a Course Pointer...

Owner's Manual
Page 27
... Waypoint Information Page appears. The Map Page appears, showing a path from your current location and automatically creates a route back to that point, a message appears: 'Do you want to return to create a user waypoint here?' Creating a Man Overboard waypoint. 17 To create a MOB waypoint: 1. Use the path to navigate to the MOB point. GGPPSS NNaavvigigaatitoinon Waypoints Creating a waypoint with the map panning arrow: 1. MOB waypoints are especially useful if you cannot stop quickly, and you mark a MOB waypoint, the GPS 60 saves your current location...
... Waypoint Information Page appears. The Map Page appears, showing a path from your current location and automatically creates a route back to that point, a message appears: 'Do you want to return to create a user waypoint here?' Creating a Man Overboard waypoint. 17 To create a MOB waypoint: 1. Use the path to navigate to the MOB point. GGPPSS NNaavvigigaatitoinon Waypoints Creating a waypoint with the map panning arrow: 1. MOB waypoints are especially useful if you cannot stop quickly, and you mark a MOB waypoint, the GPS 60 saves your current location...

Owner's Manual
Page 28
... watch, notice that the number in the 'Estimated Accuracy' field decreases as the GPS 60 calculates a more accurate location for more instruction). 2. As you wait, the waypoint position becomes more accurate. Press MENU and select 'Average Location.' Editing a Waypoint You can change the waypoint name, map symbol, location coordi- Highlight 'Save' and press ENTER to find and view Waypoint Information Pages, see p. 23 for the waypoint. Press MARK to makes the waypoint location more accurate.
... watch, notice that the number in the 'Estimated Accuracy' field decreases as the GPS 60 calculates a more accurate location for more instruction). 2. As you wait, the waypoint position becomes more accurate. Press MENU and select 'Average Location.' Editing a Waypoint You can change the waypoint name, map symbol, location coordi- Highlight 'Save' and press ENTER to find and view Waypoint Information Pages, see p. 23 for the waypoint. Press MARK to makes the waypoint location more accurate.

Owner's Manual
Page 33
... a waypoint: 1. Use the ROCKER key to scroll up and down the list to locate waypoints quickly and easily. To edit the waypoint, highlight any field, press ENTER, and make changes. To create a route to display the Waypoints List. 2. Highlight 'Waypoints' and press ENTER to the waypoint, select 'Go To.' Press FIND to view the Waypoint Information Page Waypoint Information Page From this page, you can delete the waypoint, view it on the map other than your current location...
... a waypoint: 1. Use the ROCKER key to scroll up and down the list to locate waypoints quickly and easily. To edit the waypoint, highlight any field, press ENTER, and make changes. To create a route to display the Waypoints List. 2. Highlight 'Waypoints' and press ENTER to the waypoint, select 'Go To.' Press FIND to view the Waypoint Information Page Waypoint Information Page From this page, you can delete the waypoint, view it on the map other than your current location...

Owner's Manual
Page 48
..., highlight Highway on the graphical display, and you to stop navigating, change the way the Highway Page looks. As you navigate a route, the Highway Page displays each upcoming waypoint and visually guides you can zoom in mind that appear, or restore the default data field settings. From the Main Menu Page, highlight 'Highway' and press ENTER. 3. Create or open a saved route and begin navigating. 2. Press MENU to your destination.
..., highlight Highway on the graphical display, and you to stop navigating, change the way the Highway Page looks. As you navigate a route, the Highway Page displays each upcoming waypoint and visually guides you can zoom in mind that appear, or restore the default data field settings. From the Main Menu Page, highlight 'Highway' and press ENTER. 3. Create or open a saved route and begin navigating. 2. Press MENU to your destination.
Owner's Manual
Page 51
... the input/output format used when connecting your unit to a computer, external NMEA device, DGPS beacon receiver, or other device using a USB or Serial Port Cable. GARMIN DGPS-The proprietary format used to exchange waypoint, route, track log, and MapSource data with a Garmin differential beacon receiver (e.g., GBR 21). GGPPSS NNaavvigigaatitoinon The Setup Menu 41 The following settings are available: GARMIN-The proprietary format used with a PC. For instructions on changing backlight levels, and contrast, see p. 6. You can also change the brightness and contrast levels by...
... the input/output format used when connecting your unit to a computer, external NMEA device, DGPS beacon receiver, or other device using a USB or Serial Port Cable. GARMIN DGPS-The proprietary format used to exchange waypoint, route, track log, and MapSource data with a Garmin differential beacon receiver (e.g., GBR 21). GGPPSS NNaavvigigaatitoinon The Setup Menu 41 The following settings are available: GARMIN-The proprietary format used with a PC. For instructions on changing backlight levels, and contrast, see p. 6. You can also change the brightness and contrast levels by...

Owner's Manual
Page 55
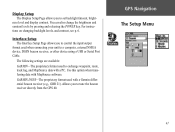
... you change map orientation, text size, track display, map item display, detailed map data display and more. To switch between pages. Auto Zoom automatically sets the map scale to move between Map Setup Pages, press the ROCKER key up until you are highlighted. Map Setup-General Settings The first page of the Map Setup feature is represented by an icon at the top of the screen are more familiar with the operation of the screen. Use...
... you change map orientation, text size, track display, map item display, detailed map data display and more. To switch between pages. Auto Zoom automatically sets the map scale to move between Map Setup Pages, press the ROCKER key up until you are highlighted. Map Setup-General Settings The first page of the Map Setup feature is represented by an icon at the top of the screen are more familiar with the operation of the screen. Use...

Owner's Manual
Page 64
... that these times are displayed in the date and location fields at the bottom of the item information page and press ENTER. Then press ENTER to the current date, press MENU and choose 'Current Location'. To return to display the table for a chosen date and location. When you with a listing of the options: Choose 'Use Map' to select a point from the Find Page (see p. 22 for instructions). From the...
... that these times are displayed in the date and location fields at the bottom of the item information page and press ENTER. Then press ENTER to the current date, press MENU and choose 'Current Location'. To return to display the table for a chosen date and location. When you with a listing of the options: Choose 'Use Map' to select a point from the Find Page (see p. 22 for instructions). From the...

Owner's Manual
Page 77
... GPS 60. Vertical Speed To Dest-The measurement of your rate of water at a measured depth using measurement devices interfaced to calculate your destination. Waypoint At Destination-The last point on your current speed and course of altitude gain/loss over water. Water Temperature-The temperature of accent to , the next turn on a destination based upon your route. Waypoint At Next-The next point on a route, your current speed over time. Vertical Speed-The rate of travel. Trip Time...
... GPS 60. Vertical Speed To Dest-The measurement of your rate of water at a measured depth using measurement devices interfaced to calculate your destination. Waypoint At Destination-The last point on your current speed and course of altitude gain/loss over water. Water Temperature-The temperature of accent to , the next turn on a destination based upon your route. Waypoint At Next-The next point on a route, your current speed over time. Vertical Speed-The rate of travel. Trip Time...
Owner's Manual
Page 81
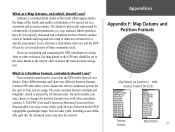
... charts use different location formats, Garmin GPS units allow you to choose the correct coordinate system for the advanced user), may choose to change the position format to -use metric grids that are found on a mathematical model of those commonly used. Your current location can be set to insure the most of the Earth. What are Map Datums, and which should I use? Position Formats Map Datums 71 Every chart has a map datum reference and the GPS 60 can be viewed...
... charts use different location formats, Garmin GPS units allow you to choose the correct coordinate system for the advanced user), may choose to change the position format to -use metric grids that are found on a mathematical model of those commonly used. Your current location can be set to insure the most of the Earth. What are Map Datums, and which should I use? Position Formats Map Datums 71 Every chart has a map datum reference and the GPS 60 can be viewed...

Owner's Manual
Page 86
... 8 Map Setup 45 general 45 information 46 points 46 text 46 tracks 46 Mark Key 2 Measuring Distance 11 Memory Race 55 MENU Key 2 N Nibbons 57 76 P PAGE Key 2 Page Sequence changing 44 Panning 8 Points of Interest (POI) finding 26 loading data 69 Points of points 35 changing route transition 37 creating 33 creating from a 'Go To' 34 deleting 36 editing 35 removing a waypoint 35 replacing points 36 stop navigating 34 Route Transition 37 S Satellite Page 4, 5, 7 choosing new location 7 Saving Battery Life 39 Serial Data Format 43 Serial Port 68 Setup Menu...
... 8 Map Setup 45 general 45 information 46 points 46 text 46 tracks 46 Mark Key 2 Measuring Distance 11 Memory Race 55 MENU Key 2 N Nibbons 57 76 P PAGE Key 2 Page Sequence changing 44 Panning 8 Points of Interest (POI) finding 26 loading data 69 Points of points 35 changing route transition 37 creating 33 creating from a 'Go To' 34 deleting 36 editing 35 removing a waypoint 35 replacing points 36 stop navigating 34 Route Transition 37 S Satellite Page 4, 5, 7 choosing new location 7 Saving Battery Life 39 Serial Data Format 43 Serial Port 68 Setup Menu...
Quick Start Guide
Page 1
... GPS 60 automatically creates tracks as a dark line from the Point Information Page to add the point to zoom in Taiwan GPS 60 navigator quick start guide GPS Antenna Power Key LCD Display In/Out (Zoom) Keys Page Key Rocker Key Find Key Mark Key Quit Key Enter Key Menu Key Walk away from one point to your route (see "Creating Routes"). Press PAGE until you have found a point, select 'Use' from your current location to your route. Then press ENTER again to view the waypoint on the map. Adding a waypoint to a route Map Page Compass Page Trip...
... GPS 60 automatically creates tracks as a dark line from the Point Information Page to add the point to zoom in Taiwan GPS 60 navigator quick start guide GPS Antenna Power Key LCD Display In/Out (Zoom) Keys Page Key Rocker Key Find Key Mark Key Quit Key Enter Key Menu Key Walk away from one point to your route (see "Creating Routes"). Press PAGE until you have found a point, select 'Use' from your current location to your route. Then press ENTER again to view the waypoint on the map. Adding a waypoint to a route Map Page Compass Page Trip...
Quick Start Guide
Page 2
... Viewing the Main Pages Your GPS 60 shows all the information you can begin using your GPS 60 clearly, adjust the brightness and contrast of the page. Satellite Page Trip Computer Page Map Page Main Menu Page Entering Data Compass Page To enter or change the screen contrast. When you want to your current location as a waypoint. PAGE PAGE Key-Press and release to navigate on . Battery Compartment D-Ring Battery Cover Initializing the GPS Before you need to set the battery type...
... Viewing the Main Pages Your GPS 60 shows all the information you can begin using your GPS 60 clearly, adjust the brightness and contrast of the page. Satellite Page Trip Computer Page Map Page Main Menu Page Entering Data Compass Page To enter or change the screen contrast. When you want to your current location as a waypoint. PAGE PAGE Key-Press and release to navigate on . Battery Compartment D-Ring Battery Cover Initializing the GPS Before you need to set the battery type...


