Owner's Manual
Page 5
... Settings 46 Map Setup-Text Settings 46 Map Setup-Information Settings 46 Geocache Setup 47 Marine Setup 47 Time Setup 48 Units Setup 48 Heading Setup 49 Welcome Page Setup 49 GPS Features 50 Calendar 50 Alarm Clock and Calculator 51 Stopwatch 52 Sun and Moon 53 Hunt and Fish 54 Introduction...
... Settings 46 Map Setup-Text Settings 46 Map Setup-Information Settings 46 Geocache Setup 47 Marine Setup 47 Time Setup 48 Units Setup 48 Heading Setup 49 Welcome Page Setup 49 GPS Features 50 Calendar 50 Alarm Clock and Calculator 51 Stopwatch 52 Sun and Moon 53 Hunt and Fish 54 Introduction...

Owner's Manual
Page 6
... or any part thereof or create any country in the normal operation of Garmin and that the Software is the property of Garmin and is protected under the United States of Garmin. Introduction Software License Agreement Software License Agreement BY USING THE GPS 60, YOU AGREE TO BE BOUND BY THE TERMS AND CONDITIONS OF THE...
... or any part thereof or create any country in the normal operation of Garmin and that the Software is the property of Garmin and is protected under the United States of Garmin. Introduction Software License Agreement Software License Agreement BY USING THE GPS 60, YOU AGREE TO BE BOUND BY THE TERMS AND CONDITIONS OF THE...
Owner's Manual
Page 9
... at a reasonable cost. WARNING: This product, its packaging, and its accuracy and maintenance. WARNING: The Global Positioning System (GPS) is operated by the United States government, which we identify as required in accordance with the most complete and accurate cartography that is available to cause cancer,... to the consumer. If you have any NAVAID can be misused or misinterpreted and, therefore, become unsafe. Although the Garmin GPS 60 is a precision electronic NAVigation AID (NAVAID), any questions or would like additional information, please refer to some degree.
... at a reasonable cost. WARNING: This product, its packaging, and its accuracy and maintenance. WARNING: The Global Positioning System (GPS) is operated by the United States government, which we identify as required in accordance with the most complete and accurate cartography that is available to cause cancer,... to the consumer. If you have any NAVAID can be misused or misinterpreted and, therefore, become unsafe. Although the Garmin GPS 60 is a precision electronic NAVigation AID (NAVAID), any questions or would like additional information, please refer to some degree.
Owner's Manual
Page 10
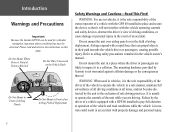
...in vehicles, it is the sole responsibility of the owner/operator of a vehicle with the GPS 60 installed to the exclusion of safe driving practices. The mounting hardware provided by Garmin is not warranted against collision damage or the consequences thereof. WARNING: When used for vehicular ...of all driving conditions at all times, and not become distracted by the unit to place and secure the device so that can be observed. Introduction Warnings and Precautions Important Because the Garmin GPS 60 can propel objects in the field of airbag deployment. Do not mount...
...in vehicles, it is the sole responsibility of the owner/operator of a vehicle with the GPS 60 installed to the exclusion of safe driving practices. The mounting hardware provided by Garmin is not warranted against collision damage or the consequences thereof. WARNING: When used for vehicular ...of all driving conditions at all times, and not become distracted by the unit to place and secure the device so that can be observed. Introduction Warnings and Precautions Important Because the Garmin GPS 60 can propel objects in the field of airbag deployment. Do not mount...

Owner's Manual
Page 11
Alkaline or NiMH batteries may ignite with explosive violence. Remove the batteries from the unit if you don't plan to use it 1/4 turn the D-ring clockwise to the battery compartment. Follow the manufacturer's instructions for proper care and disposal of ... cover by lifting up on saving battery life, see p. 40 to the bottom of the cover to set the battery type). Storing batteries in the unit for several months. Press the cover closed and turn counterclockwise, and then pulling the cover away. 2. Installing the Batteries The...
Alkaline or NiMH batteries may ignite with explosive violence. Remove the batteries from the unit if you don't plan to use it 1/4 turn the D-ring clockwise to the battery compartment. Follow the manufacturer's instructions for proper care and disposal of ... cover by lifting up on saving battery life, see p. 40 to the bottom of the cover to set the battery type). Storing batteries in the unit for several months. Press the cover closed and turn counterclockwise, and then pulling the cover away. 2. Installing the Batteries The...
Owner's Manual
Page 12
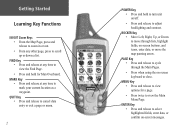
ROCKER Key • Move Left, Right, Up, or Down to view the Find Page. • Press and hold to turn unit on/off. • Press and release to close. FIND Key • Press and release at any time to view the Main Menu Page. QUIT Key &#...8226; Press and release to cancel data entry or exit a page or menu. 2 GPS 60 IN FIND OUT PAGE MARK QUIT MENU ENTER POWER Key • Press and hold for a page. • Press twice to mark your current location as...
ROCKER Key • Move Left, Right, Up, or Down to view the Find Page. • Press and hold to turn unit on/off. • Press and release to close. FIND Key • Press and release at any time to view the Main Menu Page. QUIT Key &#...8226; Press and release to cancel data entry or exit a page or menu. 2 GPS 60 IN FIND OUT PAGE MARK QUIT MENU ENTER POWER Key • Press and hold for a page. • Press twice to mark your current location as...

Owner's Manual
Page 14
...The first time you turn on the unit, you see p. 7. 4 Once you initialize, the GPS 60 should find satellite signals quickly each satellite The Satellite Page Initializing the GPS Receiver Each time you turn on the GPS 60, it on the GPS 60, try moving away from obstructions. Take your ...tree cover, so you last turned on . While the unit is searching, you must wait for the GPS to receive and store satellite information and begin searching for satellite signals. Once your GPS 60 has acquired satellites, your GPS 60 outside where it has a clear view of each time ...
...The first time you turn on the unit, you see p. 7. 4 Once you initialize, the GPS 60 should find satellite signals quickly each satellite The Satellite Page Initializing the GPS Receiver Each time you turn on the GPS 60, it on the GPS 60, try moving away from obstructions. Take your ...tree cover, so you last turned on . While the unit is searching, you must wait for the GPS to receive and store satellite information and begin searching for satellite signals. Once your GPS 60 has acquired satellites, your GPS 60 outside where it has a clear view of each time ...
Owner's Manual
Page 51
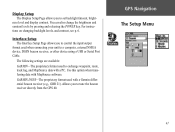
... and releasing the POWER key. Interface Setup The Interface Setup Page allows you to control the input/output format used when connecting your unit to tune the beacon receiver directly from the GPS 60. The following settings are available: GARMIN-The proprietary format used with a PC. Allows you to a computer, external NMEA device, DGPS beacon...
... and releasing the POWER key. Interface Setup The Interface Setup Page allows you to control the input/output format used when connecting your unit to tune the beacon receiver directly from the GPS 60. The following settings are available: GARMIN-The proprietary format used with a PC. Allows you to a computer, external NMEA device, DGPS beacon...
Owner's Manual
Page 54
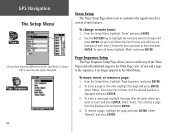
... the Main Menu. From the Setup Menu, highlight 'Tones' and press ENTER. 2. As you scroll down the list of tones, you to reorder any of unit features. Choose from the displayed list and press ENTER. 4. From the Setup Menu, highlight 'Page Sequence' and press ENTER. 2. Select 'Insert,' then choose a...To move , insert, or remove a page: 1. Choose the tone you want to hear and press ENTER. To mute all tones, highlight 'Mute' and press ENTER. GPS Navigation The Setup Menu Tones Setup The Tones Setup Page allows you to customize the signal tones for that field. To change and press...
... the Main Menu. From the Setup Menu, highlight 'Tones' and press ENTER. 2. As you scroll down the list of tones, you to reorder any of unit features. Choose from the displayed list and press ENTER. 4. From the Setup Menu, highlight 'Page Sequence' and press ENTER. 2. Select 'Insert,' then choose a...To move , insert, or remove a page: 1. Choose the tone you want to hear and press ENTER. To mute all tones, highlight 'Mute' and press ENTER. GPS Navigation The Setup Menu Tones Setup The Tones Setup Page allows you to customize the signal tones for that field. To change and press...

Owner's Manual
Page 55
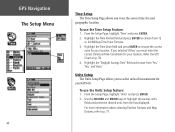
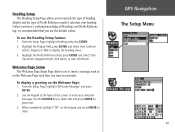
...press the ROCKER key right or left to wait until the icons at the top of the screen are more . GPS Navigation The Setup Menu Access the Map Setup menu from the Setup Page or from the Map Page menu. Each ... (see p. 9). To switch between pages. Map Setup-General 45 Using the Map Setup Feature The map display for your unit before you change Map Setup features. The Map Setup pages let you change map orientation, text size, track display, map item...the operation of a route. Use this page to include the beginning and ending points of your GPS 60 is user-configurable.
...press the ROCKER key right or left to wait until the icons at the top of the screen are more . GPS Navigation The Setup Menu Access the Map Setup menu from the Setup Page or from the Map Page menu. Each ... (see p. 9). To switch between pages. Map Setup-General 45 Using the Map Setup Feature The map display for your unit before you change Map Setup features. The Map Setup pages let you change map orientation, text size, track display, map item...the operation of a route. Use this page to include the beginning and ending points of your GPS 60 is user-configurable.
Owner's Manual
Page 58
...the lists displayed. From the Setup Page, highlight 'Units' and press ENTER. 2. Refer the UTC Chart on p. 70. 4. GPS Navigation The Setup Menu 48 Time Setup The Time ...Setup Page allows you to set the correct time for your location. Highlight the Time Zone field and press ENTER to select units of measurement for your location. Units Setup The Units..., refer to highlight the various units fields and select the desired units from 12 or 24 (Military Time) hour formats. 3. To use the Units Setup feature: 1. If you ...
...the lists displayed. From the Setup Page, highlight 'Units' and press ENTER. 2. Refer the UTC Chart on p. 70. 4. GPS Navigation The Setup Menu 48 Time Setup The Time ...Setup Page allows you to set the correct time for your location. Highlight the Time Zone field and press ENTER to select units of measurement for your location. Units Setup The Units..., refer to highlight the various units fields and select the desired units from 12 or 24 (Military Time) hour formats. 3. To use the Units Setup feature: 1. If you ...
Owner's Manual
Page 59
... you to specify the type of heading display and the type of North Reference used to calculate your welcome message. To display a greeting on your unit. When completed, highlight "OK" on the keypad and press ENTER to place text. 3. Highlight the Display field, press ENTER and select from True North..., press ENTER and select from Cardinal Letters, Degrees or Mils to display the heading value. 3. From the Setup Page, highlight 'Welcome Message' and press ENTER. 2. GPS Navigation The Setup Menu 49
... you to specify the type of heading display and the type of North Reference used to calculate your welcome message. To display a greeting on your unit. When completed, highlight "OK" on the keypad and press ENTER to place text. 3. Highlight the Display field, press ENTER and select from True North..., press ENTER and select from Cardinal Letters, Degrees or Mils to display the heading value. 3. From the Setup Page, highlight 'Welcome Message' and press ENTER. 2. GPS Navigation The Setup Menu 49
Owner's Manual
Page 61
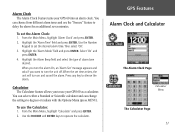
... degrees or radians with the Options Menu (press MENU). Use the ROCKER and ENTER keys to silence the alarm. To set time arrives, the unit will turn the alarm On, an 'Alarm Set' message appears and asks if you to set the desired alarm time. Highlight the Alarm Beep ... Alarm Clock: 1. Press any key to operate the calculator. Use the Number Keypad to use the Calculator: 1. Alarm Clock The Alarm Clock Feature turns your GPS 60 as a calculator. Then select 'OK.' 3. Select 'On' and press ENTER. 4. When you turn on and sound the alarm. From the Main Menu, highlight '...
... degrees or radians with the Options Menu (press MENU). Use the ROCKER and ENTER keys to silence the alarm. To set time arrives, the unit will turn the alarm On, an 'Alarm Set' message appears and asks if you to set the desired alarm time. Highlight the Alarm Beep ... Alarm Clock: 1. Press any key to operate the calculator. Use the Number Keypad to use the Calculator: 1. Alarm Clock The Alarm Clock Feature turns your GPS 60 as a calculator. Then select 'OK.' 3. Select 'On' and press ENTER. 4. When you turn on and sound the alarm. From the Main Menu, highlight '...
Owner's Manual
Page 62
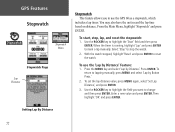
You may also have the unit record the lap time based on distance. From the Main Menu, highlight 'Stopwatch' and ... Use the ROCKER key to highlight the field you to use the 'Lap by Button Press.' 2. GPS Features Stopwatch Stopwatch Menu Stopwatch Page Lap Distance Stopwatch This feature allows you want to change and then press ENTER.... With the watch stopped, highlight 'Reset' and press ENTER to reset the watch . 2. To use the GPS 60 as a stopwatch, which includes a lap timer. To set the lap distance value, press MENU again, select 'Set Lap Distance...
You may also have the unit record the lap time based on distance. From the Main Menu, highlight 'Stopwatch' and ... Use the ROCKER key to highlight the field you to use the 'Lap by Button Press.' 2. GPS Features Stopwatch Stopwatch Menu Stopwatch Page Lap Distance Stopwatch This feature allows you want to change and then press ENTER.... With the watch stopped, highlight 'Reset' and press ENTER to reset the watch . 2. To use the GPS 60 as a stopwatch, which includes a lap timer. To set the lap distance value, press MENU again, select 'Set Lap Distance...
Owner's Manual
Page 69
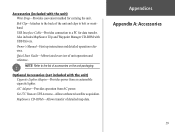
... A/C Adapter-Provides operation from an automobile cigarette lighter. Also includes MapSource Trip and Waypoint Manager CD-ROM with the unit) Cigarette Lighter Adapter-Provides power from AC power. Optional Accessories (not included with USB Drivers. Owner's Manual-Start ...PC for carrying the unit. Belt Clip-Attaches to belt or waistband. MapSource CD-ROMs-Allows transfer of the unit and clips to the back of detailed map data. Accessories (included with the unit) Wrist Strap-Provides convenient method for data transfer. GA 27C Remote GPS Antenna-Allows enhanced satellite...
... A/C Adapter-Provides operation from an automobile cigarette lighter. Also includes MapSource Trip and Waypoint Manager CD-ROM with the unit) Cigarette Lighter Adapter-Provides power from AC power. Optional Accessories (not included with USB Drivers. Owner's Manual-Start ...PC for carrying the unit. Belt Clip-Attaches to belt or waistband. MapSource CD-ROMs-Allows transfer of the unit and clips to the back of detailed map data. Accessories (included with the unit) Wrist Strap-Provides convenient method for data transfer. GA 27C Remote GPS Antenna-Allows enhanced satellite...
Owner's Manual
Page 71
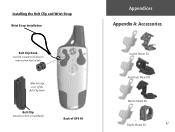
Installing the Belt Clip and Wrist Strap Wrist Strap Installation Belt Clip Knob twist left (counterclockwise) to remove from back of unit Slide belt clip on or off the Belt Clip Knob Belt Clip (attaches to belt or waistband) Back of GPS 60 Appendices Appendix A: Accessories Suction Mount Kit Auto Dash Mount Kit Marine Mount Kit Bicycle Mount Kit 61
Installing the Belt Clip and Wrist Strap Wrist Strap Installation Belt Clip Knob twist left (counterclockwise) to remove from back of unit Slide belt clip on or off the Belt Clip Knob Belt Clip (attaches to belt or waistband) Back of GPS 60 Appendices Appendix A: Accessories Suction Mount Kit Auto Dash Mount Kit Marine Mount Kit Bicycle Mount Kit 61

Owner's Manual
Page 77
... Temperature-The temperature of closure on a route, your destination. Vertical Speed To Dest-The measurement of accent to the GPS 60. Water Speed-The data acquired from measurement devices interfaced to the GPS 60 is used to , the next turn on your rate of your route. Appendices Appendix C: Data Field Options 67 Waypoint...direction of, and distance to calculate your current speed and course of altitude gain/loss over water. Trip Time-Total-The total time the unit has been tracking since the Trip Computer was reset. Waypoint At Next-The next point on an active route.
... Temperature-The temperature of closure on a route, your destination. Vertical Speed To Dest-The measurement of accent to the GPS 60. Water Speed-The data acquired from measurement devices interfaced to the GPS 60 is used to , the next turn on your rate of your route. Appendices Appendix C: Data Field Options 67 Waypoint...direction of, and distance to calculate your current speed and course of altitude gain/loss over water. Trip Time-Total-The total time the unit has been tracking since the Trip Computer was reset. Waypoint At Next-The next point on an active route.
Owner's Manual
Page 78
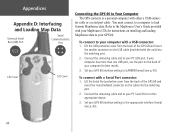
... GARMIN format (see p. 43). 68 Set your GPS 60 ...to your GPS 60. tor...2. Set your GPS 60 interface setting to...GPS 60 to Your Computer The GPS connects to a personal computer with your MapSource CDs for best results. 3. Refer to load Garmin... MapSource data. Connect the remaining cable end to the appropriate interface format (see p. 43). You must connect to a computer to the MapSource User's Guide provided with either a USB connec- Lift the USB protective cover from the back of the GPS 60... and insert the round indexed connector on the back of the GPS 60 and insert the ...
... GARMIN format (see p. 43). 68 Set your GPS 60 ...to your GPS 60. tor...2. Set your GPS 60 interface setting to...GPS 60 to Your Computer The GPS connects to a personal computer with your MapSource CDs for best results. 3. Refer to load Garmin... MapSource data. Connect the remaining cable end to the appropriate interface format (see p. 43). You must connect to a computer to the MapSource User's Guide provided with either a USB connec- Lift the USB protective cover from the back of the GPS 60... and insert the round indexed connector on the back of the GPS 60 and insert the ...
Owner's Manual
Page 81
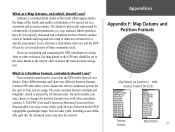
...most USGS topographic quadrangle maps. dinates. What are Map Datums, and which should I use different location formats, Garmin GPS units allow you to -use ? Lines of latitude and longitude on the GPS in a consistent and accurate manner. On most accurate navigation. trig. What is a mathematical model of the ... reference surface. Appendices Appendix F: Map Datums and Position Formats Map Datums are using. Every chart has a map datum reference and the GPS 60 can be set to the same datum as the map or chart to be selected. The datum is utilized by a framework of the...
...most USGS topographic quadrangle maps. dinates. What are Map Datums, and which should I use different location formats, Garmin GPS units allow you to -use ? Lines of latitude and longitude on the GPS in a consistent and accurate manner. On most accurate navigation. trig. What is a mathematical model of the ... reference surface. Appendices Appendix F: Map Datums and Position Formats Map Datums are using. Every chart has a map datum reference and the GPS 60 can be set to the same datum as the map or chart to be selected. The datum is utilized by a framework of the...

Owner's Manual
Page 83
Interface formats are selected from the GPS unit. Other beacon receivers with the GPS 60. The USB Interface Cable provided with this manual. The input/output lines on page 43 of external devices, including PC's, differential beacon receivers, marine autopilots and /or a second GPS receiver. The Garmin GBR 21 is supported by the GPS 60 and enables the unit to drive up to...
Interface formats are selected from the GPS unit. Other beacon receivers with the GPS 60. The USB Interface Cable provided with this manual. The input/output lines on page 43 of external devices, including PC's, differential beacon receivers, marine autopilots and /or a second GPS receiver. The Garmin GBR 21 is supported by the GPS 60 and enables the unit to drive up to...


