Owner's Manual
Page 3
...through the Quick Start Guide first, then this Owner's Manual to familiarize you for choosing the Garmin Foretrex 101. If any parts are missing, contact your new Foretrex 101 right out of the operating features. While the Owner's Manual provides some basic unit operations to understand all... Menu, and feature in the Main Menu: Waypoints, Tracks, Routes, and Setup. Read the Quick Start Guide first. The Appendix includes additional information about the Foretrex 101. i The Quick Start Guide describes the process of the Foretrex 101 and their options in the same order as ...
...through the Quick Start Guide first, then this Owner's Manual to familiarize you for choosing the Garmin Foretrex 101. If any parts are missing, contact your new Foretrex 101 right out of the operating features. While the Owner's Manual provides some basic unit operations to understand all... Menu, and feature in the Main Menu: Waypoints, Tracks, Routes, and Setup. Read the Quick Start Guide first. The Appendix includes additional information about the Foretrex 101. i The Quick Start Guide describes the process of the Foretrex 101 and their options in the same order as ...
Owner's Manual
Page 4
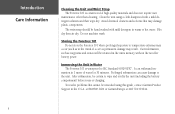
...of a car) as waypoints and routes will be remedied using a cloth dampened with mild detergent in 1 meter of high quality materials and does not require user maintenance other than cleaning. Introduction Care Information Cleaning the Unit and Wrist Strap The Foretrex 101 is waterproof to IEC... can withstand im- Clean the unit using this guide, contact Garmin Product Support in Water The Foretrex 101 is constructed of water for battery power. Do not machine wash. Storing the Foretrex 101 Do not store the Foretrex 101 where prolonged exposure to the unit. at 800/800.1020 or...
...of a car) as waypoints and routes will be remedied using a cloth dampened with mild detergent in 1 meter of high quality materials and does not require user maintenance other than cleaning. Introduction Care Information Cleaning the Unit and Wrist Strap The Foretrex 101 is waterproof to IEC... can withstand im- Clean the unit using this guide, contact Garmin Product Support in Water The Foretrex 101 is constructed of water for battery power. Do not machine wash. Storing the Foretrex 101 Do not store the Foretrex 101 where prolonged exposure to the unit. at 800/800.1020 or...
Owner's Manual
Page 5
...the Unit and Wrist Strap........... ii Storing the Foretrex 101 ii Immersing the Unit in Water ii Table of Contents iii Overview 1 Getting Started 1 Foretrex 101 Overview 1 Using the Buttons 2 Using the Wrist Strap 3 Installing Batteries 5 Turning on the Foretrex 101 6 Using the Main Pages 7 Switching Between ...Menu Pages 18 Main Menu Page 18 Main Menu Page Basics 18 Waypoints Menu Page 19 Waypoints Menu Page 19 Marking a Waypoint 21 Editing a Waypoint 21 Review Waypoint Page 24 Projecting a Waypoint 26 Hunting and Fishing Information.......... 27 Sun and Moon Information 28...
...the Unit and Wrist Strap........... ii Storing the Foretrex 101 ii Immersing the Unit in Water ii Table of Contents iii Overview 1 Getting Started 1 Foretrex 101 Overview 1 Using the Buttons 2 Using the Wrist Strap 3 Installing Batteries 5 Turning on the Foretrex 101 6 Using the Main Pages 7 Switching Between ...Menu Pages 18 Main Menu Page 18 Main Menu Page Basics 18 Waypoints Menu Page 19 Waypoints Menu Page 19 Marking a Waypoint 21 Editing a Waypoint 21 Review Waypoint Page 24 Projecting a Waypoint 26 Hunting and Fishing Information.......... 27 Sun and Moon Information 28...
Owner's Manual
Page 7
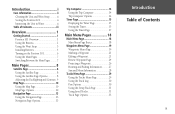
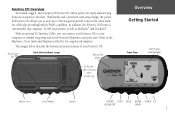
... providing built-in GPS Antenna PC Interface Cable Connector under weather cap Overview Getting Started Front View LCD Display (with Backlight) Battery Cover Serial Number Speaker POWER GOTO PAGE ENTER DOWN UP BACKLIGHT MARK 1 Foretrex 101 Overview Your small, rugged, and waterproof Foretrex 101 unit is perfect for easily maneuvering from one waypoint to the MapSource...
... providing built-in GPS Antenna PC Interface Cable Connector under weather cap Overview Getting Started Front View LCD Display (with Backlight) Battery Cover Serial Number Speaker POWER GOTO PAGE ENTER DOWN UP BACKLIGHT MARK 1 Foretrex 101 Overview Your small, rugged, and waterproof Foretrex 101 unit is perfect for easily maneuvering from one waypoint to the MapSource...

Owner's Manual
Page 8
... off • Press and release to turn display backlight on and off The GOTO button: • Press to initiate a Goto (navigate to a specific destination/waypoint) The PAGE button: • Press to switch between the Main Pages • Press to back out or escape out of the present page or screen...recent action on a page The ENTER/MARK button: • Press to confirm data entry or menu selection • Press and hold to mark a waypoint The UP/DOWN buttons: • Highlight options on pages and menus • Adjust display contrast on the Satellite Page • Zoom out (UP) and in...
... off • Press and release to turn display backlight on and off The GOTO button: • Press to initiate a Goto (navigate to a specific destination/waypoint) The PAGE button: • Press to switch between the Main Pages • Press to back out or escape out of the present page or screen...recent action on a page The ENTER/MARK button: • Press to confirm data entry or menu selection • Press and hold to mark a waypoint The UP/DOWN buttons: • Highlight options on pages and menus • Adjust display contrast on the Satellite Page • Zoom out (UP) and in...
Owner's Manual
Page 16
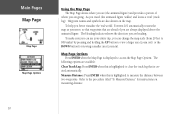
... feet to 800 miles) by pressing and holding the UP button to measure the distance between two waypoints. The Heading Indicator shows the direction you are also shown on measuring distance. 10 Waypoint names and symbols are heading. Map Page Options Press ENTER when the Map Page is highlighted to... displayed above the animated figure. Measure Distance: Press ENTER when this is created automatically. To help you better visualize the 'real world', Foretrex 101 automatically rotates the map as you move, so that waypoints that is highlighted to access the Map Page Options.
... feet to 800 miles) by pressing and holding the UP button to measure the distance between two waypoints. The Heading Indicator shows the direction you are also shown on measuring distance. 10 Waypoint names and symbols are heading. Map Page Options Press ENTER when the Map Page is highlighted to... displayed above the animated figure. Measure Distance: Press ENTER when this is created automatically. To help you better visualize the 'real world', Foretrex 101 automatically rotates the map as you move, so that waypoints that is highlighted to access the Map Page Options.
Owner's Manual
Page 17
... refers to any time you are actively navigating to a destination: Stop Navigation: Press ENTER when this is shown only if you are using the Foretrex to guide you have an active track log: Pan Track Log: Press ENTER when this is turned on, the map automatically adjusts its scale to... or Course): Toggles between Bearing (always directed at destination and follows you as you move the pointer to then start a TRACBACK or a Goto, MARK a waypoint, or ZOOM In or Out. When 'NORTHWARD' is selected, the map is turned off, you manually change the zoom level. Defaults: Press ENTER when this...
... refers to any time you are actively navigating to a destination: Stop Navigation: Press ENTER when this is shown only if you are using the Foretrex to guide you have an active track log: Pan Track Log: Press ENTER when this is turned on, the map automatically adjusts its scale to... or Course): Toggles between Bearing (always directed at destination and follows you as you move the pointer to then start a TRACBACK or a Goto, MARK a waypoint, or ZOOM In or Out. When 'NORTHWARD' is selected, the map is turned off, you manually change the zoom level. Defaults: Press ENTER when this...

Owner's Manual
Page 18
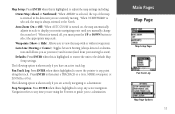
...and press ENTER when finished. To measure distance: 1. Press ENTER when the field to the right of 'TO' is highlighted to select a waypoint from the options menu. Press ENTER when the field to enter an estimated speed. Press ENTER. 3. The total distance between the two points and...from which to end the measurement. 5. Press ENTER to enter a new speed. Use the ENTER button and the UP and DOWN buttons to select the waypoint. 4. Press the ENTER button while on the Map Page to display the Map Page Options. 2. Press ENTER to display the Map Page Options. 2....
...and press ENTER when finished. To measure distance: 1. Press ENTER when the field to the right of 'TO' is highlighted to select a waypoint from the options menu. Press ENTER when the field to enter an estimated speed. Press ENTER. 3. The total distance between the two points and...from which to end the measurement. 5. Press ENTER to enter a new speed. Use the ENTER button and the UP and DOWN buttons to select the waypoint. 4. Press the ENTER button while on the Map Page to display the Map Page Options. 2. Press ENTER to display the Map Page Options. 2....

Owner's Manual
Page 24
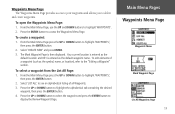
... the UP or DOWN buttons to highlight the desired sub-page (Waypoints, Tracks, Routes, or Setup), and press ENTER to highlight the desired Menu Page, such as 'WAYPOINTS'. 2. Waypoints Menu 18 The following Sub Pages are described in the following pages.... The Menu Pages and their options are available: Waypoints, Tracks, Routes, and Setup. To access a Menu Page: 1. The Main Menu Page also displays... access to access that page. Press the ENTER button to the Foretrex 101 unit's waypoints, tracks, routes, and setup screens.
... the UP or DOWN buttons to highlight the desired sub-page (Waypoints, Tracks, Routes, or Setup), and press ENTER to highlight the desired Menu Page, such as 'WAYPOINTS'. 2. Waypoints Menu 18 The following Sub Pages are described in the following pages.... The Menu Pages and their options are available: Waypoints, Tracks, Routes, and Setup. To access a Menu Page: 1. The Main Menu Page also displays... access to access that page. Press the ENTER button to the Foretrex 101 unit's waypoints, tracks, routes, and setup screens.
Owner's Manual
Page 25
.... Press the ENTER button to see an alphabetical listing of a waypoint (such as the default location and 001 is then displayed. Main Menu Pages Waypoints Menu Page Waypoints Menu Mark Waypoint Page List All Waypoints Page 19 The Mark Waypoint Page is entered as the default waypoint name. Your current location is entered as the symbol, name...
.... Press the ENTER button to see an alphabetical listing of a waypoint (such as the default location and 001 is then displayed. Main Menu Pages Waypoints Menu Page Waypoints Menu Mark Waypoint Page List All Waypoints Page 19 The Mark Waypoint Page is entered as the default waypoint name. Your current location is entered as the symbol, name...
Owner's Manual
Page 26
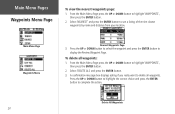
...the ENTER button to highlight 'WAYPOINTS', then press the ENTER button. 2. To delete all waypoints. Delete All Waypoints 20 Press the UP or DOWN button to select the waypoint and press the ENTER button to complete the action. Main Menu Page Waypoints Menu Nearest Waypoints Page 3. Press the UP... the ENTER button to display the Review Waypoint Page. A confirmation message box displays asking if you really want to highlight 'WAYPOINTS', then press the ENTER button. 2. Main Menu Pages Waypoints Menu Page To view the nearest waypoints page: 1. From the Main Menu Page...
...the ENTER button to highlight 'WAYPOINTS', then press the ENTER button. 2. To delete all waypoints. Delete All Waypoints 20 Press the UP or DOWN button to select the waypoint and press the ENTER button to complete the action. Main Menu Page Waypoints Menu Nearest Waypoints Page 3. Press the UP... the ENTER button to display the Review Waypoint Page. A confirmation message box displays asking if you really want to highlight 'WAYPOINTS', then press the ENTER button. 2. Main Menu Pages Waypoints Menu Page To view the nearest waypoints page: 1. From the Main Menu Page...

Owner's Manual
Page 27
... to define a location as a Waypoint, works well for geocaching. You may mark a waypoint one of the waypoint from the Waypoint Review Page instead of an existing waypoint using on of the above methods, the Mark Waypoint Page displays. Editing a Waypoint After you will be editing from this page. Select Waypoints and press ENTER. Select 'CREATE NEW...
... to define a location as a Waypoint, works well for geocaching. You may mark a waypoint one of the waypoint from the Waypoint Review Page instead of an existing waypoint using on of the above methods, the Mark Waypoint Page displays. Editing a Waypoint After you will be editing from this page. Select Waypoints and press ENTER. Select 'CREATE NEW...

Owner's Manual
Page 28
...button and highlight the symbol in the flag. 3. When the desired symbol is the default name for the waypoint name 6. Using the UP and DOWN buttons, scroll to display the Mark Waypoint Page. 2. Press the ENTER button to the desired letter or number and press enter. Selecting a character for the ...(001 is highlighted, press the ENTER button. Use the UP and DOWN buttons to highlight 'MARK'. Press the ENTER button to display the Edit Waypoint Name Page. 4. Press the ENTER button to display a drop-down list of characters. 5. Press the ENTER button to display the Mark...
...button and highlight the symbol in the flag. 3. When the desired symbol is the default name for the waypoint name 6. Using the UP and DOWN buttons, scroll to display the Mark Waypoint Page. 2. Press the ENTER button to the desired letter or number and press enter. Selecting a character for the ...(001 is highlighted, press the ENTER button. Use the UP and DOWN buttons to highlight 'MARK'. Press the ENTER button to display the Edit Waypoint Name Page. 4. Press the ENTER button to display a drop-down list of characters. 5. Press the ENTER button to display the Mark...

Owner's Manual
Page 29
... places using the UP or DOWN button (UP button to move right to left, DOWN button to move left to right). Main Menu Pages Waypoints Menu Page Mark Waypoint Page Enter Correct Elevation Page Edit Location Page 23 Press the ENTER button and the position place is now changed . 4. To change the... Edit Location Page. 3. Press the UP or DOWN button and highlight the 'LAT/LON' field and press the ENTER button to display the Mark Waypoint Page. 2. Press the UP or DOWN button to highlight 'OK' and press ENTER to return to select a new number and press the ENTER button. When...
... places using the UP or DOWN button (UP button to move right to left, DOWN button to move left to right). Main Menu Pages Waypoints Menu Page Mark Waypoint Page Enter Correct Elevation Page Edit Location Page 23 Press the ENTER button and the position place is now changed . 4. To change the... Edit Location Page. 3. Press the UP or DOWN button and highlight the 'LAT/LON' field and press the ENTER button to display the Mark Waypoint Page. 2. Press the UP or DOWN button to highlight 'OK' and press ENTER to return to select a new number and press the ENTER button. When...

Owner's Manual
Page 30
... you do not want to delete the waypoint. Press the ENTER button. 3. Waypoint on the Map Page, start a Goto, and display the Review Waypoint Page Options. Main Menu Pages Waypoints Menu Page Review Waypoint Page Delete Waypoint Page Review Waypoint Page The Review Waypoint Page allows you really want to delete the waypoint, press the UP or DOWN button...
... you do not want to delete the waypoint. Press the ENTER button. 3. Waypoint on the Map Page, start a Goto, and display the Review Waypoint Page Options. Main Menu Pages Waypoints Menu Page Review Waypoint Page Delete Waypoint Page Review Waypoint Page The Review Waypoint Page allows you really want to delete the waypoint, press the UP or DOWN button...
Owner's Manual
Page 31
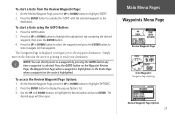
...NOTE: You can directly Goto to a waypoint by pressing the GOTO button any time a waypoint is selected: Press the GOTO button on the Waypoint Review Page, the Waypoint List Page when a waypoint is highlighted, or the Route Page when a waypoint on the route is displayed to navigate ...arrow is pointing to activate the 'GOTO' with the selected waypoint as the destination. Main Menu Pages Waypoints Menu Page Review Waypoint Page Goto Waypoint: Navigation Page displaying Review Waypoint Page Options 25 To access the Review Waypoint Page Options: 1. Press the ENTER button to reach your ...
...NOTE: You can directly Goto to a waypoint by pressing the GOTO button any time a waypoint is selected: Press the GOTO button on the Waypoint Review Page, the Waypoint List Page when a waypoint is highlighted, or the Route Page when a waypoint on the route is displayed to navigate ...arrow is pointing to activate the 'GOTO' with the selected waypoint as the destination. Main Menu Pages Waypoints Menu Page Review Waypoint Page Goto Waypoint: Navigation Page displaying Review Waypoint Page Options 25 To access the Review Waypoint Page Options: 1. Press the ENTER button to reach your ...

Owner's Manual
Page 32
... the Edit Number Page. Use the UP or DOWN button to the new waypoint and with the distance field highlighted. 3. Main Menu Pages Waypoints Menu Page Waypoint Options Project Waypoint Page Edit Number Page 26 Projecting a Waypoint Using the Project waypoint feature, the Foretrex 101 can create a waypoint at a specified distance and bearing using an existing...
... the Edit Number Page. Use the UP or DOWN button to the new waypoint and with the distance field highlighted. 3. Main Menu Pages Waypoints Menu Page Waypoint Options Project Waypoint Page Edit Number Page 26 Projecting a Waypoint Using the Project waypoint feature, the Foretrex 101 can create a waypoint at a specified distance and bearing using an existing...

Owner's Manual
Page 33
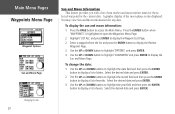
... highlight 'OPTIONS' and press ENTER. 3. But, be certain that they are the recognized best and good times for the chosen waypoint and date. Press the ENTER button when 'WAYPOINTS' is your responsibility to display a list of best times for hunting and fishing for hunting and fishing. Select ... buttons to highlight the year field and then press the ENTER button to know and abide by these laws. Main Menu Pages Waypoints Menu Page Waypoint Options Hunt and Fish Page Changing the date 27 NOTE: The times displayed are not in conflict with a listing of years...
... highlight 'OPTIONS' and press ENTER. 3. But, be certain that they are the recognized best and good times for the chosen waypoint and date. Press the ENTER button when 'WAYPOINTS' is your responsibility to display a list of best times for hunting and fishing for hunting and fishing. Select ... buttons to highlight the year field and then press the ENTER button to know and abide by these laws. Main Menu Pages Waypoints Menu Page Waypoint Options Hunt and Fish Page Changing the date 27 NOTE: The times displayed are not in conflict with a listing of years...
Owner's Manual
Page 34
... provides you with a list of dates. Press the PAGE button to open the Waypoints Menu Page. 2. Press the ENTER button when 'WAYPOINTS' is also displayed. Use the UP and DOWN buttons to highlight the date &#...the month field and then press the ENTER button to display the Review Waypoint Page. 2. To display the sun and moon information: 1. You may view Sun and Moon information for the... current date. lected waypoint for any date. Use the UP or DOWN button to highlight 'SUN/MOON' and press ENTER...
... provides you with a list of dates. Press the PAGE button to open the Waypoints Menu Page. 2. Press the ENTER button when 'WAYPOINTS' is also displayed. Use the UP and DOWN buttons to highlight the date &#...the month field and then press the ENTER button to display the Review Waypoint Page. 2. To display the sun and moon information: 1. You may view Sun and Moon information for the... current date. lected waypoint for any date. Use the UP or DOWN button to highlight 'SUN/MOON' and press ENTER...
Owner's Manual
Page 36
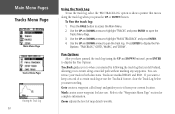
... before you start traveling. TracBack guides you to where you started by following the track log that moves along a traveled path without marking any waypoints. Mark creates a new waypoint for complete information. Use the UP and DOWN arrows to highlight 'TRACKS' and press ENTER to display the Pan Options: 'TRACBACK', 'GOTO', '...in both directions. You can retrace your current location. Use the UP and DOWN arrows to highlight 'PAN & TRACBACK' and press ENTER. 4. Refer to the "Waypoints Menu Page" section for later use. Use the UP and DOWN arrows to pan the track log. Goto creates...
... before you start traveling. TracBack guides you to where you started by following the track log that moves along a traveled path without marking any waypoints. Mark creates a new waypoint for complete information. Use the UP and DOWN arrows to highlight 'TRACKS' and press ENTER to display the Pan Options: 'TRACBACK', 'GOTO', '...in both directions. You can retrace your current location. Use the UP and DOWN arrows to highlight 'PAN & TRACBACK' and press ENTER. 4. Refer to the "Waypoints Menu Page" section for later use. Use the UP and DOWN arrows to pan the track log. Goto creates...


