Owner's Manual
Page 3
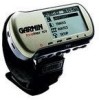
... provides information on each Main Page, Option Menu, and feature in the Main Menu: Waypoints, Tracks, Routes, and Setup. Thank you with some direction on how to select and change items, its main intention is organized into the following sections: The Introduction chapter provides care information and the Table of Contents. Introduction About This Manual Standard Package Contents: 1 Foretrex 101 Unit 1 Strap Extension 1 Wrist Strap 1 Owner's Manual 1 Quick Start Guide Check...
... provides information on each Main Page, Option Menu, and feature in the Main Menu: Waypoints, Tracks, Routes, and Setup. Thank you with some direction on how to select and change items, its main intention is organized into the following sections: The Introduction chapter provides care information and the Table of Contents. Introduction About This Manual Standard Package Contents: 1 Foretrex 101 Unit 1 Strap Extension 1 Wrist Strap 1 Owner's Manual 1 Quick Start Guide Check...
Owner's Manual
Page 4
... im- After submersion, be remedied using a cloth dampened with mild detergent in Water The Foretrex 101 is constructed of water for battery power. Clean the unit using this guide, contact Garmin Product Support in the unit's memory without the need for 30 minutes. mersion in the trunk of a car) as permanent damage may occur (such as waypoints and routes will be hand washed with...
... im- After submersion, be remedied using a cloth dampened with mild detergent in Water The Foretrex 101 is constructed of water for battery power. Clean the unit using this guide, contact Garmin Product Support in the unit's memory without the need for 30 minutes. mersion in the trunk of a car) as permanent damage may occur (such as waypoints and routes will be hand washed with...
Owner's Manual
Page 5
... Buttons 2 Using the Wrist Strap 3 Installing Batteries 5 Turning on the Foretrex 101 6 Using the Main Pages 7 Switching Between the Main Pages .......... 7 Main Pages 8 Satellite Page 8 Using the Satellite Page 8 Using the Satellite Page Options 8 Adjusting the Backlighting and Contrast . 9 Map Page 10 Using the Map Page 10 Map Page Options 10 Navigation Page 13 Using the Navigation Page 13 Navigation Page Options 13 Trip Computer 14 Using the Trip Computer 14 Trip Computer Options 14 Timer Page 15 Displaying...
... Buttons 2 Using the Wrist Strap 3 Installing Batteries 5 Turning on the Foretrex 101 6 Using the Main Pages 7 Switching Between the Main Pages .......... 7 Main Pages 8 Satellite Page 8 Using the Satellite Page 8 Using the Satellite Page Options 8 Adjusting the Backlighting and Contrast . 9 Map Page 10 Using the Map Page 10 Map Page Options 10 Navigation Page 13 Using the Navigation Page 13 Navigation Page Options 13 Trip Computer 14 Using the Trip Computer 14 Trip Computer Options 14 Timer Page 15 Displaying...
Owner's Manual
Page 6
... iv Routes Menu Page 34 Using the Routes Menu Page 34 Creating a Route 34 Using the Route Page 35 Deleting All Routes 36 Route Setup 37 Route Setup Options 37 Editing a Route 38 Navigating a Route 40 Setup Menu: Set Timer 41 Using the Setup Menu 41 Set Timer Page 41 Setting the Timer 42 Expired and Interval Timer Tones ... 43 Setup Menu: Set Time 44 Set Time Page 44 Time Zone 44 Daylight Savings Time 45 Setup Menu: Set Display 46 Set Display Page 46 Light Timeout 46 Contrast 46 Setup Menu: Set Units 47 Set Units Page 47 Position Format 47 Map Datums 48 Distance/Speed...
... iv Routes Menu Page 34 Using the Routes Menu Page 34 Creating a Route 34 Using the Route Page 35 Deleting All Routes 36 Route Setup 37 Route Setup Options 37 Editing a Route 38 Navigating a Route 40 Setup Menu: Set Timer 41 Using the Setup Menu 41 Set Timer Page 41 Setting the Timer 42 Expired and Interval Timer Tones ... 43 Setup Menu: Set Time 44 Set Time Page 44 Time Zone 44 Daylight Savings Time 45 Setup Menu: Set Display 46 Set Display Page 46 Light Timeout 46 Contrast 46 Setup Menu: Set Units 47 Set Units Page 47 Position Format 47 Map Datums 48 Distance/Speed...
Owner's Manual
Page 11
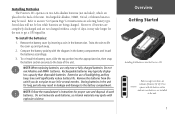
... the base of backlighting and key beep tones will not be used. NOTE: Follow the manufacturer's instructions for long periods may result in the unit. 5 NOTE: When replacing batteries, use of the unit. To re-install the battery cover, slide the top portion into the Foretrex 101 Battery usage icon shows an estimate of used batteries, as internal materials may take longer for the unit to get a GPS signal fix. Twist the...
... the base of backlighting and key beep tones will not be used. NOTE: Follow the manufacturer's instructions for long periods may result in the unit. 5 NOTE: When replacing batteries, use of the unit. To re-install the battery cover, slide the top portion into the Foretrex 101 Battery usage icon shows an estimate of used batteries, as internal materials may take longer for the unit to get a GPS signal fix. Twist the...

Owner's Manual
Page 12
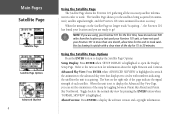
... acquiring satellites. Overview Getting Started Satellite Page Turning on the Foretrex 101 After you have not used your Foretrex 101 unit, or you have placed the batteries in more satellites and the signal strength increases, the bar moves to the right. Upon startup, the GPS signal bar appears. The GPS signal bar and accuracy fields are shown on the Foretrex 101: 1. Refer to determine your location. 6 Leave the Foretrex 101 with a clear view of the screen...
... acquiring satellites. Overview Getting Started Satellite Page Turning on the Foretrex 101 After you have not used your Foretrex 101 unit, or you have placed the batteries in more satellites and the signal strength increases, the bar moves to the right. Upon startup, the GPS signal bar appears. The GPS signal bar and accuracy fields are shown on the Foretrex 101: 1. Refer to determine your location. 6 Leave the Foretrex 101 with a clear view of the screen...
Owner's Manual
Page 14
......", the Foretrex 101 has found your Foretrex 101 in more than one month, allow time for the unit to go! Using the Satellite Page Options Press the ENTER button to open the Display Setup Page. Advanced Sky View: Press ENTER when 'ADVANCED SKYVIEW' is set the orientation of each satellite. About Foretrex: Press ENTER to the advanced sky view that displays two circles with a clear view of the sky for information about the Light Timeout...
......", the Foretrex 101 has found your Foretrex 101 in more than one month, allow time for the unit to go! Using the Satellite Page Options Press the ENTER button to open the Display Setup Page. Advanced Sky View: Press ENTER when 'ADVANCED SKYVIEW' is set the orientation of each satellite. About Foretrex: Press ENTER to the advanced sky view that displays two circles with a clear view of the sky for information about the Light Timeout...
Owner's Manual
Page 16
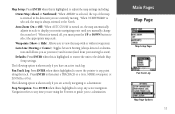
... to clear the track log that are ahead of where you are going. Measure Distance: Press ENTER when this is displayed to the procedure titled "To Measure Distance" for viewing a smaller area (zoom in). Refer to access the Map Page Options. As you are heading. To help you better visualize the 'real world', Foretrex 101 automatically rotates the map as you move, so that waypoints...
... to clear the track log that are ahead of where you are going. Measure Distance: Press ENTER when this is displayed to the procedure titled "To Measure Distance" for viewing a smaller area (zoom in). Refer to access the Map Page Options. As you are heading. To help you better visualize the 'real world', Foretrex 101 automatically rotates the map as you move, so that waypoints...
Owner's Manual
Page 17
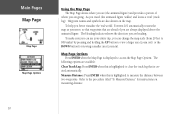
..., MARK a waypoint, or ZOOM In or Out. When it is turned off, you manually change the zoom level. Main Pages Map Page Map Setup Page Pan Track Log Map Page Options 11 Press ENTER to the North. Auto Zoom (On or Off): When 'AUTO ZOOM' is turned on, the map automatically adjusts its scale to display your starting location). Defaults: Press ENTER when this is highlighted to stop any time you are using the Foretrex to guide you...
..., MARK a waypoint, or ZOOM In or Out. When it is turned off, you manually change the zoom level. Main Pages Map Page Map Setup Page Pan Track Log Map Page Options 11 Press ENTER to the North. Auto Zoom (On or Off): When 'AUTO ZOOM' is turned on, the map automatically adjusts its scale to display your starting location). Defaults: Press ENTER when this is highlighted to stop any time you are using the Foretrex to guide you...

Owner's Manual
Page 18
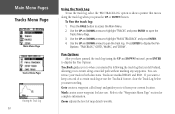
... Clearing the Track Log Measure Distance Page Edit Number Page 12 To clear the track log from which to end the measurement. 5. Press the ENTER button while on the Map Page to highlight 'CLEAR TRACK LOG' and press the ENTER button. 3. Press the UP or DOWN button to display the Map Page Options. 2. To measure distance: 1. Press ENTER when the field to the right of 'ESTIMATED SPEED' is highlighted to select a waypoint to measure. Press ENTER...
... Clearing the Track Log Measure Distance Page Edit Number Page 12 To clear the track log from which to end the measurement. 5. Press the ENTER button while on the Map Page to highlight 'CLEAR TRACK LOG' and press the ENTER button. 3. Press the UP or DOWN button to display the Map Page Options. 2. To measure distance: 1. Press ENTER when the field to the right of 'ESTIMATED SPEED' is highlighted to select a waypoint to measure. Press ENTER...

Owner's Manual
Page 27
...a location as a Waypoint, works well for geocaching. The only difference is that you have marked a waypoint using the same methods. Select 'CREATE NEW'. The Mark Waypoint Page displays. Main Menu Pages Waypoints Menu Page Mark Waypoint Page 21 Select Waypoints and press ENTER. You may mark a waypoint one of the above methods, the Mark Waypoint Page displays. Entering a known location, then saving it as a waypoint and then change elements of the waypoint from the Waypoint Review Page instead of the Mark Waypoint Page. Highlight OK? Marking a Waypoint The Mark Waypoint...
...a location as a Waypoint, works well for geocaching. The only difference is that you have marked a waypoint using the same methods. Select 'CREATE NEW'. The Mark Waypoint Page displays. Main Menu Pages Waypoints Menu Page Mark Waypoint Page 21 Select Waypoints and press ENTER. You may mark a waypoint one of the above methods, the Mark Waypoint Page displays. Entering a known location, then saving it as a waypoint and then change elements of the waypoint from the Waypoint Review Page instead of the Mark Waypoint Page. Highlight OK? Marking a Waypoint The Mark Waypoint...
Owner's Manual
Page 36
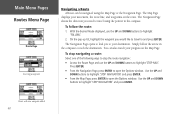
..., select the 'PAN TRACK LOG' option to show a pointer that you left behind, allowing you to return along the track log when you start traveling. Press ENTER to the "Waypoints Menu Page" section for later use the 'TracBack' feature, clear the Track Log before you press the UP or DOWN button. TracBack guides you to display the Pan Options. You can retrace your current location. Goto creates a waypoint called 'map' and guides...
..., select the 'PAN TRACK LOG' option to show a pointer that you left behind, allowing you to return along the track log when you start traveling. Press ENTER to the "Waypoints Menu Page" section for later use the 'TracBack' feature, clear the Track Log before you press the UP or DOWN button. TracBack guides you to display the Pan Options. You can retrace your current location. Goto creates a waypoint called 'map' and guides...
Owner's Manual
Page 46
... the compass. The Navigation Page opens to lead you to your movement, the route line, and waypoints on the Map Page. Main Menu Pages Routes Menu Page Route Page Inserting a waypoint Navigating a Route A Route can also watch your progress on the route. Use the UP and DOWN buttons to travel to highlight 'STOP NAV'. The Map Page displays your destination. The Navigation Page shows the direction you would like to travel using the Map Page...
... the compass. The Navigation Page opens to lead you to your movement, the route line, and waypoints on the Map Page. Main Menu Pages Routes Menu Page Route Page Inserting a waypoint Navigating a Route A Route can also watch your progress on the route. Use the UP and DOWN buttons to travel to highlight 'STOP NAV'. The Map Page displays your destination. The Navigation Page shows the direction you would like to travel using the Map Page...
Owner's Manual
Page 53
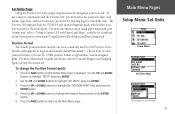
... your Garmin unit, refer to "Using a Garmin GPS with Paper Land Maps", available for the Foretrex 101 is displayed. Press the UP or DOWN button to highlight 'SETUP' and press ENTER. 2. Position Format The default position format (and the one most commonly used) for download at http://www.nima.mil. Main Menu Pages Setup Menu: Set Units Setup Menu Set Units Page Selecting the Position Format 47 Use the UP and DOWN buttons to approximate custom-designed grids. Choose from 11 other position formats or choose the 'USER' position format...
... your Garmin unit, refer to "Using a Garmin GPS with Paper Land Maps", available for the Foretrex 101 is displayed. Press the UP or DOWN button to highlight 'SETUP' and press ENTER. 2. Position Format The default position format (and the one most commonly used) for download at http://www.nima.mil. Main Menu Pages Setup Menu: Set Units Setup Menu Set Units Page Selecting the Position Format 47 Use the UP and DOWN buttons to approximate custom-designed grids. Choose from 11 other position formats or choose the 'USER' position format...

Owner's Manual
Page 57
..., or select 'USER' to control a GARMIN differential beacon receiver (e.g. None: Provides no interfacing capabilities. Effective use of this feature requires a working knowledge of location and velocity information without output capabilities. RTCM/NMEA: Allows DGPS input using a GARMIN beacon receiver and a standard RTCM SC-104 and DGPS tuning. Refer to exchange waypoint, track, and map data with a PC. Main Menu Pages Setup Menu: Set Interface Setup Menu Set Interface Page Selecting the I /O FORMAT') for connecting external NMEA devices, a DGPS beacon receiver, a personal...
..., or select 'USER' to control a GARMIN differential beacon receiver (e.g. None: Provides no interfacing capabilities. Effective use of this feature requires a working knowledge of location and velocity information without output capabilities. RTCM/NMEA: Allows DGPS input using a GARMIN beacon receiver and a standard RTCM SC-104 and DGPS tuning. Refer to exchange waypoint, track, and map data with a PC. Main Menu Pages Setup Menu: Set Interface Setup Menu Set Interface Page Selecting the I /O FORMAT') for connecting external NMEA devices, a DGPS beacon receiver, a personal...
Owner's Manual
Page 58
...') the GPS Receiver. You can select to display the information at power up ('SHOW') or not display the information at power up to three lines of batteries you to the type of owner information. Beeper: When 'KEY AND MESSAGE' is selected the unit beeps then a key is pressed and when a message is displayed. You can also enable WAAS, Battery Save, or Demo modes. Owner Info: Enter up ('HIDE'). Main Menu Pages Setup Menu: Set System Setup Menu Set System Page Set System...
...') the GPS Receiver. You can select to display the information at power up ('SHOW') or not display the information at power up to three lines of batteries you to the type of owner information. Beeper: When 'KEY AND MESSAGE' is selected the unit beeps then a key is pressed and when a message is displayed. You can also enable WAAS, Battery Save, or Demo modes. Owner Info: Enter up ('HIDE'). Main Menu Pages Setup Menu: Set System Setup Menu Set System Page Set System...
Owner's Manual
Page 68
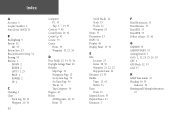
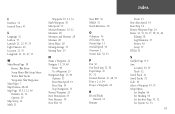
... A Accuracy 6 Acquire Satellites 6 Auto Zoom On/Off 11 B Backlighting 9 Battery 52 Life 54 Battery Save 53 Beacon Receiver Setup 51 Bearing 55 Buttons 2 DOWN 2 ENTER 2 GOTO 2, 25 PAGE 2 POWER 2 UP 2 C Cleaning ii Clear Track Log 10, 12 Waypoint 20, 36 62 Computer PC 51 Trip 1, 7, 14, 55 Contrast 9, 46 Count Down 16, 42 Count Up 43 Course 55 Create Route 34 Waypoint 19, 21, 34 D Data Fields 13, 14, 55, 56 Daylight Savings Time 45 Defaults Map...
... A Accuracy 6 Acquire Satellites 6 Auto Zoom On/Off 11 B Backlighting 9 Battery 52 Life 54 Battery Save 53 Beacon Receiver Setup 51 Bearing 55 Buttons 2 DOWN 2 ENTER 2 GOTO 2, 25 PAGE 2 POWER 2 UP 2 C Cleaning ii Clear Track Log 10, 12 Waypoint 20, 36 62 Computer PC 51 Trip 1, 7, 14, 55 Contrast 9, 46 Count Down 16, 42 Count Up 43 Course 55 Create Route 34 Waypoint 19, 21, 34 D Data Fields 13, 14, 55, 56 Daylight Savings Time 45 Defaults Map...
Owner's Manual
Page 69
..., 30 Paper Maps 47 PC 51 Position Format 47, 48, 55 Power 2, 6, 54 Project a Waypoint 26 R Record Tracks Interval 31 Rename Index Track 33 Reset Max Speed 14 Reset Trip 14 Review Waypoint Page 24 Route 34, 35, 36, 37, 38, 39, 40 Editing 38 Leg Transition 37 Routes 40 Setup 37 RTCM 51 S Satellite Page 8, 9 Save Location 19, 34 Track 32 Saved Track 32 Saved Tracks 31 Scale 10 Select a Waypoint 19, 35 Setup Menu Set Display 46 Set Heading 50 Set Interface Page 51...
..., 30 Paper Maps 47 PC 51 Position Format 47, 48, 55 Power 2, 6, 54 Project a Waypoint 26 R Record Tracks Interval 31 Rename Index Track 33 Reset Max Speed 14 Reset Trip 14 Review Waypoint Page 24 Route 34, 35, 36, 37, 38, 39, 40 Editing 38 Leg Transition 37 Routes 40 Setup 37 RTCM 51 S Satellite Page 8, 9 Save Location 19, 34 Track 32 Saved Track 32 Saved Tracks 31 Scale 10 Select a Waypoint 19, 35 Setup Menu Set Display 46 Set Heading 50 Set Interface Page 51...
Quick Start Guide
Page 1
... ENTER to access the Main Menu. 2. Foretrex 101 Features Foretrex 101 Features Foretrex 101 Features Foretrex 101 Features Foretrex™ 101 Using the Map Page The Map Page shows where you are (the animated figure) and provides a picture of where you are marked BEGIN and END. Navigating to the Pointer from a map or other reference. Because you cannot always travel forward until the Timer Page is displayed. Press the PAGE button to delete the entire route. To clear the track log: 1. Use...
... ENTER to access the Main Menu. 2. Foretrex 101 Features Foretrex 101 Features Foretrex 101 Features Foretrex 101 Features Foretrex™ 101 Using the Map Page The Map Page shows where you are (the animated figure) and provides a picture of where you are marked BEGIN and END. Navigating to the Pointer from a map or other reference. Because you cannot always travel forward until the Timer Page is displayed. Press the PAGE button to delete the entire route. To clear the track log: 1. Use...
Quick Start Guide
Page 2
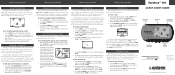
...speed, and current location. The Satellite Dish icon flashes while it . The current date and time is acquiring satellites and determining your wrist or arm. 3. Press ENTER. 3. Slide the end of the Foretrex is displayed. 2. Adjust to display the Options Menu. 3. Foretrex 101 Setup Foretrex 101 Setup Foretrex 101 Setup Foretrex 101 Setup Foretrex 101 Buttons ➊ Installing Batteries The Foretrex 101 operates on two AAA alkaline batteries (not included), which can be used , the stopwatch (timer) icon displays just below "LIGHT TIMEOUT" is selected as the unit...
...speed, and current location. The Satellite Dish icon flashes while it . The current date and time is acquiring satellites and determining your wrist or arm. 3. Press ENTER. 3. Slide the end of the Foretrex is displayed. 2. Adjust to display the Options Menu. 3. Foretrex 101 Setup Foretrex 101 Setup Foretrex 101 Setup Foretrex 101 Setup Foretrex 101 Buttons ➊ Installing Batteries The Foretrex 101 operates on two AAA alkaline batteries (not included), which can be used , the stopwatch (timer) icon displays just below "LIGHT TIMEOUT" is selected as the unit...


