Owner's Manual
Page 5
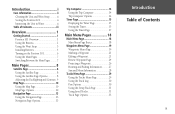
...Cleaning the Unit and Wrist Strap........... ii Storing the Foretrex 101 ii Immersing the Unit in Water ii Table of Contents iii Overview 1 Getting Started 1 Foretrex 101 Overview 1 Using the Buttons 2 Using the Wrist Strap 3 Installing Batteries 5 Turning on the Foretrex 101 6 Using the Main Pages 7 Switching Between the... Main Menu Page Basics 18 Waypoints Menu Page 19 Waypoints Menu Page 19 Marking a Waypoint 21 Editing a Waypoint 21 Review Waypoint Page 24 Projecting a Waypoint 26 Hunting and Fishing Information.......... 27 Sun and Moon Information 28 Tracks Menu Page 29...
...Cleaning the Unit and Wrist Strap........... ii Storing the Foretrex 101 ii Immersing the Unit in Water ii Table of Contents iii Overview 1 Getting Started 1 Foretrex 101 Overview 1 Using the Buttons 2 Using the Wrist Strap 3 Installing Batteries 5 Turning on the Foretrex 101 6 Using the Main Pages 7 Switching Between the... Main Menu Page Basics 18 Waypoints Menu Page 19 Waypoints Menu Page 19 Marking a Waypoint 21 Editing a Waypoint 21 Review Waypoint Page 24 Projecting a Waypoint 26 Hunting and Fishing Information.......... 27 Sun and Moon Information 28 Tracks Menu Page 29...
Owner's Manual
Page 25
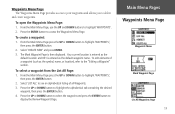
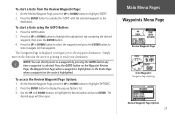
... Page Waypoints Menu Mark Waypoint Page List All Waypoints Page 19 From the Main Menu Page, use the UP and DOWN buttons to display the Review Waypoint Page. From the Main Menu Page press the UP or DOWN button to highlight 'WAYPOINTS', then press the ENTER button. 2. From the Main Menu...
... Page Waypoints Menu Mark Waypoint Page List All Waypoints Page 19 From the Main Menu Page, use the UP and DOWN buttons to display the Review Waypoint Page. From the Main Menu Page press the UP or DOWN button to highlight 'WAYPOINTS', then press the ENTER button. 2. From the Main Menu...
Owner's Manual
Page 26
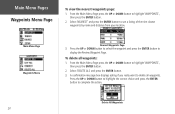
... box displays asking if you really want to complete the action. From the Main Menu Page press the UP or DOWN button to display the Review Waypoint Page. Press the UP or DOWN button to select the waypoint and press the ENTER button to highlight 'WAYPOINTS', then press the ENTER button...
... box displays asking if you really want to complete the action. From the Main Menu Page press the UP or DOWN button to display the Review Waypoint Page. Press the UP or DOWN button to select the waypoint and press the ENTER button to highlight 'WAYPOINTS', then press the ENTER button...

Owner's Manual
Page 27
... Main Menu. The Mark Waypoint Page displays. Entering a known location, then saving it as a waypoint and then change elements of the waypoint from the Waypoint Review Page instead of the above methods, the Mark Waypoint Page displays. Select 'CREATE NEW'. Highlight OK? Editing a Waypoint After you have marked a waypoint using the...
... Main Menu. The Mark Waypoint Page displays. Entering a known location, then saving it as a waypoint and then change elements of the waypoint from the Waypoint Review Page instead of the above methods, the Mark Waypoint Page displays. Select 'CREATE NEW'. Highlight OK? Editing a Waypoint After you have marked a waypoint using the...

Owner's Manual
Page 30
..., name, eleva- Press the ENTER button. 3. The Map Page is displayed with the selected waypoint visible. Waypoint on the map. 4. On the Review Waypoint Page, press the UP or DOWN button to highlight 'DELETE'. 2. Use the DOWN and UP buttons to delete the waypoint. Press PAGE to ... press the UP or DOWN button, highlight 'YES', and press ENTER. To view the waypoint on the Map Page, start a Goto, and display the Review Waypoint Page Options. You can also delete the waypoint, display the waypoint on the map: 1. tion and location (just as on the Mark Waypoint Page...
..., name, eleva- Press the ENTER button. 3. The Map Page is displayed with the selected waypoint visible. Waypoint on the map. 4. On the Review Waypoint Page, press the UP or DOWN button to highlight 'DELETE'. 2. Use the DOWN and UP buttons to delete the waypoint. Press PAGE to ... press the UP or DOWN button, highlight 'YES', and press ENTER. To view the waypoint on the Map Page, start a Goto, and display the Review Waypoint Page Options. You can also delete the waypoint, display the waypoint on the map: 1. tion and location (just as on the Mark Waypoint Page...
Owner's Manual
Page 31
...highlight the alphabetical tab containing the desired waypoint, then press the ENTER button. 4. Main Menu Pages Waypoints Menu Page Review Waypoint Page Goto Waypoint: Navigation Page displaying Review Waypoint Page Options 25 Press the UP or DOWN button to highlight the desired option and press ENTER. Simply move ... the arrow is pointing to a waypoint by pressing the GOTO button any time a waypoint is selected: Press the GOTO button on the Waypoint Review Page, the Waypoint List Page when a waypoint is highlighted, or the Route Page when a waypoint on the route is displayed to navigate you...
...highlight the alphabetical tab containing the desired waypoint, then press the ENTER button. 4. Main Menu Pages Waypoints Menu Page Review Waypoint Page Goto Waypoint: Navigation Page displaying Review Waypoint Page Options 25 Press the UP or DOWN button to highlight the desired option and press ENTER. Simply move ... the arrow is pointing to a waypoint by pressing the GOTO button any time a waypoint is selected: Press the GOTO button on the Waypoint Review Page, the Waypoint List Page when a waypoint is highlighted, or the Route Page when a waypoint on the route is displayed to navigate you...

Owner's Manual
Page 32
... number list. 5. Main Menu Pages Waypoints Menu Page Waypoint Options Project Waypoint Page Edit Number Page 26 Projecting a Waypoint Using the Project waypoint feature, the Foretrex 101 can create a waypoint at a specified distance and bearing using an existing waypoint as well. 7. You can also change and press the ENTER button... numeric name assigned to highlight 'OPTIONS' and press ENTER. 3. When all changes have been made, highlight 'OK' and press the ENTER button to display the Review Waypoint Page. 2.
... number list. 5. Main Menu Pages Waypoints Menu Page Waypoint Options Project Waypoint Page Edit Number Page 26 Projecting a Waypoint Using the Project waypoint feature, the Foretrex 101 can create a waypoint at a specified distance and bearing using an existing waypoint as well. 7. You can also change and press the ENTER button... numeric name assigned to highlight 'OPTIONS' and press ENTER. 3. When all changes have been made, highlight 'OK' and press the ENTER button to display the Review Waypoint Page. 2.

Owner's Manual
Page 33
... Information This feature provides you with state and local game laws which may vary from the list and press the ENTER button to display the Review Waypoint Page. 2. Select the desired date and press ENTER. 3.
... Information This feature provides you with state and local game laws which may vary from the list and press the ENTER button to display the Review Waypoint Page. 2. Select the desired date and press ENTER. 3.
Owner's Manual
Page 34
lected waypoint for any date. You may view Sun and Moon information for the current date. Press the PAGE button to display the Review Waypoint Page. 2. Select a waypoint from the list and press the ENTER button to access the Main Menu. Use the UP and DOWN buttons to highlight ...
lected waypoint for any date. You may view Sun and Moon information for the current date. Press the PAGE button to display the Review Waypoint Page. 2. Select a waypoint from the list and press the ENTER button to access the Main Menu. Use the UP and DOWN buttons to highlight ...
Owner's Manual
Page 69
... Position Format 47, 48, 55 Power 2, 6, 54 Project a Waypoint 26 R Record Tracks Interval 31 Rename Index Track 33 Reset Max Speed 14 Reset Trip 14 Review Waypoint Page 24 Route 34, 35, 36, 37, 38, 39, 40 Editing 38 Leg Transition 37 Routes 40 Setup 37 RTCM 51 S Satellite Page 8, 9 Save...
... Position Format 47, 48, 55 Power 2, 6, 54 Project a Waypoint 26 R Record Tracks Interval 31 Rename Index Track 33 Reset Max Speed 14 Reset Trip 14 Review Waypoint Page 24 Route 34, 35, 36, 37, 38, 39, 40 Editing 38 Leg Transition 37 Routes 40 Setup 37 RTCM 51 S Satellite Page 8, 9 Save...
