Owner's Manual
Page 3
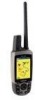
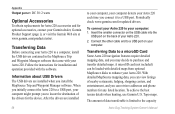
... your Astro 220. In the USA contact Garmin Product Support by completing our online registration today! Product Registration Help us better support you are not using it, and decrease the level of the display backlight (page 4). • To extend the DC 30 battery life, turn the unit off when you are not tracking a dog, or decrease the update rate (page 13). Tips and Shortcuts • Press MENU twice...
... your Astro 220. In the USA contact Garmin Product Support by completing our online registration today! Product Registration Help us better support you are not using it, and decrease the level of the display backlight (page 4). • To extend the DC 30 battery life, turn the unit off when you are not tracking a dog, or decrease the update rate (page 13). Tips and Shortcuts • Press MENU twice...

Owner's Manual
Page 4
... the Astro 220 2 Using the Astro 220 Keypad Functions 3 Turning the Astro 220 On 4 Charging the DC 30 4 Acquiring GPS Satellite Signals 5 Calibrating the Astro 220 Compass 6 Operating the Astro 220 6 Manual Conventions 7 On-Screen Messages 7 Dog Tracking 8 Communicating with the DC 30 8 Tracking a Dog 10 Main Menu 14 ii Mark Location 15 Averaging a Marked Location 16 Projecting a Location 16 Map Page 17 Map Page Options 17 Data Fields 18 Measuring Distance 19 Find Features 20 Item Information Page Options 22 Using Optional Detailed Maps 22 POI Loader and Custom Points...
... the Astro 220 2 Using the Astro 220 Keypad Functions 3 Turning the Astro 220 On 4 Charging the DC 30 4 Acquiring GPS Satellite Signals 5 Calibrating the Astro 220 Compass 6 Operating the Astro 220 6 Manual Conventions 7 On-Screen Messages 7 Dog Tracking 8 Communicating with the DC 30 8 Tracking a Dog 10 Main Menu 14 ii Mark Location 15 Averaging a Marked Location 16 Projecting a Location 16 Map Page 17 Map Page Options 17 Data Fields 18 Measuring Distance 19 Find Features 20 Item Information Page Options 22 Using Optional Detailed Maps 22 POI Loader and Custom Points...
Owner's Manual
Page 16
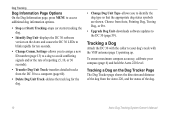
... Start) Tracking-stops (or starts) tracking the dog. • Identify Dog Unit-displays the DC 30 software version on the Dog Tracker Page The Dog Tracker page shows the direction and distance of the dog from the Astro 220, and the status of reporting (5, 10, or 30 seconds). • Transfer Dog Unit Track-transfers detailed tracks from Auto, Pointing Dog, Treeing Dog, or Pet. • Upgrade Dog Unit-downloads software updates to identify the dog type...
... Start) Tracking-stops (or starts) tracking the dog. • Identify Dog Unit-displays the DC 30 software version on the Dog Tracker Page The Dog Tracker page shows the direction and distance of the dog from the Astro 220, and the status of reporting (5, 10, or 30 seconds). • Transfer Dog Unit Track-transfers detailed tracks from Auto, Pointing Dog, Treeing Dog, or Pet. • Upgrade Dog Unit-downloads software updates to identify the dog type...
Owner's Manual
Page 21
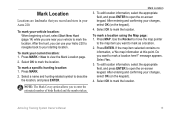
Press MARK. 2. Mark Location 3. After entering and confirming your current location: 1. To edit location information, select the appropriate field, and press ENTER to mark the location. Astro Dog Tracking System Owner's Manual 15 After the hunt, you to enter the estimated number of birds flushed and the number taken. To mark your changes, select OK (on -screen keypad. Select OK to open the on the keypad). 4. To mark a specific hunting location: 1. Press MAP. After entering and confirming your changes, select OK (on -screen keypad. Press MARK > New to...
Press MARK. 2. Mark Location 3. After entering and confirming your current location: 1. To edit location information, select the appropriate field, and press ENTER to mark the location. Astro Dog Tracking System Owner's Manual 15 After the hunt, you to enter the estimated number of birds flushed and the number taken. To mark your changes, select OK (on -screen keypad. Select OK to open the on the keypad). 4. To mark a specific hunting location: 1. Press MAP. After entering and confirming your changes, select OK (on -screen keypad. Press MARK > New to...
Owner's Manual
Page 35
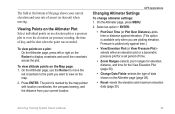
... is marked by the map pointer with location coordinates, the compass bearing, and the distance from your rate of data shown on the Altimeter page (page 28). • Reset-resets the elevation and maximum elevation data (page 30). Press ENTER. The point is available only when you want to the point you are plotting elevation. Astro Dog Tracking System Owner's Manual 29 Select an option > ENTER: • Plot Over Time (or Plot Over Distance)-plots time or distance against time.) • View Elevation...
... is marked by the map pointer with location coordinates, the compass bearing, and the distance from your rate of data shown on the Altimeter page (page 28). • Reset-resets the elevation and maximum elevation data (page 30). Press ENTER. The point is available only when you want to the point you are plotting elevation. Astro Dog Tracking System Owner's Manual 29 Select an option > ENTER: • Plot Over Time (or Plot Over Distance)-plots time or distance against time.) • View Elevation...
Owner's Manual
Page 39
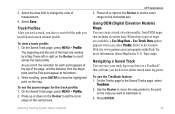
... the top of the path you select Profile. Refer to change the units of the track are available, a Use Map Data - Navigating a Saved Track You can create a track elevation profile, from the Begin point and the End point appear at the bottom. 2. 3. Select Save. On the Saved Track page, press MENU > Profile. The beginning and the end of measurement. 4. While scrolling, press ENTER to show the highlighted point on the Rocker to set the zoom range on the vertical...
... the top of the path you select Profile. Refer to change the units of the track are available, a Use Map Data - Navigating a Saved Track You can create a track elevation profile, from the Begin point and the End point appear at the bottom. 2. 3. Select Save. On the Saved Track page, press MENU > Profile. The beginning and the end of measurement. 4. While scrolling, press ENTER to show the highlighted point on the Rocker to set the zoom range on the vertical...
Owner's Manual
Page 42
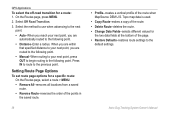
...point. • Distance-Enter a radius. Topo map data is used. • Copy Route-makes a copy of the route. • Delete Route-deletes the route. • Change Data Fields-selects different values for the two data fields at the bottom of the route when MapSource DEM U.S. Setting Route Page Options To set route page options for a route: 1. Astro Dog Tracking System Owner's Manual GPS Applications To select the off-road transition for a specific route: On the Routes page, select a route > MENU. • Remove All-removes all locations from a saved route. • Reverse Route...
...point. • Distance-Enter a radius. Topo map data is used. • Copy Route-makes a copy of the route. • Delete Route-deletes the route. • Change Data Fields-selects different values for the two data fields at the bottom of the route when MapSource DEM U.S. Setting Route Page Options To set route page options for a route: 1. Astro Dog Tracking System Owner's Manual GPS Applications To select the off-road transition for a specific route: On the Routes page, select a route > MENU. • Remove All-removes all locations from a saved route. • Reverse Route...
Owner's Manual
Page 43
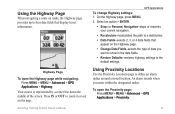
...8226; Stop (or Resume) Navigation-stops or resumes your current navigation. • Recalculate-recalculates the path to a destination. • Data Fields-selects 2, 3, or 4 data fields that display travel information. Using Proximity Locations Use the Proximity Locations page to zoom in the data fields. • Restore Defaults-restores highway settings to the default settings. Highway Page To open the Proximity page: Press MENU > MENU > Advanced > GPS Applications > Proximity. 37 Astro Dog Tracking System Owner's Manual GPS Applications To change Highway settings: 1. Using the...
...8226; Stop (or Resume) Navigation-stops or resumes your current navigation. • Recalculate-recalculates the path to a destination. • Data Fields-selects 2, 3, or 4 data fields that display travel information. Using Proximity Locations Use the Proximity Locations page to zoom in the data fields. • Restore Defaults-restores highway settings to the default settings. Highway Page To open the Proximity page: Press MENU > MENU > Advanced > GPS Applications > Proximity. 37 Astro Dog Tracking System Owner's Manual GPS Applications To change Highway settings: 1. Using the...
Owner's Manual
Page 51
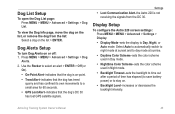
... used in Night mode. • Backlight Timeout-sets the backlight to time out after a period of time has elapsed (to save battery power) or to stay on or off: 1. Dog List Setup To open the Dog List page: Press MENU > MENU > Advanced > Settings > Dog List. Press MENU > MENU > Advanced > Settings > Dog Alerts. 2. Settings • Lost Communication Alert-the Astro 220 is on the list > ENTER. Astro Dog Tracking System Owner's Manual 45 Display Setup To configure the Astro 220 screen settings: Press MENU > MENU...
... used in Night mode. • Backlight Timeout-sets the backlight to time out after a period of time has elapsed (to save battery power) or to stay on or off: 1. Dog List Setup To open the Dog List page: Press MENU > MENU > Advanced > Settings > Dog List. Press MENU > MENU > Advanced > Settings > Dog Alerts. 2. Settings • Lost Communication Alert-the Astro 220 is on the list > ENTER. Astro Dog Tracking System Owner's Manual 45 Display Setup To configure the Astro 220 screen settings: Press MENU > MENU...

Owner's Manual
Page 54
... Text icon. Set the maximum zoom (Auto, Off, or a specific zoom level) at which Map Points, Marked Location, Street Label, and Land Cover appear on the Map page. Information Page On the Map Setup page (page 46), highlight the Information icon. Set the text size (None, Small, Medium, or Large) for hiding or showing maps. 48 Astro Dog Tracking System Owner's Manual Use the Rocker > ENTER to select options for descriptions of map items on the Map page. Points...
... Text icon. Set the maximum zoom (Auto, Off, or a specific zoom level) at which Map Points, Marked Location, Street Label, and Land Cover appear on the Map page. Information Page On the Map Setup page (page 46), highlight the Information icon. Set the text size (None, Small, Medium, or Large) for hiding or showing maps. 48 Astro Dog Tracking System Owner's Manual Use the Rocker > ENTER to select options for descriptions of map items on the Map page. Points...
Owner's Manual
Page 55
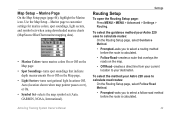
... your Astro 220 uses to calculate road routes: On the Routing Setup page, select Follow Road Method. • Prompted-asks you to select a routing method before the route is calculated. • Follow Road-creates a route that indicate depth measurements On or Off on the Map page. • Light Sectors-turns navigational light locations Off, Auto (location shown when map pointer passes over), or On. • Symbol Set-selects the map symbol set (Auto, GARMIN, NOAA, International). Map Setup - Astro Dog Tracking System Owner's Manual 49...
... your Astro 220 uses to calculate road routes: On the Routing Setup page, select Follow Road Method. • Prompted-asks you to select a routing method before the route is calculated. • Follow Road-creates a route that indicate depth measurements On or Off on the Map page. • Light Sectors-turns navigational light locations Off, Auto (location shown when map pointer passes over), or On. • Symbol Set-selects the map symbol set (Auto, GARMIN, NOAA, International). Map Setup - Astro Dog Tracking System Owner's Manual 49...
Owner's Manual
Page 57
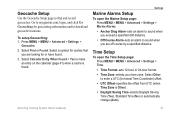
... are off course by a specified distance. Settings Marine Alarms Setup To open the Time Setup page: Press MENU > MENU > Advanced > Settings > Time. • Time Format-sets 12-hour or 24-hour format. • Time Zone-selects your time zone. Select Calendar Entry When Found > Yes to download geocache locations. Astro Dog Tracking System Owner's Manual 51 Geocache Setup Use the Geocache Setup page to sound when you are looking for or have found . Go to my.garmin.com, login, and click Go Geocaching for geocaching information and...
... are off course by a specified distance. Settings Marine Alarms Setup To open the Time Setup page: Press MENU > MENU > Advanced > Settings > Time. • Time Format-sets 12-hour or 24-hour format. • Time Zone-selects your time zone. Select Calendar Entry When Found > Yes to download geocache locations. Astro Dog Tracking System Owner's Manual 51 Geocache Setup Use the Geocache Setup page to sound when you are looking for or have found . Go to my.garmin.com, login, and click Go Geocaching for geocaching information and...
Owner's Manual
Page 58
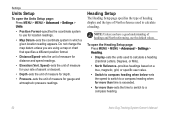
... distance and speed readings. • Elevation (Vert. Heading Setup The Heading Setup page specifies the type of heading display and the type of measure for more than-sets the time to switch to use the default values. To open the Units Setup page: Press MENU > MENU > Advanced > Settings > Units. • Position Format-specifies the coordinate system to a compass heading. 52 Astro Dog Tracking System Owner's Manual Do not change the map datum unless you have a good understanding of measure for location readings. • Map Datum-sets...
... distance and speed readings. • Elevation (Vert. Heading Setup The Heading Setup page specifies the type of heading display and the type of measure for more than-sets the time to switch to use the default values. To open the Units Setup page: Press MENU > MENU > Advanced > Settings > Units. • Position Format-specifies the coordinate system to a compass heading. 52 Astro Dog Tracking System Owner's Manual Do not change the map datum unless you have a good understanding of measure for location readings. • Map Datum-sets...

Owner's Manual
Page 59
... as a standard barometer). For more details on compass calibration, see page 6. For more details on : 1. Select Barometer Mode > Fixed Elevation (used when stationary, allowing the altimeter to self-calibrate the altimeter each time you turn the Astro 220 on altimeter calibration, see page 30. Select Compass and follow the on -screen instructions. Press MENU > MENU > Advanced > Settings > Altimeter. 2. Select Auto Calibration > ENTER > On. To calibrate the altimeter: Select Altimeter, and follow the on -screen instructions. Astro Dog Tracking System Owner's Manual 53
... as a standard barometer). For more details on compass calibration, see page 6. For more details on : 1. Select Barometer Mode > Fixed Elevation (used when stationary, allowing the altimeter to self-calibrate the altimeter each time you turn the Astro 220 on altimeter calibration, see page 30. Select Compass and follow the on -screen instructions. Press MENU > MENU > Advanced > Settings > Altimeter. 2. Select Auto Calibration > ENTER > On. To calibrate the altimeter: Select Altimeter, and follow the on -screen instructions. Astro Dog Tracking System Owner's Manual 53
Owner's Manual
Page 62
... hunting, use Garmin U.S. Transferring Data Before connecting your Astro 220 to purchase and transfer detailed maps. To connect your Astro 220 to a computer, install the USB drivers contained in the MapSource Trip and Waypoint Manager software that came with detailed maps from optional MapSource disks to a USB port on the back of the drivers for any listed location. Transferring Data to a microSD Card Some Astro 220 navigation features require detailed mapping data, and you to the capacity Astro Dog Tracking System Owner's Manual Topo maps. With...
... hunting, use Garmin U.S. Transferring Data Before connecting your Astro 220 to purchase and transfer detailed maps. To connect your Astro 220 to a computer, install the USB drivers contained in the MapSource Trip and Waypoint Manager software that came with detailed maps from optional MapSource disks to a USB port on the back of the drivers for any listed location. Transferring Data to a microSD Card Some Astro 220 navigation features require detailed mapping data, and you to the capacity Astro Dog Tracking System Owner's Manual Topo maps. With...
Owner's Manual
Page 64
... mapped to view data-card storage information. When you want to the network or, from your Astro 220 microSD card. Turn the Astro 220 on Updates & Downloads. 58 Astro Dog Tracking System Owner's Manual Appendix 3. Browse your computer for the file you are using the USB cable provided. Either log on a Windows® computer system tray or a storage-device icon for installation and operation provided with the Astro 220. 4. Highlight the file, and select Edit > Copy. 3. Observe an Eject icon shown on without connecting...
... mapped to view data-card storage information. When you want to the network or, from your Astro 220 microSD card. Turn the Astro 220 on Updates & Downloads. 58 Astro Dog Tracking System Owner's Manual Appendix 3. Browse your computer for the file you are using the USB cable provided. Either log on a Windows® computer system tray or a storage-device icon for installation and operation provided with the Astro 220. 4. Highlight the file, and select Edit > Copy. 3. Observe an Eject icon shown on without connecting...

Owner's Manual
Page 70
... conflicting dog signals 12 course pointer 26 D data card storage information 58 data fields compass 27 map page 18 daylight saving time 51 delete dog unit track 10 DEM maps 33 depth units 52 detail 47 detailed maps 22, 56 display mode 45 display setup 45 distance, measuring 19 distance/speed 52 dog alerts 45 dog information page 9 dog list setup 45 dog status 11 Astro Dog Tracking System Owner's Manual settings 10, 13 change data fields altimeter 30 map page 18 trip computer page 25 change dog unit type 10 change comm. Index...
... conflicting dog signals 12 course pointer 26 D data card storage information 58 data fields compass 27 map page 18 daylight saving time 51 delete dog unit track 10 DEM maps 33 depth units 52 detail 47 detailed maps 22, 56 display mode 45 display setup 45 distance, measuring 19 distance/speed 52 dog alerts 45 dog information page 9 dog list setup 45 dog status 11 Astro Dog Tracking System Owner's Manual settings 10, 13 change data fields altimeter 30 map page 18 trip computer page 25 change dog unit type 10 change comm. Index...

Owner's Manual
Page 72
... settings 44 trip computer page 25 resume all tracking 12 resume navigation 17 rocker key 3 route points 35 routes 34 copying 36 creating 34 deleting 35 editing 35 route page options 36 turn previews 38, 39 routing setup 49 S satellite page 39 save 20 selecting options 7 setup altimeter 53 calibration 53 heading 52 main menu 46 map 46 routing 49 time 51 units 52 setup map 17 shorter distance 50 show info 12 sight 'n go 27 single color 39 small numbers...
... settings 44 trip computer page 25 resume all tracking 12 resume navigation 17 rocker key 3 route points 35 routes 34 copying 36 creating 34 deleting 35 editing 35 route page options 36 turn previews 38, 39 routing setup 49 S satellite page 39 save 20 selecting options 7 setup altimeter 53 calibration 53 heading 52 main menu 46 map 46 routing 49 time 51 units 52 setup map 17 shorter distance 50 show info 12 sight 'n go 27 single color 39 small numbers...
Quick Start Manual
Page 1
... direction you . Use the compass page to navigate to view the Mark Location page. 2. Navigating to a Point To navigate to a point, find a location by the direction pointer Navigating to your Dog To navigate to your dog's neck with the VHF antenna pointing up. Use the compass page to navigate to ensure maximum accuracy. Select the type of the dog. Marking your Location To mark your destination, regardless of the dog, its name, and a track showing its subsidiaries Astro™ quick start manual Select...
... direction you . Use the compass page to navigate to view the Mark Location page. 2. Navigating to a Point To navigate to a point, find a location by the direction pointer Navigating to your Dog To navigate to your dog's neck with the VHF antenna pointing up. Use the compass page to navigate to ensure maximum accuracy. Select the type of the dog. Marking your Location To mark your destination, regardless of the dog, its name, and a track showing its subsidiaries Astro™ quick start manual Select...
Quick Start Manual
Page 2
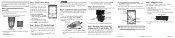
... to an open area, away from you, and the status of the unit. 2. Dog Tracker Page 3. Go outdoors to adjust the brightness levels. Step 4: Calibrate the Astro 220 Compass Calibrate the compass outdoors. Select Start, press ENTER, and follow the on the side of the dog Distance to select a brightness level. DC 30 power button Battery charging port LEDs blink red when power is on, press and quickly release the Power button on , the Garmin Logo appears...
... to an open area, away from you, and the status of the unit. 2. Dog Tracker Page 3. Go outdoors to adjust the brightness levels. Step 4: Calibrate the Astro 220 Compass Calibrate the compass outdoors. Select Start, press ENTER, and follow the on the side of the dog Distance to select a brightness level. DC 30 power button Battery charging port LEDs blink red when power is on, press and quickly release the Power button on , the Garmin Logo appears...


