
Users Guide
Page 3
... Settings 28 Epson Connect Solutions for Smartphones, Tablets, and More 29 Setting Up Epson Connect Services 30 Using Epson Email Print ...31 Using the Epson iPrint Mobile App 32 Using Epson Remote Print ...32 Using Epson Scan to Cloud......33 Voice-activated Printing ...33 Using AirPrint ...34 Using Google Cloud Print ...35 Setting Up Google Cloud Print on a Chromebook 36 Android Printing Using the Epson Print Enabler 37 Using Fire OS Printing ...37 3 Contents XP-6100...
... Settings 28 Epson Connect Solutions for Smartphones, Tablets, and More 29 Setting Up Epson Connect Services 30 Using Epson Email Print ...31 Using the Epson iPrint Mobile App 32 Using Epson Remote Print ...32 Using Epson Scan to Cloud......33 Voice-activated Printing ...33 Using AirPrint ...34 Using Google Cloud Print ...35 Setting Up Google Cloud Print on a Chromebook 36 Android Printing Using the Epson Print Enabler 37 Using Fire OS Printing ...37 3 Contents XP-6100...
Users Guide
Page 4
Using Windows 10 Mobile Printing ...38 Using Epson Print and Scan App with Windows Tablets 38 Using the Mopria Print Service ...39 Wi-Fi Networking ...40 Network Security Recommendations 40 Wi-Fi Infrastructure Mode Setup...41 ... 1 (Upper Cassette 62 Loading Paper in Cassette 2 (Lower Cassette 67 Paper Loading Capacity ...73 Double-sided Printing Capacity ...74 Borderless Paper Type Compatibility 76 Compatible Epson Papers...76 Paper or Media Type Settings - Control Panel 80 Placing Originals on the Product ...82 Placing Originals on the Scanner Glass 82 4 Printing Software...
Using Windows 10 Mobile Printing ...38 Using Epson Print and Scan App with Windows Tablets 38 Using the Mopria Print Service ...39 Wi-Fi Networking ...40 Network Security Recommendations 40 Wi-Fi Infrastructure Mode Setup...41 ... 1 (Upper Cassette 62 Loading Paper in Cassette 2 (Lower Cassette 67 Paper Loading Capacity ...73 Double-sided Printing Capacity ...74 Borderless Paper Type Compatibility 76 Compatible Epson Papers...76 Paper or Media Type Settings - Control Panel 80 Placing Originals on the Product ...82 Placing Originals on the Scanner Glass 82 4 Printing Software...
Users Guide
Page 6
... the Cloud...139 Setting Up a WSD Port (Windows 7/Windows Vista 140 Control Panel Scanning Options 141 Changing Default Scan Job Settings 142 Starting a Scan Using the Epson Scan 2 Icon 143 Starting a Scan from a Scanning Program 145 Starting a Scan from a Smart Device 147 Scanning in Epson Scan 2 ...147 Additional Scanning Settings - Mac...131 Printing Your Document or Photo - Mac...133 Cancelling Printing Using...
... the Cloud...139 Setting Up a WSD Port (Windows 7/Windows Vista 140 Control Panel Scanning Options 141 Changing Default Scan Job Settings 142 Starting a Scan Using the Epson Scan 2 Icon 143 Starting a Scan from a Scanning Program 145 Starting a Scan from a Smart Device 147 Scanning in Epson Scan 2 ...147 Additional Scanning Settings - Mac...131 Printing Your Document or Photo - Mac...133 Cancelling Printing Using...

Users Guide
Page 7
... to Email 165 Saving Scanned Images to a Folder 166 Epson JPEG File Settings ...167 Epson TIFF and Multi-TIFF File Settings 169 Using Memory Cards with Your Product 170 Inserting a Memory Card ...170 Memory Card Types ...171 Memory Card File ...
... to Email 165 Saving Scanned Images to a Folder 166 Epson JPEG File Settings ...167 Epson TIFF and Multi-TIFF File Settings 169 Using Memory Cards with Your Product 170 Inserting a Memory Card ...170 Memory Card Types ...171 Memory Card File ...

Users Guide
Page 9
... a Network 277 Product Does Not Appear in Mac Printer Window 278 Wireless Network Connection is Unstable on a Mac 279 Cannot Print Over a Network...279 Cannot Scan Over a Network ...280 Solving Copying Problems ...281 Product Makes Noise, But Nothing Copies 282 Product Makes Noise When It Sits for a While 282 Solving Paper...
... a Network 277 Product Does Not Appear in Mac Printer Window 278 Wireless Network Connection is Unstable on a Mac 279 Cannot Print Over a Network...279 Cannot Scan Over a Network ...280 Solving Copying Problems ...281 Product Makes Noise, But Nothing Copies 282 Product Makes Noise When It Sits for a While 282 Solving Paper...
Users Guide
Page 10
...Faint Printout or Printout Has Gaps 299 Grainy Printout...300 Incorrect Colors ...301 Solving Scanning Problems ...302 Scanning Software Does Not Operate Correctly 302 Cannot Start Epson Scan 2 ...302 Scanning is Slow ...303 Solving Scanned Image Quality Problems 303 Image Consists of a Few Dots Only 304 Line of ...Dots Appears in All Scanned Images 304 Straight Lines in an Image Appear Crooked 305 Image is ...
...Faint Printout or Printout Has Gaps 299 Grainy Printout...300 Incorrect Colors ...301 Solving Scanning Problems ...302 Scanning Software Does Not Operate Correctly 302 Cannot Start Epson Scan 2 ...302 Scanning is Slow ...303 Solving Scanned Image Quality Problems 303 Image Consists of a Few Dots Only 304 Line of ...Dots Appears in All Scanned Images 304 Straight Lines in an Image Appear Crooked 305 Image is ...
Users Guide
Page 11
...Image is Too Dark ...305 Back of Original Image Appears in Scanned Image 306 Ripple Patterns Appear in an Image 306 Scanned Image Colors Do Not Match Original Colors 306 Scanned Image Edges are Cropped 307 Solving Memory Card Problems...307 Memory ... Technical Specifications ...312 Windows System Requirements ...312 Mac System Requirements ...313 Paper Specifications ...313 Printable Area Specifications ...315 Scanning Specifications ...317 Ink Cartridge Specifications...318 External USB Device Specifications 319 Memory Card Specifications ...320 Dimension Specifications ...320 Electrical ...
...Image is Too Dark ...305 Back of Original Image Appears in Scanned Image 306 Ripple Patterns Appear in an Image 306 Scanned Image Colors Do Not Match Original Colors 306 Scanned Image Edges are Cropped 307 Solving Memory Card Problems...307 Memory ... Technical Specifications ...312 Windows System Requirements ...312 Mac System Requirements ...313 Paper Specifications ...313 Printable Area Specifications ...315 Scanning Specifications ...317 Ink Cartridge Specifications...318 External USB Device Specifications 319 Memory Card Specifications ...320 Dimension Specifications ...320 Electrical ...

Users Guide
Page 14
... for Smartphones, Tablets, and More Voice-activated Printing Using AirPrint Using Google Cloud Print Android Printing Using the Epson Print Enabler Using Fire OS Printing Using Windows 10 Mobile Printing Using Epson Print and Scan App with Windows Tablets Using the Mopria Print Service Product Parts Locations See these sections to identify the...
... for Smartphones, Tablets, and More Voice-activated Printing Using AirPrint Using Google Cloud Print Android Printing Using the Epson Print Enabler Using Fire OS Printing Using Windows 10 Mobile Printing Using Epson Print and Scan App with Windows Tablets Using the Mopria Print Service Product Parts Locations See these sections to identify the...

Users Guide
Page 29
... Basic Settings. 4. Parent topic: Using Power Saving Settings Epson Connect Solutions for use the software described in this : 3. You also cannot download and install any Epson product software from your Epson product with Epson Scan to print and scan documents, photos, emails, and web pages from the Epson website for Smartphones, Tablets, and More Use your smartphone...
... Basic Settings. 4. Parent topic: Using Power Saving Settings Epson Connect Solutions for use the software described in this : 3. You also cannot download and install any Epson product software from your Epson product with Epson Scan to print and scan documents, photos, emails, and web pages from the Epson website for Smartphones, Tablets, and More Use your smartphone...

Users Guide
Page 30
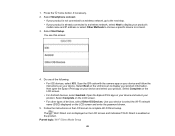
Select Settings. Select Web Service Settings. 4. Select Epson Connect Services. 30 You see a screen like this: 3. Setting Up Epson Connect Services Using Epson Email Print Using the Epson iPrint Mobile App Using Epson Remote Print Using Epson Scan to Cloud Parent topic: Product Basics Related topics Wi-Fi Networking Setting Up Epson Connect Services If you did not activate your product's email address for use with Epson Connect when you set up your product, you can activate it using the product control panel. 1. Press the home button, if necessary. 2.
Select Settings. Select Web Service Settings. 4. Select Epson Connect Services. 30 You see a screen like this: 3. Setting Up Epson Connect Services Using Epson Email Print Using the Epson iPrint Mobile App Using Epson Remote Print Using Epson Scan to Cloud Parent topic: Product Basics Related topics Wi-Fi Networking Setting Up Epson Connect Services If you did not activate your product's email address for use with Epson Connect when you set up your product, you can activate it using the product control panel. 1. Press the home button, if necessary. 2.
Users Guide
Page 32
... Google Drive. 1. You can print from the Apple App Store or Google Play. 4. Visit epson.com/connect (U.S), epson.ca/connect (Canada), or epson.com.jm/connect (Caribbean) to print or scan with networked Epson products. Open Epson iPrint and select your product. 5. Connect your product's email address. 3. See the link below... Remote Print software. 32 Note: Make a note of your wireless network. If you did not already set up an Epson Connect account when you can scan and save a file on your device, send it to your mobile device. 3. Now you print PDFs, Microsoft Office ...
... Google Drive. 1. You can print from the Apple App Store or Google Play. 4. Visit epson.com/connect (U.S), epson.ca/connect (Canada), or epson.com.jm/connect (Caribbean) to print or scan with networked Epson products. Open Epson iPrint and select your product. 5. Connect your product's email address. 3. See the link below... Remote Print software. 32 Note: Make a note of your wireless network. If you did not already set up an Epson Connect account when you can scan and save a file on your device, send it to your mobile device. 3. Now you print PDFs, Microsoft Office ...

Users Guide
Page 33
.... Note: Make a note of your product, select Scan to the Epson Connect service. Select your Epson product during Remote Print setup. 6. Parent topic: Epson Connect Solutions for Smartphones, Tablets, and More Related topics Wi-Fi Networking Using Epson Scan to Cloud The Epson Scan to Cloud service allows you to scan and send a file as Box, DropBox, Evernote, or...
.... Note: Make a note of your product, select Scan to the Epson Connect service. Select your Epson product during Remote Print setup. 6. Parent topic: Epson Connect Solutions for Smartphones, Tablets, and More Related topics Wi-Fi Networking Using Epson Scan to Cloud The Epson Scan to Cloud service allows you to scan and send a file as Box, DropBox, Evernote, or...

Users Guide
Page 38
...your Windows tablet to the same wireless network as your mobile device. Open Epson Print and Scan App and select your product. 4. Now you are ready to print photos or scan. Note: The Epson Print and Scan App does not support Windows 10 Mobile printing. 1. See the link below... or Pro tablet with networked Epson products. Visit epson.com/connect (U.S), epson.ca/connect (Canada), or epson.com.jm/connect (Caribbean) to learn more about Epson Print and Scan App. 38 Parent topic: Product Basics Related topics Wi-Fi Networking Using Epson Print and Scan App with Windows Tablets You ...
...your Windows tablet to the same wireless network as your mobile device. Open Epson Print and Scan App and select your product. 4. Now you are ready to print photos or scan. Note: The Epson Print and Scan App does not support Windows 10 Mobile printing. 1. See the link below... or Pro tablet with networked Epson products. Visit epson.com/connect (U.S), epson.ca/connect (Canada), or epson.com.jm/connect (Caribbean) to learn more about Epson Print and Scan App. 38 Parent topic: Product Basics Related topics Wi-Fi Networking Using Epson Print and Scan App with Windows Tablets You ...
Users Guide
Page 46
1. Scan the QR code with the camera app on your device and follow the instructions on your product. Select Next on the LCD screen to display your product information, then open the Epson iPrint app on the LCD screen and enter the password shown. 5. Use your product. Do one of devices, ... 2. Select Complete on the LCD screen to select the Wi-Fi network name (SSID) displayed on your device and select your device. Open the Epson iPrint app on your device and select your device to complete Wi-Fi Direct setup. Select Smartphone connect. • If your product is not connected...
1. Scan the QR code with the camera app on your device and follow the instructions on your product. Select Next on the LCD screen to display your product information, then open the Epson iPrint app on the LCD screen and enter the password shown. 5. Use your product. Do one of devices, ... 2. Select Complete on the LCD screen to select the Wi-Fi network name (SSID) displayed on your device and select your device. Open the Epson iPrint app on your device and select your device to complete Wi-Fi Direct setup. Select Smartphone connect. • If your product is not connected...
Users Guide
Page 48
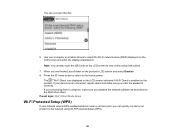
... you enter the password correctly. Press the home button to return to the network using Wi-Fi Protected Setup (WPS). 48 When you can also scan the QR Code on the Start Here sheet. If your computer or wireless device to view online setup instructions. 7. You see a screen like this...
... you enter the password correctly. Press the home button to return to the network using Wi-Fi Protected Setup (WPS). 48 When you can also scan the QR Code on the Start Here sheet. If your computer or wireless device to view online setup instructions. 7. You see a screen like this...

Users Guide
Page 83
...: You can place multiple photos of the indicated corner. Note: The area about 0.06 inch (1.5 mm) from the edges of the scanner glass is not scanned. • ID card: Place an ID card 0.2 inch (5 mm) away from 83 Do one of the following to make separate copies.
...: You can place multiple photos of the indicated corner. Note: The area about 0.06 inch (1.5 mm) from the edges of the scanner glass is not scanned. • ID card: Place an ID card 0.2 inch (5 mm) away from 83 Do one of the following to make separate copies.
Users Guide
Page 84
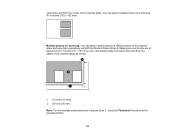
... the scanner glass. each other and from the edges of the scanner glass as shown. 1 0.2 inch (4.5 mm) 2 0.8 inch (20 mm) Note: To view multiple scanned photos in Epson Scan 2, select the Thumbnail checkbox in the preview window. 84 You can place multiple photos up to this size: 4 × 6 inches (102 × 152 mm...
... the scanner glass. each other and from the edges of the scanner glass as shown. 1 0.2 inch (4.5 mm) 2 0.8 inch (20 mm) Note: To view multiple scanned photos in Epson Scan 2, select the Thumbnail checkbox in the preview window. 84 You can place multiple photos up to this size: 4 × 6 inches (102 × 152 mm...

Users Guide
Page 85
3. Remove your original in place. If you may stick to keep your originals after scanning. Parent topic: Placing Originals on the scanner glass for a long time, they may damage the product. Caution: Do not push down on the document cover or scanner glass or you leave the originals on the Product Related references Scanning Specifications 85 Close the document cover gently to the glass surface.
3. Remove your original in place. If you may stick to keep your originals after scanning. Parent topic: Placing Originals on the scanner glass for a long time, they may damage the product. Caution: Do not push down on the document cover or scanner glass or you leave the originals on the Product Related references Scanning Specifications 85 Close the document cover gently to the glass surface.

Users Guide
Page 88
You see a screen like this: 6. Make sure the Restore Color setting is set to increase or decrease the number of copies. If you are scanned and a preview with restored colors appears on the LCD screen. 10. Note: You can also select Copies and use the displayed numeric keypad to edit ...the copy, press the reset button and change any of these settings as necessary and press the right arrow button. 9. Select Start Scanning. button to On. 8. When you need to select the number of the photo and crop it. 11. Note: To cancel copying, press the cancel button...
You see a screen like this: 6. Make sure the Restore Color setting is set to increase or decrease the number of copies. If you are scanned and a preview with restored colors appears on the LCD screen. 10. Note: You can also select Copies and use the displayed numeric keypad to edit ...the copy, press the reset button and change any of these settings as necessary and press the right arrow button. 9. Select Start Scanning. button to On. 8. When you need to select the number of the photo and crop it. 11. Note: To cancel copying, press the cancel button...

Users Guide
Page 89
... paper you want to print on the scanner glass. 2. Select Various copies. You see a screen like this: 6. Select one of these options: • ID Card: Scan and copy both sides of an ID card onto a single sheet of your originals on . 3. Parent topic: Copying Copying Books, ID Cards, or Borderless Photos...
... paper you want to print on the scanner glass. 2. Select Various copies. You see a screen like this: 6. Select one of these options: • ID Card: Scan and copy both sides of an ID card onto a single sheet of your originals on . 3. Parent topic: Copying Copying Books, ID Cards, or Borderless Photos...


