
User's Guide
Page 2
... written permission of this publication may shorten the lamp life. Dangerous electrical voltages inside the projector can damage your hands may be liable for use with Seiko Epson Corporation's operating and maintenance instructions. No part of Seiko Epson Corporation. Hereafter, each author, the conditions, and so on ; Keep plastic bags away from the...
... written permission of this publication may shorten the lamp life. Dangerous electrical voltages inside the projector can damage your hands may be liable for use with Seiko Epson Corporation's operating and maintenance instructions. No part of Seiko Epson Corporation. Hereafter, each author, the conditions, and so on ; Keep plastic bags away from the...
User's Guide
Page 5
... Additional Components 15 Positioning the Projector 15 Projector Placement Options 17 Connecting to a Computer 18 Connecting to the USB Port 19 Connecting to the VGA Computer Port 20 Connecting to Video Equipment 21 Connecting a Composite Video Source 21 Connecting an S-Video Source 22 Connecting ...a Component Video Source 23 Connecting an RGB Video Source 24 Connecting an External Monitor 25 Playing Sound Through the Projector 26 Turning the Projector On and Off 26...
... Additional Components 15 Positioning the Projector 15 Projector Placement Options 17 Connecting to a Computer 18 Connecting to the USB Port 19 Connecting to the VGA Computer Port 20 Connecting to Video Equipment 21 Connecting a Composite Video Source 21 Connecting an S-Video Source 22 Connecting ...a Component Video Source 23 Connecting an RGB Video Source 24 Connecting an External Monitor 25 Playing Sound Through the Projector 26 Turning the Projector On and Off 26...

User's Guide
Page 6
... In on Your Image 39 Controlling the Volume 40 Operating Your Computer With the Remote Control . . . . . 40 4 Fine-Tuning the Projector 43 Using the Menu System 44 Restoring the Default Settings 45 Adjusting the Image 45 Adjusting Signal Settings 47 Customizing... Customizing Power and Operation 50 Using the Projector Security Features 51 Enabling Password Protection 52 Creating Your Own Startup Screen 54 Disabling the Projector's Buttons 55 Using Security Locking 56 5 Maintaining the Projector 57 Cleaning the Lens 58 Cleaning the Projector Case 58 Cleaning the Air Filter 58 ...
... In on Your Image 39 Controlling the Volume 40 Operating Your Computer With the Remote Control . . . . . 40 4 Fine-Tuning the Projector 43 Using the Menu System 44 Restoring the Default Settings 45 Adjusting the Image 45 Adjusting Signal Settings 47 Customizing... Customizing Power and Operation 50 Using the Projector Security Features 51 Enabling Password Protection 52 Creating Your Own Startup Screen 54 Disabling the Projector's Buttons 55 Using Security Locking 56 5 Maintaining the Projector 57 Cleaning the Lens 58 Cleaning the Projector Case 58 Cleaning the Air Filter 58 ...

User's Guide
Page 7
Replacing the Lamp 60 Resetting the Lamp Timer 62 Checking Lamp Usage 63 Replacing the Remote Control Batteries 64 Transporting the Projector 65 6 Solving Problems 67 Using On-Screen Help 68 Checking Projector Status 69 What To Do When the Lights Flash 69 Solving Projector Operation Problems 71 Solving Problems With the Image or Sound 71 Solving Problems With the Remote Control 77 Where To Get Help 78 Speak to a Support Representative 78 A Technical Specifications 81 B Notices 87 Important Safety Instructions 87 FCC Compliance Statement 90 Index 91 7
Replacing the Lamp 60 Resetting the Lamp Timer 62 Checking Lamp Usage 63 Replacing the Remote Control Batteries 64 Transporting the Projector 65 6 Solving Problems 67 Using On-Screen Help 68 Checking Projector Status 69 What To Do When the Lights Flash 69 Solving Projector Operation Problems 71 Solving Problems With the Image or Sound 71 Solving Problems With the Remote Control 77 Where To Get Help 78 Speak to a Support Representative 78 A Technical Specifications 81 B Notices 87 Important Safety Instructions 87 FCC Compliance Statement 90 Index 91 7
User's Guide
Page 9
...mode, Instant Off ®/On ■ One-touch filter replacement ■ Top-loading easy lamp access ■ Security features-password protection, user's logo, projector button lock, security cable attachment (cable not included), and a slot for an optional Kensington® security lock Additional enhancements: ■ 2000:1 contrast ratio... computers and video sources. It offers up to a wide range of white and color light output (brightness) and provides a native SVGA resolution. - Welcome The EX21 is an easy-to-use, compact, lightweight projector with High and Low Brightness modes 9
...mode, Instant Off ®/On ■ One-touch filter replacement ■ Top-loading easy lamp access ■ Security features-password protection, user's logo, projector button lock, security cable attachment (cable not included), and a slot for an optional Kensington® security lock Additional enhancements: ■ 2000:1 contrast ratio... computers and video sources. It offers up to a wide range of white and color light output (brightness) and provides a native SVGA resolution. - Welcome The EX21 is an easy-to-use, compact, lightweight projector with High and Low Brightness modes 9
User's Guide
Page 10
... See page 78 for more information. 10 Welcome Getting More Information Need tips on the projector or the remote control. Quick steps for setting up and use the Epson PrivateLine Support service to your equipment, displaying and adjusting the image, and solving display problems....fast. See page 68 for details. ■ epson.com/support Download FAQs and e-mail your questions to Epson support. ■ PrivateLine® support If you still need to your equipment. ■ Notes contain important information about your projector. ■ Tips contain additional projection hints. Here...
... See page 78 for more information. 10 Welcome Getting More Information Need tips on the projector or the remote control. Quick steps for setting up and use the Epson PrivateLine Support service to your equipment, displaying and adjusting the image, and solving display problems....fast. See page 68 for details. ■ epson.com/support Download FAQs and e-mail your questions to Epson support. ■ PrivateLine® support If you still need to your equipment. ■ Notes contain important information about your projector. ■ Tips contain additional projection hints. Here...

User's Guide
Page 11
...-inch portable pop-up screen (4:3 aspect ratio) 80-inch portable pop-up screen (4:3 aspect ratio) Accolade™ DUET™ Portable Projector Screen (4:3/16:9) ELPSC06 ELPSC07 ELPSC08 ELPSC80 Welcome 11 In the unlikely event of the projector, Epson offers the following optional accessories: Product Part number Replacement lamp V13H010L41 Replacement air filter V13H134A13 Universal...
...-inch portable pop-up screen (4:3 aspect ratio) 80-inch portable pop-up screen (4:3 aspect ratio) Accolade™ DUET™ Portable Projector Screen (4:3/16:9) ELPSC06 ELPSC07 ELPSC08 ELPSC80 Welcome 11 In the unlikely event of the projector, Epson offers the following optional accessories: Product Part number Replacement lamp V13H010L41 Replacement air filter V13H134A13 Universal...

User's Guide
Page 12
... reseller. To find the nearest reseller, call 800-GO-EPSON (800-463-7766). Product Component-to-VGA video cable S-Video cable USB Cable Distribution amplifier Image presentation camera (ELPDC05) DC-10s document camera Soft carrying case (projector only) Soft shoulder case for projector and notebook Wheeled soft carrying case Molded hard-shell wheeled...
... reseller. To find the nearest reseller, call 800-GO-EPSON (800-463-7766). Product Component-to-VGA video cable S-Video cable USB Cable Distribution amplifier Image presentation camera (ELPDC05) DC-10s document camera Soft carrying case (projector only) Soft shoulder case for projector and notebook Wheeled soft carrying case Molded hard-shell wheeled...

User's Guide
Page 13
1 Setting Up the Projector This chapter tells you how to unpack the projector and connect it to a notebook or desktop computer, and/or to video equipment ■ Connecting an external monitor ■ Playing sound through the projector ■ Turning the projector on : ■ Unpacking the projector ■ Positioning the projector ■ Connecting to a computer ■ Connecting to video equipment, such as a VCR, DVD player, or video camera. Follow the instructions in this chapter on and off 13
1 Setting Up the Projector This chapter tells you how to unpack the projector and connect it to a notebook or desktop computer, and/or to video equipment ■ Connecting an external monitor ■ Playing sound through the projector ■ Turning the projector on : ■ Unpacking the projector ■ Positioning the projector ■ Connecting to a computer ■ Connecting to video equipment, such as a VCR, DVD player, or video camera. Follow the instructions in this chapter on and off 13
User's Guide
Page 14
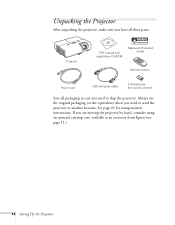
...If you need to another location. Unpacking the Projector After unpacking the projector, make sure you have all packaging in case you need to send the projector to ship the projector. See page 65 for remote control) Save all these parts: Projector PDF manual and registration CD-ROM Password Protected sticker... computer cable 2 AA batteries (for transportation instructions. Always use the original packaging (or the equivalent) when you are moving the projector by hand, consider using an optional carrying case, available as an accessory from Epson (see page 11.) 14 Setting Up the...
...If you need to another location. Unpacking the Projector After unpacking the projector, make sure you have all packaging in case you need to send the projector to ship the projector. See page 65 for remote control) Save all these parts: Projector PDF manual and registration CD-ROM Password Protected sticker... computer cable 2 AA batteries (for transportation instructions. Always use the original packaging (or the equivalent) when you are moving the projector by hand, consider using an optional carrying case, available as an accessory from Epson (see page 11.) 14 Setting Up the...

User's Guide
Page 15
...additional components: ■ To receive a video signal from a computer with a USB port, you 'll probably want to place it . Positioning the Projector If the projector isn't already installed in front of the room, face the audience, and remain close enough to the equipment to be provided with your video equipment..., or you can purchase one from Epson. Setting Up the Projector 15 One may be able to control it on a table in the room you're using, you 'll need a USB cable. See...
...additional components: ■ To receive a video signal from a computer with a USB port, you 'll probably want to place it . Positioning the Projector If the projector isn't already installed in front of the room, face the audience, and remain close enough to the equipment to be provided with your video equipment..., or you can purchase one from Epson. Setting Up the Projector 15 One may be able to control it on a table in the room you're using, you 'll need a USB cable. See...

User's Guide
Page 16
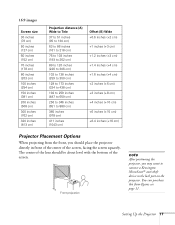
...) -4.5 inches (-11 cm) -5.7 inches (-14 cm) -8.5 inches (-22 cm) -11.3 inches (-29 cm) -17 inches (-43 cm) -19.8 inches (-50 cm) 16 Setting Up the Projector
...) -4.5 inches (-11 cm) -5.7 inches (-14 cm) -8.5 inches (-22 cm) -11.3 inches (-29 cm) -17 inches (-43 cm) -19.8 inches (-50 cm) 16 Setting Up the Projector
User's Guide
Page 17
see page 11. The center of the lens should place the projector directly in front of the center of the screen. Setting Up the Projector 17 You can purchase this from the front, you may want to connect a Kensington MicroSaver® anti-...cm) +1.6 inches (+4 cm) +2 inches (+5 cm) +3 inches (+8 cm) +4 inches (+10 cm) +6 inches (+15 cm) +6.4 inches (+16 cm) Projector Placement Options When projecting from Epson; Front projection note After positioning the projector, you should be about level with the bottom of the screen, facing the screen squarely. 16:9 images Screen size 30...
see page 11. The center of the lens should place the projector directly in front of the center of the screen. Setting Up the Projector 17 You can purchase this from the front, you may want to connect a Kensington MicroSaver® anti-...cm) +1.6 inches (+4 cm) +2 inches (+5 cm) +3 inches (+8 cm) +4 inches (+10 cm) +6 inches (+15 cm) +6.4 inches (+16 cm) Projector Placement Options When projecting from Epson; Front projection note After positioning the projector, you should be about level with the bottom of the screen, facing the screen squarely. 16:9 images Screen size 30...
User's Guide
Page 18
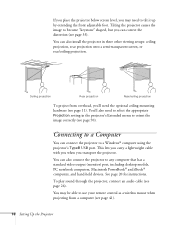
...® computers, and hand-held devices. Connecting to a Computer You can also connect the projector to a Windows® computer using the projector's TypeB USB port. To play sound through the projector, connect an audio cable (see page 33). Ceiling projection Rear projection Rear/ceiling projection To ... may need to orient the image correctly (see page 41). 18 Setting Up the Projector You can correct the distortion (see page 26). See page 20 for instructions. Tilting the projector causes the image to use your remote control as a wireless mouse when projecting from...
...® computers, and hand-held devices. Connecting to a Computer You can also connect the projector to a Windows® computer using the projector's TypeB USB port. To play sound through the projector, connect an audio cable (see page 33). Ceiling projection Rear projection Rear/ceiling projection To ... may need to orient the image correctly (see page 41). 18 Setting Up the Projector You can correct the distortion (see page 26). See page 20 for instructions. Tilting the projector causes the image to use your remote control as a wireless mouse when projecting from...

User's Guide
Page 19
...your computer. 1. The first time you connect a computer to install the Epson USB Display software. If you connect.) Setting Up the Projector 19 Turn on the screen to the projector's USB port, software from the projector is installed automatically. 6. Connect the flat end of a USB cable to.... USB TypeB port 5. Connect the square end of the cable to any available USB port on the Extended menu is set to the projector's TypeB (square) USB port. Messages appear on your computer's display. A USB 2.0 connection (recommended) provides better picture quality and response...
...your computer. 1. The first time you connect a computer to install the Epson USB Display software. If you connect.) Setting Up the Projector 19 Turn on the screen to the projector's USB port, software from the projector is installed automatically. 6. Connect the flat end of a USB cable to.... USB TypeB port 5. Connect the square end of the cable to any available USB port on the Extended menu is set to the projector's TypeB (square) USB port. Messages appear on your computer's display. A USB 2.0 connection (recommended) provides better picture quality and response...
User's Guide
Page 20
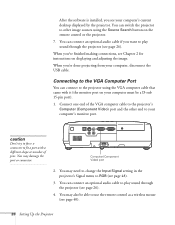
...). Connect one end of pins. You can connect an optional audio cable if you want to play sound through the projector (see page 26). 4. You can connect to the projector using the Source Search button on displaying and adjusting the image. When you've finished making connections, see Chapter 2...or connector. caution Don't try to force a connector to RGB (see page 48). 3. You may need to change the Input Signal setting in the projector's Signal menu to fit a port with it (the monitor port on your computer's monitor port. After the software is installed, you see your computer,...
...). Connect one end of pins. You can connect an optional audio cable if you want to play sound through the projector (see page 26). 4. You can connect to the projector using the Source Search button on displaying and adjusting the image. When you've finished making connections, see Chapter 2...or connector. caution Don't try to force a connector to RGB (see page 48). 3. You may need to change the Input Signal setting in the projector's Signal menu to fit a port with it (the monitor port on your computer's monitor port. After the software is installed, you see your computer,...

User's Guide
Page 21
...the image. When you may also want to connect an optional audio cable to play sound through the projector; Connecting a Composite Video Source 1. Video port Setting Up the Projector 21 note If the video cable was not provided with your video device, you can connect several video ...sources to the projector at your video equipment to the yellow video output connector on your player and the yellow Video...
...the image. When you may also want to connect an optional audio cable to play sound through the projector; Connecting a Composite Video Source 1. Video port Setting Up the Projector 21 note If the video cable was not provided with your video device, you can connect several video ...sources to the projector at your video equipment to the yellow video output connector on your player and the yellow Video...

User's Guide
Page 22
...connections, see page 26 for instructions on turning on the projector and Chapter 2 for instructions on connecting an audio cable. If you can purchase one from Epson; Connect the S-Video cable to play sound through the projector, see page 26 for instructions on displaying and adjusting ...the image. 22 Setting Up the Projector Connecting an S-Video Source 1. When you 've finished making ...
...connections, see page 26 for instructions on turning on the projector and Chapter 2 for instructions on connecting an audio cable. If you can purchase one from Epson; Connect the S-Video cable to play sound through the projector, see page 26 for instructions on displaying and adjusting ...the image. 22 Setting Up the Projector Connecting an S-Video Source 1. When you 've finished making ...

User's Guide
Page 23
...to the Y/Cb/Cr (or Y/Pb/Pr) connectors on your projector. You may need to change the Input Signal setting in the projector's Signal menu to Auto (see page 26 for instructions on ...displaying and adjusting the image. If you want to play sound through the projector, see page 48). 4. When you've finished making connections, see page 11) or...end of the cable to the Computer (Component Video) port on your player. 2. Setting Up the Projector 23 Connecting a Component Video Source If your video equipment has component video connectors (three connectors labeled either...
...to the Y/Cb/Cr (or Y/Pb/Pr) connectors on your projector. You may need to change the Input Signal setting in the projector's Signal menu to Auto (see page 26 for instructions on ...displaying and adjusting the image. If you want to play sound through the projector, see page 48). 4. When you've finished making connections, see page 11) or...end of the cable to the Computer (Component Video) port on your player. 2. Setting Up the Projector 23 Connecting a Component Video Source If your video equipment has component video connectors (three connectors labeled either...

User's Guide
Page 24
...2 for instructions on connecting audio cables. Connect the cable to RGB (see page 26 for instructions on the projector. You may need to change the Input Signal setting in the projector's Signal menu to the RGB video port on your player and the Computer (Component Video) port on displaying and... adjusting the image. 24 Setting Up the Projector Connecting an RGB Video Source You can connect to play sound through the projector, see page 48). 3. When you want to an RGB video source using the VGA computer cable provided...
...2 for instructions on connecting audio cables. Connect the cable to RGB (see page 26 for instructions on the projector. You may need to change the Input Signal setting in the projector's Signal menu to the RGB video port on your player and the Computer (Component Video) port on displaying and... adjusting the image. 24 Setting Up the Projector Connecting an RGB Video Source You can connect to play sound through the projector, see page 48). 3. When you want to an RGB video source using the VGA computer cable provided...


