
User's Guide
Page 2
... with the free software concerned) do not attempt to avoid any cover on are described in part on the work of Seiko Epson Corporation. Important Safety Information WARNING: Never look into the projector lens when the lamp is turned on; Furthermore, there is no guarantee for use of this product or unauthorized modifications, repairs, or alterations to which this product yourself. Keep plastic bags...
... with the free software concerned) do not attempt to avoid any cover on are described in part on the work of Seiko Epson Corporation. Important Safety Information WARNING: Never look into the projector lens when the lamp is turned on; Furthermore, there is no guarantee for use of this product or unauthorized modifications, repairs, or alterations to which this product yourself. Keep plastic bags...

User's Guide
Page 6
... the Remote Control . . . . . 40 4 Fine-Tuning the Projector 43 Using the Menu System 44 Restoring the Default Settings 45 Adjusting the Image 45 Adjusting Signal Settings 47 Customizing Projector Features 49 Customizing Power and Operation 50 Using the Projector Security Features 51 Enabling Password Protection 52 Creating Your Own Startup Screen 54 Disabling the Projector's Buttons 55 Using Security Locking 56 5 Maintaining the Projector 57 Cleaning the Lens 58 Cleaning the Projector Case 58 Cleaning the Air Filter 58 Replacing the Air Filter 59...
... the Remote Control . . . . . 40 4 Fine-Tuning the Projector 43 Using the Menu System 44 Restoring the Default Settings 45 Adjusting the Image 45 Adjusting Signal Settings 47 Customizing Projector Features 49 Customizing Power and Operation 50 Using the Projector Security Features 51 Enabling Password Protection 52 Creating Your Own Startup Screen 54 Disabling the Projector's Buttons 55 Using Security Locking 56 5 Maintaining the Projector 57 Cleaning the Lens 58 Cleaning the Projector Case 58 Cleaning the Air Filter 58 Replacing the Air Filter 59...

User's Guide
Page 7
Replacing the Lamp 60 Resetting the Lamp Timer 62 Checking Lamp Usage 63 Replacing the Remote Control Batteries 64 Transporting the Projector 65 6 Solving Problems 67 Using On-Screen Help 68 Checking Projector Status 69 What To Do When the Lights Flash 69 Solving Projector Operation Problems 71 Solving Problems With the Image or Sound 71 Solving Problems With the Remote Control 77 Where To Get Help 78 Speak to a Support Representative 78 A Technical Specifications 81 B Notices 87 Important Safety Instructions 87 FCC Compliance Statement 90 Index 91 7
Replacing the Lamp 60 Resetting the Lamp Timer 62 Checking Lamp Usage 63 Replacing the Remote Control Batteries 64 Transporting the Projector 65 6 Solving Problems 67 Using On-Screen Help 68 Checking Projector Status 69 What To Do When the Lights Flash 69 Solving Projector Operation Problems 71 Solving Problems With the Image or Sound 71 Solving Problems With the Remote Control 77 Where To Get Help 78 Speak to a Support Representative 78 A Technical Specifications 81 B Notices 87 Important Safety Instructions 87 FCC Compliance Statement 90 Index 91 7
User's Guide
Page 9
... via USB connection ■ Quick, convenient control-Direct Power Off, sleep mode, Instant Off ®/On ■ One-touch filter replacement ■ Top-loading easy lamp access ■ Security features-password protection, user's logo, projector button lock, security cable attachment (cable not included), and a slot for an optional Kensington® security lock Additional enhancements: ■ 2000:1 contrast ratio (with Auto Iris setting turned on) and vibrant color display ■ Integral lens cover (A/V Mute...
... via USB connection ■ Quick, convenient control-Direct Power Off, sleep mode, Instant Off ®/On ■ One-touch filter replacement ■ Top-loading easy lamp access ■ Security features-password protection, user's logo, projector button lock, security cable attachment (cable not included), and a slot for an optional Kensington® security lock Additional enhancements: ■ 2000:1 contrast ratio (with Auto Iris setting turned on) and vibrant color display ■ Integral lens cover (A/V Mute...

User's Guide
Page 11
... follow the registration instructions on new accessories, products, and service. Instead, Epson will ship you won't have to be repaired. See the brochure included with precision gear High security projector ceiling mount Adjustable suspended ceiling channel kit False ceiling plate kit Structural round ceiling plate Adjustable extension column (pipe) 8" - 11" ELPMBPJF ELPMBPRG ELPMBATA ELPMBP01 ELPMBP02 ELPMBP03 ELPMBC01 Kensington security lock ELPSL01 50-inch portable screen (4:3 aspect ratio...
... follow the registration instructions on new accessories, products, and service. Instead, Epson will ship you won't have to be repaired. See the brochure included with precision gear High security projector ceiling mount Adjustable suspended ceiling channel kit False ceiling plate kit Structural round ceiling plate Adjustable extension column (pipe) 8" - 11" ELPMBPJF ELPMBPRG ELPMBATA ELPMBP01 ELPMBP02 ELPMBP03 ELPMBC01 Kensington security lock ELPSL01 50-inch portable screen (4:3 aspect ratio...
User's Guide
Page 18
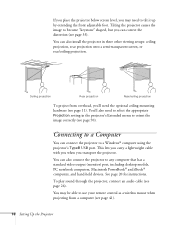
... front adjustable foot. Connecting to a Computer You can also install the projector in the projector's Extended menu to use your remote control as a wireless mouse when projecting from overhead, you may be able to orient the image correctly (see page 50). To play sound through the projector, connect an audio cable (see page 33). You can connect the projector to any computer that has a standard video output (monitor) port, including desktop models...
... front adjustable foot. Connecting to a Computer You can also install the projector in the projector's Extended menu to use your remote control as a wireless mouse when projecting from overhead, you may be able to orient the image correctly (see page 50). To play sound through the projector, connect an audio cable (see page 33). You can connect the projector to any computer that has a standard video output (monitor) port, including desktop models...

User's Guide
Page 19
...'s display. Turn on page 26 to install the Epson USB Display software. USB TypeB port 5. Follow the instructions on the screen to turn on the Extended menu is installed automatically. 6. If you see a "Digital Signature Warning," select Continue or Continue Anyway. (You will see page 50). 3. Connecting to the USB Port You can connect a Windows Vista, XP, or Windows 2000 (SP4) computer to the projector's TypeB (square) USB port and project your computer. 4. A USB 2.0 connection (recommended) provides better picture...
...'s display. Turn on page 26 to install the Epson USB Display software. USB TypeB port 5. Follow the instructions on the screen to turn on the Extended menu is installed automatically. 6. If you see a "Digital Signature Warning," select Continue or Continue Anyway. (You will see page 50). 3. Connecting to the USB Port You can connect a Windows Vista, XP, or Windows 2000 (SP4) computer to the projector's TypeB (square) USB port and project your computer. 4. A USB 2.0 connection (recommended) provides better picture...
User's Guide
Page 20
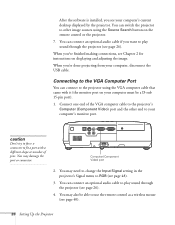
... Input Signal setting in the projector's Signal menu to fit a port with it (the monitor port on your computer, disconnect the USB cable. Computer (Component Video) port 2. You can connect to your computer's current desktop displayed by the projector. You can connect an optional audio cable to play sound through the projector (see page 40). 20 Setting Up the Projector When you 're done projecting from your computer must be able to other image sources using...
... Input Signal setting in the projector's Signal menu to fit a port with it (the monitor port on your computer, disconnect the USB cable. Computer (Component Video) port 2. You can connect to your computer's current desktop displayed by the projector. You can connect an optional audio cable to play sound through the projector (see page 40). 20 Setting Up the Projector When you 're done projecting from your computer must be able to other image sources using...

User's Guide
Page 38
... remote control stops operating to temporarily re-direct your screen. Follow these tips for more information.) 38 Presenting With the Remote Control You can use the remote control to temporarily turn off the picture and sound, freeze the action, zoom in direct sunlight may affect projector response. Using the remote control under bright fluorescent lamps or in on the projector. Turning Off the Picture and Sound Press the A/V Mute button on the remote control or...
... remote control stops operating to temporarily re-direct your screen. Follow these tips for more information.) 38 Presenting With the Remote Control You can use the remote control to temporarily turn off the picture and sound, freeze the action, zoom in direct sunlight may affect projector response. Using the remote control under bright fluorescent lamps or in on the projector. Turning Off the Picture and Sound Press the A/V Mute button on the remote control or...

User's Guide
Page 45
Restoring the Default Settings You can use the Reset option on the projector or remote control and select the Image menu. Adjusting the Image You can use the Image menu to restore the factory-default settings for the settings in the Reset menu, it does not reset the Input Signal, User's Logo, Language, or Lamp Hours settings. You see a screen similar to confirm. To restore all the projector settings to their factory-default values, select the Reset menu, highlight Reset All, press Enter, and select Yes...
Restoring the Default Settings You can use the Reset option on the projector or remote control and select the Image menu. Adjusting the Image You can use the Image menu to restore the factory-default settings for the settings in the Reset menu, it does not reset the Input Signal, User's Logo, Language, or Lamp Hours settings. You see a screen similar to confirm. To restore all the projector settings to their factory-default values, select the Reset menu, highlight Reset All, press Enter, and select Yes...
User's Guide
Page 46
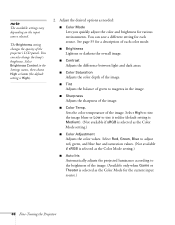
...; Color Mode Lets you quickly adjust the color and brightness for a description of each source. Select Red, Green, Blue to the brightness of the projector's LCD panels. You can save a different setting for the current input source.) 46 Fine-Tuning the Projector Select Brightness Control in the image. ■ Sharpness Adjusts the sharpness of the image. See page 35 for various environments. Sets the color temperature of the image. ■ Color Temp. note The available settings...
...; Color Mode Lets you quickly adjust the color and brightness for a description of each source. Select Red, Green, Blue to the brightness of the projector's LCD panels. You can save a different setting for the current input source.) 46 Fine-Tuning the Projector Select Brightness Control in the image. ■ Sharpness Adjusts the sharpness of the image. See page 35 for various environments. Sets the color temperature of the image. ■ Color Temp. note The available settings...

User's Guide
Page 51
... (you can use the password to prevent the projector from being changed. Select Page Up/Down to use the remote control to use the USB port. You can adjust the amount of time before the projector turns off for the projector menus. Sleep Mode Timer: When Sleep Mode is closed for more than 30 minutes. Turn this setting off automatically, from being turned on , you want the projector to turn the projector's power off automatically...
... (you can use the password to prevent the projector from being changed. Select Page Up/Down to use the remote control to use the USB port. You can adjust the amount of time before the projector turns off for the projector menus. Sleep Mode Timer: When Sleep Mode is closed for more than 30 minutes. Turn this setting off automatically, from being turned on , you want the projector to turn the projector's power off automatically...

User's Guide
Page 53
... to standby mode. Press the Menu button, then press Enter to enter a four digit password. It appears only if you must contact Epson to enter a four digit password. 6. Use the numeric keypad to arrange for assistance. The password screen closes and projection begins. Fine-Tuning the Projector 53 When you see a message prompting you see an error code with the request code number that appears in and turn the projector back...
... to standby mode. Press the Menu button, then press Enter to enter a four digit password. It appears only if you must contact Epson to enter a four digit password. 6. Use the numeric keypad to arrange for assistance. The password screen closes and projection begins. Fine-Tuning the Projector 53 When you see a message prompting you see an error code with the request code number that appears in and turn the projector back...
User's Guide
Page 60
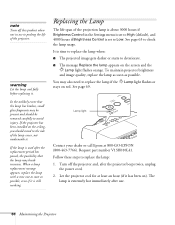
... lamp is time to replace the lamp when: ■ The projected image gets darker or starts to Low. note Turn off the projector and, after the projector beeps twice, unplug the power cord. 2. Replacing the Lamp The life span of the lamp cover, not underneath it has been on the screen and the Lamp light flashes orange. See page 69. warning Let the lamp cool fully before replacing it is set to deteriorate. ■ The message Replace the lamp...
... lamp is time to replace the lamp when: ■ The projected image gets darker or starts to Low. note Turn off the projector and, after the projector beeps twice, unplug the power cord. 2. Replacing the Lamp The life span of the lamp cover, not underneath it has been on the screen and the Lamp light flashes orange. See page 69. warning Let the lamp cool fully before replacing it is set to deteriorate. ■ The message Replace the lamp...

User's Guide
Page 63
... input signal currently selected. The life span of hours the lamp has been used the projector for less than 10 hours, the hours are close to the life span of your lamp. You see the prompt, select Yes and press Enter. 5. Checking Lamp Usage To check the number of the lamp is about 3000 hours if the Brightness Control setting in the Settings menu is set to High (default), and 4000 hours if the Brightness Control setting...
... input signal currently selected. The life span of hours the lamp has been used the projector for less than 10 hours, the hours are close to the life span of your lamp. You see the prompt, select Yes and press Enter. 5. Checking Lamp Usage To check the number of the lamp is about 3000 hours if the Brightness Control setting in the Settings menu is set to High (default), and 4000 hours if the Brightness Control setting...
User's Guide
Page 70
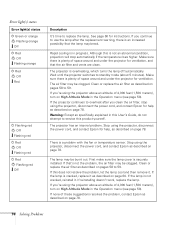
Error light(s) status Error light(s) status P Green or orange Flashing orange Off P Red Off Flashing orange P Red Off Red P Flashing red Off Flashing red P Red Off Flashing red P Red Flashing red Off Description It's time to standby mode (about 5 minutes). Wait until the projector switches to replace the lamp. If you clean the air filter, stop automatically if the temperature rises higher. Warning: Except as described on page 78. 70 Solving Problems Stop using the projector above an altitude of 4,900 feet (1,500 meters), turn on page 60. The lamp may be clogged...
Error light(s) status Error light(s) status P Green or orange Flashing orange Off P Red Off Flashing orange P Red Off Red P Flashing red Off Flashing red P Red Off Flashing red P Red Flashing red Off Description It's time to standby mode (about 5 minutes). Wait until the projector switches to replace the lamp. If you clean the air filter, stop automatically if the temperature rises higher. Warning: Except as described on page 78. 70 Solving Problems Stop using the projector above an altitude of 4,900 feet (1,500 meters), turn on page 60. The lamp may be clogged...
User's Guide
Page 75
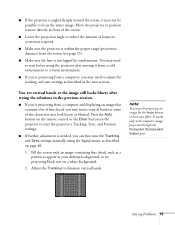
... the Tracking and Sync settings manually using the Signal menu, as your desktop background, or try projecting black text on the projector to focus the entire image. Adjust the Tracking to appear as described on page 48. 1. Press the Auto button on the remote control or the Enter button on a white background. 2. note You must be possible to reset the projector's Tracking, Sync, and Position settings. ■ If further adjustment is not...
... the Tracking and Sync settings manually using the Signal menu, as your desktop background, or try projecting black text on the projector to focus the entire image. Adjust the Tracking to appear as described on page 48. 1. Press the Auto button on the remote control or the Enter button on a white background. 2. note You must be possible to reset the projector's Tracking, Sync, and Position settings. ■ If further adjustment is not...
User's Guide
Page 92
... zooming, 39 Image menu, 45 to 46 Info menu, 63 Input Signal setting, 20, 23, 24, 48 Input signal, selecting, 32 Installing, projector, 15 to 18 Instant Off, 29 K Kensington anti-theft device, 11, 17, 56 Keystone correction, 33 to 34, 49, 74, 82 L Lamp number of hours used, 63 ordering, 11 replacing, 60 to 63 specifications, 82 status light, 60, 69 to 70 Lamp timer, resetting, 62 to 63 Language setting, 51 Laptop computer connecting...
... zooming, 39 Image menu, 45 to 46 Info menu, 63 Input Signal setting, 20, 23, 24, 48 Input signal, selecting, 32 Installing, projector, 15 to 18 Instant Off, 29 K Kensington anti-theft device, 11, 17, 56 Keystone correction, 33 to 34, 49, 74, 82 L Lamp number of hours used, 63 ordering, 11 replacing, 60 to 63 specifications, 82 status light, 60, 69 to 70 Lamp timer, resetting, 62 to 63 Language setting, 51 Laptop computer connecting...
User's Guide
Page 93
... request code, 53 Photo color mode, 35 Picture source, selecting, 32 Picture, see Image Position setting, 48, 73 Positioning image, 33 projector, 15 to 18 Power button, 28 specifications, 82 status light, 28, 69 to 70 PowerPoint, 18, 41, 51 Presentation color mode, 35 PrivateLine Support, 10 Problems color, 76 image, 71 to 76 no signal, 72 to 73 remote control, 77 sound, 76 to 77 using on-screen help, 68 Progressive format, 48 Projection lamp, see Lamp Projection setting, 50 Projector cleaning, 58 disabling buttons...
... request code, 53 Photo color mode, 35 Picture source, selecting, 32 Picture, see Image Position setting, 48, 73 Positioning image, 33 projector, 15 to 18 Power button, 28 specifications, 82 status light, 28, 69 to 70 PowerPoint, 18, 41, 51 Presentation color mode, 35 PrivateLine Support, 10 Problems color, 76 image, 71 to 76 no signal, 72 to 73 remote control, 77 sound, 76 to 77 using on-screen help, 68 Progressive format, 48 Projection lamp, see Lamp Projection setting, 50 Projector cleaning, 58 disabling buttons...
User's Guide
Page 94
..., 11 Remote control A/V Mute button, 38 as wireless mouse, 40 to 41 batteries used, 82 batteries, replacing, 64 correcting color, 35, 45 to 46 E-Zoom buttons, 39 Freeze button, 39 numeric keypad, using, 53 problems, 77 range, 82 specifications, 82 troubleshooting, 77 using, 38 Replacing lamp, 60 to 63 Request code, password, 53 Resetting lamp timer, 62 to 63 Resetting menu options, 45 Resize image, 35 to 36 Resolution, 35 to 36, 73, 81 Resolution setting, 47 S Safety instructions...
..., 11 Remote control A/V Mute button, 38 as wireless mouse, 40 to 41 batteries used, 82 batteries, replacing, 64 correcting color, 35, 45 to 46 E-Zoom buttons, 39 Freeze button, 39 numeric keypad, using, 53 problems, 77 range, 82 specifications, 82 troubleshooting, 77 using, 38 Replacing lamp, 60 to 63 Request code, password, 53 Resetting lamp timer, 62 to 63 Resetting menu options, 45 Resize image, 35 to 36 Resolution, 35 to 36, 73, 81 Resolution setting, 47 S Safety instructions...


