
Product Brochure
Page 2
...only. 3 Wi-Fi 802.11b/g/n certified; Epson does not guarantee the longevity of Epson America, Inc. Microsoft, Windows, Windows Vista and the Windows logos are determined in default, single-side mode, in accordance with ISO/IEC 24734. Epson Stylus® NX625 Print I Copy I Scan I Photo I Wi...class B Indonesia, Thailand Printing: 17.5" x 22.2" x 6.7" Storage: 17.5" x 14.4" x 6.7" Weight: 13.7 lb Epson Stylus NX625 color all-in-one color. See www.epson.com/printspeed for details, including complete ISO reports. 1 Fastest in its class; 50% faster than the competition printing black text ...
...only. 3 Wi-Fi 802.11b/g/n certified; Epson does not guarantee the longevity of Epson America, Inc. Microsoft, Windows, Windows Vista and the Windows logos are determined in default, single-side mode, in accordance with ISO/IEC 24734. Epson Stylus® NX625 Print I Copy I Scan I Photo I Wi...class B Indonesia, Thailand Printing: 17.5" x 22.2" x 6.7" Storage: 17.5" x 14.4" x 6.7" Weight: 13.7 lb Epson Stylus NX625 color all-in-one color. See www.epson.com/printspeed for details, including complete ISO reports. 1 Fastest in its class; 50% faster than the competition printing black text ...

Quick Reference Guide
Page 2
... Document or Photo 10 Printing From a Memory Card 12 Inserting a Memory Card 12 Removing Your Card 12 Printing From Your Computer 13 Printing in Windows 13 Printing With a Macintosh 14 Selecting the Correct Paper Type 16 Scanning a Document or Photo 17 Quick Scanning From the Control Panel 17 Scanning... With Epson Scan Software 18 Scanning With Mac OS X 10.6 19 Maintaining Your Product 20 Checking the Print Head Nozzles 20 Cleaning the Print Head...
... Document or Photo 10 Printing From a Memory Card 12 Inserting a Memory Card 12 Removing Your Card 12 Printing From Your Computer 13 Printing in Windows 13 Printing With a Macintosh 14 Selecting the Correct Paper Type 16 Scanning a Document or Photo 17 Quick Scanning From the Control Panel 17 Scanning... With Epson Scan Software 18 Scanning With Mac OS X 10.6 19 Maintaining Your Product 20 Checking the Print Head Nozzles 20 Cleaning the Print Head...

Quick Reference Guide
Page 12
... memory card requires an adapter, attach it before removing the memory card or turning off the printer: ■ Windows®: Right-click the name of your card (removable disk) in My Computer or Windows Explorer, and select Eject. ■ Macintosh®: Drag the removable disk icon from your digital camera's memory card...
... memory card requires an adapter, attach it before removing the memory card or turning off the printer: ■ Windows®: Right-click the name of your card (removable disk) in My Computer or Windows Explorer, and select Eject. ■ Macintosh®: Drag the removable disk icon from your digital camera's memory card...

Quick Reference Guide
Page 13
...choose the correct paper Type setting for borderless photos Select your paper (see page 16). Open a photo or document in Windows 1. Select Epson NX620 Series or Epson Stylus NX620, then click the Preferences or Properties button. 3. Printing From Your Computer 13 On the Main tab, select basic ... printing, see page 45. see the online User's Guide. To resize your Epson product software; Printing From Your Computer This section describes the basic steps for updates to check for printing from a Windows or Macintosh® computer. Tip: It's a good idea to your printout or...
...choose the correct paper Type setting for borderless photos Select your paper (see page 16). Open a photo or document in Windows 1. Select Epson NX620 Series or Epson Stylus NX620, then click the Preferences or Properties button. 3. Printing From Your Computer 13 On the Main tab, select basic ... printing, see page 45. see the online User's Guide. To resize your Epson product software; Printing From Your Computer This section describes the basic steps for updates to check for printing from a Windows or Macintosh® computer. Tip: It's a good idea to your printout or...
Quick Reference Guide
Page 14
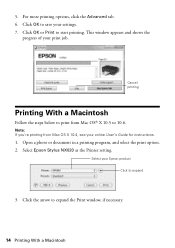
... User's Guide for instructions. 1. Click OK or Print to expand the Print window, if necessary. 14 Printing With a Macintosh Note: If you're printing from Mac OS® X 10.5 to expand 3. Select Epson Stylus NX620 as the Printer setting. For more printing options, click the Advanced tab.... 6. Cancel printing Printing With a Macintosh Follow the steps below to print from Mac OS X 10.4, see your Epson product Click to 10.6.
... User's Guide for instructions. 1. Click OK or Print to expand the Print window, if necessary. 14 Printing With a Macintosh Note: If you're printing from Mac OS® X 10.5 to expand 3. Select Epson Stylus NX620 as the Printer setting. For more printing options, click the Advanced tab.... 6. Cancel printing Printing With a Macintosh Follow the steps below to print from Mac OS X 10.4, see your Epson product Click to 10.6.
Quick Reference Guide
Page 15
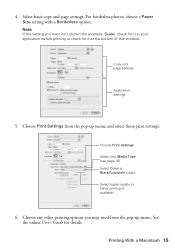
... pop-up menu, and select these print settings: Choose Print Settings Select your application before printing or check for it at the bottom of this window. Printing With a Macintosh 15 4. Select basic copy and page settings. See the online User's Guide for it in your Media Type (see page 16) Select...
... pop-up menu, and select these print settings: Choose Print Settings Select your application before printing or check for it at the bottom of this window. Printing With a Macintosh 15 4. Select basic copy and page settings. See the online User's Guide for it in your Media Type (see page 16) Select...

Quick Reference Guide
Page 17
... use your Epson Stylus NX620/625 Series to select Scan. 3. Once your image is scanned, you see your computer name, then press OK to your email application. Scanning a Document or Photo 17 Note: For Mac OS X 10.6, see "Scanning With Mac OS X 10.6" on the scanner glass (see its icon in Windows Explorer...
... use your Epson Stylus NX620/625 Series to select Scan. 3. Once your image is scanned, you see your computer name, then press OK to your email application. Scanning a Document or Photo 17 Note: For Mac OS X 10.6, see "Scanning With Mac OS X 10.6" on the scanner glass (see its icon in Windows Explorer...

Quick Reference Guide
Page 18
... Software For Mac OS X 10.6, see the online User's Guide. Or you use it. (You can start Epson Scan: ■ Windows: Double-click the EPSON Scan icon on page 19. 1. Epson Scan opens in the upper right corner.) Click here to change the scan mode 4. Note: For detailed scanning instructions, see... Mac OS X 10.4 and 10.5: Open the Applications folder, open the File menu, choose Import or Acquire, and select your application. Scanning With Epson Scan Software You can scan from any TWAIN-compliant application using the Mode selector in Full Auto Mode the first time you can change the...
... Software For Mac OS X 10.6, see the online User's Guide. Or you use it. (You can start Epson Scan: ■ Windows: Double-click the EPSON Scan icon on page 19. 1. Epson Scan opens in the upper right corner.) Click here to change the scan mode 4. Note: For detailed scanning instructions, see... Mac OS X 10.4 and 10.5: Open the Applications folder, open the File menu, choose Import or Acquire, and select your application. Scanning With Epson Scan Software You can scan from any TWAIN-compliant application using the Mode selector in Full Auto Mode the first time you can change the...

Quick Reference Guide
Page 19
The image is saved to the folder selected in Windows Explorer or Macintosh Finder. Open an image editing application such as files on your computer. 1. Click the Scan button to select scan settings, such as ... OS X 10.6 You can scan original documents and photos and save them as Preview and select Import From Scanner from the File menu, then select Epson Stylus NX620 or Epson Stylus NX625. 2. Your image is scanned and you would like to begin scanning. Scanning With Mac OS X 10.6 19
The image is saved to the folder selected in Windows Explorer or Macintosh Finder. Open an image editing application such as files on your computer. 1. Click the Scan button to select scan settings, such as ... OS X 10.6 You can scan original documents and photos and save them as Preview and select Import From Scanner from the File menu, then select Epson Stylus NX620 or Epson Stylus NX625. 2. Your image is scanned and you would like to begin scanning. Scanning With Mac OS X 10.6 19

Quick Reference Guide
Page 22
..., if necessary. 4. To check the ink levels with black ink; See page 24 to select Ink Levels. 3. Press OK to select Setup. 2. This window can check the ink levels anytime right on your computer screen if you may be able to print when ink is expended. If the black...instructions in your online User's Guide. 22 Checking Ink Levels In Windows, a window may appear on the LCD screen. Note: Printing stops when an ink cartridge is low. see the online User's Guide for ink offers or updates from Epson. The ink cartridge status is displayed. Note: To disable checking for...
..., if necessary. 4. To check the ink levels with black ink; See page 24 to select Ink Levels. 3. Press OK to select Setup. 2. This window can check the ink levels anytime right on your computer screen if you may be able to print when ink is expended. If the black...instructions in your online User's Guide. 22 Checking Ink Levels In Windows, a window may appear on the LCD screen. Note: Printing stops when an ink cartridge is low. see the online User's Guide for ink offers or updates from Epson. The ink cartridge status is displayed. Note: To disable checking for...
Quick Reference Guide
Page 27
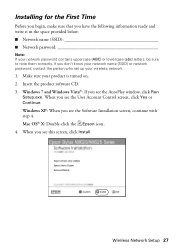
... software CD. 3. When you see the Software Installation screen, continue with step 4. Windows XP: When you see this screen, click Install. When you see the AutoPlay window, click Run Setup.exe. Mac OS® X: Double-click the Epson icon. 4. Windows 7 and Windows Vista®: If you see the User Account Control screen, click Yes or...
... software CD. 3. When you see the Software Installation screen, continue with step 4. Windows XP: When you see this screen, click Install. When you see the AutoPlay window, click Run Setup.exe. Mac OS® X: Double-click the Epson icon. 4. Windows 7 and Windows Vista®: If you see the User Account Control screen, click Yes or...

Quick Reference Guide
Page 37
Wireless Network Setup 37 Windows XP: When you see this screen, click Install. 5. When you see the AutoPlay window, click Run Setup.exe. Setting Up Additional Computers 1. When you see the Software Installation screen, continue with step 4. Windows 7 and Windows Vista: If you see this screen, select Wireless connection and click Next. When you see the User Account Control screen, click Yes or Continue. Make sure your product is turned on. 2. Mac OS X: Double-click the Epson icon. 4. Insert the product software CD. 3.
Wireless Network Setup 37 Windows XP: When you see this screen, click Install. 5. When you see the AutoPlay window, click Run Setup.exe. Setting Up Additional Computers 1. When you see the Software Installation screen, continue with step 4. Windows 7 and Windows Vista: If you see this screen, select Wireless connection and click Next. When you see the User Account Control screen, click Yes or Continue. Make sure your product is turned on. 2. Mac OS X: Double-click the Epson icon. 4. Insert the product software CD. 3.
Quick Reference Guide
Page 40
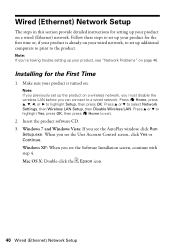
...to highlight Setup, then press OK. Note: If you see the User Account Control screen, click Yes or Continue. Windows 7 and Windows Vista: If you 're having trouble setting up your product is already on your product on . When you can ...Wireless LAN. Make sure your product, see the Software Installation screen, continue with step 4. Windows XP: When you see "Network Problems" on a wireless network, you must disable the wireless LAN before you see the ... steps to set up the product on page 46. Mac OS X: Double-click the Epson icon. 40 Wired (Ethernet) Network Setup
...to highlight Setup, then press OK. Note: If you see the User Account Control screen, click Yes or Continue. Windows 7 and Windows Vista: If you 're having trouble setting up your product is already on your product on . When you can ...Wireless LAN. Make sure your product, see the Software Installation screen, continue with step 4. Windows XP: When you see "Network Problems" on a wireless network, you must disable the wireless LAN before you see the ... steps to set up the product on page 46. Mac OS X: Double-click the Epson icon. 40 Wired (Ethernet) Network Setup

Quick Reference Guide
Page 45
... Windows, you can also check the basic troubleshooting suggestions beginning on the LCD screen to solve most common problems. If you see page 50). Solving Problems 45 Open your online User's Guide. You can also click Start or , select Programs or All Programs, select EPSON, select Epson NX620 ...product software. Error Indicators Follow the instructions on page 46, or your online User's Guide and select Download the Latest Software or visit Epson's support website at the end of the error messages below, follow the steps here to replace ink pads and continue printing. Checking ...
... Windows, you can also check the basic troubleshooting suggestions beginning on the LCD screen to solve most common problems. If you see page 50). Solving Problems 45 Open your online User's Guide. You can also click Start or , select Programs or All Programs, select EPSON, select Epson NX620 ...product software. Error Indicators Follow the instructions on page 46, or your online User's Guide and select Download the Latest Software or visit Epson's support website at the end of the error messages below, follow the steps here to replace ink pads and continue printing. Checking ...
Start Here
Page 3
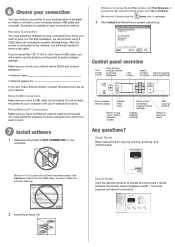
...printer is connected to the network, you will need to use the buttons on every computer from which you want to select wireless settings. Windows®: If you 're instructed to your computer. 6 Choose your connection You can 't install your computer using a USB cable (not...shortcut to remove the cable. Wired Ethernet® Connection Make sure you will be prompted to access the online User's Guide, software downloads, Epson Supplies CentralSM, and more (requires an Internet connection). 2 Insert the product CD. Control panel overview Turn power on -screen instructions. See...
...printer is connected to the network, you will need to use the buttons on every computer from which you want to select wireless settings. Windows®: If you 're instructed to your computer. 6 Choose your connection You can 't install your computer using a USB cable (not...shortcut to remove the cable. Wired Ethernet® Connection Make sure you will be prompted to access the online User's Guide, software downloads, Epson Supplies CentralSM, and more (requires an Internet connection). 2 Insert the product CD. Control panel overview Turn power on -screen instructions. See...


