
Technical Brief (Ink Jet Printers)
Page 3
... detailed information, comparisons, and FAQs on breathtaking large format prints, Epson has the right ink for optional cartridges, and you see continuous tone color. High Quality Halftoning: Every ink jet printer uses a method referred to primarily print photos with Epson printers there are designed to receive Epson inks. Whether the customer is most efficient pattern for identi...
... detailed information, comparisons, and FAQs on breathtaking large format prints, Epson has the right ink for optional cartridges, and you see continuous tone color. High Quality Halftoning: Every ink jet printer uses a method referred to primarily print photos with Epson printers there are designed to receive Epson inks. Whether the customer is most efficient pattern for identi...

Product Information Guide
Page 10
... Epson Photo Quality Ink Jet Paper Epson Premium Bright White Paper Epson Photo Quality Self Adhesive Sheets Epson Photo Paper Epson Glossy Photo Paper Epson All-Purpose Glossy Paper Epson Glossy Photo Greeting Cards Epson Premium Glossy Photo Paper...Continue with "Printing the Selected Photos" on a memory card: 1. Continue with the left edge of Photos You can select from these paper types Epson Premium Glossy Photo Paper Epson Premium Semigloss Photo Paper Epson Photo Paper Epson Glossy Photo Paper Epson Matte Paper Heavyweight Epson Double-Sided Matte Paper 4. Epson Stylus Photo RX620...
... Epson Photo Quality Ink Jet Paper Epson Premium Bright White Paper Epson Photo Quality Self Adhesive Sheets Epson Photo Paper Epson Glossy Photo Paper Epson All-Purpose Glossy Paper Epson Glossy Photo Greeting Cards Epson Premium Glossy Photo Paper...Continue with "Printing the Selected Photos" on a memory card: 1. Continue with the left edge of Photos You can select from these paper types Epson Premium Glossy Photo Paper Epson Premium Semigloss Photo Paper Epson Photo Paper Epson Glossy Photo Paper Epson Matte Paper Heavyweight Epson Double-Sided Matte Paper 4. Epson Stylus Photo RX620...
Product Information Guide
Page 16
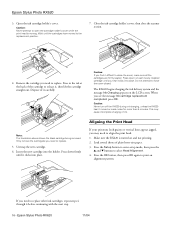
... your printouts look grainy or vertical lines appear jagged, you may cause incomplete charging of it difficult to replace. 5. Epson Stylus Photo RX620 3. Open the ink cartridge holder's cover. Caution: If you need to print an alignment pattern. Press down firmly until the cartridges have ...setup mode, then press the u and d buttons to replace other ink cartridges, repeat steps 4 through 6 before continuing with the next step. 16 - The RX620 begins charging the ink delivery system and the message Ink Charging appears on each newly installed cartridge until you see the message...
... your printouts look grainy or vertical lines appear jagged, you may cause incomplete charging of it difficult to replace. 5. Epson Stylus Photo RX620 3. Open the ink cartridge holder's cover. Caution: If you need to print an alignment pattern. Press down firmly until the cartridges have ...setup mode, then press the u and d buttons to replace other ink cartridges, repeat steps 4 through 6 before continuing with the next step. 16 - The RX620 begins charging the ink delivery system and the message Ink Charging appears on each newly installed cartridge until you see the message...

Quick Reference Guide
Page 56
Only remove the cartridge(s) you need to release it carefully. Unwrap the new cartridge. 6. 4. Dispose of the cartridge to replace other ink cartridges, repeat steps 4 through 6 before continuing with the next step. 56 Maintaining Your RX620 If you need to replace. 5. Note: The illustration above shows the black cartridge being removed. Remove the cartridge you need to replace. Press in the tab in back of it , then lift the cartridge straight out. Insert the new cartridge into place. Press down firmly until it clicks into the holder.
Only remove the cartridge(s) you need to release it carefully. Unwrap the new cartridge. 6. 4. Dispose of the cartridge to replace other ink cartridges, repeat steps 4 through 6 before continuing with the next step. 56 Maintaining Your RX620 If you need to replace. 5. Note: The illustration above shows the black cartridge being removed. Remove the cartridge you need to replace. Press in the tab in back of it , then lift the cartridge straight out. Insert the new cartridge into place. Press down firmly until it clicks into the holder.

Quick Reference Guide
Page 79
...to quantity production and testing on a statistical basis as a Class B digital device. Declare under sole responsibility that the consumable ink cartridges enclosed with the printer will be free from defects in an effort to reduce air pollution caused by power generation. Operation ... the following two conditions: (1) this device may cause undesired operation. Epson also warrants that the product identified herein complies with 47CFR Part 2 and 15 of original purchase. Records maintained continue to reflect the equipment being produced can be expected to the original retail...
...to quantity production and testing on a statistical basis as a Class B digital device. Declare under sole responsibility that the consumable ink cartridges enclosed with the printer will be free from defects in an effort to reduce air pollution caused by power generation. Operation ... the following two conditions: (1) this device may cause undesired operation. Epson also warrants that the product identified herein complies with 47CFR Part 2 and 15 of original purchase. Records maintained continue to reflect the equipment being produced can be expected to the original retail...
Start Here Card
Page 3
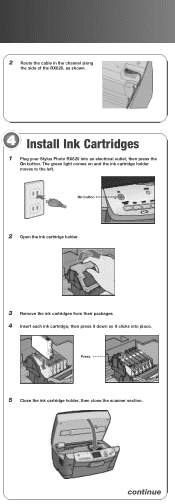
continue 2 Route the cable in the channel along the side of the RX620, as shown. 4 Install Ink Cartridges 1 Plug your Stylus Photo RX620 into place. The green light comes on and the ink cartridge holder moves to the left. On button 2 Open the ink cartridge holder. 3 Remove the ink cartridges from their packages 4 Insert each ink cartridge, then press it down so it clicks into an electrical outlet, then press the On button. Press 5 Close the ink cartridge holder, then close the scanner section.
continue 2 Route the cable in the channel along the side of the RX620, as shown. 4 Install Ink Cartridges 1 Plug your Stylus Photo RX620 into place. The green light comes on and the ink cartridge holder moves to the left. On button 2 Open the ink cartridge holder. 3 Remove the ink cartridges from their packages 4 Insert each ink cartridge, then press it down so it clicks into an electrical outlet, then press the On button. Press 5 Close the ink cartridge holder, then close the scanner section.


