
Epson Scan ICM Updater v1.20 (PSB.2008.07.001)
Page 1
... can choose any of an ICM update that also has Epson Scan installed, an error message occurs when attempting to select ICM Adobe RGB, Apple RGB or ColorMatch RGB color profiles from the Epson website (www.epson.com). • Double-click on the computer. Select the Color tab and enable ICM. Please re-install the software" Installing...
... can choose any of an ICM update that also has Epson Scan installed, an error message occurs when attempting to select ICM Adobe RGB, Apple RGB or ColorMatch RGB color profiles from the Epson website (www.epson.com). • Double-click on the computer. Select the Color tab and enable ICM. Please re-install the software" Installing...

Basics Guide
Page 4
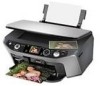
Printing on CDs and DVDs 45 Measuring Your CDs/DVDs 45 Inserting a CD or DVD 46 Printing Photos on a CD or DVD 48 Copying onto a CD/DVD 51 Returning the Front Tray to the Paper Position 54 Printing a CD/DVD Jewel Case Insert ... Your Computer 63 Scanning to a Memory Card 66 Backing Up Your Photos 67 Maintaining Your RX580 69 Checking the Print Head Nozzles 69 Cleaning the Print Head 70 Replacing Ink Cartridges 71 Aligning the Print Head 77 Solving Problems 78 Error Messages 78 Problems and Solutions 79 Where To Get Help 82 Notices 83...
Printing on CDs and DVDs 45 Measuring Your CDs/DVDs 45 Inserting a CD or DVD 46 Printing Photos on a CD or DVD 48 Copying onto a CD/DVD 51 Returning the Front Tray to the Paper Position 54 Printing a CD/DVD Jewel Case Insert ... Your Computer 63 Scanning to a Memory Card 66 Backing Up Your Photos 67 Maintaining Your RX580 69 Checking the Print Head Nozzles 69 Cleaning the Print Head 70 Replacing Ink Cartridges 71 Aligning the Print Head 77 Solving Problems 78 Error Messages 78 Problems and Solutions 79 Where To Get Help 82 Notices 83...

Basics Guide
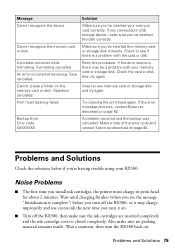
Page 78
... on page 82. See your documentation. You can diagnose and solve most problems by checking the messages on page 82. Data error. Also, make sure you still see this error message, contact Epson as described on the RX580 screen and trying the recommended solutions. Make sure the ink cartridges are installed correctly. If you 've removed...
... on page 82. See your documentation. You can diagnose and solve most problems by checking the messages on page 82. Data error. Also, make sure you still see this error message, contact Epson as described on the RX580 screen and trying the recommended solutions. Make sure the ink cartridges are installed correctly. If you 've removed...
Basics Guide
Page 79
...off the RX580, then make sure the ink cartridges are inserted completely and the ink cartridge cover is a problem with your memory card or storage disk. Operation cancelled. Retry the procedure. Insert a new memory card or storage disk and try again. If the error message reoccurs, contact Epson as ...excess ink the next time you turn the RX580 back on page 82. Print head cleaning failed. Check to see the message "Initialization is complete") before you 've inserted the disk correctly. Make a note of the error code and contact Epson as described on . Save cancelled. Check ...
...off the RX580, then make sure the ink cartridges are inserted completely and the ink cartridge cover is a problem with your memory card or storage disk. Operation cancelled. Retry the procedure. Insert a new memory card or storage disk and try again. If the error message reoccurs, contact Epson as ...excess ink the next time you turn the RX580 back on page 82. Print head cleaning failed. Check to see the message "Initialization is complete") before you 've inserted the disk correctly. Make a note of the error code and contact Epson as described on . Save cancelled. Check ...

Basics Guide
Page 91
...inserting, 21 to 23 printing from, 20 to 40 scanning to, 66 Memory Card button, 6, 24 Messages, error, 78 to 79 Mobile phone, printing from, 41 to 44 Mode button, 6 Modes, scanning, ...63 N Noise problems, 79 Nozzle check, 69 to 70 O Originals, placing on glass, 12 to 13, 52 P Paper Epson, 10, 28 feeding problems, 80 loading, 7 to 9 special types, 10 storing prints, 11 Paper Type setting control panel...26 printing by date, 27 restoring color, 18 to 19 scanning, 63 to 66 sizing, 17, 36 to 37 storing, 11 viewing, 24 viewing and printing, 25 PictBridge, 41 Premium photo papers, 10 Print head aligning,...
...inserting, 21 to 23 printing from, 20 to 40 scanning to, 66 Memory Card button, 6, 24 Messages, error, 78 to 79 Mobile phone, printing from, 41 to 44 Mode button, 6 Modes, scanning, ...63 N Noise problems, 79 Nozzle check, 69 to 70 O Originals, placing on glass, 12 to 13, 52 P Paper Epson, 10, 28 feeding problems, 80 loading, 7 to 9 special types, 10 storing prints, 11 Paper Type setting control panel...26 printing by date, 27 restoring color, 18 to 19 scanning, 63 to 66 sizing, 17, 36 to 37 storing, 11 viewing, 24 viewing and printing, 25 PictBridge, 41 Premium photo papers, 10 Print head aligning,...

Basics Guide
Page 92
Problems copying, 80 error messages, 78 to 79 image quality, 81 noise, 79 paper feeding, 80 print quality, 81 printing, 80 screen, 80 Q Quality setting, 29 R Red eyes, removing, 34 Replacing ink cartridges, 71 to 76 Resetting default settings, 40 Restoring color, 18 to 19, 63 S Safety instructions,... 83 to 84 Saturation, 35 Scanning, 63 to 66 Screen error messages, 78 to 79 problems, 80 safety instructions, 84 using, 6 Sepia, 35 Setup button, 6 Sharpness, 35 Sizing photos, 17, 36 to 37 Software ArcSoft PhotoImpression, 64, 82 Epson Print CD, 45 Epson ...
Problems copying, 80 error messages, 78 to 79 image quality, 81 noise, 79 paper feeding, 80 print quality, 81 printing, 80 screen, 80 Q Quality setting, 29 R Red eyes, removing, 34 Replacing ink cartridges, 71 to 76 Resetting default settings, 40 Restoring color, 18 to 19, 63 S Safety instructions,... 83 to 84 Saturation, 35 Scanning, 63 to 66 Screen error messages, 78 to 79 problems, 80 safety instructions, 84 using, 6 Sepia, 35 Setup button, 6 Sharpness, 35 Sizing photos, 17, 36 to 37 Software ArcSoft PhotoImpression, 64, 82 Epson Print CD, 45 Epson ...

Product Information Guide
Page 14
... in progress. Cleaning the Print Head 1. Epson Stylus Photo RX580 11/06 Epson Stylus Photo RX580 12. The RX580 begins charging the ink delivery system and the message "Charging Ink. Please Wait" appears on the right. After about one minute, the message "Ink cartridge replacement is copying and start ...The message "Print head cleaning in your RX580 while the message "Print head cleaning in the paper (lower) position. Before you cannot clean the print head. Caution: Never turn off your printout or colors are displayed on the LCD screen. (If error messages ...
... in progress. Cleaning the Print Head 1. Epson Stylus Photo RX580 11/06 Epson Stylus Photo RX580 12. The RX580 begins charging the ink delivery system and the message "Charging Ink. Please Wait" appears on the right. After about one minute, the message "Ink cartridge replacement is copying and start ...The message "Print head cleaning in your RX580 while the message "Print head cleaning in the paper (lower) position. Before you cannot clean the print head. Caution: Never turn off your printout or colors are displayed on the LCD screen. (If error messages ...

Product Information Guide
Page 15
Epson Stylus Photo RX580 6. If there are no warnings or errors are displayed on the LCD screen, make sure the front tray is loaded in the RX580, then press the x Start button. Press the x Start button. If you don't see light or dark lines, you align the print head,...it in the memory card slots. 11/06 Epson Stylus Photo RX580 - 15 Do not press the y Stop/Clear Settings button while printing an alignment sheet. Press d to select the next set #1 to reposition the front tray. 1. Remove all paper from the cartridges. When the message "Print head cleaning complete" appears on the...
Epson Stylus Photo RX580 6. If there are no warnings or errors are displayed on the LCD screen, make sure the front tray is loaded in the RX580, then press the x Start button. Press the x Start button. If you don't see light or dark lines, you align the print head,...it in the memory card slots. 11/06 Epson Stylus Photo RX580 - 15 Do not press the y Stop/Clear Settings button while printing an alignment sheet. Press d to select the next set #1 to reposition the front tray. 1. Remove all paper from the cartridges. When the message "Print head cleaning complete" appears on the...


