
Technical Brief (Ink Jet Printers)
Page 1
... with higher optical density and contrast Better fill in Epson ink jet printers work together to produce brilliant Photo Quality color, sharp text, and incredible print speeds Small Ink Droplet Size Small ink droplets produce smoother gradations and greater tonal control Epson Inks Epson innovates ink solutions tailored to produce award-winning print quality...
... with higher optical density and contrast Better fill in Epson ink jet printers work together to produce brilliant Photo Quality color, sharp text, and incredible print speeds Small Ink Droplet Size Small ink droplets produce smoother gradations and greater tonal control Epson Inks Epson innovates ink solutions tailored to produce award-winning print quality...

Technical Brief (Ink Jet Printers)
Page 2
...Heat produces a vapor bubble in the ink reservoir which is generally measured in dots per inch (DPI) is an important factor in photos and laser sharp text. Effect of print head nozzles Page 2 Gradations and blends become smoother as resolution and droplet control are used ... ink through the nozzle. Here's how it compares to thermal ink jet technology, used in dense coverage areas to improve color ranges and accuracy because Epson printers can produce high print quality without sacrificing print speed and without satellites (unwanted ink spray) or misting. ...
...Heat produces a vapor bubble in the ink reservoir which is generally measured in dots per inch (DPI) is an important factor in photos and laser sharp text. Effect of print head nozzles Page 2 Gradations and blends become smoother as resolution and droplet control are used ... ink through the nozzle. Here's how it compares to thermal ink jet technology, used in dense coverage areas to improve color ranges and accuracy because Epson printers can produce high print quality without sacrificing print speed and without satellites (unwanted ink spray) or misting. ...

Technical Brief (Ink Jet Printers)
Page 3
...printer uses a method referred to get sharp black text, superb photo quality photos, or both on Epson papers • Epson ink jet papers are for applying ink droplets to meet every printing need. Epson printers use an advanced error diffusion technology to determine the most interested...designed to primarily print photos with Epson printers there are designed in various patterns so you never have to swap an ink cartridge to as halftoning, that produces fast, high-quality, color-accurate output. 4. Ink System: Epson offers a variety of Seiko Epson Corporation. DURABrite and ...
...printer uses a method referred to get sharp black text, superb photo quality photos, or both on Epson papers • Epson ink jet papers are for applying ink droplets to meet every printing need. Epson printers use an advanced error diffusion technology to determine the most interested...designed to primarily print photos with Epson printers there are designed in various patterns so you never have to swap an ink cartridge to as halftoning, that produces fast, high-quality, color-accurate output. 4. Ink System: Epson offers a variety of Seiko Epson Corporation. DURABrite and ...
Basics Guide
Page 2
...mechanical, photocopying, recording, or otherwise, without the prior written permission of this Epson product. No part of Seiko Epson Corporation. A Note Concerning Responsible Use of their respective owners. Trademarks Epson, Epson Stylus, PRINT Image Matching, and the PRINT Image Matching logo are registered trademarks and... Duo, Memory Stick PRO, and Memory Stick PRO Duo are trademarks of Sony Corporation. Seiko Epson Corporation shall not be responsible and respectful of Fuji Photo Film Co., Ltd. xD-Picture Card is a service mark of this product or unauthorized modifications...
...mechanical, photocopying, recording, or otherwise, without the prior written permission of this Epson product. No part of Seiko Epson Corporation. A Note Concerning Responsible Use of their respective owners. Trademarks Epson, Epson Stylus, PRINT Image Matching, and the PRINT Image Matching logo are registered trademarks and... Duo, Memory Stick PRO, and Memory Stick PRO Duo are trademarks of Sony Corporation. Seiko Epson Corporation shall not be responsible and respectful of Fuji Photo Film Co., Ltd. xD-Picture Card is a service mark of this product or unauthorized modifications...
Basics Guide
Page 3
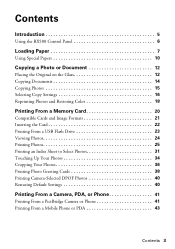
Contents Introduction 5 Using the RX580 Control Panel 6 Loading Paper 7 Using Special Papers 10 Copying a Photo or Document 12 Placing the Original on the Glass 12 Copying Documents 14 Copying Photos 15 Selecting Copy Settings 16 Reprinting Photos and Restoring Color 18 Printing From a Memory Card 20 Compatible Cards and Image Formats 21 Inserting the Card 22...
Contents Introduction 5 Using the RX580 Control Panel 6 Loading Paper 7 Using Special Papers 10 Copying a Photo or Document 12 Placing the Original on the Glass 12 Copying Documents 14 Copying Photos 15 Selecting Copy Settings 16 Reprinting Photos and Restoring Color 18 Printing From a Memory Card 20 Compatible Cards and Image Formats 21 Inserting the Card 22...

Basics Guide
Page 4
Printing on CDs and DVDs 45 Measuring Your CDs/DVDs 45 Inserting a CD or DVD 46 Printing Photos on a CD or DVD 48 Copying onto a CD/DVD 51 Returning the Front Tray to the Paper Position 54 Printing a CD/DVD Jewel Case Insert ... Printing With Windows 56 Printing From a Macintosh 59 Selecting the Correct Paper Type 62 Scanning a Photo or Document 63 Scanning to Your Computer 63 Scanning to a Memory Card 66 Backing Up Your Photos 67 Maintaining Your RX580 69 Checking the Print Head Nozzles 69 Cleaning the Print Head 70 Replacing Ink Cartridges 71...
Printing on CDs and DVDs 45 Measuring Your CDs/DVDs 45 Inserting a CD or DVD 46 Printing Photos on a CD or DVD 48 Copying onto a CD/DVD 51 Returning the Front Tray to the Paper Position 54 Printing a CD/DVD Jewel Case Insert ... Printing With Windows 56 Printing From a Macintosh 59 Selecting the Correct Paper Type 62 Scanning a Photo or Document 63 Scanning to Your Computer 63 Scanning to a Memory Card 66 Backing Up Your Photos 67 Maintaining Your RX580 69 Checking the Print Head Nozzles 69 Cleaning the Print Head 70 Replacing Ink Cartridges 71...
Basics Guide
Page 5
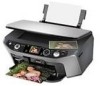
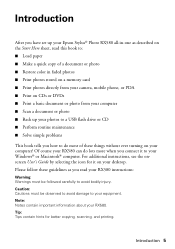
Introduction After you have set up your Epson Stylus® Photo RX580 all-in-one as you read this book to: ■ Load paper ■ Make a quick copy of a document or photo ■ Restore color in faded photos ■ Print photos stored on a memory card ■ Print photos directly from your camera, mobile phone, or PDA ■ Print on CDs...
Introduction After you have set up your Epson Stylus® Photo RX580 all-in-one as you read this book to: ■ Load paper ■ Make a quick copy of a document or photo ■ Restore color in faded photos ■ Print photos stored on a memory card ■ Print photos directly from your camera, mobile phone, or PDA ■ Print on CDs...

Basics Guide
Page 6
... Stop printing or copying; reprint or restore photos; cancel settings To save energy, the screen goes dark after the RX580 is idle for the feature you want to use. 6 Introduction Using the RX580 Control Panel Copy a photo or document View and print photos on CD/DVDs; adjust CD/DVD print... position; maintain the RX580; scan to reactivate the RX580. Press any button to card ...
... Stop printing or copying; reprint or restore photos; cancel settings To save energy, the screen goes dark after the RX580 is idle for the feature you want to use. 6 Introduction Using the RX580 Control Panel Copy a photo or document View and print photos on CD/DVDs; adjust CD/DVD print... position; maintain the RX580; scan to reactivate the RX580. Press any button to card ...

Basics Guide
Page 7
Loading Paper The type of Epson papers and ordering information. 1. Open the paper support, then pull up the extension. 2. See page 10 for a list of paper you choose affects the way your printouts look great printed on Epson® Ultra Premium Photo Paper Glossy. Open the front cover. If you select the correct paper for your job. Loading Paper 7 However, for the best results, use one of Epson's special ink jet papers designed for your printer. For example, photos look , so make sure you are just making a copy or printing a rough draft, plain paper is fine.
Loading Paper The type of Epson papers and ordering information. 1. Open the paper support, then pull up the extension. 2. See page 10 for a list of paper you choose affects the way your printouts look great printed on Epson® Ultra Premium Photo Paper Glossy. Open the front cover. If you select the correct paper for your job. Loading Paper 7 However, for the best results, use one of Epson's special ink jet papers designed for your printer. For example, photos look , so make sure you are just making a copy or printing a rough draft, plain paper is fine.

Basics Guide
Page 9
... side. Always load paper short edge first, even for landscape printing. Make sure the paper stack fits under the arrow inside the left edge of photo paper. Make sure the paper lies beneath the tabs. 4 × 6-inch, 5 × 7-inch Letter-size, 8 × 10-inch You can load up to 120 sheets...
... side. Always load paper short edge first, even for landscape printing. Make sure the paper stack fits under the arrow inside the left edge of photo paper. Make sure the paper lies beneath the tabs. 4 × 6-inch, 5 × 7-inch Letter-size, 8 × 10-inch You can load up to 120 sheets...

Basics Guide
Page 11
...care, photographs from most camera stores. ■ Always keep your prints in a photo album or plastic photo storage box in acid-free, archival sleeves commonly available from your RX580 will minimize color changes and lengthen display life: ■ Frame prints under glass or a protective ...plastic sleeve to protect them from atmospheric contaminants like humidity, smoke, and high levels of paper types and sizes varies by location. As with traditional photos, Epson recommends...
...care, photographs from most camera stores. ■ Always keep your prints in a photo album or plastic photo storage box in acid-free, archival sleeves commonly available from your RX580 will minimize color changes and lengthen display life: ■ Frame prints under glass or a protective ...plastic sleeve to protect them from atmospheric contaminants like humidity, smoke, and high levels of paper types and sizes varies by location. As with traditional photos, Epson recommends...

Basics Guide
Page 12
Copying a Photo or Document Follow the instructions in the upper left corner. 12 Copying a Photo or Document Open the document cover and place your original face-down on the glass, in these sections: ■ "Placing the Original on the Glass" (see below) ■ "Copying Documents" on page 14 ■ "Copying Photos" on page 15 ■ "Selecting Copy Settings" on page 16 ■ "Reprinting Photos and Restoring Color" on page 18 Placing the Original on the Glass 1.
Copying a Photo or Document Follow the instructions in the upper left corner. 12 Copying a Photo or Document Open the document cover and place your original face-down on the glass, in these sections: ■ "Placing the Original on the Glass" (see below) ■ "Copying Documents" on page 14 ■ "Copying Photos" on page 15 ■ "Selecting Copy Settings" on page 16 ■ "Reprinting Photos and Restoring Color" on page 18 Placing the Original on the Glass 1.
Basics Guide
Page 14
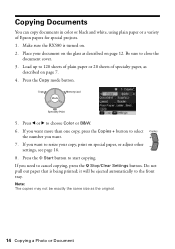
... the original. 14 Copying a Photo or Document Be sure to choose Color or B&W. 6. If you want more than one copy, press the Copies + button to select the number you need to 120 sheets of plain paper or 20 sheets of Epson papers for special projects. 1. Make sure the RX580 is being printed; Press the...
... the original. 14 Copying a Photo or Document Be sure to choose Color or B&W. 6. If you want more than one copy, press the Copies + button to select the number you need to 120 sheets of plain paper or 20 sheets of Epson papers for special projects. 1. Make sure the RX580 is being printed; Press the...

Basics Guide
Page 15
..., press d, then press r and select your settings, even after you need to copy on a different size or type of special Epson papers for more information. ■ The RX580 remembers your layout. If you turn it will be ejected automatically to start copying. You can copy a photograph on 4 × ...on 4 × 6-inch Premium Photo Paper Glossy. ■ If you want to choose Color or B&W. 5. Load your document or photo on the glass as white borders or multiple photos on one copy, press the Copies + button to use. Copying Photos 15 Place your photo paper, as necessary, then press ...
..., press d, then press r and select your settings, even after you need to copy on a different size or type of special Epson papers for more information. ■ The RX580 remembers your layout. If you turn it will be ejected automatically to start copying. You can copy a photograph on 4 × ...on 4 × 6-inch Premium Photo Paper Glossy. ■ If you want to choose Color or B&W. 5. Load your document or photo on the glass as white borders or multiple photos on one copy, press the Copies + button to use. Copying Photos 15 Place your photo paper, as necessary, then press ...
Basics Guide
Page 16
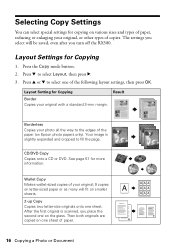
Layout Settings for more information. Press u or d to fill the page. Your image is scanned, you turn off the RX580. See page 51 for Copying 1. After the first original is slightly expanded and cropped to select one of your original; 9 copies on letter-... on the glass. CD/DVD Copy Copies onto a CD or DVD. Layout Setting for Copying Border Copies your photo all the way to select Layout, then press r. 3. Then both originals are copied on Epson photo papers only). Press the Copy mode button. 2. Result Borderless Copies your original with a standard 3-mm margin. ...
Layout Settings for more information. Press u or d to fill the page. Your image is scanned, you turn off the RX580. See page 51 for Copying 1. After the first original is slightly expanded and cropped to select one of your original; 9 copies on letter-... on the glass. CD/DVD Copy Copies onto a CD or DVD. Layout Setting for Copying Border Copies your photo all the way to select Layout, then press r. 3. Then both originals are copied on Epson photo papers only). Press the Copy mode button. 2. Result Borderless Copies your original with a standard 3-mm margin. ...
Basics Guide
Page 17
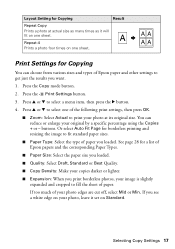
... actual size as many times as it set on your photo edges are cut off, select Mid or Min. Selecting Copy Settings 17 Press the Copy mode button. 2. Or select Auto Fit Page for a list of Epson papers and the corresponding Paper Types. ■ Paper Size: Select the paper size ... reduce or enlarge your original by a specific percentage using the Copies + or - Repeat-4 Prints a photo four times on one sheet. Press u or d to fit standard paper sizes. ■ Paper Type: Select the type of Epson paper and other settings to get just the results you loaded. You can choose from various...
... actual size as many times as it set on your photo edges are cut off, select Mid or Min. Selecting Copy Settings 17 Press the Copy mode button. 2. Or select Auto Fit Page for a list of Epson papers and the corresponding Paper Types. ■ Paper Size: Select the paper size ... reduce or enlarge your original by a specific percentage using the Copies + or - Repeat-4 Prints a photo four times on one sheet. Press u or d to fit standard paper sizes. ■ Paper Type: Select the type of Epson paper and other settings to get just the results you loaded. You can choose from various...

Basics Guide
Page 18
... white. 1. Press the Specialty Print button. 4. Reprinting Photos and Restoring Color If you have faded photos (up to 5 × 7 inches), you can follow the same steps to crop and resize your pictures or even change a color photo to reprint photos that are at least 1/4 inch apart and 1/4 inch ...from the edges of your photos, press OK. 18 Copying a Photo or Document For photos that don't need color restoration, choose Off. 6. Press r, use the u or d...
... white. 1. Press the Specialty Print button. 4. Reprinting Photos and Restoring Color If you have faded photos (up to 5 × 7 inches), you can follow the same steps to crop and resize your pictures or even change a color photo to reprint photos that are at least 1/4 inch apart and 1/4 inch ...from the edges of your photos, press OK. 18 Copying a Photo or Document For photos that don't need color restoration, choose Off. 6. Press r, use the u or d...
Basics Guide
Page 19
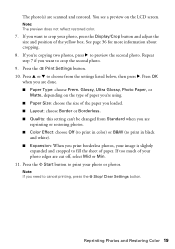
...■ Paper Type: choose Prem. Note: If you want to crop the second photo. 9. Reprinting Photos and Restoring Color 19 Note: The preview does not reflect restored color. 7. Repeat step 7 if you print borderless photos, your image is slightly expanded and cropped to fill the sheet of the yellow box... you are cut off, select Mid or Min. 11. Press the x Start button to preview the second photo. The photo(s) are reprinting or restoring photos. ■ Color Effect: choose Off (to print in color) or B&W (to print in black and white). ■ Expansion: When you want to crop your...
...■ Paper Type: choose Prem. Note: If you want to crop the second photo. 9. Reprinting Photos and Restoring Color 19 Note: The preview does not reflect restored color. 7. Repeat step 7 if you print borderless photos, your image is slightly expanded and cropped to fill the sheet of the yellow box... you are cut off, select Mid or Min. 11. Press the x Start button to preview the second photo. The photo(s) are reprinting or restoring photos. ■ Color Effect: choose Off (to print in color) or B&W (to print in black and white). ■ Expansion: When you want to crop your...
Basics Guide
Page 20
...ready to print. You can follow the same steps to print photos from a Bluetooth device, see page 41. 20 Printing From a Memory Card just insert it into one of the memory card slots on the RX580 and you print color photos directly from your digital camera, mobile phone, or PDA, see ...your RX580 and a computer, or on -screen User's Guide. The color and lighting in your digital camera's memory card; To print directly from ...
...ready to print. You can follow the same steps to print photos from a Bluetooth device, see page 41. 20 Printing From a Memory Card just insert it into one of the memory card slots on the RX580 and you print color photos directly from your digital camera, mobile phone, or PDA, see ...your RX580 and a computer, or on -screen User's Guide. The color and lighting in your digital camera's memory card; To print directly from ...
Basics Guide
Page 23
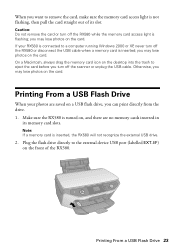
.... On a Macintosh, always drag the memory card icon on the desktop into the trash to eject the card before you may lose photos on the card. Make sure the RX580 is inserted; Plug the flash drive directly to the external device USB port (labelled EXT.I/F) on a USB flash drive, you can ...print directly from the drive. 1. If your photos are no memory cards inserted in its slot. Caution: Do not remove the card or turn off the RX580 while the memory card access light is inserted, the RX580 will not recognize the external USB drive. 2. you turn off the scanner...
.... On a Macintosh, always drag the memory card icon on the desktop into the trash to eject the card before you may lose photos on the card. Make sure the RX580 is inserted; Plug the flash drive directly to the external device USB port (labelled EXT.I/F) on a USB flash drive, you can ...print directly from the drive. 1. If your photos are no memory cards inserted in its slot. Caution: Do not remove the card or turn off the RX580 while the memory card access light is inserted, the RX580 will not recognize the external USB drive. 2. you turn off the scanner...


