
User Manual (P.I.M Plug-in)
Page 2
... Epson Stylus® Photo R200 ■ Epson Stylus Photo R300/R300M ■ Epson Stylus Photo R320 ■ Epson Stylus Photo R800 ■ Epson Stylus Photo RX500 ■ Epson Stylus Photo RX600 ■ Epson Stylus Photo 780 ■ Epson Stylus Photo 785EPX ■ Epson Stylus Photo 820 ■ Epson Stylus Photo 825 ■ Epson Stylus Photo 890 ■ Epson Stylus Photo 900 ■ Epson Stylus Photo 925 ■ Epson Stylus Photo 960 ■ Epson Stylus Photo 1280 ■ Epson Stylus Photo 2000P* ■ Epson Stylus Photo 2200 ■ PictureMate™ by Epson * This printer...
... Epson Stylus® Photo R200 ■ Epson Stylus Photo R300/R300M ■ Epson Stylus Photo R320 ■ Epson Stylus Photo R800 ■ Epson Stylus Photo RX500 ■ Epson Stylus Photo RX600 ■ Epson Stylus Photo 780 ■ Epson Stylus Photo 785EPX ■ Epson Stylus Photo 820 ■ Epson Stylus Photo 825 ■ Epson Stylus Photo 890 ■ Epson Stylus Photo 900 ■ Epson Stylus Photo 925 ■ Epson Stylus Photo 960 ■ Epson Stylus Photo 1280 ■ Epson Stylus Photo 2000P* ■ Epson Stylus Photo 2200 ■ PictureMate™ by Epson * This printer...

Product Information Guide
Page 1
Epson Stylus Photo R800 Printer Parts Paper support and extension Left edge guide Output tray extensions Sheet feeder Printer cover Output tray (in lower position) CD position check disc CD adapter ring Output tray (in upper position) CD/DVD tray Ink ... T054120 T054720 T054920 T054020 Caution: To ensure good results, use genuine Epson ink cartridges and do not refill them. Control panel Paper support (closed) Roll paper edge guide Roll paper holder IEEE 1394 (FireWire) port USB port 1/04 Epson Stylus Photo R800 - 1 Other products may cause damage to your printer not covered by...
Epson Stylus Photo R800 Printer Parts Paper support and extension Left edge guide Output tray extensions Sheet feeder Printer cover Output tray (in lower position) CD position check disc CD adapter ring Output tray (in upper position) CD/DVD tray Ink ... T054120 T054720 T054920 T054020 Caution: To ensure good results, use genuine Epson ink cartridges and do not refill them. Control panel Paper support (closed) Roll paper edge guide Roll paper holder IEEE 1394 (FireWire) port USB port 1/04 Epson Stylus Photo R800 - 1 Other products may cause damage to your printer not covered by...

Product Information Guide
Page 2
... Safety EMC UL 1950 CSA C22.2 No.60950 FCC Part 15 Subpart B Class B CSA C108.8 Class B 2 - Epson Stylus Photo R800 1/04 See page 11 or your printer software, you may see smears, roller marks, misting, or other problems. Printer Specifications Printing Printing method Nozzle configuration Advanced Micro Piezo pigment ink technology, optimized for its voltage. If...
... Safety EMC UL 1950 CSA C22.2 No.60950 FCC Part 15 Subpart B Class B CSA C108.8 Class B 2 - Epson Stylus Photo R800 1/04 See page 11 or your printer software, you may see smears, roller marks, misting, or other problems. Printer Specifications Printing Printing method Nozzle configuration Advanced Micro Piezo pigment ink technology, optimized for its voltage. If...

Product Information Guide
Page 3
... to 60% RH Paper sizes which can be used with this printer range from 3.5 × 5" (89 × 127 mm) up to a higher grade of paper. Do not load curled or folded paper. Epson Stylus Photo R800 Mechanical Paper path Sheet feeder capacity Dimensions Weight Sheet feeder, top entry...25.6 inches (644 mm) Height: 12.7 inches (322 mm) 17.6 lb (8.0 kg) without the ink cartridges Ink Cartridges Color Cartridge life Temperature Dimensions Yellow, Magenta, Cyan, Matte Black, Photo Black, Red, Blue, Gloss Optimizer Within 6 months of opening the package, at 77 °F (25 °C) Storage: -4...
... to 60% RH Paper sizes which can be used with this printer range from 3.5 × 5" (89 × 127 mm) up to a higher grade of paper. Do not load curled or folded paper. Epson Stylus Photo R800 Mechanical Paper path Sheet feeder capacity Dimensions Weight Sheet feeder, top entry...25.6 inches (644 mm) Height: 12.7 inches (322 mm) 17.6 lb (8.0 kg) without the ink cartridges Ink Cartridges Color Cartridge life Temperature Dimensions Yellow, Magenta, Cyan, Matte Black, Photo Black, Red, Blue, Gloss Optimizer Within 6 months of opening the package, at 77 °F (25 °C) Storage: -4...

Product Information Guide
Page 4
... right margin is 0.12 inch (3.0 mm). If you press the z roll paper button again and send print data, the margin between the printouts. Epson Stylus Photo R800 1/04 C: The minimum bottom margin is about 65 mm. Envelopes A B-L B-R C A: The minimum top margin is about 65 mm. If you... mm) for Windows and Mac OS 8.6 to . The minimum bottom margin is 0.78 inch (20 mm) for Mac OS X. If you to 9.X. Epson Stylus Photo R800 Printable area Single sheets and index cards Normal A Borderless (4 x 6, 5 x 7, 8 x 10, and roll panorama only) B-L B-R C A: The minimum top margin...
... right margin is 0.12 inch (3.0 mm). If you press the z roll paper button again and send print data, the margin between the printouts. Epson Stylus Photo R800 1/04 C: The minimum bottom margin is about 65 mm. Envelopes A B-L B-R C A: The minimum top margin is about 65 mm. If you... mm) for Windows and Mac OS 8.6 to . The minimum bottom margin is 0.78 inch (20 mm) for Mac OS X. If you to 9.X. Epson Stylus Photo R800 Printable area Single sheets and index cards Normal A Borderless (4 x 6, 5 x 7, 8 x 10, and roll panorama only) B-L B-R C A: The minimum top margin...

Product Information Guide
Page 5
... paper or a foreign object is blocking print head movement, or you suspect a paper jam, turn the printer back on your printer and computer. 1/04 Epson Stylus Photo R800 - 5 Green P power light, red ) paper light, and red H ink light flash An unknown printer error has occurred. Hold down the ) paper button until the P power light flashes. 4. A test page...
... paper or a foreign object is blocking print head movement, or you suspect a paper jam, turn the printer back on your printer and computer. 1/04 Epson Stylus Photo R800 - 5 Green P power light, red ) paper light, and red H ink light flash An unknown printer error has occurred. Hold down the ) paper button until the P power light flashes. 4. A test page...

Product Information Guide
Page 6
Make sure the colors on the cartridges match the labels inside . 6. Don't touch the green part 8. Release and open the printer cover. 5. Close the cartridge cover and press it down until it clicks into place. 2. Close the printer cover, then press the H ink button. 4. Caution: Don't ...5 times before opening them. (Don't shake them after 5 minutes, and the printer isn't making any noise, you 'll waste ink. Epson Stylus Photo R800 1/04 If the P power and H ink lights don't turn off the printer or interrupt charging, or you can turn off after they're unpacked.) 7. Then...
Make sure the colors on the cartridges match the labels inside . 6. Don't touch the green part 8. Release and open the printer cover. 5. Close the cartridge cover and press it down until it clicks into place. 2. Close the printer cover, then press the H ink button. 4. Caution: Don't ...5 times before opening them. (Don't shake them after 5 minutes, and the printer isn't making any noise, you 'll waste ink. Epson Stylus Photo R800 1/04 If the P power and H ink lights don't turn off the printer or interrupt charging, or you can turn off after they're unpacked.) 7. Then...

Product Information Guide
Page 7
Place your paper in the printer on the left edge guide to load plain paper and certain special papers in the lower position. Check the following number of sheets of the sheet feeder. Pull out the output tray extensions. 4. Epson Stylus Photo R800 Loading Paper Follow these steps to fit lightly against the paper. Check the...
Place your paper in the printer on the left edge guide to load plain paper and certain special papers in the lower position. Check the following number of sheets of the sheet feeder. Pull out the output tray extensions. 4. Epson Stylus Photo R800 Loading Paper Follow these steps to fit lightly against the paper. Check the...

Product Information Guide
Page 8
... the end of the paper is smeared on your printer software. 3. Load envelopes short edge first as shown, then remove any paper loaded in your ink cartridges are not low before loading it, or load one envelope at a time. 1. Epson Stylus Photo R800 Loading Envelopes You can load 4-inch and 8.3-inch ...on the holders as shown, with roll paper loaded, you should remove the paper or marks may have problems feeding the paper. 8 - Epson Stylus Photo R800 1/04 If you may appear in the sheet feeder at a time, as described below. Turn on roll paper. Loading Roll Paper You ...
... the end of the paper is smeared on your printer software. 3. Load envelopes short edge first as shown, then remove any paper loaded in your ink cartridges are not low before loading it, or load one envelope at a time. 1. Epson Stylus Photo R800 Loading Envelopes You can load 4-inch and 8.3-inch ...on the holders as shown, with roll paper loaded, you should remove the paper or marks may have problems feeding the paper. 8 - Epson Stylus Photo R800 1/04 If you may appear in the sheet feeder at a time, as described below. Turn on roll paper. Loading Roll Paper You ...

Product Information Guide
Page 9
... slide up the paper. Press the z roll paper button to roll up the support extension. 4. Load the paper part of letter-size paper. 1/04 Epson Stylus Photo R800 - 9 Turn on the right. Epson Stylus Photo R800 9. Then insert the other holder into the printer. 6. If it isn't, lift the tray as it . Avoid touching the printable surface of the...
... slide up the paper. Press the z roll paper button to roll up the support extension. 4. Load the paper part of letter-size paper. 1/04 Epson Stylus Photo R800 - 9 Turn on the right. Epson Stylus Photo R800 9. Then insert the other holder into the printer. 6. If it isn't, lift the tray as it . Avoid touching the printable surface of the...

Product Information Guide
Page 10
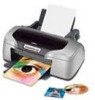
... top of CDs or DVDs, it stops. Caution: Before you plan to each other 7. Epson Stylus Photo R800 5. Press the ) paper button again to feed the paper. 4. To print on a small CD (8 cm), place the small CD ring on the printer. Push in the User's Guide. 1. Lift the output tray as shown below , then ...down in the guide until it 's a good idea to print a small sample, then wait a day and check the quality to check the print position or color before printing on your ink-jet printable CDs or DVDs before you always use the small CD ring when printing 8-cm CDs and that the...
... top of CDs or DVDs, it stops. Caution: Before you plan to each other 7. Epson Stylus Photo R800 5. Press the ) paper button again to feed the paper. 4. To print on a small CD (8 cm), place the small CD ring on the printer. Push in the User's Guide. 1. Lift the output tray as shown below , then ...down in the guide until it 's a good idea to print a small sample, then wait a day and check the quality to check the print position or color before printing on your ink-jet printable CDs or DVDs before you always use the small CD ring when printing 8-cm CDs and that the...
Product Information Guide
Page 11
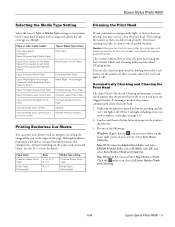
... it only if quality declines. Make sure the printer is a bit slower, you get beautiful portraits and enlargements, without trimming, on , you have any clogged nozzles. Click the utility icon, then click Auto Nozzle Check and Cleaning. 1/04 Epson Stylus Photo R800 - 11 Paper name Premium Glossy Photo Paper Matte Paper Heavyweight Sizes 4 × 6, 5 × 7, 8 ×...
... it only if quality declines. Make sure the printer is a bit slower, you get beautiful portraits and enlargements, without trimming, on , you have any clogged nozzles. Click the utility icon, then click Auto Nozzle Check and Cleaning. 1/04 Epson Stylus Photo R800 - 11 Paper name Premium Glossy Photo Paper Matte Paper Heavyweight Sizes 4 × 6, 5 × 7, 8 ×...

Product Information Guide
Page 12
...-screen message telling you still have print quality problems, check the solutions in the printer list, click OK, and select Head Cleaning. Epson Stylus Photo R800 1/04 Epson Stylus Photo R800 4. Follow the instructions below . Make sure the printer is turned on but not printing, and the red H ink light is off and... check pattern prints. 5. When the green P power light stops flashing, make sure paper is flashing or on the screen. The printer prints and examines the nozzle check pattern shown below to soften-and then try cleaning the print head again. Cleaning takes about two ...
...-screen message telling you still have print quality problems, check the solutions in the printer list, click OK, and select Head Cleaning. Epson Stylus Photo R800 1/04 Epson Stylus Photo R800 4. Follow the instructions below . Make sure the printer is turned on but not printing, and the red H ink light is off and... check pattern prints. 5. When the green P power light stops flashing, make sure paper is flashing or on the screen. The printer prints and examines the nozzle check pattern shown below to soften-and then try cleaning the print head again. Cleaning takes about two ...

Product Information Guide
Page 13
... cartridges and do one shown below. Caution: To avoid damaging the printer, never move the print head by Epson's warranty. You cannot print if an ink cartridge is low on the Windows taskbar. Epson Stylus Photo R800 ❏ Macintosh: OS X: Choose Applications > EPSON Printer Utility > SP R800 > EPSON StatusMonitor. If your ink levels and replace ink cartridges, if necessary, before...
... cartridges and do one shown below. Caution: To avoid damaging the printer, never move the print head by Epson's warranty. You cannot print if an ink cartridge is low on the Windows taskbar. Epson Stylus Photo R800 ❏ Macintosh: OS X: Choose Applications > EPSON Printer Utility > SP R800 > EPSON StatusMonitor. If your ink levels and replace ink cartridges, if necessary, before...

Product Information Guide
Page 14
...cartridge too and repeat this step. Slide the new cartridge into place. 5. Lift up the cartridge cover. 14 - Epson Stylus Photo R800 11. Close the cartridge cover, then close the printer cover. 1/04 Press in one session. Make a note of which cartridge it 's unwrapped.) 4. Caution: Don't touch... cartridge directly beneath the _ mark needs to step 5. Go to be on the printer. The side with step 12. 12. Remove the new cartridge from its package. Epson Stylus Photo R800 Removing and Installing Ink Cartridges Be sure you have a new ink cartridge before you ...
...cartridge too and repeat this step. Slide the new cartridge into place. 5. Lift up the cartridge cover. 14 - Epson Stylus Photo R800 11. Close the cartridge cover, then close the printer cover. 1/04 Press in one session. Make a note of which cartridge it 's unwrapped.) 4. Caution: Don't touch... cartridge directly beneath the _ mark needs to step 5. Go to be on the printer. The side with step 12. 12. Remove the new cartridge from its package. Epson Stylus Photo R800 Removing and Installing Ink Cartridges Be sure you have a new ink cartridge before you ...

Product Information Guide
Page 15
... all the patterns, click Finish. 1/04 Epson Stylus Photo R800 - 15 On the next screen, click Start. Select one of your printouts contain misaligned vertical lines, or you can check and adjust the alignment yourself. The printer begins charging the ink delivery system. Select ...Print Head Alignment. Click the Manual button, then click OK. Turn on the printer. 2. Epson Stylus Photo R800 13. Press the H ink button.
... all the patterns, click Finish. 1/04 Epson Stylus Photo R800 - 15 On the next screen, click Start. Select one of your printouts contain misaligned vertical lines, or you can check and adjust the alignment yourself. The printer begins charging the ink delivery system. Select ...Print Head Alignment. Click the Manual button, then click OK. Turn on the printer. 2. Epson Stylus Photo R800 13. Press the H ink button.

Product Information Guide
Page 16
...on CD-ROM) CPD-17408 CPD-17409 CPD-17410 16 - Epson Stylus Photo R800 Cleaning the Printer To keep your printer working at its best, you need to clean ink out of the inside of the printer, use a soft cloth to clean only the black plastic ... printer in a sealable plastic bag. If you should clean it . 7. Close the cartridge cover and press the H ink button. Test your printer. Close the output tray and the paper support. 5. Related Documentation Epson Stylus Photo R800 Start Here sheet Epson Stylus Photo R800 User's Guide Epson Stylus Photo R800 CD-ROM Epson Stylus Photo R800 ...
...on CD-ROM) CPD-17408 CPD-17409 CPD-17410 16 - Epson Stylus Photo R800 Cleaning the Printer To keep your printer working at its best, you need to clean ink out of the inside of the printer, use a soft cloth to clean only the black plastic ... printer in a sealable plastic bag. If you should clean it . 7. Close the cartridge cover and press the H ink button. Test your printer. Close the output tray and the paper support. 5. Related Documentation Epson Stylus Photo R800 Start Here sheet Epson Stylus Photo R800 User's Guide Epson Stylus Photo R800 CD-ROM Epson Stylus Photo R800 ...
Start Here Card
Page 1
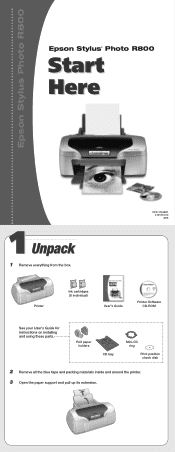
Epson Stylus Photo R800 Epson Stylus® Photo R800 Start Here 1 Unpack 1 Remove everything from the box. CPD-17408R1 4101374-00 XXX Printer Ink cartridges (8 individual) User's Guide Printer Software CD-ROM See your User's Guide for instructions on installing and using these parts. Roll paper holders CD tray Mini-CD ring Print position check disk 2 Remove all the blue tape and packing materials inside and around the printer. 3 Open the paper support and pull up its extension.
Epson Stylus Photo R800 Epson Stylus® Photo R800 Start Here 1 Unpack 1 Remove everything from the box. CPD-17408R1 4101374-00 XXX Printer Ink cartridges (8 individual) User's Guide Printer Software CD-ROM See your User's Guide for instructions on installing and using these parts. Roll paper holders CD tray Mini-CD ring Print position check disk 2 Remove all the blue tape and packing materials inside and around the printer. 3 Open the paper support and pull up its extension.

Start Here Card
Page 6
... Add button. 5 You see your USB or FireWire port. 3 Turn on and connected. 2 Click Stylus Photo R800, then click the Add button. 3 On the next screen, select EPSON USB or EPSON FireWire from Classic applications, start your Macintosh in the Printer List. Epson disclaims any software later. 14 OS X users: If you 're ready to learn more...
... Add button. 5 You see your USB or FireWire port. 3 Turn on and connected. 2 Click Stylus Photo R800, then click the Add button. 3 On the next screen, select EPSON USB or EPSON FireWire from Classic applications, start your Macintosh in the Printer List. Epson disclaims any software later. 14 OS X users: If you 're ready to learn more...

User's Guide
Page 7
...Epson Stylus® Photo R800 gives you create BorderFree®, frame-ready prints in popular photo sizes, such as 4 × 6, 5 × 7, and 8 × 10. ■ Direct printing on glossy papers so your prints look like they came from these advanced features: ■ Eight individually-replaceable Epson® ink cartridges let you print at up to the printer... with a Hi-Speed USB 2.0 cable. 7 Your outstanding printouts result from a photo lab ■ Ink droplets as small...
...Epson Stylus® Photo R800 gives you create BorderFree®, frame-ready prints in popular photo sizes, such as 4 × 6, 5 × 7, and 8 × 10. ■ Direct printing on glossy papers so your prints look like they came from these advanced features: ■ Eight individually-replaceable Epson® ink cartridges let you print at up to the printer... with a Hi-Speed USB 2.0 cable. 7 Your outstanding printouts result from a photo lab ■ Ink droplets as small...


