Printer Basics
Page 3
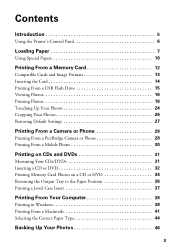
... Flash Drive 15 Viewing Photos 16 Printing Photos 16 Touching Up Your Photos 24 Cropping Your Photos 26 Restoring Default Settings 27 Printing From a Camera or Phone 28 Printing From a PictBridge Camera or Phone 28 Printing From a Mobile Phone 30 Printing on CDs and DVDs 31 Measuring Your CDs/DVDs 31 Inserting a CD or DVD 32 Printing Memory Card Photos on a CD or DVD 34...
... Flash Drive 15 Viewing Photos 16 Printing Photos 16 Touching Up Your Photos 24 Cropping Your Photos 26 Restoring Default Settings 27 Printing From a Camera or Phone 28 Printing From a PictBridge Camera or Phone 28 Printing From a Mobile Phone 30 Printing on CDs and DVDs 31 Measuring Your CDs/DVDs 31 Inserting a CD or DVD 32 Printing Memory Card Photos on a CD or DVD 34...
Printer Basics
Page 5
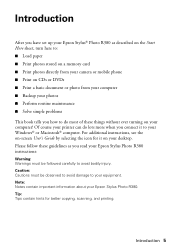
... the icon for better copying, scanning, and printing. Tip: Tips contain hints for it to your Epson Stylus Photo R380. Introduction After you have set up your Epson Stylus® Photo R380 as you read your Epson Stylus Photo R380 instructions: Warning: Warnings must be followed carefully...printer can do lots more when you how to do most of these guidelines as described on the Start Here sheet, turn here to: ■ Load paper ■ Print photos stored on a memory card ■ Print photos directly from your camera or mobile phone ■ Print on CDs or DVDs ■ Print...
... the icon for better copying, scanning, and printing. Tip: Tips contain hints for it to your Epson Stylus Photo R380. Introduction After you have set up your Epson Stylus® Photo R380 as you read your Epson Stylus Photo R380 instructions: Warning: Warnings must be followed carefully...printer can do lots more when you how to do most of these guidelines as described on the Start Here sheet, turn here to: ■ Load paper ■ Print photos stored on a memory card ■ Print photos directly from your camera or mobile phone ■ Print on CDs or DVDs ■ Print...
Printer Basics
Page 6
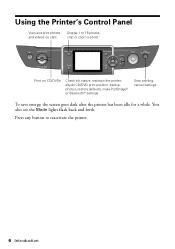
maintain the printer; Press any button to 16 photos; crop or zoom a photo Print on card Display 1 to reactivate the printer. 6 Introduction adjust CD/DVD print position; cancel settings To save energy, the screen goes dark after the printer has been idle for a while. make PictBridge® or Bluetooth® settings Stop printing; restore defaults; Using the Printer's Control Panel View and print photos and videos on CD/DVDs Check ink status; backup photos; You also see the Mode lights flash back and forth.
maintain the printer; Press any button to 16 photos; crop or zoom a photo Print on card Display 1 to reactivate the printer. 6 Introduction adjust CD/DVD print position; cancel settings To save energy, the screen goes dark after the printer has been idle for a while. make PictBridge® or Bluetooth® settings Stop printing; restore defaults; Using the Printer's Control Panel View and print photos and videos on CD/DVDs Check ink status; backup photos; You also see the Mode lights flash back and forth.
Printer Basics
Page 25
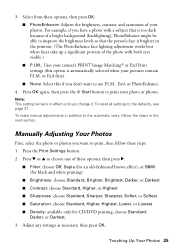
...'t want to print your photos. Touching Up Your Photos 25 Manually Adjusting Your Photos First, select the photo or photos you have a photo with both eyes visible.) ■ P.I.M.: Uses your camera's PRINT Image Matching® or Exif Print settings (this if...printing) ■ Brightness: choose Standard, Brighter, Brightest, Darker, or Darkest ■ Contrast: choose Standard, Higher, or Highest ■ Sharpness: choose Standard, Sharper, Sharpest, Softer, or Softest ■ Saturation: choose Standard, Higher, Highest, Lower, or Lowest ■ Density: available only for CD/DVD printing...
...'t want to print your photos. Touching Up Your Photos 25 Manually Adjusting Your Photos First, select the photo or photos you have a photo with both eyes visible.) ■ P.I.M.: Uses your camera's PRINT Image Matching® or Exif Print settings (this if...printing) ■ Brightness: choose Standard, Brighter, Brightest, Darker, or Darkest ■ Contrast: choose Standard, Higher, or Highest ■ Sharpness: choose Standard, Sharper, Sharpest, Softer, or Softest ■ Saturation: choose Standard, Higher, Highest, Lower, or Lowest ■ Density: available only for CD/DVD printing...
Printer Basics
Page 31
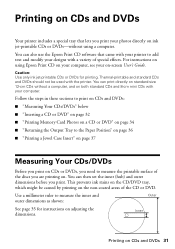
... of the discs you print your photos directly on ink jet-printable CDs or DVDs-without a computer, and on both standard CDs and 8-cm mini CDs with your computer. You can print directly on standard-size 12-cm CDs without using Epson Print CD on your computer, see your on CDs and DVDs 31 Printing on CDs and DVDs Your printer includes a special tray...
... of the discs you print your photos directly on ink jet-printable CDs or DVDs-without a computer, and on both standard CDs and 8-cm mini CDs with your computer. You can print directly on standard-size 12-cm CDs without using Epson Print CD on your computer, see your on CDs and DVDs 31 Printing on CDs and DVDs Your printer includes a special tray...
Printer Basics
Page 32
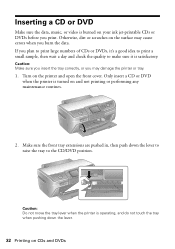
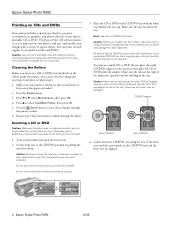
... to raise the tray to make sure it is burned on your ink jet-printable CDs or DVDs before you print. Caution: Do not move the tray lever when the printer is turned on the surface may damage the printer or tray. 1. Caution: Make sure you insert the tray correctly, or you may cause... wait a day and check the quality to the CD/DVD position. Turn on CDs and DVDs If you burn the data. Make sure the front tray extensions are pushed in, then push down the lever. 32 Printing on the printer and open the front cover. Inserting a CD or DVD Make sure the data, music, or...
... to raise the tray to make sure it is burned on your ink jet-printable CDs or DVDs before you print. Caution: Do not move the tray lever when the printer is turned on the surface may damage the printer or tray. 1. Caution: Make sure you insert the tray correctly, or you may cause... wait a day and check the quality to the CD/DVD position. Turn on CDs and DVDs If you burn the data. Make sure the front tray extensions are pushed in, then push down the lever. 32 Printing on the printer and open the front cover. Inserting a CD or DVD Make sure the data, music, or...
Printer Basics
Page 33
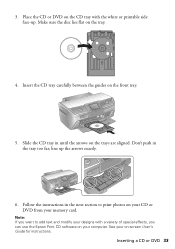
...DVD 33 Insert the CD tray carefully between the guides on the tray. 4. Don't push in until the arrows on the trays are aligned. line up . 3. Follow the instructions in the next section to add text and modify your computer. Note: If you can use the Epson Print CD software on -screen User...'s Guide for instructions. Place the CD or DVD on the CD tray with a variety of special effects, you want to print photos on your CD or DVD from your on your designs with the white or printable ...
...DVD 33 Insert the CD tray carefully between the guides on the tray. 4. Don't push in until the arrows on the trays are aligned. line up . 3. Follow the instructions in the next section to add text and modify your computer. Note: If you can use the Epson Print CD software on -screen User...'s Guide for instructions. Place the CD or DVD on the CD tray with a variety of special effects, you want to print photos on your CD or DVD from your on your designs with the white or printable ...
Printer Basics
Page 34
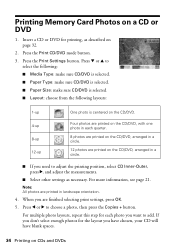
... a circle. ■ If you need to adjust the printing position, select CD Inner-Outer, press r, and adjust the measurements. ■ Select other settings as described on CDs and DVDs When you are printed in landscape orientation. 4. Press the Print CD/DVD mode button. 3. Note: All photos are finished selecting print settings, press OK. 5. Press d or u to select the...
... a circle. ■ If you need to adjust the printing position, select CD Inner-Outer, press r, and adjust the measurements. ■ Select other settings as described on CDs and DVDs When you are printed in landscape orientation. 4. Press the Print CD/DVD mode button. 3. Note: All photos are finished selecting print settings, press OK. 5. Press d or u to select the...
Printer Basics
Page 35
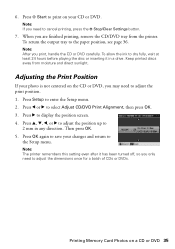
... in any direction. When you are finished printing, remove the CD/DVD tray from moisture and direct sunlight. Keep printed discs away from the printer. Press l or r to display the position screen. 4. Press u, d, l, or r to adjust the position up to enter the Setup menu. 2. Printing Memory Card Photos on the CD or DVD, you only need to...
... in any direction. When you are finished printing, remove the CD/DVD tray from moisture and direct sunlight. Keep printed discs away from the printer. Press l or r to display the position screen. 4. Press u, d, l, or r to adjust the position up to enter the Setup menu. 2. Printing Memory Card Photos on the CD or DVD, you only need to...
Printer Basics
Page 36
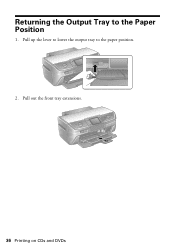
Returning the Output Tray to the paper position. 2. Pull up the lever to lower the output tray to the Paper Position 1. Pull out the front tray extensions. 36 Printing on CDs and DVDs
Returning the Output Tray to the paper position. 2. Pull up the lever to lower the output tray to the Paper Position 1. Pull out the front tray extensions. 36 Printing on CDs and DVDs
Printer Basics
Page 37
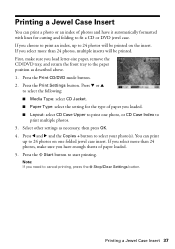
If you select more than 24 photos, multiple inserts will be printed. Press the Print Settings button. You can print a photo or an index of photos and have enough sheets of paper you need to print multiple photos. 3. Press the Print CD/DVD mode button. 2. Press d or u to select the following: ■ Media Type: select CD Jacket. ■ Paper Type: select the...
If you select more than 24 photos, multiple inserts will be printed. Press the Print Settings button. You can print a photo or an index of photos and have enough sheets of paper you need to print multiple photos. 3. Press the Print CD/DVD mode button. 2. Press d or u to select the following: ■ Media Type: select CD Jacket. ■ Paper Type: select the...
Printer Basics
Page 47
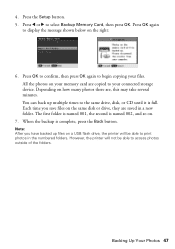
... r to the same drive, disk, or CD until it is full. You can back up files on a USB flash drive, the printer will not be able to display the message shown below on how many photos there are, this may take several minutes. Backing Up Your Photos 47 The first folder is named 001... . 7. When the backup is named 002, and so on the same disk or drive, they are copied to access photos outside of the folders. Press the Setup button. 5. Press OK again to print photos in a new folder. Press OK to confirm, then press OK again to begin copying your memory card are saved...
... r to the same drive, disk, or CD until it is full. You can back up files on a USB flash drive, the printer will not be able to display the message shown below on how many photos there are, this may take several minutes. Backing Up Your Photos 47 The first folder is named 001... . 7. When the backup is named 002, and so on the same disk or drive, they are copied to access photos outside of the folders. Press the Setup button. 5. Press OK again to print photos in a new folder. Press OK to confirm, then press OK again to begin copying your memory card are saved...
Printer Basics
Page 50
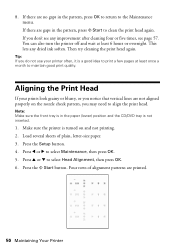
... pages at least 6 hours or overnight. If there are not aligned properly on and not printing. 2. Note: Make sure the front tray is in the paper (lower) position and the CD/DVD tray is turned on the nozzle check pattern, you notice that vertical lines are gaps in the ... Maintenance, then press OK. 5. Press the x Start button. Make sure the printer is not inserted. 1. Press l or r to select Head Alignment, then press OK. 6. If there are printed. 50 Maintaining Your Printer If you do not use your prints look grainy or blurry, or you may need to the Maintenance menu. This...
... pages at least 6 hours or overnight. If there are not aligned properly on and not printing. 2. Note: Make sure the front tray is in the paper (lower) position and the CD/DVD tray is turned on the nozzle check pattern, you notice that vertical lines are gaps in the ... Maintenance, then press OK. 5. Press the x Start button. Make sure the printer is not inserted. 1. Press l or r to select Head Alignment, then press OK. 6. If there are printed. 50 Maintaining Your Printer If you do not use your prints look grainy or blurry, or you may need to the Maintenance menu. This...
Printer Basics
Page 53
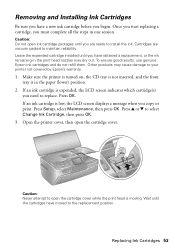
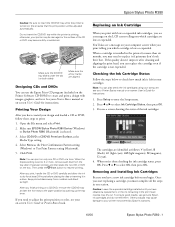
...expended cartridge installed until you have obtained a replacement, or the ink remaining in the print head nozzles may cause damage to your printer not covered by Epson's warranty. 1. To ensure good results, use genuine Epson ink cartridges and do not refill them. If an ink cartridge is moving. Removing... the replacement position. Caution: Never attempt to open the cartridge cover while the print head is expended, the LCD screen indicates which cartridge(s) you copy or print. Make sure the printer is turned on, the CD tray is not inserted, and the front tray is low, the LCD screen...
...expended cartridge installed until you have obtained a replacement, or the ink remaining in the print head nozzles may cause damage to your printer not covered by Epson's warranty. 1. To ensure good results, use genuine Epson ink cartridges and do not refill them. If an ink cartridge is moving. Removing... the replacement position. Caution: Never attempt to open the cartridge cover while the print head is expended, the LCD screen indicates which cartridge(s) you copy or print. Make sure the printer is turned on, the CD tray is not inserted, and the front tray is low, the LCD screen...
Printer Basics
Page 61
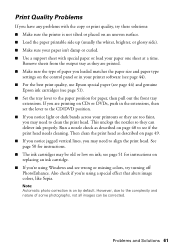
...using Windows and see wrong or missing colors, try these solutions: ■ Make sure the printer is on CDs or DVDs, push in your printer software (see page 44). ■ For the best print quality, use Epson special paper (see page 44) and genuine Epson ink cartridges (see page 51). ...■ Set the tray lever to clean the print head. see if the print head needs cleaning. Note: Automatic photo...
...using Windows and see wrong or missing colors, try these solutions: ■ Make sure the printer is on CDs or DVDs, push in your printer software (see page 44). ■ For the best print quality, use Epson special paper (see page 44) and genuine Epson ink cartridges (see page 51). ...■ Set the tray lever to clean the print head. see if the print head needs cleaning. Note: Automatic photo...
Printer Basics
Page 69
...printer, 29 printing from, 28 to 29 Cancelling printing with a computer, 41, 44 without a computer, 17 Cartridges, replacing, 51 to 56 CD Jacket setting, 37 CD-R/RW drive, backing up photos, 46 to 47 CDs adjusting print density, 25 adjusting print ...Color management, turning off, 40, 43 ColorSync, 43 Contrast, 25 Control panel, 6 Cropping, 26 to 27 D Date printing, 22, 23 printing photos by, 18 Declaration of Conformity, 66 Default settings, 27 Density, 25 Digital camera, printing from, 28 to 29 Display/Crop button, 6 Displaying prints, 11 DPOF, 20 DVDs, see also CDs E Enhancing photos, 25 Epson...
...printer, 29 printing from, 28 to 29 Cancelling printing with a computer, 41, 44 without a computer, 17 Cartridges, replacing, 51 to 56 CD Jacket setting, 37 CD-R/RW drive, backing up photos, 46 to 47 CDs adjusting print density, 25 adjusting print ...Color management, turning off, 40, 43 ColorSync, 43 Contrast, 25 Control panel, 6 Cropping, 26 to 27 D Date printing, 22, 23 printing photos by, 18 Declaration of Conformity, 66 Default settings, 27 Density, 25 Digital camera, printing from, 28 to 29 Display/Crop button, 6 Displaying prints, 11 DPOF, 20 DVDs, see also CDs E Enhancing photos, 25 Epson...
Printer Basics
Page 71
...sizing, 26 to 27 storing, 11 viewing and printing, 16 to 17 PictBridge, 28 Premium photo papers, 10 Print head aligning, 50 to 51 cleaning, 49 to 50 Print quality problems, 61 Print settings, 21 to 26 Printing adjusting CD/DVD position, 35 all photos, 17 cancelling, 41, 44 from a camera...64 using, 6 Sepia, 25 Setup button, 6 Sharpness, 25 Sizing photos, 26 to 27 Software ArcSoft PhotoImpression, 62 Epson Print CD, 31 Stop/Clear Settings button, 6 Stopping printing, 17, 41, 44 Storing prints, 11 T Technical support, 62 Touching up photos, 24 to 26 Troubleshooting, 59 to 61 Type setting, Windows, ...
...sizing, 26 to 27 storing, 11 viewing and printing, 16 to 17 PictBridge, 28 Premium photo papers, 10 Print head aligning, 50 to 51 cleaning, 49 to 50 Print quality problems, 61 Print settings, 21 to 26 Printing adjusting CD/DVD position, 35 all photos, 17 cancelling, 41, 44 from a camera...64 using, 6 Sepia, 25 Setup button, 6 Sharpness, 25 Sizing photos, 26 to 27 Software ArcSoft PhotoImpression, 62 Epson Print CD, 31 Stop/Clear Settings button, 6 Stopping printing, 17, 41, 44 Storing prints, 11 T Technical support, 62 Touching up photos, 24 to 26 Troubleshooting, 59 to 61 Type setting, Windows, ...
Product Information Guide
Page 1
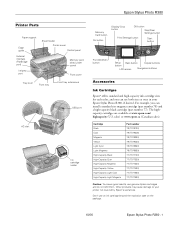
... button Print CD/DVD button Setup Back button button Copies buttons LCD screen Navigation buttons Accessories Ink Cartridges Epson® offers standard and high-capacity ink cartridge sizes for each color, and you can use both sizes at www.epson.com/ highcapacity (U.S. sales) or www.epson.ca (Canadian sales). Other products may cause damage to your Epson Stylus Photo R380...
... button Print CD/DVD button Setup Back button button Copies buttons LCD screen Navigation buttons Accessories Ink Cartridges Epson® offers standard and high-capacity ink cartridge sizes for each color, and you can use both sizes at www.epson.com/ highcapacity (U.S. sales) or www.epson.ca (Canadian sales). Other products may cause damage to your Epson Stylus Photo R380...
Product Information Guide
Page 6
... ejecting several sheets of letter-size plain paper are on the tray first, then place the CD or DVD inside the printer. Epson Stylus Photo R380 Printing on CDs and DVDs Your printer includes a special tray that lets you print customized text, graphics, and photos directly on the edge of the adapter fit squarely into the molding of the tray. Caution...
... ejecting several sheets of letter-size plain paper are on the tray first, then place the CD or DVD inside the printer. Epson Stylus Photo R380 Printing on CDs and DVDs Your printer includes a special tray that lets you print customized text, graphics, and photos directly on the edge of the adapter fit squarely into the molding of the tray. Caution...
Product Information Guide
Page 7
...to adjust the print position or color, see your Printer Basics manual or on -screen User's Guide or Printer Basics book. Open the File menu and select Print. 2. Select CD/DVD or CD/DVD Premium Surface as the Print Confirmation Pattern setting (Windows) or Test Print Pattern setting (Macintosh...print head, you print with images, graphics, and text. Caution: Leave the expended cartridge installed until you print, handle the CD or DVD carefully and allow the ink to your printer may dry out. Press Setup to insert the CD/DVD tray while the printer is printing; Epson Stylus Photo R380...
...to adjust the print position or color, see your Printer Basics manual or on -screen User's Guide or Printer Basics book. Open the File menu and select Print. 2. Select CD/DVD or CD/DVD Premium Surface as the Print Confirmation Pattern setting (Windows) or Test Print Pattern setting (Macintosh...print head, you print with images, graphics, and text. Caution: Leave the expended cartridge installed until you print, handle the CD or DVD carefully and allow the ink to your printer may dry out. Press Setup to insert the CD/DVD tray while the printer is printing; Epson Stylus Photo R380...


