Printer Basics
Page 12
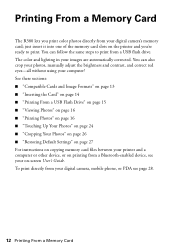
... card; You can also crop your photos, manually adjust the brightness and contrast, and correct red eyes-all without using your images are automatically corrected. just insert it into one of the memory card slots on the printer and you print color photos directly from your on printing from a... USB flash drive. Printing From a Memory Card The R380 lets you 're ready to print from a Bluetooth-enabled device, see your digital...
... card; You can also crop your photos, manually adjust the brightness and contrast, and correct red eyes-all without using your images are automatically corrected. just insert it into one of the memory card slots on the printer and you print color photos directly from your on printing from a... USB flash drive. Printing From a Memory Card The R380 lets you 're ready to print from a Bluetooth-enabled device, see your digital...
Printer Basics
Page 19
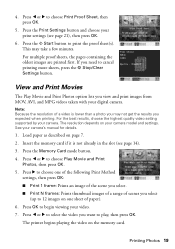
...taken with your camera model and settings. View and Print Movies The Play Movie and Print Photos option lets you need to cancel printing more sheets, press the y Stop/Clear Settings button...(see page 21), then press OK. 6. See your video. 7. Press r to begin viewing your camera's manual for details. 1. Press l or r to 12 images on page 7. 2. The resolution depends on the memory ...results, choose the highest quality video setting supported by your print settings (see page 14). 3. The printer begins playing the video on your digital camera. 4. Press l or r to play, then press...
...taken with your camera model and settings. View and Print Movies The Play Movie and Print Photos option lets you need to cancel printing more sheets, press the y Stop/Clear Settings button...(see page 21), then press OK. 6. See your video. 7. Press r to begin viewing your camera's manual for details. 1. Press l or r to 12 images on page 7. 2. The resolution depends on the memory ...results, choose the highest quality video setting supported by your print settings (see page 14). 3. The printer begins playing the video on your digital camera. 4. Press l or r to play, then press...
Printer Basics
Page 20
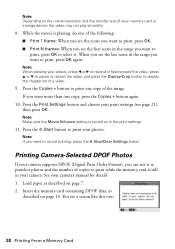
...your camera supports DPOF (Digital Print Order Format), you want to select it to preselect photos and the number of copies to print one of the image. Press the Print Settings button and choose your camera's manual for details. 1. If you want to print, press OK. ■ Print N frames...: When you see the last scene in your photos. Press the x Start button to cancel printing, press the y Stop/Clear Settings ...
...your camera supports DPOF (Digital Print Order Format), you want to select it to preselect photos and the number of copies to print one of the image. Press the Print Settings button and choose your camera's manual for details. 1. If you want to print, press OK. ■ Print N frames...: When you see the last scene in your photos. Press the x Start button to cancel printing, press the y Stop/Clear Settings ...
Printer Basics
Page 25
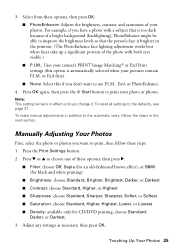
...PRINT Image Matching® or Exif Print settings (this if you don't want to print your photo or photos. choose Standard, Darker, or Darkest. 3. Manually Adjusting Your Photos First, select the photo or photos you change it. Press the Print Settings button. 2. Adjust any settings as necessary, then ...press OK. Touching Up Your Photos 25 or Exif data). ■ None: Select this option is brighter...
...PRINT Image Matching® or Exif Print settings (this if you don't want to print your photo or photos. choose Standard, Darker, or Darkest. 3. Manually Adjusting Your Photos First, select the photo or photos you change it. Press the Print Settings button. 2. Adjust any settings as necessary, then ...press OK. Touching Up Your Photos 25 or Exif data). ■ None: Select this option is brighter...
Printer Basics
Page 29
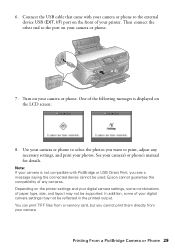
...manual for details. See your camera or phone. Depending on the front of your camera or phone. 7. You can print TIFF files from a memory card, but you cannot print them directly from your digital camera settings, some of your photos...any necessary settings, and print your printer. I/F) port on the printer settings and your camera. Use your camera or phone to select the photos you see a message saying the.... Then connect the other end to the external device USB (EXT. 6. Epson cannot guarantee the compatibility of the following messages is not compatible with PictBridge or USB...
...manual for details. See your camera or phone. Depending on the front of your camera or phone. 7. You can print TIFF files from a memory card, but you cannot print them directly from your digital camera settings, some of your photos...any necessary settings, and print your printer. I/F) port on the printer settings and your camera. Use your camera or phone to select the photos you see a message saying the.... Then connect the other end to the external device USB (EXT. 6. Epson cannot guarantee the compatibility of the following messages is not compatible with PictBridge or USB...
Printer Basics
Page 30
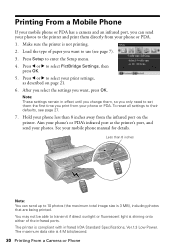
... them directly from your phone or PDA. Aim your phone's or PDA's infrared port at the printer's port, and send your mobile phone manual for details. See your photos. Press l or r to enter the Setup menu. 4. The printer is not printing. 2. Press Setup to select PictBridge Settings, then press OK. 5. To reset all settings...
... them directly from your phone or PDA. Aim your phone's or PDA's infrared port at the printer's port, and send your mobile phone manual for details. See your photos. Press l or r to enter the Setup menu. 4. The printer is not printing. 2. Press Setup to select PictBridge Settings, then press OK. 5. To reset all settings...
Product Information Guide
Page 7
...LCD screen telling you which cartridge is low or expended. Printing Your Design After you have created your printer may be adjusted automatically. Make sure EPSON Stylus Photo R380 Series (Windows) or Stylus Photo R380 (Macintosh) is printing; Click Print. Keep printed discs away from the tray after cleaning and aligning ...need to adjust the print position or color, see a message on only one session. Then press the Start button to select OK, then press OK. If you can print on your Printer Basics manual or on -screen User's Guide or Printer Basics book. When a cartridge is ...
...LCD screen telling you which cartridge is low or expended. Printing Your Design After you have created your printer may be adjusted automatically. Make sure EPSON Stylus Photo R380 Series (Windows) or Stylus Photo R380 (Macintosh) is printing; Click Print. Keep printed discs away from the tray after cleaning and aligning ...need to adjust the print position or color, see a message on only one session. Then press the Start button to select OK, then press OK. If you can print on your Printer Basics manual or on -screen User's Guide or Printer Basics book. When a cartridge is ...
Product Information Guide
Page 9
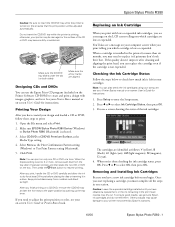
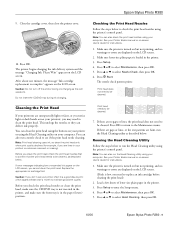
...OK to return to enter the Setup menu. 4. See your Printer Basics manual or on your printer or using your Printer Basics manual or on the LCD screen. Caution: If you may need ... lines in the printer. 3. Before you need to check the print head nozzles using your printout or colors are faint, run the Head Cleaning utility using the printer's control panel. Cleaning... Press l or r to select Head Cleaning, then press OK. 10/06 Epson Stylus Photo R380 - 9 Caution: Do not turn off the printer during ink charging. Note: You can also run a nozzle check to maintain ...
...OK to return to enter the Setup menu. 4. See your Printer Basics manual or on your printer or using your Printer Basics manual or on the LCD screen. Caution: If you may need ... lines in the printer. 3. Before you need to check the print head nozzles using your printout or colors are faint, run the Head Cleaning utility using the printer's control panel. Cleaning... Press l or r to select Head Cleaning, then press OK. 10/06 Epson Stylus Photo R380 - 9 Caution: Do not turn off the printer during ink charging. Note: You can also run a nozzle check to maintain ...
Product Information Guide
Page 10
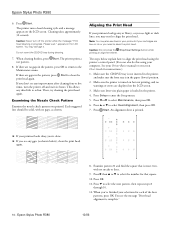
... Printer Basics manual or on but not printing, and no streaks or lines. 9. See your selections for instructions.) 1. Press Setup to align the print head. Press Start. When you see any dried ink to clean the print head again. Cleaning takes approximately 30 seconds. Epson Stylus Photo R380 ...8. Do not insert the CD/DVD tray during cleaning. 7. Note: You may damage it. The steps below ), clean the print head again. 10 - Make sure the CD/DVD tray is not inserted in the printer, and make sure the...
... Printer Basics manual or on but not printing, and no streaks or lines. 9. See your selections for instructions.) 1. Press Setup to align the print head. Press Start. When you see any dried ink to clean the print head again. Cleaning takes approximately 30 seconds. Epson Stylus Photo R380 ...8. Do not insert the CD/DVD tray during cleaning. 7. Note: You may damage it. The steps below ), clean the print head again. 10 - Make sure the CD/DVD tray is not inserted in the printer, and make sure the...

