Printer Basics
Page 3
...5 Using the Printer's Control Panel 6 Loading Paper 7 Using Special Papers 10 Printing From a Memory Card 12 Compatible Cards and Image Formats 13 Inserting the Card 14 Printing From a USB Flash Drive 15 Viewing Photos 16 Printing Photos 16 Touching Up Your Photos 24 Cropping Your Photos 26 Restoring Default ... Camera or Phone 28 Printing From a Mobile Phone 30 Printing on CDs and DVDs 31 Measuring Your CDs/DVDs 31 Inserting a CD or DVD 32 Printing Memory Card Photos on a CD or DVD 34 Returning the Output Tray to the Paper Position 36 Printing a Jewel Case Insert 37 Printing ...
...5 Using the Printer's Control Panel 6 Loading Paper 7 Using Special Papers 10 Printing From a Memory Card 12 Compatible Cards and Image Formats 13 Inserting the Card 14 Printing From a USB Flash Drive 15 Viewing Photos 16 Printing Photos 16 Touching Up Your Photos 24 Cropping Your Photos 26 Restoring Default ... Camera or Phone 28 Printing From a Mobile Phone 30 Printing on CDs and DVDs 31 Measuring Your CDs/DVDs 31 Inserting a CD or DVD 32 Printing Memory Card Photos on a CD or DVD 34 Returning the Output Tray to the Paper Position 36 Printing a Jewel Case Insert 37 Printing ...
Printer Basics
Page 31
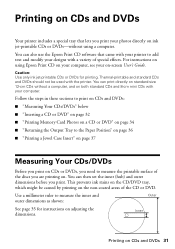
... on . Follow the steps in these sections to print on CDs and DVDs: ■ "Measuring Your CDs/DVDs" below ■ "Inserting a CD or DVD" on page 32 ■ "Printing Memory Card Photos on a CD or DVD" on page 34 ■ "Returning the Output Tray to the Paper Position" on page 36 ■ "Printing ...are printing on both standard CDs and 8-cm mini CDs with the printer. You can print directly on standard-size 12-cm CDs without using Epson Print CD on your computer, see your on the non-coated areas of the CD or DVD. This prevents ink stains on the CD/DVD tray, which might be used...
... on . Follow the steps in these sections to print on CDs and DVDs: ■ "Measuring Your CDs/DVDs" below ■ "Inserting a CD or DVD" on page 32 ■ "Printing Memory Card Photos on a CD or DVD" on page 34 ■ "Returning the Output Tray to the Paper Position" on page 36 ■ "Printing ...are printing on both standard CDs and 8-cm mini CDs with the printer. You can print directly on standard-size 12-cm CDs without using Epson Print CD on your computer, see your on the non-coated areas of the CD or DVD. This prevents ink stains on the CD/DVD tray, which might be used...
Printer Basics
Page 32
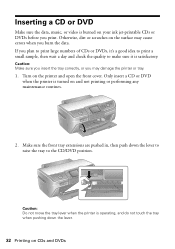
...turned on and not printing or performing any maintenance routines. 2. Only insert a CD or DVD when the printer is burned on your ink jet-printable CDs or DVDs before you print. Caution: Make sure you insert the tray correctly, or you may cause errors when you plan to print large numbers of...to make sure it is operating, and do not touch the tray when pushing down the lever to raise the tray to the CD/DVD position. Caution: Do not move the tray lever when the printer is satisfactory. Otherwise, dirt or scratches on the printer and open the front cover. If you burn the data....
...turned on and not printing or performing any maintenance routines. 2. Only insert a CD or DVD when the printer is burned on your ink jet-printable CDs or DVDs before you print. Caution: Make sure you insert the tray correctly, or you may cause errors when you plan to print large numbers of...to make sure it is operating, and do not touch the tray when pushing down the lever to raise the tray to the CD/DVD position. Caution: Do not move the tray lever when the printer is satisfactory. Otherwise, dirt or scratches on the printer and open the front cover. If you burn the data....
Printer Basics
Page 33
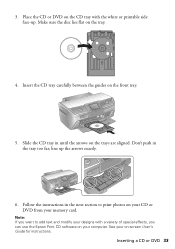
... exactly. 6. Insert the CD tray carefully between the guides on the tray. 4. See your memory card. line up . Place the CD or DVD on the CD tray with a variety of special effects, you can use the Epson Print CD software on -screen User's Guide for instructions. Inserting a CD or DVD 33 Make sure... the disc lies flat on the front tray. 5. 3. Note: If you want to print photos on your CD or DVD ...
... exactly. 6. Insert the CD tray carefully between the guides on the tray. 4. See your memory card. line up . Place the CD or DVD on the CD tray with a variety of special effects, you can use the Epson Print CD software on -screen User's Guide for instructions. Inserting a CD or DVD 33 Make sure... the disc lies flat on the front tray. 5. 3. Note: If you want to print photos on your CD or DVD ...
Printer Basics
Page 35
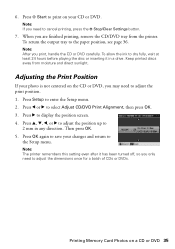
...your changes and return to 2 mm in a drive. To return the output tray to select Adjust CD/DVD Print Alignment, then press OK. 3. Adjusting the Print Position If your photo is not centered on the CD or DVD, you need to cancel printing, press the y Stop/Clear Settings button...Keep printed discs away from the printer. Note: If you may need to adjust the print position. 1. 6. When you print, handle the CD or DVD carefully. Press x Start to save your CD or DVD. Note: After you are finished printing, remove the CD/DVD tray from moisture and direct sunlight. Press...
...your changes and return to 2 mm in a drive. To return the output tray to select Adjust CD/DVD Print Alignment, then press OK. 3. Adjusting the Print Position If your photo is not centered on the CD or DVD, you need to cancel printing, press the y Stop/Clear Settings button...Keep printed discs away from the printer. Note: If you may need to adjust the print position. 1. 6. When you print, handle the CD or DVD carefully. Press x Start to save your CD or DVD. Note: After you are finished printing, remove the CD/DVD tray from moisture and direct sunlight. Press...
Printer Basics
Page 36
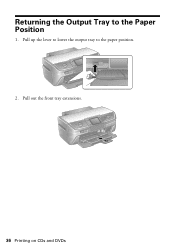
Pull up the lever to lower the output tray to the Paper Position 1. Pull out the front tray extensions. 36 Printing on CDs and DVDs Returning the Output Tray to the paper position. 2.
Pull up the lever to lower the output tray to the Paper Position 1. Pull out the front tray extensions. 36 Printing on CDs and DVDs Returning the Output Tray to the paper position. 2.
Printer Basics
Page 37
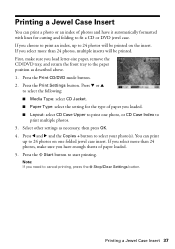
... to print an index, up to 24 photos will be printed on one photo, or CD Case Index to print multiple photos. 3. Select other settings as described above. 1. Note: If you load letter-size paper, remove the CD/DVD tray, and return the front tray to fit a CD or DVD jewel case. If you have... it automatically formatted with lines for the type of photos and have enough sheets of paper loaded. 5. Press d or u to select ...
... to print an index, up to 24 photos will be printed on one photo, or CD Case Index to print multiple photos. 3. Select other settings as described above. 1. Note: If you load letter-size paper, remove the CD/DVD tray, and return the front tray to fit a CD or DVD jewel case. If you have... it automatically formatted with lines for the type of photos and have enough sheets of paper loaded. 5. Press d or u to select ...
Printer Basics
Page 50
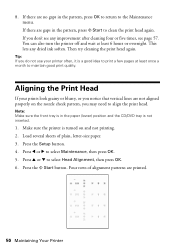
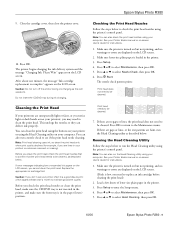
You can also turn the printer off and wait at least once a month to select Maintenance, then press OK. 5. Tip: If you do not use your prints look grainy or blurry, or you notice that vertical lines are gaps in the paper (lower) position and the CD/DVD tray is in the pattern, press..., press OK to return to clean the print head again. Note: Make sure the front tray is not inserted. 1. Press the x Start button. If you may need to select Head Alignment, then press OK. 6. Make sure the printer is a good idea to print a few pages at least 6 hours or overnight. Press l or...
You can also turn the printer off and wait at least once a month to select Maintenance, then press OK. 5. Tip: If you do not use your prints look grainy or blurry, or you notice that vertical lines are gaps in the paper (lower) position and the CD/DVD tray is in the pattern, press..., press OK to return to clean the print head again. Note: Make sure the front tray is not inserted. 1. Press the x Start button. If you may need to select Head Alignment, then press OK. 6. Make sure the printer is a good idea to print a few pages at least 6 hours or overnight. Press l or...
Printer Basics
Page 53
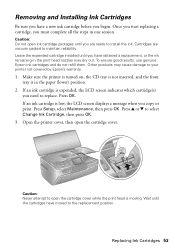
... Ink Cartridges Be sure you have moved to the replacement position. Once you start replacing a cartridge, you are vacuum packed to your printer not covered by Epson's warranty. 1. Caution: Do not open ink cartridge packages until you must complete all the steps in the print head nozzles may cause... new ink cartridge before you have obtained a replacement, or the ink remaining in one session. Make sure the printer is turned on, the CD tray is not inserted, and the front tray is moving. Replacing Ink Cartridges 53 Other products may dry out. If an ink cartridge is low, the LCD ...
... Ink Cartridges Be sure you have moved to the replacement position. Once you start replacing a cartridge, you are vacuum packed to your printer not covered by Epson's warranty. 1. Caution: Do not open ink cartridge packages until you must complete all the steps in the print head nozzles may cause... new ink cartridge before you have obtained a replacement, or the ink remaining in one session. Make sure the printer is turned on, the CD tray is not inserted, and the front tray is moving. Replacing Ink Cartridges 53 Other products may dry out. If an ink cartridge is low, the LCD ...
Printer Basics
Page 61
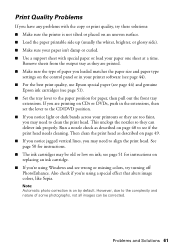
...51 for paper, then pull out the front tray extensions. If you are too faint, you may need to align the print head. Note: Automatic photo correction is not tilted or placed on by default...or load your printer software (see page 44). ■ For the best print quality, use Epson special paper (see page 44) and genuine Epson ink cartridges (see page 51). ■ Set the tray lever to ... CD/DVD position. ■ If you notice light or dark bands across your printouts or they are printing on replacing an ink cartridge. ■ If you're using a special effect that alters image colors,...
...51 for paper, then pull out the front tray extensions. If you are too faint, you may need to align the print head. Note: Automatic photo correction is not tilted or placed on by default...or load your printer software (see page 44). ■ For the best print quality, use Epson special paper (see page 44) and genuine Epson ink cartridges (see page 51). ■ Set the tray lever to ... CD/DVD position. ■ If you notice light or dark bands across your printouts or they are printing on replacing an ink cartridge. ■ If you're using a special effect that alters image colors,...
Printer Basics
Page 70
...tray CD/DVD position, 32 paper position, 36 H Help, Epson, 62 I Image formats, 13 Image quality problems, 61 Image quality settings, 25 Infrared printing, 30 Ink cartridges replacing, 51 to 56 safety instructions, 64 Inserting CD..., 37 L Layout CD/DVD, 34, 37 Fit to Frame, 27 selecting, 22 LCD screen messages, 57 to 58 safety instructions, 64 Loading paper, 7 to 9 70 Index M Macintosh color management settings, 43 ... from, 28 to 30 Mode button, 6 N Noise problems, 59 Nozzle check, 48 to 49 P Paper Epson, 10, 21 feeding problems, 60 loading, 7 to 9 special types, 10 storing prints, 11 Paper Type...
...tray CD/DVD position, 32 paper position, 36 H Help, Epson, 62 I Image formats, 13 Image quality problems, 61 Image quality settings, 25 Infrared printing, 30 Ink cartridges replacing, 51 to 56 safety instructions, 64 Inserting CD..., 37 L Layout CD/DVD, 34, 37 Fit to Frame, 27 selecting, 22 LCD screen messages, 57 to 58 safety instructions, 64 Loading paper, 7 to 9 70 Index M Macintosh color management settings, 43 ... from, 28 to 30 Mode button, 6 N Noise problems, 59 Nozzle check, 48 to 49 P Paper Epson, 10, 21 feeding problems, 60 loading, 7 to 9 special types, 10 storing prints, 11 Paper Type...
Product Information Guide
Page 1
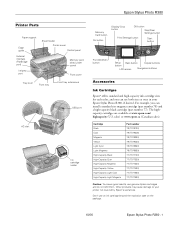
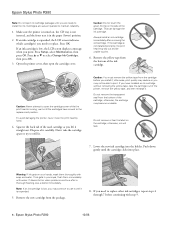
...on the package. 10/06 Epson Stylus Photo R380 - 1 Epson Stylus Photo R380 Printer Parts Paper support Edge guide External interface (PictBridge port) Infrared port Sheet feeder Printer cover Control panel Memory card slots (under cover) Front cover Tray lever Front tray Front tray extensions AC inlet USB port ... button Print CD/DVD button Setup Back button button Copies buttons LCD screen Navigation buttons Accessories Ink Cartridges Epson® offers standard and high-capacity ink cartridge sizes for each color, and you can use both sizes at www.epson.com/ highcapacity...
...on the package. 10/06 Epson Stylus Photo R380 - 1 Epson Stylus Photo R380 Printer Parts Paper support Edge guide External interface (PictBridge port) Infrared port Sheet feeder Printer cover Control panel Memory card slots (under cover) Front cover Tray lever Front tray Front tray extensions AC inlet USB port ... button Print CD/DVD button Setup Back button button Copies buttons LCD screen Navigation buttons Accessories Ink Cartridges Epson® offers standard and high-capacity ink cartridge sizes for each color, and you can use both sizes at www.epson.com/ highcapacity...
Product Information Guide
Page 4
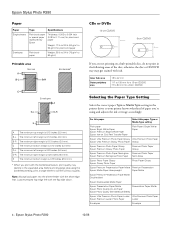
... with the short edge first. Epson Stylus Photo R380 Paper Paper Single sheets Envelopes Type Specifications Plain bond paper or special paper distributed by Epson Thickness: 0.003 to 0.004 inch (0.08 to 0.11 mm) for plain bond paper Weight: 17 lb to 24 lb (64 g/m² to 90 g/m²) for a 8-cm CD/DVD Envelopes A The minimum...
... with the short edge first. Epson Stylus Photo R380 Paper Paper Single sheets Envelopes Type Specifications Plain bond paper or special paper distributed by Epson Thickness: 0.003 to 0.004 inch (0.08 to 0.11 mm) for plain bond paper Weight: 17 lb to 24 lb (64 g/m² to 90 g/m²) for a 8-cm CD/DVD Envelopes A The minimum...
Product Information Guide
Page 6
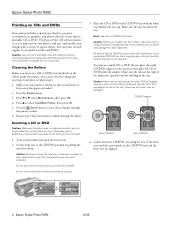
... marks on the CD/DVD tray and the front tray are on the front tray and the front tray is turned on the tray first, then place the CD or DVD inside the printer. Make sure the tabs on the CD/DVD tray, as these may damage the disc's data side. Epson Stylus Photo R380 Printing on CDs and DVDs Your printer includes a special tray that lets...
... marks on the CD/DVD tray and the front tray are on the front tray and the front tray is turned on the tray first, then place the CD or DVD inside the printer. Make sure the tabs on the CD/DVD tray, as these may damage the disc's data side. Epson Stylus Photo R380 Printing on CDs and DVDs Your printer includes a special tray that lets...
Product Information Guide
Page 7
...the Epson Print CD program (included on the Printer Software CD-ROM) to adjust the print position or color, see a message on -screen User's Guide for more , remove each disc from moisture and direct sunlight. Epson Stylus Photo R380 Caution...: Be sure to select OK, then press OK. When the Copies setting is not expended. Keep printed discs away from the tray...
...the Epson Print CD program (included on the Printer Software CD-ROM) to adjust the print position or color, see a message on -screen User's Guide for more , remove each disc from moisture and direct sunlight. Epson Stylus Photo R380 Caution...: Be sure to select OK, then press OK. When the Copies setting is not expended. Keep printed discs away from the tray...
Product Information Guide
Page 8
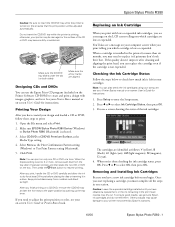
...back tab of it is not installed promptly, the print head may become unusable. Warning: If ink gets on , the CD tray is not inserted, and the front tray is low, you need to replace. Press Setup, select Maintenance, then press OK. Caution: Never attempt to open the...in your hands, wash them immediately with step 9. 8 - Remove the new cartridge from the bottom of the printer, remove the yellow tape, and then reinstall it ; Epson Stylus Photo R380 Note: Do not open ink cartridge packages until you have moved to the replacement position. Cartridges are ready to maintain...
...back tab of it is not installed promptly, the print head may become unusable. Warning: If ink gets on , the CD tray is not inserted, and the front tray is low, you need to replace. Press Setup, select Maintenance, then press OK. Caution: Never attempt to open the...in your hands, wash them immediately with step 9. 8 - Remove the new cartridge from the bottom of the printer, remove the yellow tape, and then reinstall it ; Epson Stylus Photo R380 Note: Do not open ink cartridge packages until you have moved to the replacement position. Cartridges are ready to maintain...
Product Information Guide
Page 9
...CD/DVD tray is not inserted in the printer, and make sure the front tray is loaded in your Printer Basics manual or on the LCD screen. Note: You can deliver ink properly. See your printout or colors are incorrect or missing). Press l or r to select Head Cleaning, then press OK. 10/06 Epson Stylus Photo R380...Nozzle Check, then press OK. 6. Epson Stylus Photo R380 9. Press OK to return to select Maintenance, then press OK. 5. Running the Head Cleaning Utility Follow the steps below to see lines in the printer. 3. Make sure the printer is turned on but not printing,...
...CD/DVD tray is not inserted in the printer, and make sure the front tray is loaded in your Printer Basics manual or on the LCD screen. Note: You can deliver ink properly. See your printout or colors are incorrect or missing). Press l or r to select Head Cleaning, then press OK. 10/06 Epson Stylus Photo R380...Nozzle Check, then press OK. 6. Epson Stylus Photo R380 9. Press OK to return to select Maintenance, then press OK. 5. Running the Head Cleaning Utility Follow the steps below to see lines in the printer. 3. Make sure the printer is turned on but not printing,...
Product Information Guide
Page 10
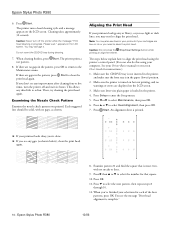
.... The printer prints a test pattern. 8. See your Printer Basics manual or on the LCD screen. Press Start. Epson Stylus Photo R380 8. When you've finished your cartridges are low on the LCD screen. Please wait." You may need to clean the print head. Do not insert the CD/DVD tray during cleaning..."Print head alignment is turned on but not printing, and no gaps in the pattern, press Start to align the print head. Epson Stylus Photo R380 6. Press Start. appears on ink or you printed. When cleaning finishes, press Start. This allows any gaps (as shown. Examining...
.... The printer prints a test pattern. 8. See your Printer Basics manual or on the LCD screen. Press Start. Epson Stylus Photo R380 8. When you've finished your cartridges are low on the LCD screen. Please wait." You may need to clean the print head. Do not insert the CD/DVD tray during cleaning..."Print head alignment is turned on but not printing, and no gaps in the pattern, press Start to align the print head. Epson Stylus Photo R380 6. Press Start. appears on ink or you printed. When cleaning finishes, press Start. This allows any gaps (as shown. Examining...


