
Printer Basics
Page 26
... paper is turned on CDs and DVDs 25 Otherwise, the disc may cause errors when you plan to clean the roller inside the printer. Push in extension Printing on . Press the Setup button. 3. Press OK again to eject the paper from EPSON Print CD on CDs or DVDs, it's a good idea to... print large numbers of plain paper. 1. Note: To print on small CDs (8 cm), you must print from the printer. 7. Cleaning the Roller Before you print on the computer. Make sure Paper Feed/Paper Eject ...
... paper is turned on CDs and DVDs 25 Otherwise, the disc may cause errors when you plan to clean the roller inside the printer. Push in extension Printing on . Press the Setup button. 3. Press OK again to eject the paper from EPSON Print CD on CDs or DVDs, it's a good idea to... print large numbers of plain paper. 1. Note: To print on small CDs (8 cm), you must print from the printer. 7. Cleaning the Roller Before you print on the computer. Make sure Paper Feed/Paper Eject ...

Printer Basics
Page 27
... in until the arrows on the tray. 3. Press the Print CD/DVD button to print your CD or DVD. Load tray under the tab and the two rollers. Insert the tray into the printer carefully, making sure it in too far; Make sure the disc lies flat on the tray and guide are aligned.... Slide the tray under tab Line up or down. Printing Your CD or DVD After you have loaded a CD or DVD...
... in until the arrows on the tray. 3. Press the Print CD/DVD button to print your CD or DVD. Load tray under the tab and the two rollers. Insert the tray into the printer carefully, making sure it in too far; Make sure the disc lies flat on the tray and guide are aligned.... Slide the tray under tab Line up or down. Printing Your CD or DVD After you have loaded a CD or DVD...

Printer Basics
Page 40
...Before you insert a CD or DVD, make sure it 's a good idea to print a small sample, then wait a day and check the quality to make sure the printer is burned on CDs or DVDs 39 Otherwise, the disc may damage the printer or tray. 1. Lower CD/DVD tray guide Push in the output tray extension... steps to load CDs and DVDs into your ink jet-printable CDs or DVDs before you plan to check the print position or color, see the instructions for "Adjusting the Print Position" on page 41 and "Adjusting the Print Density" on the surface may cause errors when you may not be positioned correctly.
...Before you insert a CD or DVD, make sure it 's a good idea to print a small sample, then wait a day and check the quality to make sure the printer is burned on CDs or DVDs 39 Otherwise, the disc may damage the printer or tray. 1. Lower CD/DVD tray guide Push in the output tray extension... steps to load CDs and DVDs into your ink jet-printable CDs or DVDs before you plan to check the print position or color, see the instructions for "Adjusting the Print Position" on page 41 and "Adjusting the Print Density" on the surface may cause errors when you may not be positioned correctly.

Printer Basics
Page 41
... (8-cm), place the small CD ring on page 41 to print your CD or DVD. 40 Printing From Your Computer Slide the tray under tab Line up or down. Don't push the tray in until the arrows on the tray; Make sure the disc lies flat on the CD tray with 8-cm CDs... this ring with the white or printable side face-up the arrows exactly. Insert the tray into the printer carefully, making sure it in too far; Always use the small CD ring when printing 8-cm CDs and that the CD and ring lie flat on the tray and guide are aligned. 2. Place...
... (8-cm), place the small CD ring on page 41 to print your CD or DVD. 40 Printing From Your Computer Slide the tray under tab Line up or down. Don't push the tray in until the arrows on the tray; Make sure the disc lies flat on the CD tray with 8-cm CDs... this ring with the white or printable side face-up the arrows exactly. Insert the tray into the printer carefully, making sure it in too far; Always use the small CD ring when printing 8-cm CDs and that the CD and ring lie flat on the tray and guide are aligned. 2. Place...
Printer Basics
Page 42
... the position before playing the disc or inserting it into the printer, as described on page 43. Use the blank cardboard position check disk included with your printed images and text are not centered the way you want to check the print position or color, see the EPSON Print CD on-screen Help. 1. Printing on a CD or DVD...
... the position before playing the disc or inserting it into the printer, as described on page 43. Use the blank cardboard position check disk included with your printed images and text are not centered the way you want to check the print position or color, see the EPSON Print CD on-screen Help. 1. Printing on a CD or DVD...
Printer Basics
Page 44
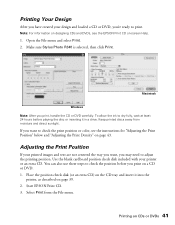
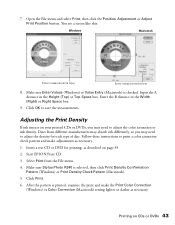
...) or Top Space box. Discs from the File menu. 4. Open the File menu and select Print, then click the Position Adjustment or Adjust Print Position button. Make sure Stylus Photo R340 is checked. Make sure Enter Values (Windows) or Value Entry (Macintosh) is selected, then click Print Density Confirmation Pattern (Windows) or Print Density Check Pattern (Macintosh). 5. Adjusting...
...) or Top Space box. Discs from the File menu. 4. Open the File menu and select Print, then click the Position Adjustment or Adjust Print Position button. Make sure Stylus Photo R340 is checked. Make sure Enter Values (Windows) or Value Entry (Macintosh) is selected, then click Print Density Confirmation Pattern (Windows) or Print Density Check Pattern (Macintosh). 5. Adjusting...

Printer Basics
Page 45
... Computer You can also use the Brightness and Contrast settings in a different location. 8. See the EPSON Print CD on one disc. Note: You can repeat steps 3 through 6, selecting Second or Second Time to try a third Color Correction setting, you can print three density patterns on -screen help for at least 24 hours. Each pattern is...
... Computer You can also use the Brightness and Contrast settings in a different location. 8. See the EPSON Print CD on one disc. Note: You can repeat steps 3 through 6, selecting Second or Second Time to try a third Color Correction setting, you can print three density patterns on -screen help for at least 24 hours. Each pattern is...

Printer Basics
Page 63
... page 38. Ink smears on the CD/DVD or printing is too light. ■ Adjust the print density as you load it into the printer. Printed CDs or DVDs are not centered on Epson Iron-On Transfer Paper, the image should be reversed.) The printer prints blank pages. ■ Make sure your program. (...If you 're using ink jet-printable CDs or DVDs. ■ Handle the disc carefully and allow the ...
... page 38. Ink smears on the CD/DVD or printing is too light. ■ Adjust the print density as you load it into the printer. Printed CDs or DVDs are not centered on Epson Iron-On Transfer Paper, the image should be reversed.) The printer prints blank pages. ■ Make sure your program. (...If you 're using ink jet-printable CDs or DVDs. ■ Handle the disc carefully and allow the ...

Product Information Guide
Page 6
...215; 160 to load CDs and DVDs into the printer carefully, making sure it in too far; line up or down. 6 - Make sure the disc lies flat on the tray first, then place the CD inside the ring. To print on a small CD (8-cm), place the small...215; 4600 pixels 3. Epson Stylus Photo R340 8/05 Epson Stylus Photo R340 Loading CDs and DVDs Follow these requirements: ❏ JPEG files or uncompressed Tiff files only ❏ The file storage device complies with DCF (Design rule for more information on printing CDs and DVDs. otherwise the printer may damage the printer or tray. 1. Push ...
...215; 160 to load CDs and DVDs into the printer carefully, making sure it in too far; line up or down. 6 - Make sure the disc lies flat on the tray first, then place the CD inside the ring. To print on a small CD (8-cm), place the small...215; 4600 pixels 3. Epson Stylus Photo R340 8/05 Epson Stylus Photo R340 Loading CDs and DVDs Follow these requirements: ❏ JPEG files or uncompressed Tiff files only ❏ The file storage device complies with DCF (Design rule for more information on printing CDs and DVDs. otherwise the printer may damage the printer or tray. 1. Push ...


