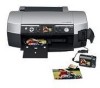
Printer Basics
Page 4
... Printing Borderless Photos 35 Windows 36 Mac OS X 37 Printing on CDs or DVDs 38 Cleaning the Roller 38 Inserting a CD or DVD 39 Printing Your Design 41 Adjusting the Print Position 41 Adjusting the Print Density 43 Maintaining Your Printer 45 Cleaning the Print Head 45 Replacing an Ink Cartridge 47 Removing and Installing Ink Cartridges 48 Aligning the Print Head...
... Printing Borderless Photos 35 Windows 36 Mac OS X 37 Printing on CDs or DVDs 38 Cleaning the Roller 38 Inserting a CD or DVD 39 Printing Your Design 41 Adjusting the Print Position 41 Adjusting the Print Density 43 Maintaining Your Printer 45 Cleaning the Print Head 45 Replacing an Ink Cartridge 47 Removing and Installing Ink Cartridges 48 Aligning the Print Head...
Printer Basics
Page 49
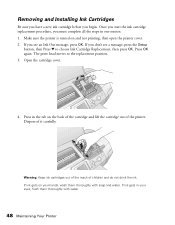
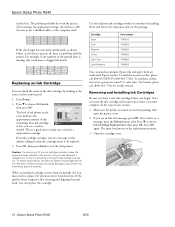
...you don't see an Ink Out message, press OK. The print head moves to choose Ink Cartridge Replacement, then press OK. Press in the tab on the back of the cartridge and lift the cartridge out of it carefully. Removing and Installing Ink Cartridges Be sure you have a new ink ...cartridge before you must complete all the steps in one session. 1. If ink gets on and not printing, then open the printer cover. 2. Press OK again. Dispose of the printer. Warning: Keep ink cartridges ...
...you don't see an Ink Out message, press OK. The print head moves to choose Ink Cartridge Replacement, then press OK. Press in the tab on the back of the cartridge and lift the cartridge out of it carefully. Removing and Installing Ink Cartridges Be sure you have a new ink ...cartridge before you must complete all the steps in one session. 1. If ink gets on and not printing, then open the printer cover. 2. Press OK again. Dispose of the printer. Warning: Keep ink cartridges ...
Printer Basics
Page 51
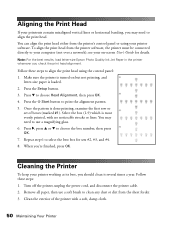
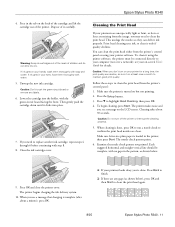
... step 6 to align the print head using your printer software. Remove all paper, then use a magnifying glass. 6. You can align the print head either from the printer's control panel or using the control panel: 1. Cleaning the Printer To keep your on but not printing, and letter-size paper is...Note: For the best results, load letter-size Epson Photo Quality Ink Jet Paper in the printer whenever you 're finished, press OK. Turn off the printer, unplug the power cord, and disconnect the printer cable. 2. see your printer working at its best, you should clean it ...
... step 6 to align the print head using your printer software. Remove all paper, then use a magnifying glass. 6. You can align the print head either from the printer's control panel or using the control panel: 1. Cleaning the Printer To keep your on but not printing, and letter-size paper is...Note: For the best results, load letter-size Epson Photo Quality Ink Jet Paper in the printer whenever you 're finished, press OK. Turn off the printer, unplug the power cord, and disconnect the printer cable. 2. see your printer working at its best, you should clean it ...
Printer Basics
Page 52
... distance, you need to clean the LCD screen and preview monitor. Unplug the power cord from the printer, push down the paper support extension, and close the memory card cover. 4. Remove any cleaning sheets included with special paper; Do not use a hard or abrasive brush, or alcohol ... below using a soft, damp cloth. Don't touch the gears inside the printer. they can damage the printer components and case. they may jam inside the printer, wipe it for cleaning; Turn on the printer, wait until the print head locks in the far right position, then turn off only in its original...
... distance, you need to clean the LCD screen and preview monitor. Unplug the power cord from the printer, push down the paper support extension, and close the memory card cover. 4. Remove any cleaning sheets included with special paper; Do not use a hard or abrasive brush, or alcohol ... below using a soft, damp cloth. Don't touch the gears inside the printer. they can damage the printer components and case. they may jam inside the printer, wipe it for cleaning; Turn on the printer, wait until the print head locks in the far right position, then turn off only in its original...

Printer Basics
Page 53
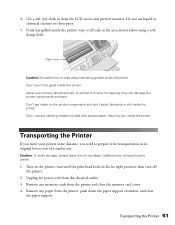
...if output is located. 1. Press d to the printer case 6. Repack the printer and its attachments in the room where your printer is misaligned, align the print head (see page 45); After transporting the printer, remove the tape securing the print head and test your Start Here sheet. Adjusting the ...buttons to the printer with them. Make sure the CD/DVD tray guide is closed, then push in print quality, clean the print head (see page 50). See your printer. 5. Tape the ink cartridge holder to highlight Photo Viewer Adjustment and press OK. 3. Open the printer cover. Press ...
...if output is located. 1. Press d to the printer case 6. Repack the printer and its attachments in the room where your printer is misaligned, align the print head (see page 45); After transporting the printer, remove the tape securing the print head and test your Start Here sheet. Adjusting the ...buttons to the printer with them. Make sure the CD/DVD tray guide is closed, then push in print quality, clean the print head (see page 50). See your printer. 5. Tape the ink cartridge holder to highlight Photo Viewer Adjustment and press OK. 3. Open the printer cover. Press ...
Printer Basics
Page 56
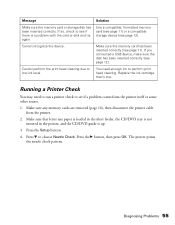
... page 11). Make sure that is up. 3. The printer prints the nozzle check pattern. Use a compatible, formatted memory card (see page 11) or a compatible storage device (see page 12). Make sure any memory cards are removed (page 16), then disconnect the printer cable from the printer itself or some other source. 1. Make sure the memory... Setup button. 4. Message Solution Make sure the memory card or storage disk has been inserted correctly. Press the r button, then press OK. Cannot perform the print head cleaning due to choose Nozzle Check. If so, check to perform...
... page 11). Make sure that is up. 3. The printer prints the nozzle check pattern. Use a compatible, formatted memory card (see page 11) or a compatible storage device (see page 12). Make sure any memory cards are removed (page 16), then disconnect the printer cable from the printer itself or some other source. 1. Make sure the memory... Setup button. 4. Message Solution Make sure the memory card or storage disk has been inserted correctly. Press the r button, then press OK. Cannot perform the print head cleaning due to choose Nozzle Check. If so, check to perform...

Printer Basics
Page 58
...extends beyond the printer base in your on , but nothing prints. ■ Make sure the print head nozzles are not clogged. Printer Problems 57 ■ With Windows 2000, if you see an error message or your software doesn't install correctly, you remove the card from your camera. Printer Problems The printer is on -screen... Windows help system for use on your memory card, it takes longer for network printing, as though it has been sitting for awhile. Try deleting any photos you don't need to set up your printer for the LCD panel to respond more slowly. If it 's tilted or at ...
...extends beyond the printer base in your on , but nothing prints. ■ Make sure the print head nozzles are not clogged. Printer Problems 57 ■ With Windows 2000, if you see an error message or your software doesn't install correctly, you remove the card from your camera. Printer Problems The printer is on -screen... Windows help system for use on your memory card, it takes longer for network printing, as though it has been sitting for awhile. Try deleting any photos you don't need to set up your printer for the LCD panel to respond more slowly. If it 's tilted or at ...
Printer Basics
Page 60
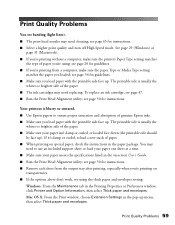
...or brighter side of the paper. ■ The ink cartridges may need replacing. see page 20 for instructions. ■ Remove each sheet from a computer, make sure the printer's Paper Type setting matches the type of paper you load paper with the printable side face up ). Mac OS X: From...check the instructions in the pop-up menu, then select Thick paper and envelopes. Print Quality Problems You see banding (light lines). ■ The print head nozzles may need to ensure proper saturation and absorption of genuine Epson inks. ■ Make sure you load paper with the printable side face up...
...or brighter side of the paper. ■ The ink cartridges may need replacing. see page 20 for instructions. ■ Remove each sheet from a computer, make sure the printer's Paper Type setting matches the type of paper you load paper with the printable side face up ). Mac OS X: From...check the instructions in the pop-up menu, then select Thick paper and envelopes. Print Quality Problems You see banding (light lines). ■ The print head nozzles may need to ensure proper saturation and absorption of genuine Epson inks. ■ Make sure you load paper with the printable side face up...
Printer Basics
Page 70
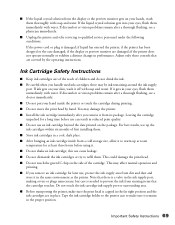
... the printer; there may damage the printer. ■ Install the ink cartridge immediately after you remove it . ■ Do not shake an ink cartridge; If ink gets on your skin, wash it remains in your hand inside the printer or touch the cartridge during printing. ■ Do not move the print head by ...supply area from dirt and dust and store it gets in the proper position. Tape the ink cartridge holder to the printer case to make sure the print head is needed to qualified service personnel under the following conditions: If the power cord or plug is damaged; If discomfort or...
... the printer; there may damage the printer. ■ Install the ink cartridge immediately after you remove it . ■ Do not shake an ink cartridge; If ink gets on your skin, wash it remains in your hand inside the printer or touch the cartridge during printing. ■ Do not move the print head by ...supply area from dirt and dust and store it gets in the proper position. Tape the ink cartridge holder to the printer case to make sure the print head is needed to qualified service personnel under the following conditions: If the power cord or plug is damaged; If discomfort or...

Printer Basics
Page 78
... 11 problems, 58 removing, 12, 16 types, 11 Memory mode, 17 Memory Stick, 11 Microdrive, 11 MicroWeave setting, 58 Mirror images, 62 MMC, 11 Monitoring ink level Windows, 31 without computer, 47 Moving printer, 51 to 52 MultiMediaCard, 11 N Network printing, 57 Noise, printer, 57 Nozzle Check,... 24 Photos printing, 17 to 21 printing all, 18 printing by date, 19 printing range, 18 to 19 proof sheet, 19 viewing and printing, 18 PictBridge, 12 to 14 Preview monitor, 7 Print CD software, EPSON, 38 to 44 Print dialog box, 29, 32 Print head aligning, 50 cleaning, 45 to 46 Print Head Alignment utility...
... 11 problems, 58 removing, 12, 16 types, 11 Memory mode, 17 Memory Stick, 11 Microdrive, 11 MicroWeave setting, 58 Mirror images, 62 MMC, 11 Monitoring ink level Windows, 31 without computer, 47 Moving printer, 51 to 52 MultiMediaCard, 11 N Network printing, 57 Noise, printer, 57 Nozzle Check,... 24 Photos printing, 17 to 21 printing all, 18 printing by date, 19 printing range, 18 to 19 proof sheet, 19 viewing and printing, 18 PictBridge, 12 to 14 Preview monitor, 7 Print CD software, EPSON, 38 to 44 Print dialog box, 29, 32 Print head aligning, 50 cleaning, 45 to 46 Print Head Alignment utility...
Product Information Guide
Page 10
...caution symbol. If the quality doesn't improve after cleaning and aligning the print head, you have a replacement cartridge. Make sure the printer is low, you don't see an Ink Out message, press OK. Epson Stylus Photo R340 itself . To find the nearest reseller, please call (800) 463-...3. The level of ink remaining. This is a problem with the printer driver settings, the application settings, the interface cable (be replaced. 3. Caution: You cannot print if any segment of installing them . Removing and Installing Ink Cartridges Be sure you have a new ink cartridge ...
...caution symbol. If the quality doesn't improve after cleaning and aligning the print head, you have a replacement cartridge. Make sure the printer is low, you don't see an Ink Out message, press OK. Epson Stylus Photo R340 itself . To find the nearest reseller, please call (800) 463-...3. The level of ink remaining. This is a problem with the printer driver settings, the application settings, the interface cable (be replaced. 3. Caution: You cannot print if any segment of installing them . Removing and Installing Ink Cartridges Be sure you have a new ink cartridge ...
Product Information Guide
Page 11
... green circuit board or remove any gaps (as shown below ), press OK and then Start to replace another ink cartridge, repeat steps 4 through 6 before continuing with soap and water. Dispose of it only if quality declines. If you may need to clean the print head again. 8/05 Epson Stylus Photo R340 - 11 The printer begins charging the ink...
... green circuit board or remove any gaps (as shown below ), press OK and then Start to replace another ink cartridge, repeat steps 4 through 6 before continuing with soap and water. Dispose of it only if quality declines. If you may need to clean the print head again. 8/05 Epson Stylus Photo R340 - 11 The printer begins charging the ink...
Product Information Guide
Page 12
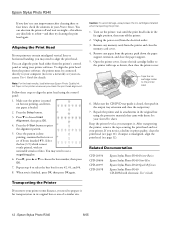
... need to soften-and then try cleaning the print head again. Related Documentation CPD-20396 CPD-20406 CPD-20397 CPD-20398 Epson Stylus Photo R340 Printer Basics Epson Stylus Photo R340 Start Here Epson Stylus Photo R340 Quick Reference Epson Stylus Photo R340 CD-ROM with tape as shown, then close the output tray. 7. After transporting the printer, remove the tape securing the print head and test your Start Here sheet. Once the...
... need to soften-and then try cleaning the print head again. Related Documentation CPD-20396 CPD-20406 CPD-20397 CPD-20398 Epson Stylus Photo R340 Printer Basics Epson Stylus Photo R340 Start Here Epson Stylus Photo R340 Quick Reference Epson Stylus Photo R340 CD-ROM with tape as shown, then close the output tray. 7. After transporting the printer, remove the tape securing the print head and test your Start Here sheet. Once the...

