Printer Basics
Page 7
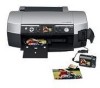
... friends. These photos are some of the printer's outstanding features: ■ Epson's exclusive 6-color ink technology lets you achieve fine shadow detail, dazzling highlights, and excellent fill across a wide range of the printer lets you want to save your memory card contents to your Windows® or ... of papers for connecting the printer to your digital camera's memory card. If you connect a digital camera (supported models only) or an external storage device, such as an Iomega® Zip® drive or CD-R drive. Your Epson Stylus® Photo R340 can transfer them later from ...
... friends. These photos are some of the printer's outstanding features: ■ Epson's exclusive 6-color ink technology lets you achieve fine shadow detail, dazzling highlights, and excellent fill across a wide range of the printer lets you want to save your memory card contents to your Windows® or ... of papers for connecting the printer to your digital camera's memory card. If you connect a digital camera (supported models only) or an external storage device, such as an Iomega® Zip® drive or CD-R drive. Your Epson Stylus® Photo R340 can transfer them later from ...
Printer Basics
Page 30
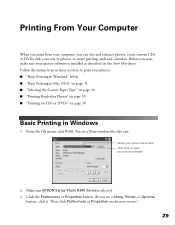
... instructions in these sections to open your photos: ■ "Basic Printing in Windows" below ■ "Basic Printing in Windows 1. Make sure EPSON Stylus Photo R340 Series is installed as described on the Start Here sheet. Click the Preferences or Properties button. (If you see a Print window like this one: Select your printer name here Click here to print your...
... instructions in these sections to open your photos: ■ "Basic Printing in Windows" below ■ "Basic Printing in Windows 1. Make sure EPSON Stylus Photo R340 Series is installed as described on the Start Here sheet. Click the Preferences or Properties button. (If you see a Print window like this one: Select your printer name here Click here to print your...

Printer Basics
Page 32
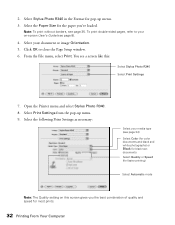
...Stylus Photo R340 Select your Paper Size Select your document or image orientation Basic Printing in Mac OS X 31 If you have left. You see a screen like this window appears and shows the progress of your applications, then click OK. Click to cancel printing Click to pause or resume printing Selecting Default Settings Your printer... settings only apply to the program you can still change the Windows default printer settings for all your print job. You can change the printer settings in your program, if necessary. From...
...Stylus Photo R340 Select your Paper Size Select your document or image orientation Basic Printing in Mac OS X 31 If you have left. You see a screen like this window appears and shows the progress of your applications, then click OK. Click to cancel printing Click to pause or resume printing Selecting Default Settings Your printer... settings only apply to the program you can still change the Windows default printer settings for all your print job. You can change the printer settings in your program, if necessary. From...
Printer Basics
Page 33
...a screen like this screen gives you 've loaded. To print double-sided pages, refer to close the Page Setup window. 6. Open the Printer menu and select Stylus Photo R340. 8. Select Print Settings from the pop-up menu. 3. Select the Paper Size for the paper you the best ...To print without borders, see page 8). 4. Select your on this : Select Stylus Photo R340 Select Print Settings 7. Select the following Print Settings as necessary: Select your media type (see page 34) Select Color (for color documents and black and white photographs) or Black for black text documents Select Quality...
...a screen like this screen gives you 've loaded. To print double-sided pages, refer to close the Page Setup window. 6. Open the Printer menu and select Stylus Photo R340. 8. Select Print Settings from the pop-up menu. 3. Select the Paper Size for the paper you the best ...To print without borders, see page 8). 4. Select your on this : Select Stylus Photo R340 Select Print Settings 7. Select the following Print Settings as necessary: Select your media type (see page 34) Select Color (for color documents and black and white photographs) or Black for black text documents Select Quality...

Printer Basics
Page 34
...printer window or Print Center. You can also choose these options from the Print Settings pop-up . 14. When you want one of your print job: 13. In Mac OS X 10.3.x or 10.4.x, click the Stylus Photo R340 icon when it appears in the dock. Tip: For more information about printer... the number of copies or a page range. ■ Layout: For selecting page layout options. ■ Color Management: For adjusting the color controls, changing the gamma setting, or turning off color adjustments by the printer software. ■ Summary: For viewing a list of your selections. 11.
...printer window or Print Center. You can also choose these options from the Print Settings pop-up . 14. When you want one of your print job: 13. In Mac OS X 10.3.x or 10.4.x, click the Stylus Photo R340 icon when it appears in the dock. Tip: For more information about printer... the number of copies or a page range. ■ Layout: For selecting page layout options. ■ Color Management: For adjusting the color controls, changing the gamma setting, or turning off color adjustments by the printer software. ■ Summary: For viewing a list of your selections. 11.

Printer Basics
Page 38
... other print settings as necessary, then click Print to close the Page Setup window. 5. Printing Borderless Photos 37 Choose the borderless Paper Size for menu. 7. From the File menu, select Print. 6. Choose Print Settings from the pop-up menu. 3. Select Stylus Photo R340 in the Format for the paper you've loaded. 4. You see a screen...
... other print settings as necessary, then click Print to close the Page Setup window. 5. Printing Borderless Photos 37 Choose the borderless Paper Size for menu. 7. From the File menu, select Print. 6. Choose Print Settings from the pop-up menu. 3. Select Stylus Photo R340 in the Format for the paper you've loaded. 4. You see a screen...
Printer Basics
Page 42
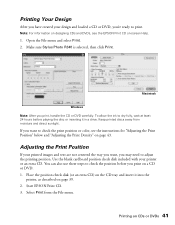
Printing Your Design After you have created your printer or an extra CD. Make sure Stylus Photo R340 is selected, then click Print. Printing on page 43. Open the File menu and select Print. 2. Use the blank cardboard position check disk included with ... position check disk (or an extra CD) on page 39. 2. Select Print from moisture and direct sunlight. Macintosh Windows Note: After you may need to check the print position or color, see the EPSON Print CD on a CD or DVD. 1. Adjusting the Print Position If your printed images and text are not centered...
Printing Your Design After you have created your printer or an extra CD. Make sure Stylus Photo R340 is selected, then click Print. Printing on page 43. Open the File menu and select Print. 2. Use the blank cardboard position check disk included with ... position check disk (or an extra CD) on page 39. 2. Select Print from moisture and direct sunlight. Macintosh Windows Note: After you may need to check the print position or color, see the EPSON Print CD on a CD or DVD. 1. Adjusting the Print Position If your printed images and text are not centered...

Printer Basics
Page 43
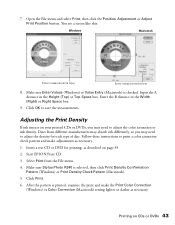
The confirmation pattern is selected, then click Print Position Confirmation Pattern (Windows) or Print Position Check Pattern (Macintosh). 4. Make sure Stylus Photo R340 is printed on the position check disk or CD. 6. Click Print. Macintosh Windows 5. Remove the position check disk or CD and measure the distance from the edge of the hole to the small cross marks (distances labeled A and B as shown). You'll need a metric ruler with millimeters for these measurements. 42 Printing From Your Computer
The confirmation pattern is selected, then click Print Position Confirmation Pattern (Windows) or Print Position Check Pattern (Macintosh). 4. Make sure Stylus Photo R340 is printed on the position check disk or CD. 6. Click Print. Macintosh Windows 5. Remove the position check disk or CD and measure the distance from the edge of the hole to the small cross marks (distances labeled A and B as shown). You'll need a metric ruler with millimeters for these measurements. 42 Printing From Your Computer
Printer Basics
Page 44
Start EPSON Print CD. 3. Select Print from different manufacturers may absorb ink differently, so you may need to adjust the density for printing, as necessary. Make sure Stylus Photo R340 is printed, examine the print and make adjustments as necessary. 1. Open the File menu and select Print,...Space box. 9. Insert a test CD or DVD for each type of disc. Click OK to print a color saturation check pattern and make the Print Color Correction (Windows) or Color Correction (Macintosh) setting lighter or darker as described on CDs or DVDs 43 Adjusting the Print Density If ...
Start EPSON Print CD. 3. Select Print from different manufacturers may absorb ink differently, so you may need to adjust the density for printing, as necessary. Make sure Stylus Photo R340 is printed, examine the print and make adjustments as necessary. 1. Open the File menu and select Print,...Space box. 9. Insert a test CD or DVD for each type of disc. Click OK to print a color saturation check pattern and make the Print Color Correction (Windows) or Color Correction (Macintosh) setting lighter or darker as described on CDs or DVDs 43 Adjusting the Print Density If ...
Printer Basics
Page 65
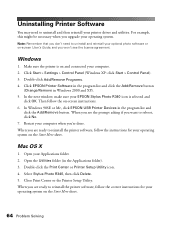
... you want to reboot, click No. 7. In the next window, make sure your computer. 2. In Windows 98SE or Me, click EPSON USB Printer Devices in the Applications folder). 3. Mac OS X 1. Open the Utilities folder (in the program list and click the Add/Remove button. Select Stylus Photo R340, then click Delete. 5. Then follow the on the Start...
... you want to reboot, click No. 7. In the next window, make sure your computer. 2. In Windows 98SE or Me, click EPSON USB Printer Devices in the Applications folder). 3. Mac OS X 1. Open the Utilities folder (in the program list and click the Add/Remove button. Select Stylus Photo R340, then click Delete. 5. Then follow the on the Start...
Product Brochure
Page 2
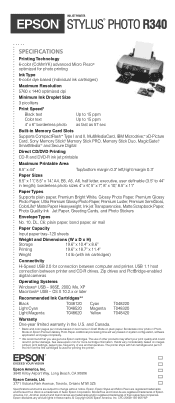
... computer and printer, USB 1.1 host connection between printer and CD-R drives, Zip drives and PictBridge-enabled digital cameras Operating Systems Windows® USB - 98SE, 2000, Me, XP Macintosh® USB - See www.epson.com for photo printing Ink Type 6-color dye based ... (with full cartridges and part of the ink from the first cartridges is a trademark of Seiko Epson Corporation. INK JET PRINTER EPSON® STYLUS® PHOTO R340 SPECIFICATIONS Printing Technology 6-color (CcMmYK) advanced Micro Piezo® optimized for more cartridge information. OS X 10.2.x or later ...
... computer and printer, USB 1.1 host connection between printer and CD-R drives, Zip drives and PictBridge-enabled digital cameras Operating Systems Windows® USB - 98SE, 2000, Me, XP Macintosh® USB - See www.epson.com for photo printing Ink Type 6-color dye based ... (with full cartridges and part of the ink from the first cartridges is a trademark of Seiko Epson Corporation. INK JET PRINTER EPSON® STYLUS® PHOTO R340 SPECIFICATIONS Printing Technology 6-color (CcMmYK) advanced Micro Piezo® optimized for more cartridge information. OS X 10.2.x or later ...
Start Here Card
Page 7
..., or (905) 709-2567 (Canada), 6 AM to Epson Stylus Photo R340 information. On-screen help with your printer is turned on . • Turn off the printer, or it on and the cable is 82720. Use this code to quickly select the Epson Stylus R340 in SoundAdvice. • To speak to a technical support ...sure your system meets the System Requirements listed in the Printer Basics book. • Close your other programs, including any screen savers and virus protection software, and install the software again. • In Windows, make sure the ink cartridges are inserted completely and the...
..., or (905) 709-2567 (Canada), 6 AM to Epson Stylus Photo R340 information. On-screen help with your printer is turned on . • Turn off the printer, or it on and the cable is 82720. Use this code to quickly select the Epson Stylus R340 in SoundAdvice. • To speak to a technical support ...sure your system meets the System Requirements listed in the Printer Basics book. • Close your other programs, including any screen savers and virus protection software, and install the software again. • In Windows, make sure the ink cartridges are inserted completely and the...


