Printer Basics
Page 7
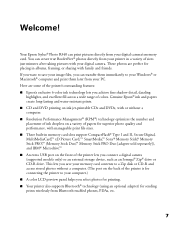
... An extra USB port on a variety of the printer is for connecting the printer to your computer.) ■ A color LCD preview panel helps you can transfer them later from your PC. If you want to your Windows® or Macintosh® computer and print them immediately... superior photo quality and performance, with your printer in a variety of sizes just minutes after taking pictures with manageable print file sizes. ■ Three built-in albums, framing, or sharing with family and friends. Your Epson Stylus® Photo R340 can create true BorderFree® photos directly ...
... An extra USB port on a variety of the printer is for connecting the printer to your computer.) ■ A color LCD preview panel helps you can transfer them later from your PC. If you want to your Windows® or Macintosh® computer and print them immediately... superior photo quality and performance, with your printer in a variety of sizes just minutes after taking pictures with manageable print file sizes. ■ Three built-in albums, framing, or sharing with family and friends. Your Epson Stylus® Photo R340 can create true BorderFree® photos directly ...
Printer Basics
Page 30
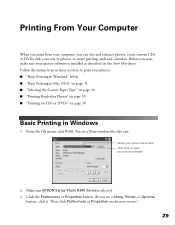
... or Properties button. (If you start, make sure your photos: ■ "Basic Printing in Windows" below ■ "Basic Printing in Mac OS X" on page 31 ■ "Selecting the Correct Paper Type" on page 34 ■ "Printing Borderless Photos" on page 35 ■ "Printing on CDs or DVDs... sections to open your text or photos, or create greeting cards and calendars. Printing From Your Computer When you print from your computer, you can edit and enhance photos, create custom CDs or DVDs with your printer software 2. Make sure EPSON Stylus Photo R340 Series is installed as described on ...
... or Properties button. (If you start, make sure your photos: ■ "Basic Printing in Windows" below ■ "Basic Printing in Mac OS X" on page 31 ■ "Selecting the Correct Paper Type" on page 34 ■ "Printing Borderless Photos" on page 35 ■ "Printing on CDs or DVDs... sections to open your text or photos, or create greeting cards and calendars. Printing From Your Computer When you print from your computer, you can edit and enhance photos, create custom CDs or DVDs with your printer software 2. Make sure EPSON Stylus Photo R340 Series is installed as described on ...

Printer Basics
Page 32
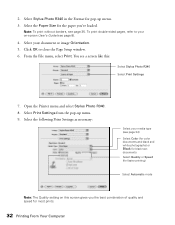
... change the Windows default printer settings for all your program, if necessary. Right-click the printer icon in Mac OS X Follow the steps below to the program you can also see how much ink you want , you 're currently using. During printing, this : Select Stylus Photo R340 Select your ...Paper Size Select your applications, then click OK. You can change the printer settings in Mac OS X 31 Select Printer Settings. From the File menu, select Page Setup. Click to cancel printing ...
... change the Windows default printer settings for all your program, if necessary. Right-click the printer icon in Mac OS X Follow the steps below to the program you can also see how much ink you want , you 're currently using. During printing, this : Select Stylus Photo R340 Select your ...Paper Size Select your applications, then click OK. You can change the printer settings in Mac OS X 31 Select Printer Settings. From the File menu, select Page Setup. Click to cancel printing ...
Printer Basics
Page 33
To print double-sided pages, refer to close the Page Setup window. 6. Open the Printer menu and select Stylus Photo R340. 8. Select your on-screen User's Guide (see page 34) Select Color (for color documents and black and white photographs) or Black for black text documents Select Quality or Speed (for faster printing) Select Automatic mode Note: The...
To print double-sided pages, refer to close the Page Setup window. 6. Open the Printer menu and select Stylus Photo R340. 8. Select your on-screen User's Guide (see page 34) Select Color (for color documents and black and white photographs) or Black for black text documents Select Quality or Speed (for faster printing) Select Automatic mode Note: The...

Printer Basics
Page 34
... the number of copies or a page range. ■ Layout: For selecting page layout options. ■ Color Management: For adjusting the color controls, changing the gamma setting, or turning off color adjustments by the printer software. ■ Summary: For viewing a list of the following: ■ Click the print job, then...job: 13. You can also choose these options from the Print Settings pop-up . 14. To monitor the progress of your printer window or Print Center. Tip: For more information about printer settings, click ?. 10. You can do one of all your printer name (Stylus Photo R340).
... the number of copies or a page range. ■ Layout: For selecting page layout options. ■ Color Management: For adjusting the color controls, changing the gamma setting, or turning off color adjustments by the printer software. ■ Summary: For viewing a list of the following: ■ Click the print job, then...job: 13. You can also choose these options from the Print Settings pop-up . 14. To monitor the progress of your printer window or Print Center. Tip: For more information about printer settings, click ?. 10. You can do one of all your printer name (Stylus Photo R340).

Printer Basics
Page 38
...Print Settings from the pop-up menu. 3. Select other print settings as necessary, then click Print to close the Page Setup window. 5. Printing Borderless Photos 37 Select Stylus Photo R340 in the Format for the paper you've loaded. 4. From the File menu, select Page Setup. From the File menu..., select Print. 6. You see a screen like this: Select Stylus Photo R340 Choose a borderless Paper Size 2. Choose the borderless Paper Size for pop-up menu. 8. Select one of the following media types: ■ ...
...Print Settings from the pop-up menu. 3. Select other print settings as necessary, then click Print to close the Page Setup window. 5. Printing Borderless Photos 37 Select Stylus Photo R340 in the Format for the paper you've loaded. 4. From the File menu, select Page Setup. From the File menu..., select Print. 6. You see a screen like this: Select Stylus Photo R340 Choose a borderless Paper Size 2. Choose the borderless Paper Size for pop-up menu. 8. Select one of the following media types: ■ ...
Printer Basics
Page 42
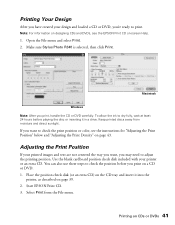
...ready to dry fully, wait at least 24 hours before you print, handle the CD or DVD carefully. Adjusting the Print Position If your printer or an extra CD. Select Print from moisture and direct sunlight. Printing on page 43. Keep printed discs away from the File menu....and insert it in a drive. Make sure Stylus Photo R340 is selected, then click Print. You can also use these steps to check the print position or color, see the EPSON Print CD on-screen Help. 1. Macintosh Windows Note: After you print on page 39. 2. Start EPSON Print CD. 3. Note: For information on ...
...ready to dry fully, wait at least 24 hours before you print, handle the CD or DVD carefully. Adjusting the Print Position If your printer or an extra CD. Select Print from moisture and direct sunlight. Printing on page 43. Keep printed discs away from the File menu....and insert it in a drive. Make sure Stylus Photo R340 is selected, then click Print. You can also use these steps to check the print position or color, see the EPSON Print CD on-screen Help. 1. Macintosh Windows Note: After you print on page 39. 2. Start EPSON Print CD. 3. Note: For information on ...

Printer Basics
Page 43
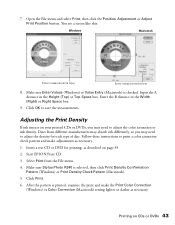
Macintosh Windows 5. You'll need a metric ruler with millimeters for these measurements. 42 Printing From Your Computer Click Print. The confirmation pattern is selected, then click Print Position Confirmation Pattern (Windows) or Print Position Check Pattern (Macintosh). Make sure Stylus Photo R340 is printed on the position check disk or CD. 6. 4. Remove the position check disk or CD and measure the distance from the edge of the hole to the small cross marks (distances labeled A and B as shown).
Macintosh Windows 5. You'll need a metric ruler with millimeters for these measurements. 42 Printing From Your Computer Click Print. The confirmation pattern is selected, then click Print Position Confirmation Pattern (Windows) or Print Position Check Pattern (Macintosh). Make sure Stylus Photo R340 is printed on the position check disk or CD. 6. 4. Remove the position check disk or CD and measure the distance from the edge of the hole to the small cross marks (distances labeled A and B as shown).
Printer Basics
Page 44
... A distance in the Width (Right) or Right Space box. 9. Start EPSON Print CD. 3. After the pattern is printed, examine the print and make adjustments as necessary. 1. Make sure Enter Values (Windows) or Value Entry (Macintosh) is selected, then click Print Density Confirmation Pattern...absorb ink differently, so you may need to print a color saturation check pattern and make the Print Color Correction (Windows) or Color Correction (Macintosh) setting lighter or darker as described on CDs or DVDs 43 Make sure Stylus Photo R340 is checked. 7. Open the File menu and select Print...
... A distance in the Width (Right) or Right Space box. 9. Start EPSON Print CD. 3. After the pattern is printed, examine the print and make adjustments as necessary. 1. Make sure Enter Values (Windows) or Value Entry (Macintosh) is selected, then click Print Density Confirmation Pattern...absorb ink differently, so you may need to print a color saturation check pattern and make the Print Color Correction (Windows) or Color Correction (Macintosh) setting lighter or darker as described on CDs or DVDs 43 Make sure Stylus Photo R340 is checked. 7. Open the File menu and select Print...
Printer Basics
Page 65
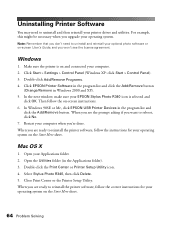
... Start Here sheet. Double-click Add/Remove Programs. 4. In Windows 98SE or Me, click EPSON USB Printer Devices in the Applications folder). 3. Restart your computer when you upgrade your operating system. Open your EPSON Stylus Photo R340 icon is on -screen instructions. 6. Double-click the Print Center or Printer Setup Utility icon. 4. For example, this might be necessary...
... Start Here sheet. Double-click Add/Remove Programs. 4. In Windows 98SE or Me, click EPSON USB Printer Devices in the Applications folder). 3. Restart your computer when you upgrade your operating system. Open your EPSON Stylus Photo R340 icon is on -screen instructions. 6. Double-click the Print Center or Printer Setup Utility icon. 4. For example, this might be necessary...
Product Brochure
Page 2
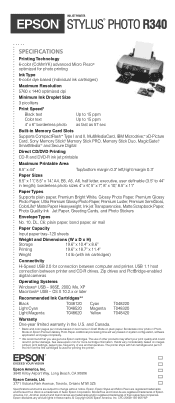
... cameras Operating Systems Windows® USB - 98SE, 2000, Me, XP Macintosh® USB - Epson, Epson Stylus and Micro Piezo are registered trademarks of use genuine Epson cartridges. All other products may affect your print quality and could result in the U.S. CPD-20629 15K 9/05 WP INK JET PRINTER EPSON® STYLUS® PHOTO R340 SPECIFICATIONS Printing Technology 6-color (CcMmYK) advanced Micro...
... cameras Operating Systems Windows® USB - 98SE, 2000, Me, XP Macintosh® USB - Epson, Epson Stylus and Micro Piezo are registered trademarks of use genuine Epson cartridges. All other products may affect your print quality and could result in the U.S. CPD-20629 15K 9/05 WP INK JET PRINTER EPSON® STYLUS® PHOTO R340 SPECIFICATIONS Printing Technology 6-color (CcMmYK) advanced Micro...
Start Here Card
Page 7
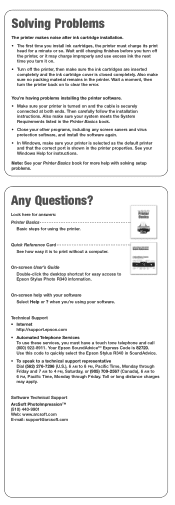
... • The first time you 're using the printer. Look here for answers: Printer Basics Basic steps for easy access to Epson Stylus Photo R340 information. Wait a moment, then turn off the printer, then make sure your Printer Basics book for more help with solving setup problems. ... technical support representative Dial (562) 276-7296 (U.S.), 6 AM to 8 PM, Pacific Time, Monday through Friday. On-screen help with your Windows Help for a minute or so. Software Technical Support ArcSoft PhotoImpression™ (510) 440-9901 Web: www.arcsoft.com E-mail: support@arcsoft....
... • The first time you 're using the printer. Look here for answers: Printer Basics Basic steps for easy access to Epson Stylus Photo R340 information. Wait a moment, then turn off the printer, then make sure your Printer Basics book for more help with solving setup problems. ... technical support representative Dial (562) 276-7296 (U.S.), 6 AM to 8 PM, Pacific Time, Monday through Friday. On-screen help with your Windows Help for a minute or so. Software Technical Support ArcSoft PhotoImpression™ (510) 440-9901 Web: www.arcsoft.com E-mail: support@arcsoft....


