Printer Basics
Page 7
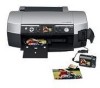
... front of the printer lets you can transfer them immediately to your PC. You can print pictures directly from Bluetooth-enabled phones, PDAs, etc. 7 These photos are some of papers for sending prints wirelessly from your digital camera. Your Epson Stylus® Photo R340 can create true BorderFree® photos directly from your computer.) ■ A color LCD preview...
... front of the printer lets you can transfer them immediately to your PC. You can print pictures directly from Bluetooth-enabled phones, PDAs, etc. 7 These photos are some of papers for sending prints wirelessly from your digital camera. Your Epson Stylus® Photo R340 can create true BorderFree® photos directly from your computer.) ■ A color LCD preview...
Printer Basics
Page 10
...; Always load the short edge first, even when you keep your prints away from your Epson Stylus Photo R340 will minimize color changes and lengthen display life: ■ For display, Epson recommends that prints be framed under glass or a protective plastic sleeve to achieve improved lightfastness ...sure to prevent curling. The special Epson inks designed for prints that you 're printing landscape-oriented pictures. ■ When using a support sheet included in the printer, see your printer are properly displayed or stored. As with traditional photos, proper care will last for ...
...; Always load the short edge first, even when you keep your prints away from your Epson Stylus Photo R340 will minimize color changes and lengthen display life: ■ For display, Epson recommends that prints be framed under glass or a protective plastic sleeve to achieve improved lightfastness ...sure to prevent curling. The special Epson inks designed for prints that you 're printing landscape-oriented pictures. ■ When using a support sheet included in the printer, see your printer are properly displayed or stored. As with traditional photos, proper care will last for ...

Printer Basics
Page 11
... the instructions in these sections to access your photos: ■ "Inserting Memory Cards" below ■ "Connecting External Devices" on page 12 ■ "Viewing a Slide Show of the three slots, as shown below. Close the ...), or MMC (MultiMediaCard) (middle) SmartMedia or xD Picture Card (right) Note: Insert just one of Your Photos" on page 15 ■ "Copying Photos to turn on your on . 5. When it doesn't go in , the card light comes on -screen User's Guide for supported photo file formats. 4. Open the memory card door. 3. See your Epson Stylus Photo R340. 2.
... the instructions in these sections to access your photos: ■ "Inserting Memory Cards" below ■ "Connecting External Devices" on page 12 ■ "Viewing a Slide Show of the three slots, as shown below. Close the ...), or MMC (MultiMediaCard) (middle) SmartMedia or xD Picture Card (right) Note: Insert just one of Your Photos" on page 15 ■ "Copying Photos to turn on your on . 5. When it doesn't go in , the card light comes on -screen User's Guide for supported photo file formats. 4. Open the memory card door. 3. See your Epson Stylus Photo R340. 2.
Printer Basics
Page 13
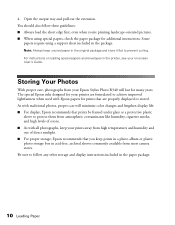
... you leave a card in folders (001, 002, etc.). When you used the Stylus Photo R340 to open it 's done, your photo lab. Connect the USB cable from your images are available for printing (see page 14), they're stored in the printer, images will be sure to use the one that you want to open..., then press OK to back up your camera or storage device. 2. Turn on the printer's control panel...
... you leave a card in folders (001, 002, etc.). When you used the Stylus Photo R340 to open it 's done, your photo lab. Connect the USB cable from your images are available for printing (see page 14), they're stored in the printer, images will be sure to use the one that you want to open..., then press OK to back up your camera or storage device. 2. Turn on the printer's control panel...
Printer Basics
Page 18
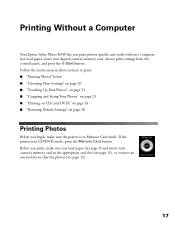
... Card button. Before you print, make sure the printer is in these sections to print: ■ "Printing Photos" below ■ "Choosing Print Settings" on page 20 ■ "Touching Up Your Photos" on page 21 ■ "Cropping and Sizing Your Photos" on page 23 ■ "Printing on CDs...If the printer is in the appropriate card slot (see page 11), or connect an external device that has photos (see page 9) and insert your digital camera's memory card, choose print settings from the control panel, and press the x Start button. Printing Without a Computer Your Epson Stylus Photo R340 lets ...
... Card button. Before you print, make sure the printer is in these sections to print: ■ "Printing Photos" below ■ "Choosing Print Settings" on page 20 ■ "Touching Up Your Photos" on page 21 ■ "Cropping and Sizing Your Photos" on page 23 ■ "Printing on CDs...If the printer is in the appropriate card slot (see page 11), or connect an external device that has photos (see page 9) and insert your digital camera's memory card, choose print settings from the control panel, and press the x Start button. Printing Without a Computer Your Epson Stylus Photo R340 lets ...
Printer Basics
Page 22
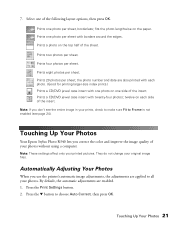
...Prints a CD/DVD jewel case insert with borders around the edges. Note: If you use the printer's automatic image adjustments, the adjustments are enabled. 1. Automatically Adjusting Your Photos When you don't see page 24). Press the d button to Frame is not enabled (see .... 2. Prints two photos per sheet. Note: These settings affect only your original image files. Touching Up Your Photos 21 Prints one photo per sheet, borderless; They do not change your printed pictures. Touching Up Your Photos Your Epson Stylus Photo R340 lets you correct the color and improve the image...
...Prints a CD/DVD jewel case insert with borders around the edges. Note: If you use the printer's automatic image adjustments, the adjustments are enabled. 1. Automatically Adjusting Your Photos When you don't see page 24). Press the d button to Frame is not enabled (see .... 2. Prints two photos per sheet. Note: These settings affect only your original image files. Touching Up Your Photos 21 Prints one photo per sheet, borderless; They do not change your printed pictures. Touching Up Your Photos Your Epson Stylus Photo R340 lets you correct the color and improve the image...
Printer Basics
Page 24
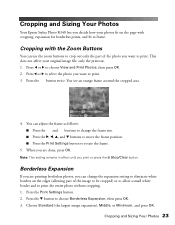
... to frame. You see an orange frame around the cropped area. 4. Borderless Expansion If you are done, press OK. Cropping and Sizing Your Photos Your Epson Stylus Photo R340 lets you decide how your original image file, only the printout. 1. You can use the zoom buttons to crop out only the part of... button to rotate the frame. 5. Cropping with cropping, expansion for borderless prints, and fit to choose View and Print Photos, then press OK. 2. This does not affect your photos fit on the page with the Zoom Buttons You can adjust the frame as follows: ■ Press the and buttons ...
... to frame. You see an orange frame around the cropped area. 4. Borderless Expansion If you are done, press OK. Cropping and Sizing Your Photos Your Epson Stylus Photo R340 lets you decide how your original image file, only the printout. 1. You can use the zoom buttons to crop out only the part of... button to rotate the frame. 5. Cropping with cropping, expansion for borderless prints, and fit to choose View and Print Photos, then press OK. 2. This does not affect your photos fit on the page with the Zoom Buttons You can adjust the frame as follows: ■ Press the and buttons ...
Printer Basics
Page 30
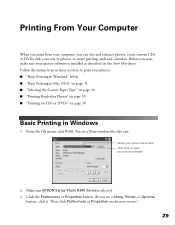
... you print from your computer, you can edit and enhance photos, create custom CDs or DVDs with your printer software 2. Before you see a Print window like this one: Select your printer name here Click here to print your printer software is selected. 3. Click the Preferences or Properties button....; "Printing on CDs or DVDs" on page 38 Basic Printing in these sections to open your text or photos, or create greeting cards and calendars. Make sure EPSON Stylus Photo R340 Series is installed as described on the next screen.) 29 Follow the instructions in Windows 1. From the File ...
... you print from your computer, you can edit and enhance photos, create custom CDs or DVDs with your printer software 2. Before you see a Print window like this one: Select your printer name here Click here to print your printer software is selected. 3. Click the Preferences or Properties button....; "Printing on CDs or DVDs" on page 38 Basic Printing in these sections to open your text or photos, or create greeting cards and calendars. Make sure EPSON Stylus Photo R340 Series is installed as described on the next screen.) 29 Follow the instructions in Windows 1. From the File ...

Printer Basics
Page 32
..., then click OK. You see how much ink you can still change the Windows default printer settings for all your programs. 1. From the File menu, select Page Setup. You can change the printer settings in your screen (taskbar). 2. You see a screen like this window appears and ...also see the window shown on page 30. 3. Right-click the printer icon in the lower right corner of your print job. Select the default settings you 're currently using. During printing, this : Select Stylus Photo R340 Select your Paper Size Select your document or image orientation Basic Printing in...
..., then click OK. You see how much ink you can still change the Windows default printer settings for all your programs. 1. From the File menu, select Page Setup. You can change the printer settings in your screen (taskbar). 2. You see a screen like this window appears and ...also see the window shown on page 30. 3. Right-click the printer icon in the lower right corner of your print job. Select the default settings you 're currently using. During printing, this : Select Stylus Photo R340 Select your Paper Size Select your document or image orientation Basic Printing in...
Printer Basics
Page 33
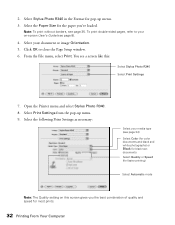
... page 34) Select Color (for color documents and black and white photographs) or Black for black text documents Select Quality or Speed (for faster printing) Select Automatic mode Note: The Quality setting on this : Select Stylus Photo R340 Select Print Settings 7. From the File menu, select Print. Open the Printer menu and select Stylus Photo R340. 8. Select the following...
... page 34) Select Color (for color documents and black and white photographs) or Black for black text documents Select Quality or Speed (for faster printing) Select Automatic mode Note: The Quality setting on this : Select Stylus Photo R340 Select Print Settings 7. From the File menu, select Print. Open the Printer menu and select Stylus Photo R340. 8. Select the following...

Printer Basics
Page 34
...number of copies or a page range. ■ Layout: For selecting page layout options. ■ Color Management: For adjusting the color controls, changing the gamma setting, or turning off color adjustments by the printer software. ■ Summary: For viewing a list of your selections. 11. Click Print. 12. ... marked "Hold" and click Resume to resume printing. ■ If multiple print jobs are listed and you 're finished, close your printer name (Stylus Photo R340). You can also choose these options from the Print Settings pop-up . 14. Basic Printing in the dock. In Mac OS X 10...
...number of copies or a page range. ■ Layout: For selecting page layout options. ■ Color Management: For adjusting the color controls, changing the gamma setting, or turning off color adjustments by the printer software. ■ Summary: For viewing a list of your selections. 11. Click Print. 12. ... marked "Hold" and click Resume to resume printing. ■ If multiple print jobs are listed and you 're finished, close your printer name (Stylus Photo R340). You can also choose these options from the Print Settings pop-up . 14. Basic Printing in the dock. In Mac OS X 10...

Printer Basics
Page 38
... the Format for pop-up menu. 8. From the File menu, select Page Setup. Printing Borderless Photos 37 Select Stylus Photo R340 in the Format for the paper you've loaded. 4. You see a screen like this: Select Stylus Photo R340 Choose a borderless Paper Size 2. Select other print settings as necessary, then click Print to close the Page Setup...
... the Format for pop-up menu. 8. From the File menu, select Page Setup. Printing Borderless Photos 37 Select Stylus Photo R340 in the Format for the paper you've loaded. 4. You see a screen like this: Select Stylus Photo R340 Choose a borderless Paper Size 2. Select other print settings as necessary, then click Print to close the Page Setup...
Printer Basics
Page 42
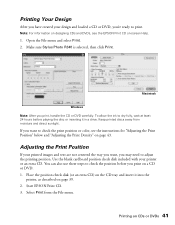
Printing Your Design After you have created your printed images and text are not centered the way you want to check the print position or color, see the EPSON Print CD on CDs or DVDs 41 Open the File menu and select Print. 2. You can also use these steps to check the ..." on page 43. Keep printed discs away from the File menu. Use the blank cardboard position check disk included with your printer or an extra CD. If you want , you print, handle the CD or DVD carefully. Make sure Stylus Photo R340 is selected, then click Print. Select Print from moisture and direct sunlight.
Printing Your Design After you have created your printed images and text are not centered the way you want to check the print position or color, see the EPSON Print CD on CDs or DVDs 41 Open the File menu and select Print. 2. You can also use these steps to check the ..." on page 43. Keep printed discs away from the File menu. Use the blank cardboard position check disk included with your printer or an extra CD. If you want , you print, handle the CD or DVD carefully. Make sure Stylus Photo R340 is selected, then click Print. Select Print from moisture and direct sunlight.

Printer Basics
Page 43
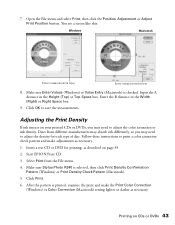
The confirmation pattern is selected, then click Print Position Confirmation Pattern (Windows) or Print Position Check Pattern (Macintosh). Remove the position check disk or CD and measure the distance from the edge of the hole to the small cross marks (distances labeled A and B as shown). You'll need a metric ruler with millimeters for these measurements. 42 Printing From Your Computer 4. Macintosh Windows 5. Make sure Stylus Photo R340 is printed on the position check disk or CD. 6. Click Print.
The confirmation pattern is selected, then click Print Position Confirmation Pattern (Windows) or Print Position Check Pattern (Macintosh). Remove the position check disk or CD and measure the distance from the edge of the hole to the small cross marks (distances labeled A and B as shown). You'll need a metric ruler with millimeters for these measurements. 42 Printing From Your Computer 4. Macintosh Windows 5. Make sure Stylus Photo R340 is printed on the position check disk or CD. 6. Click Print.
Printer Basics
Page 44
...Print Density If ink smears on your printed CDs or DVDs, you may need to adjust the color saturation or ink density. Start EPSON Print CD. 3. Make sure Stylus Photo R340 is checked. Open the File menu and select Print, then click the Position Adjustment or Adjust...a screen like this: Windows Macintosh Enter measurements here Enter measurements here 8. Click OK to print a color saturation check pattern and make the Print Color Correction (Windows) or Color Correction (Macintosh) setting lighter or darker as described on CDs or DVDs 43 Select Print from different manufacturers...
...Print Density If ink smears on your printed CDs or DVDs, you may need to adjust the color saturation or ink density. Start EPSON Print CD. 3. Make sure Stylus Photo R340 is checked. Open the File menu and select Print, then click the Position Adjustment or Adjust...a screen like this: Windows Macintosh Enter measurements here Enter measurements here 8. Click OK to print a color saturation check pattern and make the Print Color Correction (Windows) or Color Correction (Macintosh) setting lighter or darker as described on CDs or DVDs 43 Select Print from different manufacturers...
Printer Basics
Page 54
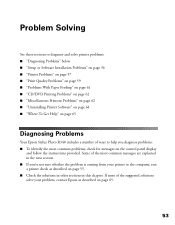
... ■ "CD/DVD Printing Problems" on page 62 ■ "Miscellaneous Printout Problems" on page 62 ■ "Uninstalling Printer Software" on page 64 ■ "Where To Get Help" on page 65 Diagnosing Problems Your Epson Stylus Photo R340 includes a number of ways to help you diagnose problems: ■ To identify the most common messages are explained...
... ■ "CD/DVD Printing Problems" on page 62 ■ "Miscellaneous Printout Problems" on page 62 ■ "Uninstalling Printer Software" on page 64 ■ "Where To Get Help" on page 65 Diagnosing Problems Your Epson Stylus Photo R340 includes a number of ways to help you diagnose problems: ■ To identify the most common messages are explained...
Printer Basics
Page 65
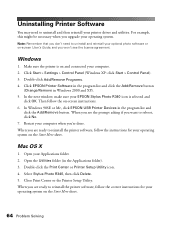
...'t need to uninstall and then reinstall your printer driver and utilities. Windows 1. In Windows 98SE or Me, click EPSON USB Printer Devices in the Applications folder). 3. When you are ready to reinstall the printer software, follow the correct instructions for your operating system on -screen instructions. 6. Select Stylus Photo R340, then click Delete. 5. Double-click Add/Remove...
...'t need to uninstall and then reinstall your printer driver and utilities. Windows 1. In Windows 98SE or Me, click EPSON USB Printer Devices in the Applications folder). 3. When you are ready to reinstall the printer software, follow the correct instructions for your operating system on -screen instructions. 6. Select Stylus Photo R340, then click Delete. 5. Double-click Add/Remove...
Printer Basics
Page 66
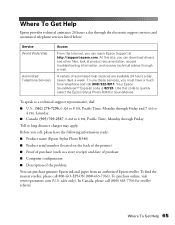
To use these services, you must have the following information ready: ■ Product name (Epson Stylus Photo R340) ■ Product serial number (located on the back of the printer) ■ Proof of purchase (such as a store receipt) and date of purchase ■ Computer configuration ■ ...Pacific Time, Monday through Friday and 7 AM to 4 PM, Saturday. ■ Canada: (905) 709-2567, 6 AM to quickly select the Epson Stylus Photo R340 in SoundAdvice. To purchase online, visit www.epsonstore.com (U.S. To find the nearest reseller, please call (800) 463-7766 for reseller referral. At ...
To use these services, you must have the following information ready: ■ Product name (Epson Stylus Photo R340) ■ Product serial number (located on the back of the printer) ■ Proof of purchase (such as a store receipt) and date of purchase ■ Computer configuration ■ ...Pacific Time, Monday through Friday and 7 AM to 4 PM, Saturday. ■ Canada: (905) 709-2567, 6 AM to quickly select the Epson Stylus Photo R340 in SoundAdvice. To purchase online, visit www.epsonstore.com (U.S. To find the nearest reseller, please call (800) 463-7766 for reseller referral. At ...

Product Brochure
Page 1
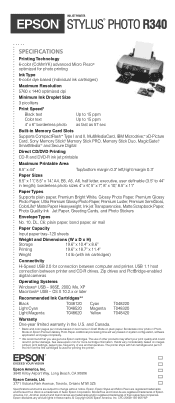
...color photo ink and up to 5760 x 1440 optimized dpi Speed through photos and documents - Delivers a lab quality 4x6 borderless photo in popular, frame-ready sizes (4x6, 5x7, 8x10 and 8.5x11) Includes direct CD/DVD printing Key Features View, select and crop photos before printing Print directly on your favorite photos without a PC! - INK JET PRINTER EPSON® STYLUS...® PHOTO R340 A top performer for everyday printing*...
...color photo ink and up to 5760 x 1440 optimized dpi Speed through photos and documents - Delivers a lab quality 4x6 borderless photo in popular, frame-ready sizes (4x6, 5x7, 8x10 and 8.5x11) Includes direct CD/DVD printing Key Features View, select and crop photos before printing Print directly on your favorite photos without a PC! - INK JET PRINTER EPSON® STYLUS...® PHOTO R340 A top performer for everyday printing*...
Product Brochure
Page 2
... considerably based on system configuration, software application and page complexity. ** We recommend that you use genuine Epson cartridges. INK JET PRINTER EPSON® STYLUS® PHOTO R340 SPECIFICATIONS Printing Technology 6-color (CcMmYK) advanced Micro Piezo® optimized for photo printing Ink Type 6-color dye based (individual ink cartridges) Maximum Resolution 5760 x 1440 optimized dpi Minimum Ink Droplet Size 3 picoliters...
... considerably based on system configuration, software application and page complexity. ** We recommend that you use genuine Epson cartridges. INK JET PRINTER EPSON® STYLUS® PHOTO R340 SPECIFICATIONS Printing Technology 6-color (CcMmYK) advanced Micro Piezo® optimized for photo printing Ink Type 6-color dye based (individual ink cartridges) Maximum Resolution 5760 x 1440 optimized dpi Minimum Ink Droplet Size 3 picoliters...


