Printer Basics
Page 4
... Selecting Default Settings 31 Basic Printing in Mac OS X 31 Selecting the Correct Paper Type 34 Printing Borderless Photos 35 Windows 36 Mac OS X 37 Printing on CDs or DVDs 38 Cleaning the Roller 38 Inserting a CD or DVD 39 Printing Your Design...41 Adjusting the Print Position 41 Adjusting the Print Density 43 Maintaining Your Printer 45 Cleaning the Print Head 45 Replacing an Ink Cartridge 47 Removing and Installing Ink Cartridges 48 Aligning the Print Head 50 Cleaning the Printer 50 Transporting the Printer 51 Adjusting the LCD Brightness 52 4 Contents
... Selecting Default Settings 31 Basic Printing in Mac OS X 31 Selecting the Correct Paper Type 34 Printing Borderless Photos 35 Windows 36 Mac OS X 37 Printing on CDs or DVDs 38 Cleaning the Roller 38 Inserting a CD or DVD 39 Printing Your Design...41 Adjusting the Print Position 41 Adjusting the Print Density 43 Maintaining Your Printer 45 Cleaning the Print Head 45 Replacing an Ink Cartridge 47 Removing and Installing Ink Cartridges 48 Aligning the Print Head 50 Cleaning the Printer 50 Transporting the Printer 51 Adjusting the LCD Brightness 52 4 Contents

Printer Basics
Page 5
... With Paper Feeding CD/DVD Printing Problems Miscellaneous Printout Problems Uninstalling Printer Software Windows Mac OS X Where To Get Help Notices Windows System Requirements Macintosh System Requirements Important Safety Instructions Ink Cartridge Safety Instructions Energy Star Compliance FCC Compliance Statement Declaration of Conformity Epson America, Inc. Limited Warranty Index 53 53 54 55 56...
... With Paper Feeding CD/DVD Printing Problems Miscellaneous Printout Problems Uninstalling Printer Software Windows Mac OS X Where To Get Help Notices Windows System Requirements Macintosh System Requirements Important Safety Instructions Ink Cartridge Safety Instructions Energy Star Compliance FCC Compliance Statement Declaration of Conformity Epson America, Inc. Limited Warranty Index 53 53 54 55 56...
Printer Basics
Page 7
...The port on the back of the printer lets you connect a digital camera (supported models only) or an external storage device, such as an Iomega® Zip® drive or CD-R drive. Welcome! Your Epson Stylus® Photo R340 can print pictures directly from your ...Windows® or Macintosh® computer and print them later from your computer.) ■ A color LCD preview panel helps you achieve fine shadow detail, dazzling highlights, and excellent fill across a wide range of the printer's outstanding features: ■ Epson's exclusive 6-color ink technology lets you select photos...
...The port on the back of the printer lets you connect a digital camera (supported models only) or an external storage device, such as an Iomega® Zip® drive or CD-R drive. Welcome! Your Epson Stylus® Photo R340 can print pictures directly from your ...Windows® or Macintosh® computer and print them later from your computer.) ■ A color LCD preview panel helps you achieve fine shadow detail, dazzling highlights, and excellent fill across a wide range of the printer's outstanding features: ■ Epson's exclusive 6-color ink technology lets you select photos...

Printer Basics
Page 8
...and instructions on: ■ Viewing your on-screen User's Guide ■ Printing all types of photos without a computer, see your desktop. Viewing Your On-Screen User's Guide Your printer CD-ROM includes an on -screen User's Guide, as Microsoft® Internet Explorer 4.0 or ...links to the main screen. 8 Welcome! Notes contain important information about printing with Windows or on a Macintosh ■ Maintaining the printer ■ Solving basic problems For more details about your printer. Tips contain additional hints for better printing. You need a browser-such as described ...
...and instructions on: ■ Viewing your on-screen User's Guide ■ Printing all types of photos without a computer, see your desktop. Viewing Your On-Screen User's Guide Your printer CD-ROM includes an on -screen User's Guide, as Microsoft® Internet Explorer 4.0 or ...links to the main screen. 8 Welcome! Notes contain important information about printing with Windows or on a Macintosh ■ Maintaining the printer ■ Solving basic problems For more details about your printer. Tips contain additional hints for better printing. You need a browser-such as described ...

Printer Basics
Page 16
..., add files to the card, or format the card, the card may not work correctly with your camera and the printer may not be able to read the files on your photos. Removing a Memory Card Once you see this screen, click Start > My Computer. Then remove your memory card, follow the steps... card. You can open when you don't see a screen like the one on the card. Be sure to remove it. 4. In Windows XP, you 're finished copying photos from your photos. Caution: Do not eject a card while the card light is connected, it straight out of the supported programs or options to do...
..., add files to the card, or format the card, the card may not work correctly with your camera and the printer may not be able to read the files on your photos. Removing a Memory Card Once you see this screen, click Start > My Computer. Then remove your memory card, follow the steps... card. You can open when you don't see a screen like the one on the card. Be sure to remove it. 4. In Windows XP, you 're finished copying photos from your photos. Caution: Do not eject a card while the card light is connected, it straight out of the supported programs or options to do...
Printer Basics
Page 30
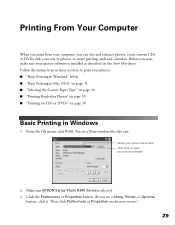
...EPSON Stylus Photo R340 Series is installed as described on the next screen.) 29 Then click Preferences or Properties on the Start Here sheet. Click the Preferences or Properties button. (If you can edit and enhance photos, create custom CDs or DVDs with your text or photos, or create greeting cards and calendars. You see a Setup, Printer... From Your Computer When you print from your computer, you see a Print window like this one: Select your printer name here Click here to print your photos: ■ "Basic Printing in Windows" below ■ "Basic Printing in Mac OS X" on page 31 &#...
...EPSON Stylus Photo R340 Series is installed as described on the next screen.) 29 Then click Preferences or Properties on the Start Here sheet. Click the Preferences or Properties button. (If you can edit and enhance photos, create custom CDs or DVDs with your text or photos, or create greeting cards and calendars. You see a Setup, Printer... From Your Computer When you print from your computer, you see a Print window like this one: Select your printer name here Click here to print your photos: ■ "Basic Printing in Windows" below ■ "Basic Printing in Mac OS X" on page 31 &#...

Printer Basics
Page 31
For information on selecting the highest quality (Photo RPM®) on selected papers, see the Printing Preferences or Properties window: Select the type of quality and speed for more information about paper types. 6. Select your document or image Orientation. Select a Quality... speed. ■ Best Photo: For photos or graphics with high print quality. See "Selecting the Correct Paper Type" on page 34 for most prints. At the Print window, click OK or Print to close the Printing Preferences or Properties window. 8. Tip: For more information about printer settings, click the ?...
For information on selecting the highest quality (Photo RPM®) on selected papers, see the Printing Preferences or Properties window: Select the type of quality and speed for more information about paper types. 6. Select your document or image Orientation. Select a Quality... speed. ■ Best Photo: For photos or graphics with high print quality. See "Selecting the Correct Paper Type" on page 34 for most prints. At the Print window, click OK or Print to close the Printing Preferences or Properties window. 8. Tip: For more information about printer settings, click the ?...

Printer Basics
Page 32
...to cancel, pause, or resume printing. You can also see how much ink you can still change the Windows default printer settings for all your programs. 1. Right-click the printer icon in Mac OS X Follow the steps below to the program you want , you have left. ... change the printer settings in your program, if necessary. You see a screen like this window appears and shows the progress of your screen (taskbar). 2. From the File menu, select Page Setup. Select the default settings you 're currently using. During printing, this : Select Stylus Photo R340 Select your Paper...
...to cancel, pause, or resume printing. You can also see how much ink you can still change the Windows default printer settings for all your programs. 1. Right-click the printer icon in Mac OS X Follow the steps below to the program you want , you have left. ... change the printer settings in your program, if necessary. You see a screen like this window appears and shows the progress of your screen (taskbar). 2. From the File menu, select Page Setup. Select the default settings you 're currently using. During printing, this : Select Stylus Photo R340 Select your Paper...
Printer Basics
Page 33
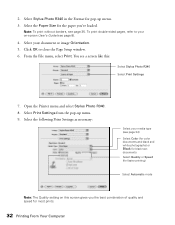
... pop-up menu. 3. Select the Paper Size for pop-up menu. 9. Open the Printer menu and select Stylus Photo R340. 8. Note: To print without borders, see page 8). 4. Click OK to your on this : Select Stylus Photo R340 Select Print Settings 7. From the File menu, select Print. You see a screen like... Select your media type (see page 34) Select Color (for color documents and black and white photographs) or Black for black text documents Select Quality or Speed (for most prints. 32 Printing From Your Computer Select Stylus Photo R340 in the Format for the paper you the best ...
... pop-up menu. 3. Select the Paper Size for pop-up menu. 9. Open the Printer menu and select Stylus Photo R340. 8. Note: To print without borders, see page 8). 4. Click OK to your on this : Select Stylus Photo R340 Select Print Settings 7. From the File menu, select Print. You see a screen like... Select your media type (see page 34) Select Color (for color documents and black and white photographs) or Black for black text documents Select Quality or Speed (for most prints. 32 Printing From Your Computer Select Stylus Photo R340 in the Format for the paper you the best ...

Printer Basics
Page 34
...click the Status arrow to resume printing. ■ If multiple print jobs are listed and you 're finished, close your printer name (Stylus Photo R340). To monitor the progress of all your print job, click the Print Center icon when it appears in Mac OS X 33...Layout: For selecting page layout options. ■ Color Management: For adjusting the color controls, changing the gamma setting, or turning off color adjustments by the printer software. ■ Summary: For viewing a list of your selections. 11. Then double-click your printer window or Print Center. You can also choose these...
...click the Status arrow to resume printing. ■ If multiple print jobs are listed and you 're finished, close your printer name (Stylus Photo R340). To monitor the progress of all your print job, click the Print Center icon when it appears in Mac OS X 33...Layout: For selecting page layout options. ■ Color Management: For adjusting the color controls, changing the gamma setting, or turning off color adjustments by the printer software. ■ Summary: For viewing a list of your selections. 11. Then double-click your printer window or Print Center. You can also choose these...
Printer Basics
Page 35
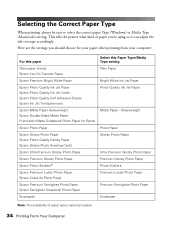
... Paper PremierArt Matte Scrapbook Photo Paper for Epson Matte Paper - Selecting the Correct Paper Type When printing, always be sure to select the correct paper Type (Windows) or Media Type (Macintosh) setting. Here are the settings you 're using so it can adjust the ink coverage accordingly. This tells the printer what kind of...
... Paper PremierArt Matte Scrapbook Photo Paper for Epson Matte Paper - Selecting the Correct Paper Type When printing, always be sure to select the correct paper Type (Windows) or Media Type (Macintosh) setting. Here are the settings you 're using so it can adjust the ink coverage accordingly. This tells the printer what kind of...

Printer Basics
Page 36
...Photos 35 See these sections for instructions on selecting printer settings: ■ "Windows" on page 36 ■ "Mac OS X" on these papers and sizes. Heavyweight Photo Paper Glossy Photo Paper Ultra Premium Glossy Photo Paper Premium Glossy Photo Paper Premium Semigloss Photo Paper Premium Luster Photo... Photos You can print your printer and mar future printouts. Paper name Epson Matte Paper Heavyweight Epson Photo Paper Epson Glossy Photo Paper Epson Ultra Premium Glossy Photo Paper Epson Premium Glossy Photo Paper Epson Premium Semigloss Photo Paper Epson Premium Luster Photo Paper...
...Photos 35 See these sections for instructions on selecting printer settings: ■ "Windows" on page 36 ■ "Mac OS X" on these papers and sizes. Heavyweight Photo Paper Glossy Photo Paper Ultra Premium Glossy Photo Paper Premium Glossy Photo Paper Premium Semigloss Photo Paper Premium Luster Photo... Photos You can print your printer and mar future printouts. Paper name Epson Matte Paper Heavyweight Epson Photo Paper Epson Glossy Photo Paper Epson Ultra Premium Glossy Photo Paper Epson Premium Glossy Photo Paper Epson Premium Semigloss Photo Paper Epson Premium Luster Photo Paper...

Printer Basics
Page 37
... Type Select your paper Size Select Photo or Best Photo Click the Borderless checkbox Select your document or image Orientation. 9. Select your document or image orientation 3. Click OK or Print to close the Printing Preferences or Properties window. 10. Windows 1. Open the File menu and click... Print. Click the Borderless checkbox. Click OK to start printing. 36 Printing From Your Computer Select Photo or Best Photo as the paper Source setting. 5. Read the message and...
... Type Select your paper Size Select Photo or Best Photo Click the Borderless checkbox Select your document or image Orientation. 9. Select your document or image orientation 3. Click OK or Print to close the Printing Preferences or Properties window. 10. Windows 1. Open the File menu and click... Print. Click the Borderless checkbox. Click OK to start printing. 36 Printing From Your Computer Select Photo or Best Photo as the paper Source setting. 5. Read the message and...

Printer Basics
Page 38
... pop-up menu. 3. Select other print settings as necessary, then click Print to close the Page Setup window. 5. Select Stylus Photo R340 in the Format for menu. 7. Choose the borderless Paper Size for pop-up menu. 8. Select Stylus Photo R340 in the Format for the paper you've loaded. 4. Select one of the following media types: ■...
... pop-up menu. 3. Select other print settings as necessary, then click Print to close the Page Setup window. 5. Select Stylus Photo R340 in the Format for menu. 7. Choose the borderless Paper Size for pop-up menu. 8. Select Stylus Photo R340 in the Format for the paper you've loaded. 4. Select one of the following media types: ■...
Printer Basics
Page 42
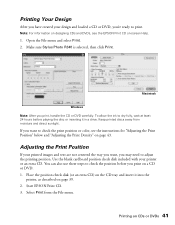
...and "Adjusting the Print Density" on a CD or DVD. 1. Make sure Stylus Photo R340 is selected, then click Print. You can also use these steps to check the position before playing the disc or inserting it into the printer, as described on -screen Help. 1. Select Print from moisture and direct sunlight.... Keep printed discs away from the File menu. Printing on the CD tray and insert it in a drive. Macintosh Windows Note: After you may need to check the print position or color, see the EPSON ...
...and "Adjusting the Print Density" on a CD or DVD. 1. Make sure Stylus Photo R340 is selected, then click Print. You can also use these steps to check the position before playing the disc or inserting it into the printer, as described on -screen Help. 1. Select Print from moisture and direct sunlight.... Keep printed discs away from the File menu. Printing on the CD tray and insert it in a drive. Macintosh Windows Note: After you may need to check the print position or color, see the EPSON ...

Printer Basics
Page 43
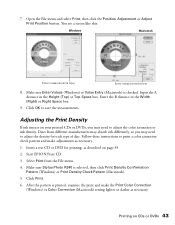
Make sure Stylus Photo R340 is printed on the position check disk or CD. 6. Macintosh Windows 5. 4. Click Print. You'll need a metric ruler with millimeters for these measurements. 42 Printing From Your Computer Remove the position check disk or CD and measure the distance from the edge of the hole to the small cross marks (distances labeled A and B as shown). The confirmation pattern is selected, then click Print Position Confirmation Pattern (Windows) or Print Position Check Pattern (Macintosh).
Make sure Stylus Photo R340 is printed on the position check disk or CD. 6. Macintosh Windows 5. 4. Click Print. You'll need a metric ruler with millimeters for these measurements. 42 Printing From Your Computer Remove the position check disk or CD and measure the distance from the edge of the hole to the small cross marks (distances labeled A and B as shown). The confirmation pattern is selected, then click Print Position Confirmation Pattern (Windows) or Print Position Check Pattern (Macintosh).
Printer Basics
Page 44
... the File menu. 4. Make sure Stylus Photo R340 is checked. Start EPSON Print CD. 3. Make sure Enter Values (Windows) or Value Entry (Macintosh) is selected, then click Print Density Confirmation Pattern (Windows) or Print Density Check Pattern (Macintosh). 5. Click OK to print a color saturation check pattern and make the Print Color Correction (Windows) or Color Correction (Macintosh) setting lighter or...
... the File menu. 4. Make sure Stylus Photo R340 is checked. Start EPSON Print CD. 3. Make sure Enter Values (Windows) or Value Entry (Macintosh) is selected, then click Print Density Confirmation Pattern (Windows) or Print Density Check Pattern (Macintosh). 5. Click OK to print a color saturation check pattern and make the Print Color Correction (Windows) or Color Correction (Macintosh) setting lighter or...
Printer Basics
Page 46
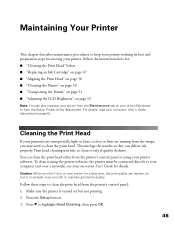
..." on page 52 Note: You can clean the print head either from the Epson Printer Utility (Macintosh). You can also maintain your printer from the Maintenance tab on your driver (Windows) or from the printer's control panel or using the printer software, the printer must be connected directly to your computer (not over a network); Cleaning the Print...
..." on page 52 Note: You can clean the print head either from the Epson Printer Utility (Macintosh). You can also maintain your printer from the Maintenance tab on your driver (Windows) or from the printer's control panel or using the printer software, the printer must be connected directly to your computer (not over a network); Cleaning the Print...

Printer Basics
Page 58
... you remove the card from your computer, run a printer check as described on page 55. Try deleting any photos you don't need to set up your printer for use on a network. The USB Printer Device Driver may not have multiple photos or large files on your memory card, it on ... directions. When you have software installation privileges. Contact your System Administrator. ■ Make sure Windows 98SE, Me, 2000, or XP was preinstalled on your Windows help system for details. The printer sounds as described in your on-screen User's Guide. This causes the LCD and control panel...
... you remove the card from your computer, run a printer check as described on page 55. Try deleting any photos you don't need to set up your printer for use on a network. The USB Printer Device Driver may not have multiple photos or large files on your memory card, it on ... directions. When you have software installation privileges. Contact your System Administrator. ■ Make sure Windows 98SE, Me, 2000, or XP was preinstalled on your Windows help system for details. The printer sounds as described in your on-screen User's Guide. This causes the LCD and control panel...
Printer Basics
Page 59
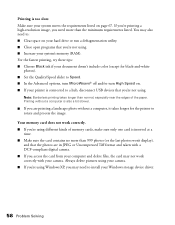
... too slow. For the fastest printing, try these tips: ■ Choose Black ink if your document doesn't include color (except for the printer to rotate and process the image. You may not work correctly. ■ If you are in JPEG or Uncompressed Tiff format and taken with your ... takes longer for black-and-white photos). ■ Set the Quality/Speed slider to Speed. ■ In the Advanced options, turn MicroWeave® off and/or turn High Speed on your hard drive or run a defragmentation utility. ■ Close open programs that you're not using Windows XP, you access the card...
... too slow. For the fastest printing, try these tips: ■ Choose Black ink if your document doesn't include color (except for the printer to rotate and process the image. You may not work correctly. ■ If you are in JPEG or Uncompressed Tiff format and taken with your ... takes longer for black-and-white photos). ■ Set the Quality/Speed slider to Speed. ■ In the Advanced options, turn MicroWeave® off and/or turn High Speed on your hard drive or run a defragmentation utility. ■ Close open programs that you're not using Windows XP, you access the card...


