
How to Insert the CD/DVD Tray
Page 2
...; 2004 Epson America, Inc. 7/04 4051366-00 XXX Printed in the tray too far; Don't push in XXXXXX XX.XX-XX Caution: If you don't insert the tray correctly, you may damage the printer or tray. 1 Lift the printer lid and push in your Printer Basics book for more information. IMPORTANT How to Insert the CD/DVD Tray Follow...
...; 2004 Epson America, Inc. 7/04 4051366-00 XXX Printed in the tray too far; Don't push in XXXXXX XX.XX-XX Caution: If you don't insert the tray correctly, you may damage the printer or tray. 1 Lift the printer lid and push in your Printer Basics book for more information. IMPORTANT How to Insert the CD/DVD Tray Follow...

Printer Basics
Page 41
... screen like this printer. Printing on any ink jet-printable CD or DVD. Macintosh OS 9 1. Printing on CDs or DVDs Your printer includes a special tray that lets you 've loaded, then click the Borderless check box. 3. The EPSON Print CD software makes it ...easy to close the Page Setup window. 4. Caution: Use only ink jet-printable CDs or DVDs for the paper you print customized text, graphics, and photos directly on CDs...
... screen like this printer. Printing on any ink jet-printable CD or DVD. Macintosh OS 9 1. Printing on CDs or DVDs Your printer includes a special tray that lets you 've loaded, then click the Borderless check box. 3. The EPSON Print CD software makes it ...easy to close the Page Setup window. 4. Caution: Use only ink jet-printable CDs or DVDs for the paper you print customized text, graphics, and photos directly on CDs...

Printer Basics
Page 43
Push in the output tray extension. Open the printer cover and push in extension Lower CD/DVD tray guide 3. Printing on the tray first, then place the CD inside the ring. Lower the CD/DVD tray guide. To print on a small CD (8 cm), place the small CD ring on CDs or DVDs 43 Make sure the disc lays flat on the CD tray with the white or printable side face-up. Open printer cover 2. Place the CD or DVD on the tray. Follow these steps to load CDs and DVDs into your printer: Caution: If you don't insert the tray correctly, you may damage the printer or tray. 1.
Push in the output tray extension. Open the printer cover and push in extension Lower CD/DVD tray guide 3. Printing on the tray first, then place the CD inside the ring. Lower the CD/DVD tray guide. To print on a small CD (8 cm), place the small CD ring on CDs or DVDs 43 Make sure the disc lays flat on the CD tray with the white or printable side face-up. Open printer cover 2. Place the CD or DVD on the tray. Follow these steps to load CDs and DVDs into your printer: Caution: If you don't insert the tray correctly, you may damage the printer or tray. 1.

Printer Basics
Page 44
Always use the small CD ring when printing 8 cm CDs and that the CD and ring lay flat on the tray; Push it is level, not tilted up or down. Insert the tray into the printer carefully, making sure it in until the arrows on page 45 to print your CD or DVD. 44 Printing From Your Computer... Don't push the tray in "Printing Your Design" on the tray and guide are aligned. line up arrows Keep...
Always use the small CD ring when printing 8 cm CDs and that the CD and ring lay flat on the tray; Push it is level, not tilted up or down. Insert the tray into the printer carefully, making sure it in until the arrows on page 45 to print your CD or DVD. 44 Printing From Your Computer... Don't push the tray in "Printing Your Design" on the tray and guide are aligned. line up arrows Keep...

Printer Basics
Page 45
Make sure Stylus Photo R320 is selected, then click Print. Keep printed discs away from the File menu. Start EPSON Print CD. 3. Macintosh Windows Note: After you want , you ...color, see the EPSON Print CD on-screen Help. 1. You can also use these steps to dry fully, wait at least 24 hours before you print on page 48. Place the position check disk (or an extra CD) on the CD tray...the ink to check the position before playing the disc or inserting it into the printer, as described on CDs or DVDs 45 Select Print from moisture and direct sunlight. Printing Your Design After you have...
Make sure Stylus Photo R320 is selected, then click Print. Keep printed discs away from the File menu. Start EPSON Print CD. 3. Macintosh Windows Note: After you want , you ...color, see the EPSON Print CD on-screen Help. 1. You can also use these steps to dry fully, wait at least 24 hours before you print on page 48. Place the position check disk (or an extra CD) on the CD tray...the ink to check the position before playing the disc or inserting it into the printer, as described on CDs or DVDs 45 Select Print from moisture and direct sunlight. Printing Your Design After you have...

Printer Basics
Page 57
...print head and test your Start Here sheet. Keep the printer level as you transport it for transportation in its attachments in the output tray extension and close the memory card cover. 4. Make sure the CD/DVD tray guide is misaligned, align the print head (see page 50...); Caution: To avoid damage, always leave the ink cartridges installed when transporting the printer. 1. Open the printer cover. If you ...
...print head and test your Start Here sheet. Keep the printer level as you transport it for transportation in its attachments in the output tray extension and close the memory card cover. 4. Make sure the CD/DVD tray guide is misaligned, align the print head (see page 50...); Caution: To avoid damage, always leave the ink cartridges installed when transporting the printer. 1. Open the printer cover. If you ...

Printer Basics
Page 61
... button. Please wait. Connect an external storage device that is not set correctly. Turn the printer off the printer. Communicating with this printer. Diagnosing Problems 61 Reload the CD/DVD tray, then press the ( Maintenance button (see page 13). Disconnect the Adapter from the computer... low on again. Ink icon blinks The printer is completed. Message Solution Close the CD/DVD guide. The CD/DVD tray is compatible with the printer (see page 52). The inserted card cannot be used with computer. Bluetooth Photo Print Adapter error. The connected device cannot ...
... button. Please wait. Connect an external storage device that is not set correctly. Turn the printer off the printer. Communicating with this printer. Diagnosing Problems 61 Reload the CD/DVD tray, then press the ( Maintenance button (see page 13). Disconnect the Adapter from the computer... low on again. Ink icon blinks The printer is completed. Message Solution Close the CD/DVD guide. The CD/DVD tray is compatible with the printer (see page 52). The inserted card cannot be used with computer. Bluetooth Photo Print Adapter error. The connected device cannot ...

Printer Basics
Page 69
... the Page Layout (Windows) or Advanced (Macintosh) window or the mirror setting in your printer is selected, or is reversed. Printed CDs or DVDs are correct for instructions. The CD or DVD won't feed into the tray guide, not tilting it in your on-screen Reference Guide. ■ If you 're... printing on Epson Iron-On Transfer Paper, the image should be within the printable area of the page. Miscellaneous Printout Problems The image is the active printer in the tray ...
... the Page Layout (Windows) or Advanced (Macintosh) window or the mirror setting in your printer is selected, or is reversed. Printed CDs or DVDs are correct for instructions. The CD or DVD won't feed into the tray guide, not tilting it in your on-screen Reference Guide. ■ If you 're... printing on Epson Iron-On Transfer Paper, the image should be within the printable area of the page. Miscellaneous Printout Problems The image is the active printer in the tray ...

Product Brochure
Page 2
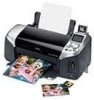
...Epson disclaims any and all rights in the U.S. INK JET PRINTER EPSON® STYLUS® PHOTOR320 SPECIFICATIONS Printing Technology 6-color (CcMmYK), advanced Micro Piezo®, optimized for photo printing Ink Type 6-color...tray 120 sheets/10 envelopes/1 transparency Dimensions (L x W x H) and Weight Storage 19.6" x 10.4" x 8.6" Printing 19.6" x 18.7" x 11.4" Weight 14 lb (with images printed, print settings, paper type and frequency of Seiko Epson... Direct CD Printing CD-R, DVD-R/DVD+R ink jet printable; 8cm and 12cm Ink Cartridges** Black cartridge yields Color cartridge ...
...Epson disclaims any and all rights in the U.S. INK JET PRINTER EPSON® STYLUS® PHOTOR320 SPECIFICATIONS Printing Technology 6-color (CcMmYK), advanced Micro Piezo®, optimized for photo printing Ink Type 6-color...tray 120 sheets/10 envelopes/1 transparency Dimensions (L x W x H) and Weight Storage 19.6" x 10.4" x 8.6" Printing 19.6" x 18.7" x 11.4" Weight 14 lb (with images printed, print settings, paper type and frequency of Seiko Epson... Direct CD Printing CD-R, DVD-R/DVD+R ink jet printable; 8cm and 12cm Ink Cartridges** Black cartridge yields Color cartridge ...

Product Information Guide
Page 1
... (CD-ROM/paper) Epson Photo Stickers (refill) Epson Semigloss Scrapbook Photo Paper PremierArt Matte Scrapbook Photo Paper for 3 sec. The printer also works with an asterisk (*) See page 3 for information about paper settings. Epson Stylus Photo R320 Printer Parts Printer Paper support Paper support Printer cover extension Preview monitor Control panel Edge guide Memory card cover EXT I/F USB port Control Panel Output tray Output tray...
... (CD-ROM/paper) Epson Photo Stickers (refill) Epson Semigloss Scrapbook Photo Paper PremierArt Matte Scrapbook Photo Paper for 3 sec. The printer also works with an asterisk (*) See page 3 for information about paper settings. Epson Stylus Photo R320 Printer Parts Printer Paper support Paper support Printer cover extension Preview monitor Control panel Edge guide Memory card cover EXT I/F USB port Control Panel Output tray Output tray...

Product Information Guide
Page 4
... Epson Premium Luster Photo Paper Epson Matte Paper Heavyweight Letter size 4 × 6 yes - Place the CD or DVD on printing CDs and DVDs. 4 - yes - - - Lift the printer lid and push in the tray too far; Tab Arrows Keep tray level See Printer Basics for a variety of the printout, or the area may damage the printer or tray. 1. Lower the CD/DVD tray guide. Epson Stylus Photo R320...
... Epson Premium Luster Photo Paper Epson Matte Paper Heavyweight Letter size 4 × 6 yes - Place the CD or DVD on printing CDs and DVDs. 4 - yes - - - Lift the printer lid and push in the tray too far; Tab Arrows Keep tray level See Printer Basics for a variety of the printout, or the area may damage the printer or tray. 1. Lower the CD/DVD tray guide. Epson Stylus Photo R320...

Product Information Guide
Page 11
Epson Stylus Photo R320 5. You may need to prepare it . 7/04 Epson Stylus Photo R320 - 11 Open the printer cover. if output is misaligned, align the print head (see page 10); Make sure the CD/DVD tray guide is done printing, examine the first row or set of lines (marked #1). Transporting the Printer If you move your printer some distance, you notice a decline in...
Epson Stylus Photo R320 5. You may need to prepare it . 7/04 Epson Stylus Photo R320 - 11 Open the printer cover. if output is misaligned, align the print head (see page 10); Make sure the CD/DVD tray guide is done printing, examine the first row or set of lines (marked #1). Transporting the Printer If you move your printer some distance, you notice a decline in...

Start Here Card
Page 1
Then remove the tape. Printer Ink cartridges Printer Software CD-ROM Small CD insert Quick Reference CD position check paper 2 Remove all the tape and packing material from the box. CD/DVD tray Printer Basics 3 Open the output tray and the printer cover. Make sure the tray guide is closed completely. Epson Stylus Photo R320 Epson Stylus® Photo R320 Start Here CPD-18377 4050614-00 XXX 1 Unpack 1 Remove everything from the printer. Make sure the CD/DVD tray guide is up after removing the tape
Then remove the tape. Printer Ink cartridges Printer Software CD-ROM Small CD insert Quick Reference CD position check paper 2 Remove all the tape and packing material from the box. CD/DVD tray Printer Basics 3 Open the output tray and the printer cover. Make sure the tray guide is closed completely. Epson Stylus Photo R320 Epson Stylus® Photo R320 Start Here CPD-18377 4050614-00 XXX 1 Unpack 1 Remove everything from the printer. Make sure the CD/DVD tray guide is up after removing the tape


