
User Manual (P.I.M Plug-in)
Page 2
... Epson Stylus® Photo R200 ■ Epson Stylus Photo R300/R300M ■ Epson Stylus Photo R320 ■ Epson Stylus Photo R800 ■ Epson Stylus Photo RX500 ■ Epson Stylus Photo RX600 ■ Epson Stylus Photo 780 ■ Epson Stylus Photo 785EPX ■ Epson Stylus Photo 820 ■ Epson Stylus Photo 825 ■ Epson Stylus Photo 890 ■ Epson Stylus Photo 900 ■ Epson Stylus Photo 925 ■ Epson Stylus Photo 960 ■ Epson Stylus Photo 1280 ■ Epson Stylus Photo 2000P* ■ Epson Stylus Photo 2200 ■ PictureMate™ by Epson * This printer...
... Epson Stylus® Photo R200 ■ Epson Stylus Photo R300/R300M ■ Epson Stylus Photo R320 ■ Epson Stylus Photo R800 ■ Epson Stylus Photo RX500 ■ Epson Stylus Photo RX600 ■ Epson Stylus Photo 780 ■ Epson Stylus Photo 785EPX ■ Epson Stylus Photo 820 ■ Epson Stylus Photo 825 ■ Epson Stylus Photo 890 ■ Epson Stylus Photo 900 ■ Epson Stylus Photo 925 ■ Epson Stylus Photo 960 ■ Epson Stylus Photo 1280 ■ Epson Stylus Photo 2000P* ■ Epson Stylus Photo 2200 ■ PictureMate™ by Epson * This printer...
Product Information Guide
Page 9
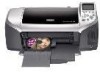
... card, software settings, interface cable, or computer, or your User's Guide. 9. When an installed cartridge is off. Press OK to back up photos from a memory card ❏ Printing from the printer. 2. If the quality doesn't improve after ink replacement. EPSON Stylus Photo R300 Series Additional Stand-alone Features See the User's Guide for information on other source...
... card, software settings, interface cable, or computer, or your User's Guide. 9. When an installed cartridge is off. Press OK to back up photos from a memory card ❏ Printing from the printer. 2. If the quality doesn't improve after ink replacement. EPSON Stylus Photo R300 Series Additional Stand-alone Features See the User's Guide for information on other source...
Product Information Guide
Page 10
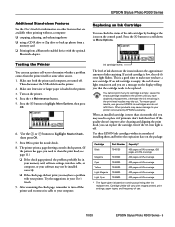
Removing and Installing Ink Cartridges Be sure you have a new ink cartridge before continuing with the green circuit board facing the front. Press the button to the replacement ...'t touch the green circuit boards or remove any labels. 7. EPSON Stylus Photo R300 Series 11. Make sure the printer is turned on the display telling you that charging is low), press the b maintenance button. Press OK. ❏ If the b error light is firmly seated. 8. EPSON Stylus Photo R300 Series When you need to continue. In Canada, please call the...
Removing and Installing Ink Cartridges Be sure you have a new ink cartridge before continuing with the green circuit board facing the front. Press the button to the replacement ...'t touch the green circuit boards or remove any labels. 7. EPSON Stylus Photo R300 Series 11. Make sure the printer is turned on the display telling you that charging is low), press the b maintenance button. Press OK. ❏ If the b error light is firmly seated. 8. EPSON Stylus Photo R300 Series When you need to continue. In Canada, please call the...
Product Information Guide
Page 12
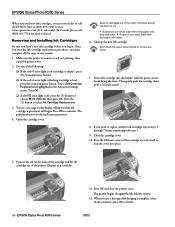
...-17017 CPD-17019 EPSON Stylus Photo R300 Series User's Guide EPSON Stylus Photo R300 Series Start Here EPSON Stylus Photo R300 Series Quick Reference guide EPSON Stylus Photo R300 Series CD-ROM with electronic Reference Guide Tape the ink cartridge holder to the printer with them. Use the and buttons to prepare it . 12 - To avoid damage, always leave the ink cartridges installed when transporting the printer. If you...
...-17017 CPD-17019 EPSON Stylus Photo R300 Series User's Guide EPSON Stylus Photo R300 Series Start Here EPSON Stylus Photo R300 Series Quick Reference guide EPSON Stylus Photo R300 Series CD-ROM with electronic Reference Guide Tape the ink cartridge holder to the printer with them. Use the and buttons to prepare it . 12 - To avoid damage, always leave the ink cartridges installed when transporting the printer. If you...
Start Here Card
Page 2
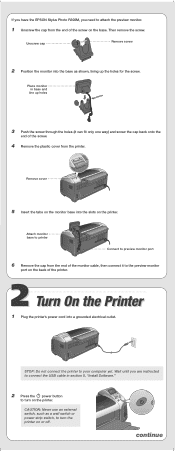
Place monitor in section 5, "Install Software." 2 Press the power button to turn the printer on or off. STOP: Do not connect the printer to your computer yet. Wait until you need to attach the preview monitor. 1 Unscrew the cap from the end of the monitor cable, then ...on the back of the printer. 2 Turn On the Printer 1 Plug the printer's power cord into the slots on the printer. Then remove the screw. Attach monitor base to printer Connect to preview monitor port 6 Remove the cap from the end of the screw on the base. If you have the EPSON Stylus Photo R300M, you are instructed...
Place monitor in section 5, "Install Software." 2 Press the power button to turn the printer on or off. STOP: Do not connect the printer to your computer yet. Wait until you need to attach the preview monitor. 1 Unscrew the cap from the end of the monitor cable, then ...on the back of the printer. 2 Turn On the Printer 1 Plug the printer's power cord into the slots on the printer. Then remove the screw. Attach monitor base to printer Connect to preview monitor port 6 Remove the cap from the end of the screw on the base. If you have the EPSON Stylus Photo R300M, you are instructed...
Start Here Card
Page 6
... in OS X, restart your printer is a service mark of Epson America, Inc. You're ready to step 3. 2 Click the Stylus Photo R300 printer name and then click the Add or Add Printer button. Then go to step 2. You're ready to 9.x Open the Chooser from Macintosh Classic applications in OS 9 and follow the "Install Software" steps again. General...
... in OS X, restart your printer is a service mark of Epson America, Inc. You're ready to step 3. 2 Click the Stylus Photo R300 printer name and then click the Add or Add Printer button. Then go to step 2. You're ready to 9.x Open the Chooser from Macintosh Classic applications in OS 9 and follow the "Install Software" steps again. General...

User Manual
Page 17
... instructions in the printer, turn it on, install ink cartridges, and load paper, as described on page 46 17 Just insert your Start Here sheet. Printing Without a Computer Your EPSON Stylus Photo R300 Series printer lets you plug in these sections: ■ "Using Your Camera's Print Settings" on page 18 ■ "Getting Photos into the Printer" on page 19...
... instructions in the printer, turn it on, install ink cartridges, and load paper, as described on page 46 17 Just insert your Start Here sheet. Printing Without a Computer Your EPSON Stylus Photo R300 Series printer lets you plug in these sections: ■ "Using Your Camera's Print Settings" on page 18 ■ "Getting Photos into the Printer" on page 19...

User Manual
Page 97
Problem Solving See these sections to diagnose and solve printer problems: ■ "Diagnosing Problems" below ■ "Setup or Software Installation Problems" on page 101 ■ "Printer Problems" on page 102 ■ "Print Quality Problems" on page 103 ■ "Problems With Paper Feeding" ... on page 107 ■ "Miscellaneous Printout Problems" on page 107 ■ "Uninstalling Printer Software" on page 109 ■ "Where To Get Help" on page 111 Diagnosing Problems Your EPSON Stylus Photo R300 Series printer includes a number of ways to help you diagnose problems: ■ To identify the ...
Problem Solving See these sections to diagnose and solve printer problems: ■ "Diagnosing Problems" below ■ "Setup or Software Installation Problems" on page 101 ■ "Printer Problems" on page 102 ■ "Print Quality Problems" on page 103 ■ "Problems With Paper Feeding" ... on page 107 ■ "Miscellaneous Printout Problems" on page 107 ■ "Uninstalling Printer Software" on page 109 ■ "Where To Get Help" on page 111 Diagnosing Problems Your EPSON Stylus Photo R300 Series printer includes a number of ways to help you diagnose problems: ■ To identify the ...
User Manual
Page 110
... all applications. 2. In the Drivers folder, double-click the CardMonitor folder, double-click the OS 8-9 folder, then double-click the Installer icon. Select EPSON Stylus Photo R300(Sheet Feeder - When you are ready to reinstall the printer software, follow the correct instructions for X folders to 9x 1. In the Drivers folder, double-click the OS 8-9 folder, then...
... all applications. 2. In the Drivers folder, double-click the CardMonitor folder, double-click the OS 8-9 folder, then double-click the Installer icon. Select EPSON Stylus Photo R300(Sheet Feeder - When you are ready to reinstall the printer software, follow the correct instructions for X folders to 9x 1. In the Drivers folder, double-click the OS 8-9 folder, then...
User Manual
Page 111
... ■ Canada: (905) 709-2567, 6 AM to quickly select the EPSON Stylus Photo R300 Series printer in SoundAdvice. Toll or long distance charges may apply. Use this site, you can reach EPSON Support at product documentation, access troubleshooting information, and receive technical advice through the ...When you don't need to reinstall the printer software, follow the correct instructions for your Macintosh. In the Drivers folder, double-click the PhotoStarter folder, double-click the OS 8-9 folder, then double-click the Installer icon. Note: Remember that you are ...
... ■ Canada: (905) 709-2567, 6 AM to quickly select the EPSON Stylus Photo R300 Series printer in SoundAdvice. Toll or long distance charges may apply. Use this site, you can reach EPSON Support at product documentation, access troubleshooting information, and receive technical advice through the ...When you don't need to reinstall the printer software, follow the correct instructions for your Macintosh. In the Drivers folder, double-click the PhotoStarter folder, double-click the OS 8-9 folder, then double-click the Installer icon. Note: Remember that you are ...


