Product Information Guide
Page 7
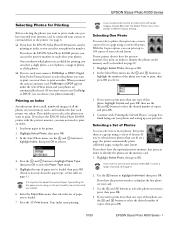
...then select the size of paper you can select a photo, then print one or more copies of it displays the first photo on your card. 3. Selecting One Photo You can choose your photos manually.) Printing an Index An index print shows small, ...Photo, then press OK. EPSON Stylus Photo R300 Series Selecting Photos for Printing Before selecting the photos you want to print, make sure you have inserted your memory card or connected your camera or external device to 100 copies of your selected layout. Highlight Select Photo, then press OK. 2. If you have the EPSON Stylus Photo R300M printer...
...then select the size of paper you can select a photo, then print one or more copies of it displays the first photo on your card. 3. Selecting One Photo You can choose your photos manually.) Printing an Index An index print shows small, ...Photo, then press OK. EPSON Stylus Photo R300 Series Selecting Photos for Printing Before selecting the photos you want to print, make sure you have inserted your memory card or connected your camera or external device to 100 copies of your selected layout. Highlight Select Photo, then press OK. 2. If you have the EPSON Stylus Photo R300M printer...
User Manual
Page 29
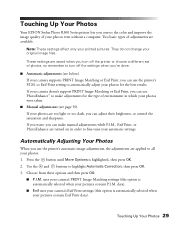
Touching Up Your Photos Your EPSON Stylus Photo R300 Series printer lets you correct the color and improve the image quality of environment in order to automatically adjust your photos for the type of your photos even without a computer. Automatically Adjusting Your Photos When you can make adjustments for the best... camera doesn't support PRINT Image Matching or Exif Print, you can use the printer's P.I .M., Exif Print, or PhotoEnhance are turned on in which your photos were taken. ■ Manual adjustments (see below) If your camera supports PRINT Image Matching or Exif Print,...
Touching Up Your Photos Your EPSON Stylus Photo R300 Series printer lets you correct the color and improve the image quality of environment in order to automatically adjust your photos for the type of your photos even without a computer. Automatically Adjusting Your Photos When you can make adjustments for the best... camera doesn't support PRINT Image Matching or Exif Print, you can use the printer's P.I .M., Exif Print, or PhotoEnhance are turned on in which your photos were taken. ■ Manual adjustments (see below) If your camera supports PRINT Image Matching or Exif Print,...
User Manual
Page 72
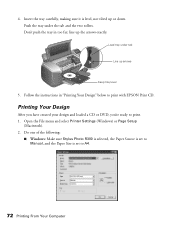
...line up arrows Keep tray level 5. Open the File menu and select Printer Settings (Windows) or Page Setup (Macintosh). 2. 4. Do one of the following: ■ Windows: Make sure Stylus Photo R300 is selected, the Paper Source is set to Manual, and the Paper Size is level, not tilted up or down. ...Follow the instructions in too far; Insert the tray carefully, making sure it is set to print with EPSON Print CD. Printing Your Design ...
...line up arrows Keep tray level 5. Open the File menu and select Printer Settings (Windows) or Page Setup (Macintosh). 2. 4. Do one of the following: ■ Windows: Make sure Stylus Photo R300 is selected, the Paper Source is set to Manual, and the Paper Size is level, not tilted up or down. ...Follow the instructions in too far; Insert the tray carefully, making sure it is set to print with EPSON Print CD. Printing Your Design ...
User Manual
Page 73
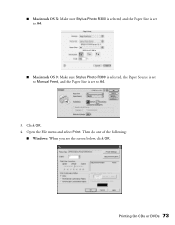
Click OK. 4. Printing On CDs or DVDs 73 ■ Macintosh OS X: Make sure Stylus Photo R300 is selected and the Paper Size is set to A4. ■ Macintosh OS 9: Make sure Stylus Photo R300 is selected, the Paper Source is set to Manual Feed, and the Paper Size is set to A4. 3. Open the File menu and select Print. Then do one of the following: ■ Windows: When you see the screen below, click OK.
Click OK. 4. Printing On CDs or DVDs 73 ■ Macintosh OS X: Make sure Stylus Photo R300 is selected and the Paper Size is set to A4. ■ Macintosh OS 9: Make sure Stylus Photo R300 is selected, the Paper Source is set to Manual Feed, and the Paper Size is set to A4. 3. Open the File menu and select Print. Then do one of the following: ■ Windows: When you see the screen below, click OK.

User Manual
Page 75
... images and text are not centered or positioned the way you want, you may need to check the position before you want to Manual or Manual Feed. 4. Start EPSON Print CD. 3. Windows Mac OS X Mac OS 9 Printing On CDs or DVDs 75 You can also use these steps to ... described on page 77. Use the blank cardboard position check disk included with your EPSON Stylus Photo R300 Series printer is selected, and the Paper Source is set to check the print position or color, see the instructions for "Adjusting the Print Position" below and "Adjusting the Print Density" on page 70. 2. ...
... images and text are not centered or positioned the way you want, you may need to check the position before you want to Manual or Manual Feed. 4. Start EPSON Print CD. 3. Windows Mac OS X Mac OS 9 Printing On CDs or DVDs 75 You can also use these steps to ... described on page 77. Use the blank cardboard position check disk included with your EPSON Stylus Photo R300 Series printer is selected, and the Paper Source is set to check the print position or color, see the instructions for "Adjusting the Print Position" below and "Adjusting the Print Density" on page 70. 2. ...

User Manual
Page 77
...Color Correction setting, you can print three density patterns on one disc. You can also use the Brightness and Contrast settings in "Printing Your Design" on page 72 to make adjustments as described on page 70. 2. Adjusting the Print Density If ink smears on your EPSON Stylus Photo R300 Series printer ...CD or DVD and let it dry for instructions. Printing On CDs or DVDs 77 Follow these instructions to Manual (Windows) or Manual Feed (Mac OS 9). 4. Follow the instructions in EPSON Print CD to print the second pattern. Select Print from the pop-up menu then choose Print Density ...
...Color Correction setting, you can print three density patterns on one disc. You can also use the Brightness and Contrast settings in "Printing Your Design" on page 72 to make adjustments as described on page 70. 2. Adjusting the Print Density If ink smears on your EPSON Stylus Photo R300 Series printer ...CD or DVD and let it dry for instructions. Printing On CDs or DVDs 77 Follow these instructions to Manual (Windows) or Manual Feed (Mac OS 9). 4. Follow the instructions in EPSON Print CD to print the second pattern. Select Print from the pop-up menu then choose Print Density ...
User Manual
Page 112
sales only). Before you call (800) 463-7766 for dealer referral. 112 Problem Solving In Canada, please call , please have the following information ready: ■ Product name (EPSON Stylus Photo R300 or EPSON Stylus Photo R300M) ■ Product serial number (located on the back of the printer) ■ Proof of purchase (such as a store receipt) and date of purchase ■ Computer configuration ■ Description of the problem You can purchase ink cartridges, paper, manuals, and accessories from the EPSON Store at (800) 873-7766 or visit www.epsonstore.com (U.S.
sales only). Before you call (800) 463-7766 for dealer referral. 112 Problem Solving In Canada, please call , please have the following information ready: ■ Product name (EPSON Stylus Photo R300 or EPSON Stylus Photo R300M) ■ Product serial number (located on the back of the printer) ■ Proof of purchase (such as a store receipt) and date of purchase ■ Computer configuration ■ Description of the problem You can purchase ink cartridges, paper, manuals, and accessories from the EPSON Store at (800) 873-7766 or visit www.epsonstore.com (U.S.


