Product Information Guide
Page 1
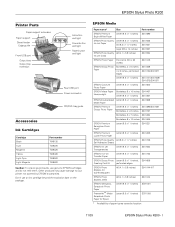
.... Don't use genuine EPSON cartridges and do not refill them. EPSON Stylus Photo R200 Printer Parts Paper support extension Paper support Sheet feeder Edge guide Front USB port Output tray Output tray extension Ink button and light Power button and light Paper button and light Rear USB port Power connector CD/DVD tray guide Accessories Ink Cartridges Cartridge Black Cyan...
.... Don't use genuine EPSON cartridges and do not refill them. EPSON Stylus Photo R200 Printer Parts Paper support extension Paper support Sheet feeder Edge guide Front USB port Output tray Output tray extension Ink button and light Power button and light Paper button and light Rear USB port Power connector CD/DVD tray guide Accessories Ink Cartridges Cartridge Black Cyan...
Product Information Guide
Page 3
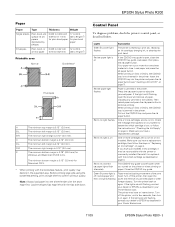
... margin is 0.12" (3.0 mm). D-R The minimum right margin is 0.12" (3.0 mm). Your paper ran out or more cartridges are still flashing, contact your Printer Basics book. 11/03 EPSON Stylus Photo R200 - 3 Pull out the CD/DVD tray and press the ) paper button. Turn off ; If the lights are out of the print head. Turn off the...
... margin is 0.12" (3.0 mm). D-R The minimum right margin is 0.12" (3.0 mm). Your paper ran out or more cartridges are still flashing, contact your Printer Basics book. 11/03 EPSON Stylus Photo R200 - 3 Pull out the CD/DVD tray and press the ) paper button. Turn off ; If the lights are out of the print head. Turn off the...

Product Information Guide
Page 6
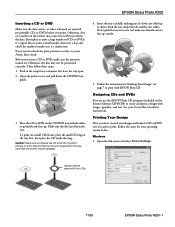
.... Press the ) button again to import your own photos, add text, and modify your designs with a variety of special effects. EPSON Stylus Photo R200 11/03 The EPSON Print CD software makes it 's a good idea to feed a sheet of paper into the printer. 2. Printing CDs and DVDs Your printer includes a special tray that have an ink jet-printable surface. You can...
.... Press the ) button again to import your own photos, add text, and modify your designs with a variety of special effects. EPSON Stylus Photo R200 11/03 The EPSON Print CD software makes it 's a good idea to feed a sheet of paper into the printer. 2. Printing CDs and DVDs Your printer includes a special tray that have an ink jet-printable surface. You can...
Product Information Guide
Page 7
... to check the print position or color, see your Printer Basics book. Open the printer cover and pull down . Then follow these steps: 1. Place the CD or DVD on the CD/DVD tray with 8 cm CDs 11/03 EPSON Stylus Photo R200 - 7 See your operating system below. Insert the tray carefully, making sure it 's satisfactory. Designing CDs and DVDs You can use this...
... to check the print position or color, see your Printer Basics book. Open the printer cover and pull down . Then follow these steps: 1. Place the CD or DVD on the CD/DVD tray with 8 cm CDs 11/03 EPSON Stylus Photo R200 - 7 See your operating system below. Insert the tray carefully, making sure it 's satisfactory. Designing CDs and DVDs You can use this...
Product Information Guide
Page 8
... SP R200 appears at least 24 hours before playing the disc or inserting it on the tray. EPSON Stylus Photo R200 2. The printer prints your CD and ejects it in a drive. Select these settings are selected: ❏ Stylus Photo R200 as ...the Name ❏ Manual as the source ❏ A4 as the Paper Size ❏ CD/DVD as the Format for option and the Paper Size is set to adjust the print position or color, see your Printer...
... SP R200 appears at least 24 hours before playing the disc or inserting it on the tray. EPSON Stylus Photo R200 2. The printer prints your CD and ejects it in a drive. Select these settings are selected: ❏ Stylus Photo R200 as ...the Name ❏ Manual as the source ❏ A4 as the Paper Size ❏ CD/DVD as the Format for option and the Paper Size is set to adjust the print position or color, see your Printer...
Product Information Guide
Page 9
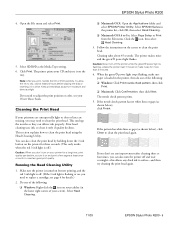
EPSON Stylus Photo R200 4. see your Printer Basics book. Follow the instructions on the screen to clean the print head again. When the green P power light stops flashing, make sure paper is loaded in the printer, then do one of the following: ❏ Windows: Right-click the icon on your CD and ejects it on ...print head by holding down the H ink button on , you print, handle the CD or DVD carefully. Print head cleaning uses ink, so clean it on the tray. You can deliver ink properly. Make sure the printer is turned on but not printing, and the red H ink light is off .)...
EPSON Stylus Photo R200 4. see your Printer Basics book. Follow the instructions on the screen to clean the print head again. When the green P power light stops flashing, make sure paper is loaded in the printer, then do one of the following: ❏ Windows: Right-click the icon on your CD and ejects it on ...print head by holding down the H ink button on , you print, handle the CD or DVD carefully. Print head cleaning uses ink, so clean it on the tray. You can deliver ink properly. Make sure the printer is turned on but not printing, and the red H ink light is off .)...
Product Information Guide
Page 11
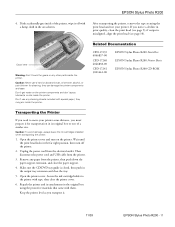
...'t get water on the printer. Make sure the CD/DVD tray guide is misaligned, align the print head (see page 9); Unplug the power cord from the electrical outlet. Caution: Never use any other parts inside the printer. Keep the printer level as you must prepare it . 11/03 EPSON Stylus Photo R200 - 11 EPSON Stylus Photo R200 4. Repack the printer and its original box...
...'t get water on the printer. Make sure the CD/DVD tray guide is misaligned, align the print head (see page 9); Unplug the power cord from the electrical outlet. Caution: Never use any other parts inside the printer. Keep the printer level as you must prepare it . 11/03 EPSON Stylus Photo R200 - 11 EPSON Stylus Photo R200 4. Repack the printer and its original box...

Start Here Card
Page 1
...: Use only the printer's power button to the printer, then plug it into a grounded electrical outlet. 2 Press the printer's power button until the green power light comes on your printer, so check carefully. 3 Lift the printer cover and remove the tape securing the ink cartridge holder. 4046837-00 XXX Start Here EPSON Stylus® Photo R200 1 Unpack 1 Remove everything...
...: Use only the printer's power button to the printer, then plug it into a grounded electrical outlet. 2 Press the printer's power button until the green power light comes on your printer, so check carefully. 3 Lift the printer cover and remove the tape securing the ink cartridge holder. 4046837-00 XXX Start Here EPSON Stylus® Photo R200 1 Unpack 1 Remove everything...
Printer Basics
Page 38
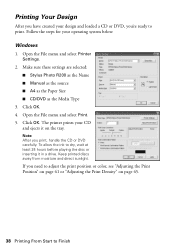
...; Stylus Photo R200 as the Name ■ Manual as the source ■ A4 as the Paper Size ■ CD/DVD as the Media Type 3. Note: After you 're ready to Finish Keep printed discs away from moisture and direct sunlight. Follow the steps for your operating system below. Open the File menu and select Printer...
...; Stylus Photo R200 as the Name ■ Manual as the source ■ A4 as the Paper Size ■ CD/DVD as the Media Type 3. Note: After you 're ready to Finish Keep printed discs away from moisture and direct sunlight. Follow the steps for your operating system below. Open the File menu and select Printer...
Printer Basics
Page 39
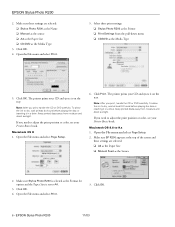
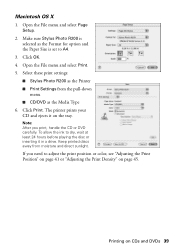
...9632; CD/DVD as the Format for option and the Paper Size is set to adjust the print position or color, see "Adjusting the Print Position" on page 41 or "Adjusting the Print Density" on page 45. Macintosh OS X 1. Select these print settings: ■ Stylus Photo R200 as the Printer &#.... 3. Make sure Stylus Photo R200 is selected as the Media Type 6. Click OK. 4. Open the File menu and select Page Setup. 2. Open the File menu and select Print. 5. The printer prints your CD and ejects it in a drive. If you print, handle the CD or DVD carefully. Printing on the tray.
...9632; CD/DVD as the Format for option and the Paper Size is set to adjust the print position or color, see "Adjusting the Print Position" on page 41 or "Adjusting the Print Density" on page 45. Macintosh OS X 1. Select these print settings: ■ Stylus Photo R200 as the Printer &#.... 3. Make sure Stylus Photo R200 is selected as the Media Type 6. Click OK. 4. Open the File menu and select Page Setup. 2. Open the File menu and select Print. 5. The printer prints your CD and ejects it in a drive. If you print, handle the CD or DVD carefully. Printing on the tray.

Printer Basics
Page 42
...■ Stylus Photo R200 as the Media Type 8. Select EPSON Print CD from the pull-down menu ■ CD/DVD as the Printer ■ Print Settings from the pull-down menu. 9. Place the cardboard check disk (or an extra CD) on page 33. 2. Make sure Stylus Photo R200 is selected as described on the CD tray and insert... it . 42 Printing From Start to Finish Click Print then click OK on the check disk or CD and the printer ejects it into the printer, as the Format ...
...■ Stylus Photo R200 as the Media Type 8. Select EPSON Print CD from the pull-down menu ■ CD/DVD as the Printer ■ Print Settings from the pull-down menu. 9. Place the cardboard check disk (or an extra CD) on page 33. 2. Make sure Stylus Photo R200 is selected as described on the CD tray and insert... it . 42 Printing From Start to Finish Click Print then click OK on the check disk or CD and the printer ejects it into the printer, as the Format ...
Printer Basics
Page 43
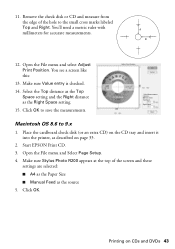
...distance as the Top Space setting and the Right distance as described on CDs and DVDs 43 Start EPSON Print CD. 3. Click OK. Open the File menu and Select Page Setup. 4. Click OK to 9.x 1. Make sure Stylus Photo R200 appears at the top of the hole to the small cross marks labeled... Top and Right. Open the File menu and select Adjust Print Position. Place the cardboard check disk (or an extra CD) on the CD tray and insert it into the printer, as the Right Space ...
...distance as the Top Space setting and the Right distance as described on CDs and DVDs 43 Start EPSON Print CD. 3. Click OK. Open the File menu and Select Page Setup. 4. Click OK to 9.x 1. Make sure Stylus Photo R200 appears at the top of the hole to the small cross marks labeled... Top and Right. Open the File menu and select Adjust Print Position. Place the cardboard check disk (or an extra CD) on the CD tray and insert it into the printer, as the Right Space ...
Service Manual
Page 13
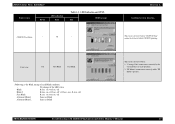
... 1 : Same as Blink Alternant Blink 2 : Same as Blink This error is the Blink timing of each operation. 2. On -- LED Indication and STM3 STM3 message Ink CD/DVD Tray Error -- EPSON Stylus Photo R200/R210 Printer status Power LED indication Paper Table 1-3. Revision A Condition for error detection This error is detected when...
... 1 : Same as Blink Alternant Blink 2 : Same as Blink This error is the Blink timing of each operation. 2. On -- LED Indication and STM3 STM3 message Ink CD/DVD Tray Error -- EPSON Stylus Photo R200/R210 Printer status Power LED indication Paper Table 1-3. Revision A Condition for error detection This error is detected when...
Service Manual
Page 22
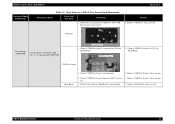
...CD/DVD Tray Error to CN11 on "Main Board". Check if the contact point of CR Phenomenon Detail Table 1-9. An error occurs even though "CDR Tray" is not damaged. 2. Check if "CDR Tray Sensor" is set when printing CDR/DVDR. Contact point 1. Remedy 1. Check if "CDR Tray... Tray Sensor" with "CDR Tray Sensor" is not cut off. 1. Check if any device on "Main Board". 1. CDR Tray When printing CDR/DVDR - CDR Tray Sensor CDR Tray Sensor Main Board 2. EPSON Stylus Photo R200/R210 Revision A Occurrence Timing Position of "CDR Tray" with a new one . Connect "CDR Tray ...
...CD/DVD Tray Error to CN11 on "Main Board". Check if the contact point of CR Phenomenon Detail Table 1-9. An error occurs even though "CDR Tray" is not damaged. 2. Check if "CDR Tray Sensor" is set when printing CDR/DVDR. Contact point 1. Remedy 1. Check if "CDR Tray... Tray Sensor" with "CDR Tray Sensor" is not cut off. 1. Check if any device on "Main Board". 1. CDR Tray When printing CDR/DVDR - CDR Tray Sensor CDR Tray Sensor Main Board 2. EPSON Stylus Photo R200/R210 Revision A Occurrence Timing Position of "CDR Tray" with a new one . Connect "CDR Tray ...


