
Product Information Guide
Page 1
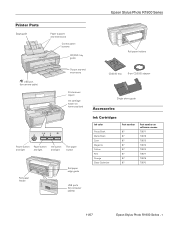
Epson Stylus Photo R1900 Series Printer Parts Edge guide Paper support and extensions Control panel buttons CD/DVD tray guide Roll paper holders USB port (for camera cable) Output tray and extensions Printer cover (open) Ink cartridge holder (in home position) Power button Paper button Ink button and light and light and light Roll paper button Roll paper feeder Roll paper edge guide USB ports (for computer...
Epson Stylus Photo R1900 Series Printer Parts Edge guide Paper support and extensions Control panel buttons CD/DVD tray guide Roll paper holders USB port (for camera cable) Output tray and extensions Printer cover (open) Ink cartridge holder (in home position) Power button Paper button Ink button and light and light and light Roll paper button Roll paper feeder Roll paper edge guide USB ports (for computer...
Product Information Guide
Page 3
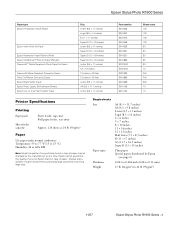
... 25 20 10 Roll Roll 500 10 10 Printer Specifications Printing Paper path Sheet feeder capacity Sheet feeder, top entry Roll paper feeder, rear entry Approx. 120 sheets at 24 lb (90 g/m2) Paper Use paper under normal conditions: Temperature: 59 to 77 °F (15 to 25 °C) Humidity: 40 to 24 lb (90 g/m2) 11/07 Epson Stylus Photo R1900 Series - 3
... 25 20 10 Roll Roll 500 10 10 Printer Specifications Printing Paper path Sheet feeder capacity Sheet feeder, top entry Roll paper feeder, rear entry Approx. 120 sheets at 24 lb (90 g/m2) Paper Use paper under normal conditions: Temperature: 59 to 77 °F (15 to 25 °C) Humidity: 40 to 24 lb (90 g/m2) 11/07 Epson Stylus Photo R1900 Series - 3
Product Information Guide
Page 4
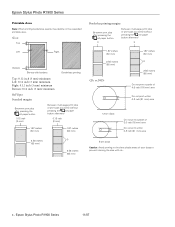
Epson Stylus Photo R1900 Series 11/07 Epson Stylus Photo R1900 Series Printable Area Note: When printing borderless, quality may decline in the clear plastic areas of 3.0 inch (76 mm) area Do not print within 0.8 inch (... mm) 2.56 inches (65 mm) 0 2.56 inches (65 mm) Borderless printing margins Between print jobs after pressing the roll paper button 0 Between multi-page print jobs or print jobs you send without pressing the roll paper button afterward 0 1.97 inches (50 mm) 2.56 inches (65 mm) CDs or DVDs 1.97 inches (50 mm) 0 2.56...
Epson Stylus Photo R1900 Series 11/07 Epson Stylus Photo R1900 Series Printable Area Note: When printing borderless, quality may decline in the clear plastic areas of 3.0 inch (76 mm) area Do not print within 0.8 inch (... mm) 2.56 inches (65 mm) 0 2.56 inches (65 mm) Borderless printing margins Between print jobs after pressing the roll paper button 0 Between multi-page print jobs or print jobs you send without pressing the roll paper button afterward 0 1.97 inches (50 mm) 2.56 inches (65 mm) CDs or DVDs 1.97 inches (50 mm) 0 2.56...
Product Information Guide
Page 6
... or DVD, the CD/DVD tray may be out. Epson Stylus Photo R1900 Series 11/07 Paper may have fed into the sheet I feeder, press the paper button to the external USB port. Replace or reinstall the cartridge. Turn off the printer and your printer is operating. Disconnect any printed roll paper or canvas media, then remove and reload the...
... or DVD, the CD/DVD tray may be out. Epson Stylus Photo R1900 Series 11/07 Paper may have fed into the sheet I feeder, press the paper button to the external USB port. Replace or reinstall the cartridge. Turn off the printer and your printer is operating. Disconnect any printed roll paper or canvas media, then remove and reload the...
Product Information Guide
Page 8
... which way your photo faces. Remove the paper from the sheet feeder and close the paper support. 2. Slide the roll paper edge guide on the printer so it . 4. Open the printer cover and make sure the paper has fed all the way to clear the paper out error, and load the paper again. 8 - Epson Stylus Photo R1900 Series 11/07 The paper must feed straight...
... which way your photo faces. Remove the paper from the sheet feeder and close the paper support. 2. Slide the roll paper edge guide on the printer so it . 4. Open the printer cover and make sure the paper has fed all the way to clear the paper out error, and load the paper again. 8 - Epson Stylus Photo R1900 Series 11/07 The paper must feed straight...
Product Information Guide
Page 9
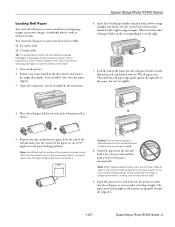
... paper roll as it . 11/07 Epson Stylus Photo R1900 Series - 9 Then insert the other roll paper holder in the paper automatically. With canvas media that the edge is installed. Guide the paper into the roll paper feeder, located behind the roll and marked with or without borders. Open the printer cover and look into the far left slot on the right. 7. Epson Stylus Photo R1900 Series Loading Roll Paper...
... paper roll as it . 11/07 Epson Stylus Photo R1900 Series - 9 Then insert the other roll paper holder in the paper automatically. With canvas media that the edge is installed. Guide the paper into the roll paper feeder, located behind the roll and marked with or without borders. Open the printer cover and look into the far left slot on the right. 7. Epson Stylus Photo R1900 Series Loading Roll Paper...
Product Information Guide
Page 10
... printing position. 4. Open the paper support and output tray. 3. Epson Stylus Photo R1900 Series If it during printing. To avoid this way to completely clean the rollers. Close the printer cover and do not cut it . 1. Press the M roll paper button to back the paper out. You can use your printed photos straight across the paper at the cutting guideline. Note...
... printing position. 4. Open the paper support and output tray. 3. Epson Stylus Photo R1900 Series If it during printing. To avoid this way to completely clean the rollers. Close the printer cover and do not cut it . 1. Press the M roll paper button to back the paper out. You can use your printed photos straight across the paper at the cutting guideline. Note...
Start Here
Page 5
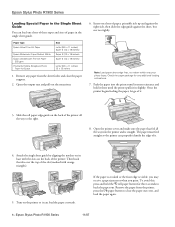
... by aligning the notches on its base with orange triangles). 5 Turn on the printer so it can load the paper correctly. 6 Insert one sheet of paper against the right edge, then slide the edge guide over. Note: For instructions on loading roll paper, or a CD or DVD, see the User's Guide or your on the...
... by aligning the notches on its base with orange triangles). 5 Turn on the printer so it can load the paper correctly. 6 Insert one sheet of paper against the right edge, then slide the edge guide over. Note: For instructions on loading roll paper, or a CD or DVD, see the User's Guide or your on the...
User's Guide - PDF
Page 3
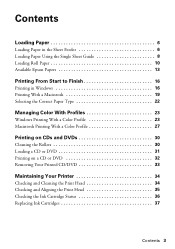
Contents Loading Paper 6 Loading Paper in the Sheet Feeder 6 Loading Paper Using the Single Sheet Guide 8 Loading Roll Paper 10 Available Epson Papers 13 Printing From Start to Finish 16 Printing in Windows 16 Printing With a Macintosh 19 Selecting the Correct Paper Type 22 Managing Color With Profiles 23 Windows Printing With a Color Profile 23 Macintosh Printing With a Color Profile 27 Printing...
Contents Loading Paper 6 Loading Paper in the Sheet Feeder 6 Loading Paper Using the Single Sheet Guide 8 Loading Roll Paper 10 Available Epson Papers 13 Printing From Start to Finish 16 Printing in Windows 16 Printing With a Macintosh 19 Selecting the Correct Paper Type 22 Managing Color With Profiles 23 Windows Printing With a Color Profile 23 Macintosh Printing With a Color Profile 27 Printing...
User's Guide - PDF
Page 6
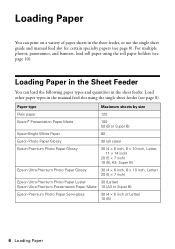
... roll paper using the single sheet feeder (see page 8). Paper type Maximum sheets by size Plain paper 120 Epson® Presentation Paper Matte 100 50 (B or Super B) Epson Bright White Paper 80 Epson Photo Paper Glossy 30 (all sizes) Epson Premium Photo Paper Glossy 30 (4 × 6 inch, 8 × 10 inch, Letter, 11 × 14 inch) 20 (5 × 7 inch) 10 (B, A3, Super B) Epson Ultra Premium Photo Paper Glossy...
... roll paper using the single sheet feeder (see page 8). Paper type Maximum sheets by size Plain paper 120 Epson® Presentation Paper Matte 100 50 (B or Super B) Epson Bright White Paper 80 Epson Photo Paper Glossy 30 (all sizes) Epson Premium Photo Paper Glossy 30 (4 × 6 inch, 8 × 10 inch, Letter, 11 × 14 inch) 20 (5 × 7 inch) 10 (B, A3, Super B) Epson Ultra Premium Photo Paper Glossy...
User's Guide - PDF
Page 8
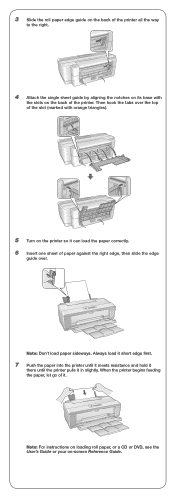
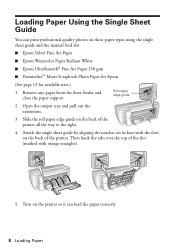
... guide and the manual feed slot: ■ Epson Velvet Fine Art Paper ■ Epson Watercolor Paper Radiant White ■ Epson UltraSmooth® Fine Art Paper 250 gsm ■ PremierArt™ Matte Scrapbook Photo Paper for Epson (See page 13 for available sizes.) 1. Slide the roll paper edge guide on the back of the printer. Attach the single sheet guide by aligning the...
... guide and the manual feed slot: ■ Epson Velvet Fine Art Paper ■ Epson Watercolor Paper Radiant White ■ Epson UltraSmooth® Fine Art Paper 250 gsm ■ PremierArt™ Matte Scrapbook Photo Paper for Epson (See page 13 for available sizes.) 1. Slide the roll paper edge guide on the back of the printer. Attach the single sheet guide by aligning the...
User's Guide - PDF
Page 9
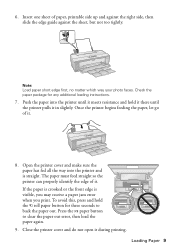
... and hold the M roll paper button for any additional loading instructions. 7. The paper must feed straight so the printer can properly identify the edge of it . Press the I paper button to back the paper out. Loading Paper 9 Close the printer cover and do not open...paper, printable side up and against the right side, then slide the edge guide against the sheet, but not too tightly. Open the printer cover and make sure the paper has fed all the way into the printer until the printer pulls it during printing. Note: Load paper short edge first, no matter which way your photo...
... and hold the M roll paper button for any additional loading instructions. 7. The paper must feed straight so the printer can properly identify the edge of it . Press the I paper button to back the paper out. Loading Paper 9 Close the printer cover and do not open...paper, printable side up and against the right side, then slide the edge guide against the sheet, but not too tightly. Open the printer cover and make sure the paper has fed all the way into the printer until the printer pulls it during printing. Note: Load paper short edge first, no matter which way your photo...

User's Guide - PDF
Page 10
...if necessary, before replacing cartridges to avoid ink marks on roll paper (see page 8). Turn on each end of the paper roll as shown. 5. Loading Roll Paper You can load Epson roll paper in the sheet feeder and remove the single sheet guide...roll paper from the end 90° of the roll and make sure the corners of the paper are cut at 90° angles to avoid paper feeding problems. 10 Loading Paper Also close the paper support. 3. Place the roll paper holders on the printer. 2. You can load roll paper or canvas media to print large, panoramic images or multiple photos...
...if necessary, before replacing cartridges to avoid ink marks on roll paper (see page 8). Turn on each end of the paper roll as shown. 5. Loading Roll Paper You can load Epson roll paper in the sheet feeder and remove the single sheet guide...roll paper from the end 90° of the roll and make sure the corners of the paper are cut at 90° angles to avoid paper feeding problems. 10 Loading Paper Also close the paper support. 3. Place the roll paper holders on the printer. 2. You can load roll paper or canvas media to print large, panoramic images or multiple photos...

User's Guide - PDF
Page 11
... reload it feeds and prints for a few seconds until the printer feeds in the corresponding slot on the back of the paper into the far left roll paper holder (marked with a right orange triangle). Loading Paper 11 If you reload it for the best results. Then insert... the right roll paper holder in the paper automatically. Feed the end of the printer (marked with a down orange triangle) into the roll paper feeder, located behind the roll and marked with up orange triangles). 9. With canvas media that you have ...
... reload it feeds and prints for a few seconds until the printer feeds in the corresponding slot on the back of the paper into the far left roll paper holder (marked with a right orange triangle). Loading Paper 11 If you reload it for the best results. Then insert... the right roll paper holder in the paper automatically. Feed the end of the printer (marked with a down orange triangle) into the roll paper feeder, located behind the roll and marked with up orange triangles). 9. With canvas media that you have ...
User's Guide - PDF
Page 12
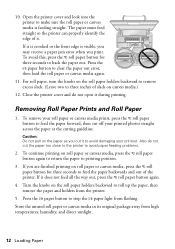
... from high temperatures, humidity, and direct sunlight. 12 Loading Paper Removing Roll Paper Prints and Roll Paper 1. To remove your roll paper or canvas media prints, press the M roll paper button to feed the paper forward, then cut the paper too close to the printer to avoid damaging your printed photos straight across the paper at the cutting guideline. To continue printing on canvas...
... from high temperatures, humidity, and direct sunlight. 12 Loading Paper Removing Roll Paper Prints and Roll Paper 1. To remove your roll paper or canvas media prints, press the M roll paper button to feed the paper forward, then cut the paper too close to the printer to avoid damaging your printed photos straight across the paper at the cutting guideline. To continue printing on canvas...
User's Guide - PDF
Page 17
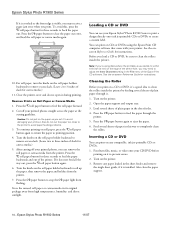
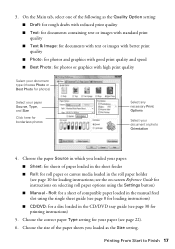
... Finish 17 Choose the correct paper Type setting for your paper (see the on selecting roll paper options using the single sheet guide (see page 8 for loading instructions) ■ CD/DVD: for a disc loaded in the roll paper holder (see page 30 for borderless photos Select any necessary Print Options Select your paper Source, Type, and Size Click...
... Finish 17 Choose the correct paper Type setting for your paper (see the on selecting roll paper options using the single sheet guide (see page 8 for loading instructions) ■ CD/DVD: for a disc loaded in the roll paper holder (see page 30 for borderless photos Select any necessary Print Options Select your paper Source, Type, and Size Click...
User's Guide - PDF
Page 18
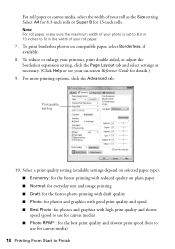
... quality setting 10. Note: For roll paper, make sure the maximum width of your photo is set to 8.3 or 13 inches to fit in the width of your roll as necessary. (Click Help or see your on-screen Reference Guide for details.) 9. For roll paper or canvas media, select the width... of your printout, print double-sided, or adjust the borderless expansion setting, click the Page Layout tab and select settings as the Size setting. To print borderless photos on plain paper ■ Normal: for everyday text...
... quality setting 10. Note: For roll paper, make sure the maximum width of your photo is set to 8.3 or 13 inches to fit in the width of your roll as necessary. (Click Help or see your on-screen Reference Guide for details.) 9. For roll paper or canvas media, select the width... of your printout, print double-sided, or adjust the borderless expansion setting, click the Page Layout tab and select settings as the Size setting. To print borderless photos on plain paper ■ Normal: for everyday text...
User's Guide - PDF
Page 19
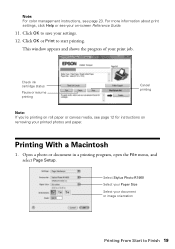
Printing With a Macintosh 1. Select Stylus Photo R1900 Select your Paper Size Select your print job. This window appears and shows the progress of your document or image orientation Printing From Start to Finish 19 Open a photo or document in a printing program, open the File menu, and select Page Setup. ...your settings. 12. Check ink cartridge status Pause or resume printing Cancel printing Note: If you're printing on roll paper or canvas media, see page 23. Note: For color management instructions, see page 12 for instructions on removing your printed photos and paper.
Printing With a Macintosh 1. Select Stylus Photo R1900 Select your Paper Size Select your print job. This window appears and shows the progress of your document or image orientation Printing From Start to Finish 19 Open a photo or document in a printing program, open the File menu, and select Page Setup. ...your settings. 12. Check ink cartridge status Pause or resume printing Cancel printing Note: If you're printing on roll paper or canvas media, see page 23. Note: For color management instructions, see page 12 for instructions on removing your printed photos and paper.
User's Guide - PDF
Page 20
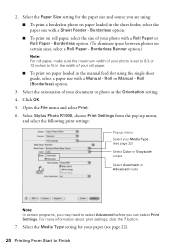
... the single sheet guide, select a paper size with a Roll Paper or Roll Paper - Click OK. 5. button. 7. Borderless option. (To eliminate space between photos on roll paper, select the size of your photo with a Manual - Roll (Borderless) option. 3. Select the Media Type setting for the paper size and source you can select Print Settings. Roll or Manual - Select Stylus Photo R1900, choose Print Settings from the...
... the single sheet guide, select a paper size with a Roll Paper or Roll Paper - Click OK. 5. button. 7. Borderless option. (To eliminate space between photos on roll paper, select the size of your photo with a Manual - Roll (Borderless) option. 3. Select the Media Type setting for the paper size and source you can select Print Settings. Roll or Manual - Select Stylus Photo R1900, choose Print Settings from the...

User's Guide - PDF
Page 21
...printing Select the print job Note: If you're printing on removing your printed photos and paper, if necessary. Select Color or Grayscale output in the dock (or click the Print Center icon and double-click SP R1900 on -screen Reference Guide. 12. For basic printing, select Automatic as the ... for canvas media) ■ Photo RPM: for the best print quality and slowest print speed (best to use for instructions on roll paper or canvas media, see page 12 for canvas media) Note: For color management instructions, see your print job, click the printer icon in the Color pop-up menu. 9. To ...
...printing Select the print job Note: If you're printing on removing your printed photos and paper, if necessary. Select Color or Grayscale output in the dock (or click the Print Center icon and double-click SP R1900 on -screen Reference Guide. 12. For basic printing, select Automatic as the ... for canvas media) ■ Photo RPM: for the best print quality and slowest print speed (best to use for instructions on roll paper or canvas media, see page 12 for canvas media) Note: For color management instructions, see your print job, click the printer icon in the Color pop-up menu. 9. To ...


