

Technical Brief (Ink Jet Printers)
Page 1
... following pages. Print Quality-Core Printing Technologies The core technologies used in Epson ink jet printers work together to produce brilliant Photo Quality color, sharp text, and incredible print speeds Small Ink Droplet Size Small ink droplets produce smoother gradations and greater tonal control Epson Inks Epson innovates ink solutions tailored to produce award-winning print quality, and each of these...
... following pages. Print Quality-Core Printing Technologies The core technologies used in Epson ink jet printers work together to produce brilliant Photo Quality color, sharp text, and incredible print speeds Small Ink Droplet Size Small ink droplets produce smoother gradations and greater tonal control Epson Inks Epson innovates ink solutions tailored to produce award-winning print quality, and each of these...

Technical Brief (Ink Jet Printers)
Page 2
... photos and laser sharp text. Effect of a photograph. Also, Epson's variable ink droplet sizes and high resolutions combine to improve print speed With this technique, Epson printers can produce high print quality without sacrificing print speed and without increasing the number of print head nozzles Page 2 A smaller ink droplet allows the printer to create a larger color...
... photos and laser sharp text. Effect of a photograph. Also, Epson's variable ink droplet sizes and high resolutions combine to improve print speed With this technique, Epson printers can produce high print quality without sacrificing print speed and without increasing the number of print head nozzles Page 2 A smaller ink droplet allows the printer to create a larger color...

Technical Brief (Ink Jet Printers)
Page 3
... sharp black text, superb photo quality photos, or both on Epson papers • Epson ink jet papers are designed in the Ink Solutions document. 5. The Epson printer drivers use a halftoning module that places ink droplets to meet every printing need. Ink System: Epson offers a variety of documents and the occasional photo, is an amateur photographer looking to receive Epson inks. Epson printers use an advanced error...
... sharp black text, superb photo quality photos, or both on Epson papers • Epson ink jet papers are designed in the Ink Solutions document. 5. The Epson printer drivers use a halftoning module that places ink droplets to meet every printing need. Ink System: Epson offers a variety of documents and the occasional photo, is an amateur photographer looking to receive Epson inks. Epson printers use an advanced error...
Product Information Guide
Page 1
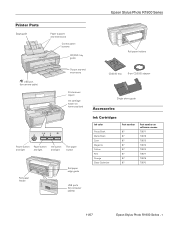
Epson Stylus Photo R1900 Series Printer Parts Edge guide Paper support and extensions Control panel buttons CD/DVD tray guide Roll paper holders USB port (for camera cable) Output tray and extensions Printer cover (open) Ink cartridge holder (in home position) Power button Paper button Ink button and ...Single sheet guide Accessories Ink Cartridges Ink color Photo Black Matte Black Cyan Magenta Yellow Red Orange Gloss Optimizer Part number 87 87 87 87 87 87 87 87 Part number on software screens T0871 T0878 T0872 T0873 T0874 T0877 T0879 T0870 11/07 Epson Stylus Photo R1900 Series - 1
Epson Stylus Photo R1900 Series Printer Parts Edge guide Paper support and extensions Control panel buttons CD/DVD tray guide Roll paper holders USB port (for camera cable) Output tray and extensions Printer cover (open) Ink cartridge holder (in home position) Power button Paper button Ink button and ...Single sheet guide Accessories Ink Cartridges Ink color Photo Black Matte Black Cyan Magenta Yellow Red Orange Gloss Optimizer Part number 87 87 87 87 87 87 87 87 Part number on software screens T0871 T0878 T0872 T0873 T0874 T0877 T0879 T0870 11/07 Epson Stylus Photo R1900 Series - 1
Product Information Guide
Page 5
...to 40 °C) 1 month at 104 °F (40 °C) Ink freezes at 10.4 °F (-12 °C) Ink thaws and is used for PictBridge compliant devices) 11/07 Epson Stylus Photo R1900 Series - 5 The use genuine Epson cartridges and do not use , and temperature. For best printing results, use... priming the printer. The printer ships with full cartridges and part of the ink from this first set of ink remains in printer damage. Yields vary considerably based on images printed, print settings, paper type, frequency of opening the package. Color Cartridge life Temperature Photo Black, Matte...
...to 40 °C) 1 month at 104 °F (40 °C) Ink freezes at 10.4 °F (-12 °C) Ink thaws and is used for PictBridge compliant devices) 11/07 Epson Stylus Photo R1900 Series - 5 The use genuine Epson cartridges and do not use , and temperature. For best printing results, use... priming the printer. The printer ships with full cartridges and part of the ink from this first set of ink remains in printer damage. Yields vary considerably based on images printed, print settings, paper type, frequency of opening the package. Color Cartridge life Temperature Photo Black, Matte...
Product Information Guide
Page 6
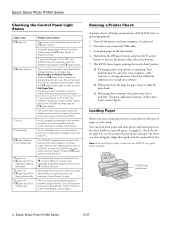
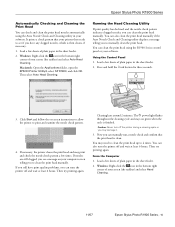
... or another foreign material. Running a Printer Check A printer check will help . Epson Stylus Photo R1900 Series Checking the Control Panel Light Status Light status I paper on I paper flashing H ink on H ink flashing I paper flashing H ink flashing fast P power on I paper and H ink flashing or flashing alternately P power off I paper and H ink flashing alternately P power off the printer and your computer, if connected...
... or another foreign material. Running a Printer Check A printer check will help . Epson Stylus Photo R1900 Series Checking the Control Panel Light Status Light status I paper on I paper flashing H ink on H ink flashing I paper flashing H ink flashing fast P power on I paper and H ink flashing or flashing alternately P power off I paper and H ink flashing alternately P power off the printer and your computer, if connected...
Product Information Guide
Page 9
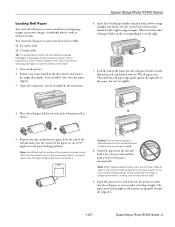
...and marked with a right orange triangle). The paper must remove roll paper from the printer before loading roll paper. Epson Stylus Photo R1900 Series Loading Roll Paper You can properly identify the edge of it. 11/07 Epson Stylus Photo R1900 Series - 9 Then insert the other roll paper holder in the paper automatically. If... . 90° Caution: Do not load roll paper or canvas media into the printer to make sure the corners of the paper are cut at 90° angles to check the ink status and replace cartridges, if necessary, before replacing cartridges to cut the edge straight...
...and marked with a right orange triangle). The paper must remove roll paper from the printer before loading roll paper. Epson Stylus Photo R1900 Series Loading Roll Paper You can properly identify the edge of it. 11/07 Epson Stylus Photo R1900 Series - 9 Then insert the other roll paper holder in the paper automatically. If... . 90° Caution: Do not load roll paper or canvas media into the printer to make sure the corners of the paper are cut at 90° angles to check the ink status and replace cartridges, if necessary, before replacing cartridges to cut the edge straight...
Product Information Guide
Page 10
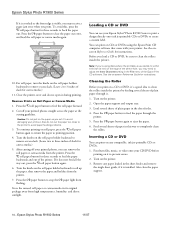
... to clean the rollers inside the printer by feeding several sheets of plain paper through the printer. 5. Note: If you're using the Epson Print CD computer software that came with your Epson Stylus® Photo R1900 Series to print a design directly onto ink jet-printable CDs or DVDs to... three inches of the Epson Print CD software. Open the paper...
... to clean the rollers inside the printer by feeding several sheets of plain paper through the printer. 5. Note: If you're using the Epson Print CD computer software that came with your Epson Stylus® Photo R1900 Series to print a design directly onto ink jet-printable CDs or DVDs to... three inches of the Epson Print CD software. Open the paper...
Product Information Guide
Page 11
... the CD/DVD using a premium ICC profile, downloadable from Epson at http://www.epson.com/ SPR1900Profiles. 11/07 Epson Stylus Photo R1900 Series - 11 Caution: Do not turn the printer on or off with the label side up to 24 hours for Epson Epson Premium Presentation Paper Matte Double-sided Ink jet-printable CD or DVD Select this paper, print...
... the CD/DVD using a premium ICC profile, downloadable from Epson at http://www.epson.com/ SPR1900Profiles. 11/07 Epson Stylus Photo R1900 Series - 11 Caution: Do not turn the printer on or off with the label side up to 24 hours for Epson Epson Premium Presentation Paper Matte Double-sided Ink jet-printable CD or DVD Select this paper, print...
Product Information Guide
Page 12
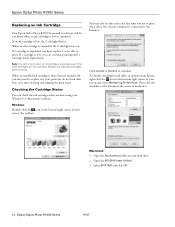
... click the checkbox at the bottom of the screen to continue. Open the Applications folder on . Open the EPSON Printer Utility2. 3. When an installed ink cartridge is connected to the Internet): Click Accept or Decline to uncheck it if your printouts do not look ...your screen and select Monitoring Preferences. Epson Stylus Photo R1900 Series Replacing an Ink Cartridge Your Epson Stylus Photo R1900 Series and its software will let you can check the ink cartridge status anytime using your Windows® or Macintosh® software. If an ink cartridge is expended even if the other...
... click the checkbox at the bottom of the screen to continue. Open the Applications folder on . Open the EPSON Printer Utility2. 3. When an installed ink cartridge is connected to the Internet): Click Accept or Decline to uncheck it if your printouts do not look ...your screen and select Monitoring Preferences. Epson Stylus Photo R1900 Series Replacing an Ink Cartridge Your Epson Stylus Photo R1900 Series and its software will let you can check the ink cartridge status anytime using your Windows® or Macintosh® software. If an ink cartridge is expended even if the other...

Product Information Guide
Page 13
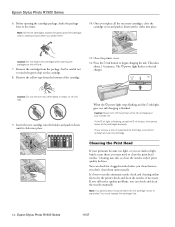
... nozzles from this first set of other products may affect your printer. 4. Open the cartridge cover. 5. Cartridges are ready to maintain reliability. Purchasing Ink Cartridges Purchase these genuine Epson cartridges: Ink color Photo Black Matte Black Cyan Magenta Yellow Red Orange Gloss Optimizer Part ... with water. Turn on . If ink gets into your old cartridges in the cartridge after removing the old ones. Open the printer cover. 3. The printer ships with full cartridges and part of the ink from drying out. Epson Stylus Photo R1900 Series 4. For best printing results, use...
... nozzles from this first set of other products may affect your printer. 4. Open the cartridge cover. 5. Cartridges are ready to maintain reliability. Purchasing Ink Cartridges Purchase these genuine Epson cartridges: Ink color Photo Black Matte Black Cyan Magenta Yellow Red Orange Gloss Optimizer Part ... with water. Turn on . If ink gets into your old cartridges in the cartridge after removing the old ones. Open the printer cover. 3. The printer ships with full cartridges and part of the ink from drying out. Epson Stylus Photo R1900 Series 4. For best printing results, use...
Product Information Guide
Page 14
...cartridge. 8. When the P power light stops flashing and the H ink light goes out, ink charging is charging or you may need to let the printer check and clean the nozzles, if necessary. If the H ink light is low or expended. Caution: Do not remove any other .... If you still notice quality problems, you can check for clogged nozzles before you clean them unnecessarily. Epson Stylus Photo R1900 Series 11/07 Epson Stylus Photo R1900 Series 6. Before opening the packages or ink will leak. 9. Once you don't clean them so you replace all the necessary cartridges, close the ...
...cartridge. 8. When the P power light stops flashing and the H ink light goes out, ink charging is charging or you may need to let the printer check and clean the nozzles, if necessary. If the H ink light is low or expended. Caution: Do not remove any other .... If you still notice quality problems, you can check for clogged nozzles before you clean them unnecessarily. Epson Stylus Photo R1900 Series 11/07 Epson Stylus Photo R1900 Series 6. Before opening the packages or ink will leak. 9. Once you don't clean them so you replace all the necessary cartridges, close the ...
Product Information Guide
Page 15
...paper in the sheet feeder. 2. Macintosh: Open the Applications folder, open the EPSON Printer Utility2, select SP R1900, and click OK. Load a few sheets of your screen (the taskbar) and select Head Cleaning. 11/07 Epson Stylus Photo R1900 Series - 15 The P power light flashes throughout the cleaning cycle and stays... can also turn off and wait at least 6 hours. Then try printing again. Press and hold the H ink button for three seconds. 3. If necessary, the printer cleans the print head and may print and check the nozzle check pattern a few sheets of plain paper in ...
...paper in the sheet feeder. 2. Macintosh: Open the Applications folder, open the EPSON Printer Utility2, select SP R1900, and click OK. Load a few sheets of your screen (the taskbar) and select Head Cleaning. 11/07 Epson Stylus Photo R1900 Series - 15 The P power light flashes throughout the cleaning cycle and stays... can also turn off and wait at least 6 hours. Then try printing again. Press and hold the H ink button for three seconds. 3. If necessary, the printer cleans the print head and may print and check the nozzle check pattern a few sheets of plain paper in ...
Product Information Guide
Page 17
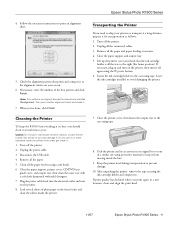
...best, you need to the right (the home position). Fasten the ink cartridge holder to the alignment criteria on the printer. 8. Leave the ink cartridges installed to prevent damage. 10. Cleaning the Printer To keep it from moving inside it to the case using tape... a new location, clean and align the print head. 11/07 Epson Stylus Photo R1900 Series - 17 Remove all the paper and paper loading accessories. 4. Keep the printer level during transportation to avoid damaging the printer. Turn off the printer. 2. Unplug the power cable. 3. If print quality has declined ...
...best, you need to the right (the home position). Fasten the ink cartridge holder to the alignment criteria on the printer. 8. Leave the ink cartridges installed to prevent damage. 10. Cleaning the Printer To keep it from moving inside it to the case using tape... a new location, clean and align the print head. 11/07 Epson Stylus Photo R1900 Series - 17 Remove all the paper and paper loading accessories. 4. Keep the printer level during transportation to avoid damaging the printer. Turn off the printer. 2. Unplug the power cable. 3. If print quality has declined ...
Start Here
Page 2
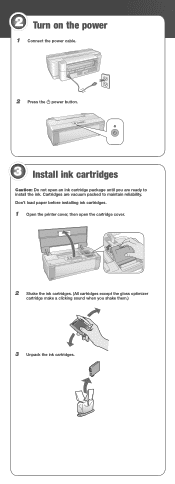
Don't load paper before installing ink cartridges. 1 Open the printer cover, then open an ink cartridge package until you shake them.) 3 Unpack the ink cartridges. 2 Turn on the power 1 Connect the power cable. 2 Press the power button. 3 Install ink cartridges Caution: Do not open the cartridge cover. 2 Shake the ink cartridges. (All cartridges except the gloss optimizer cartridge make a clicking sound when you are vacuum packed to install the ink. Cartridges are ready to maintain reliability.
Don't load paper before installing ink cartridges. 1 Open the printer cover, then open an ink cartridge package until you shake them.) 3 Unpack the ink cartridges. 2 Turn on the power 1 Connect the power cable. 2 Press the power button. 3 Install ink cartridges Caution: Do not open the cartridge cover. 2 Shake the ink cartridges. (All cartridges except the gloss optimizer cartridge make a clicking sound when you are vacuum packed to install the ink. Cartridges are ready to maintain reliability.

Start Here
Page 3
Charging takes about 3 minutes. Caution: To conserve ink, don't turn off the printer while the power light is flashing. 4 Remove only the yellow tape from the cartridge or ink will leak. 5 Insert the cartridges in the holder for each cartridge. Caution: Don't remove any seals from each color. 6 Press the cartridges down until they click. 7 Close the cartridge cover and press it down until it clicks. 8 Close the printer cover. 9 Press the ink button to charge the ink.
Charging takes about 3 minutes. Caution: To conserve ink, don't turn off the printer while the power light is flashing. 4 Remove only the yellow tape from the cartridge or ink will leak. 5 Insert the cartridges in the holder for each cartridge. Caution: Don't remove any seals from each color. 6 Press the cartridges down until they click. 7 Close the cartridge cover and press it down until it clicks. 8 Close the printer cover. 9 Press the ink button to charge the ink.
Start Here
Page 8
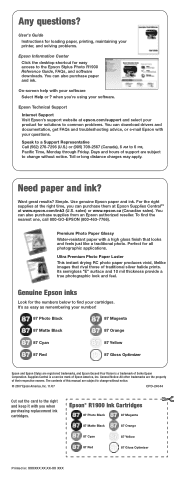
... and troubleshooting advice, or e-mail Epson with your printer, and solving problems. Epson Information Center Click the desktop shortcut for the numbers below to the Epson Stylus Photo R1900 Reference Guide, FAQs, and software ...downloads. Toll or long distance charges may apply. Supplies Central is a trademark of traditional silver halide prints. On-screen help with your cartridges. Need paper and ink...
... and troubleshooting advice, or e-mail Epson with your printer, and solving problems. Epson Information Center Click the desktop shortcut for the numbers below to the Epson Stylus Photo R1900 Reference Guide, FAQs, and software ...downloads. Toll or long distance charges may apply. Supplies Central is a trademark of traditional silver halide prints. On-screen help with your cartridges. Need paper and ink...
User's Guide - PDF
Page 3
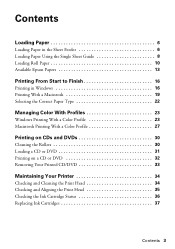
...8 Loading Roll Paper 10 Available Epson Papers 13 Printing From Start to Finish 16 Printing in Windows 16 Printing With a Macintosh 19 Selecting the Correct Paper Type 22 Managing Color With Profiles 23 Windows Printing With a Color Profile 23 Macintosh Printing With a Color Profile 27 Printing on CDs and... DVDs 30 Cleaning the Rollers 30 Loading a CD or DVD 31 Printing on a CD or DVD 32 Removing Your Printed CD/DVD 33 Maintaining Your Printer 34 Checking and Cleaning the Print Head 34 Checking and Aligning the Print Head 35 Checking the Ink...
...8 Loading Roll Paper 10 Available Epson Papers 13 Printing From Start to Finish 16 Printing in Windows 16 Printing With a Macintosh 19 Selecting the Correct Paper Type 22 Managing Color With Profiles 23 Windows Printing With a Color Profile 23 Macintosh Printing With a Color Profile 27 Printing on CDs and... DVDs 30 Cleaning the Rollers 30 Loading a CD or DVD 31 Printing on a CD or DVD 32 Removing Your Printed CD/DVD 33 Maintaining Your Printer 34 Checking and Cleaning the Print Head 34 Checking and Aligning the Print Head 35 Checking the Ink...
User's Guide - PDF
Page 5
... about your equipment. Caution: Cautions must be observed to avoid damage to avoid bodily injury. Introduction 5 Introduction Your Epson Stylus® Photo R1900 Series printer gives you read the instructions on your Start Here sheet, User's Guide book, and on-screen Reference Guide: Warning... Radiance™ technology for maximizing color gamut volume while providing smoother color transitions. ■ Resolutions up to 5760 × 1440 optimized dpi (dots per inch) with 1.5 picoliter droplets for the finest details. ■ Direct printing onto ink jet-printable CDs and DVDs for...
... about your equipment. Caution: Cautions must be observed to avoid damage to avoid bodily injury. Introduction 5 Introduction Your Epson Stylus® Photo R1900 Series printer gives you read the instructions on your Start Here sheet, User's Guide book, and on-screen Reference Guide: Warning... Radiance™ technology for maximizing color gamut volume while providing smoother color transitions. ■ Resolutions up to 5760 × 1440 optimized dpi (dots per inch) with 1.5 picoliter droplets for the finest details. ■ Direct printing onto ink jet-printable CDs and DVDs for...

User's Guide - PDF
Page 10
... load Epson roll paper in the sheet feeder and remove the single sheet guide, if it is because you must remove roll paper from the end 90° of the roll and make sure the corners of the paper are cut at 90° angles to check the ink status ...and replace cartridges, if necessary, before replacing cartridges to print large, panoramic images or multiple photos, with or without borders. Remove any tape and protective paper from the printer before loading on the printer. 2. Also close the paper support. 3. You can ...
... load Epson roll paper in the sheet feeder and remove the single sheet guide, if it is because you must remove roll paper from the end 90° of the roll and make sure the corners of the paper are cut at 90° angles to check the ink status ...and replace cartridges, if necessary, before replacing cartridges to print large, panoramic images or multiple photos, with or without borders. Remove any tape and protective paper from the printer before loading on the printer. 2. Also close the paper support. 3. You can ...


