
Technical Brief (Ink Jet Printers)
Page 2
... technique, Epson printers can be combined to increase the number of nozzles on the print head. Also, Epson's variable ink droplet sizes and high resolutions combine to improve color ranges and accuracy because Epson printers can use Variable Size Droplet Technology, where the printers can produce... sizes combine to precisely print crisp details in photos and laser sharp text. Piezo Crystal Deformation Nozzle Ink Droplet Epson's MicroPiezo technology results in dense coverage areas allowing Epson to create a larger color palette. Effect of tiny droplets can be combined...
... technique, Epson printers can be combined to increase the number of nozzles on the print head. Also, Epson's variable ink droplet sizes and high resolutions combine to improve color ranges and accuracy because Epson printers can use Variable Size Droplet Technology, where the printers can produce... sizes combine to precisely print crisp details in photos and laser sharp text. Piezo Crystal Deformation Nozzle Ink Droplet Epson's MicroPiezo technology results in dense coverage areas allowing Epson to create a larger color palette. Effect of tiny droplets can be combined...
Product Information Guide
Page 5
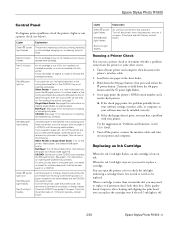
...instructions on ink. Turn off . 2/05 Epson Stylus Photo R1800 - 5 Lights Explanation Green P power light flashes The printer is off the printer, open the printer cover to check the ink light indicating a...head, you have a problem with the printer. If the error persists, contact Epson. Open the cover and remove any jammed or torn paper, or foreign object. Replacing an Ink Cartridge When the red H ink light flashes, an ink cartridge is not inserted completely. Epson Stylus Photo R1800 Control Panel To diagnose printer problems, check the printer's lights or run a printer...
...instructions on ink. Turn off . 2/05 Epson Stylus Photo R1800 - 5 Lights Explanation Green P power light flashes The printer is off the printer, open the printer cover to check the ink light indicating a...head, you have a problem with the printer. If the error persists, contact Epson. Open the cover and remove any jammed or torn paper, or foreign object. Replacing an Ink Cartridge When the red H ink light flashes, an ink cartridge is not inserted completely. Epson Stylus Photo R1800 Control Panel To diagnose printer problems, check the printer's lights or run a printer...
Product Information Guide
Page 6
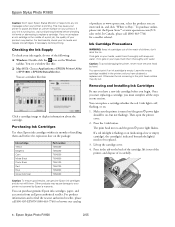
... Be sure you have a new ink cartridge before printing. Caution: To avoid damaging the printer, never move the print head by Epson's warranty. Then open Epson Status Monitor or respond to Buy." Press in the printer until printing finishes before the expiration date on the Windows taskbar. Press the H ink button. Epson Stylus Photo R1800 Caution: Don't open the...
... Be sure you have a new ink cartridge before printing. Caution: To avoid damaging the printer, never move the print head by Epson's warranty. Then open Epson Status Monitor or respond to Buy." Press in the printer until printing finishes before the expiration date on the Windows taskbar. Press the H ink button. Epson Stylus Photo R1800 Caution: Don't open the...
Product Information Guide
Page 14
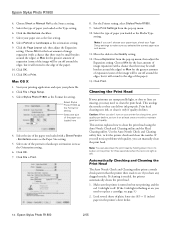
... the edge of plain, letter-size (8.5 × 11 inches) paper in the printer's sheet feeder. 14 - Choose Sheet or Manual Roll as the orientation setting. 9. For the Printer setting, select Stylus Photo R1800. 9. Make sure the printer is needed, the printer automatically cleans the print head. 1. Epson Stylus Photo R1800 4. Select Portrait or Landscape as the Source setting. 5. Click OK. 11. Mac...
... the edge of plain, letter-size (8.5 × 11 inches) paper in the printer's sheet feeder. 14 - Choose Sheet or Manual Roll as the orientation setting. 9. For the Printer setting, select Stylus Photo R1800. 9. Make sure the printer is needed, the printer automatically cleans the print head. 1. Epson Stylus Photo R1800 4. Select Portrait or Landscape as the Source setting. 5. Click OK. 11. Mac...
Product Information Guide
Page 15
... noise and the green P power light flashes. Make sure the printer is turned on but not printing, and the red H ink light is necessary, it displays an on , you don't see page 5.) 2. Epson Stylus Photo R1800 Note: Sizes smaller than 5 minutes. 5. Select Auto Head Cleaning. If cleaning is off and wait overnight-this allows any dried...
... noise and the green P power light flashes. Make sure the printer is turned on but not printing, and the red H ink light is necessary, it displays an on , you don't see page 5.) 2. Epson Stylus Photo R1800 Note: Sizes smaller than 5 minutes. 5. Select Auto Head Cleaning. If cleaning is off and wait overnight-this allows any dried...
Product Information Guide
Page 16
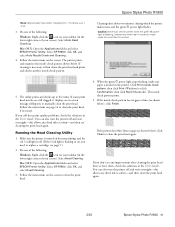
Epson Stylus Photo R1800 Aligning the Print Head If your printouts contain misaligned vertical lines, or you see light or dark horizontal banding, you clean the printer. 16 - Select Print Head Alignment. Select one of the following : Windows: Right-click the icon on the last screen...has the least noticeable lines in the lower right corner of the printer with a soft, damp cloth. The printer then prints and checks an alignment pattern. Manually Aligning the Print Head 1. Epson Stylus Photo R1800 2/05 Turn on the printer. 2. You see a screen like this as you may need...
Epson Stylus Photo R1800 Aligning the Print Head If your printouts contain misaligned vertical lines, or you see light or dark horizontal banding, you clean the printer. 16 - Select Print Head Alignment. Select one of the following : Windows: Right-click the icon on the last screen...has the least noticeable lines in the lower right corner of the printer with a soft, damp cloth. The printer then prints and checks an alignment pattern. Manually Aligning the Print Head 1. Epson Stylus Photo R1800 2/05 Turn on the printer. 2. You see a screen like this as you may need...
Product Information Guide
Page 17
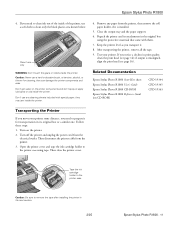
...'t spray or apply lubricants or oils inside the printer. 4. Open the printer cover and tape the ink cartridge holder to remove the tape after installing the printer in print quality, clean the print head (see page 16). Related Documentation Epson Stylus Photo R1800 Start Here sheet Epson Stylus Photo R1800 User's Guide Epson Stylus Photo R1800 CD-ROM Epson Stylus Photo R1800 Reference Guide (on CD-ROM) CPD-19344 CPD...
...'t spray or apply lubricants or oils inside the printer. 4. Open the printer cover and tape the ink cartridge holder to remove the tape after installing the printer in print quality, clean the print head (see page 16). Related Documentation Epson Stylus Photo R1800 Start Here sheet Epson Stylus Photo R1800 User's Guide Epson Stylus Photo R1800 CD-ROM Epson Stylus Photo R1800 Reference Guide (on CD-ROM) CPD-19344 CPD...
User's Guide
Page 4
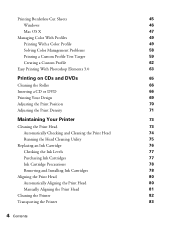
Printing Borderless Cut Sheets 45 Windows 46 Mac OS X 47 Managing Color With Profiles 49 Printing With a Color Profile 49 Solving Color Management Problems 58 Printing a Custom Profile Test Target 59 Creating a Custom Profile 62 Easy Printing With Photoshop Elements 3.0 ...Your Design 69 Adjusting the Print Position 70 Adjusting the Print Density 71 Maintaining Your Printer 73 Cleaning the Print Head 73 Automatically Checking and Cleaning the Print Head 74 Running the Head Cleaning Utility 75 Replacing an Ink Cartridge 76 Checking the Ink Levels 77 Purchasing ...
Printing Borderless Cut Sheets 45 Windows 46 Mac OS X 47 Managing Color With Profiles 49 Printing With a Color Profile 49 Solving Color Management Problems 58 Printing a Custom Profile Test Target 59 Creating a Custom Profile 62 Easy Printing With Photoshop Elements 3.0 ...Your Design 69 Adjusting the Print Position 70 Adjusting the Print Density 71 Maintaining Your Printer 73 Cleaning the Print Head 73 Automatically Checking and Cleaning the Print Head 74 Running the Head Cleaning Utility 75 Replacing an Ink Cartridge 76 Checking the Ink Levels 77 Purchasing ...
User's Guide
Page 7
...panoramics on a wide variety of ink jet printable CDs and DVDs allows you beautiful archival prints on photo paper or canvas. ■ Automatic print head cleaning and alignment utilities analyze your prints look like they came from a photo lab. ■ Ink droplets as small as 1.5 picoliters give you finer detail and highlights. &#...papers so your print quality and improve it quickly and easily. ■ Hi-Speed USB 2.0 and FireWire® (IEEE 1394) ports provide fast connections. Your Epson Stylus® Photo R1800 gives you to the printer with a Hi-Speed USB 2.0 cable. 7 Welcome!
...panoramics on a wide variety of ink jet printable CDs and DVDs allows you beautiful archival prints on photo paper or canvas. ■ Automatic print head cleaning and alignment utilities analyze your prints look like they came from a photo lab. ■ Ink droplets as small as 1.5 picoliters give you finer detail and highlights. &#...papers so your print quality and improve it quickly and easily. ■ Hi-Speed USB 2.0 and FireWire® (IEEE 1394) ports provide fast connections. Your Epson Stylus® Photo R1800 gives you to the printer with a Hi-Speed USB 2.0 cable. 7 Welcome!
User's Guide
Page 73
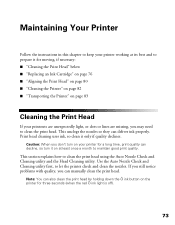
... ■ "Replacing an Ink Cartridge" on page 76 ■ "Aligning the Print Head" on page 80 ■ "Cleaning the Printer" on page 82 ■ "Transporting the Printer" on page 83 Cleaning the Print Head If your printouts are unexpectedly light, or dots or lines are missing, you can decline,...when the red H ink light is off). 73 Print head cleaning uses ink, so clean it on your printer for a long time, print quality can manually clean the print head. Maintaining Your Printer Follow the instructions in this chapter to keep your printer working at least once a month to maintain good print ...
... ■ "Replacing an Ink Cartridge" on page 76 ■ "Aligning the Print Head" on page 80 ■ "Cleaning the Printer" on page 82 ■ "Transporting the Printer" on page 83 Cleaning the Print Head If your printouts are unexpectedly light, or dots or lines are missing, you can decline,...when the red H ink light is off). 73 Print head cleaning uses ink, so clean it on your printer for a long time, print quality can manually clean the print head. Maintaining Your Printer Follow the instructions in this chapter to keep your printer working at least once a month to maintain good print ...

User's Guide
Page 74
... light is turned on -screen message telling you still have any dried ink to soften-and then try cleaning the print head again. 74 Maintaining Your Printer Follow the instructions on EPSON Stylus Photo R1800, and select Printing Preferences. Load several sheets of plain, letter-size paper in the lower right corner of the following: Windows...
... light is turned on -screen message telling you still have any dried ink to soften-and then try cleaning the print head again. 74 Maintaining Your Printer Follow the instructions on EPSON Stylus Photo R1800, and select Printing Preferences. Load several sheets of plain, letter-size paper in the lower right corner of the following: Windows...
User's Guide
Page 75
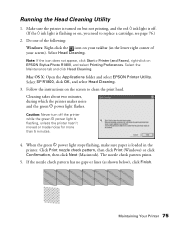
Select Head Cleaning. Follow the instructions on your taskbar (in the printer. When the green P power light stops flashing, make sure paper is flashing or on EPSON Stylus Photo R1800, and select Printing Preferences. If the nozzle check pattern has no gaps or lines (as shown below), click Finish. Do one of your screen). Mac ...
Select Head Cleaning. Follow the instructions on your taskbar (in the printer. When the green P power light stops flashing, make sure paper is flashing or on EPSON Stylus Photo R1800, and select Printing Preferences. If the nozzle check pattern has no gaps or lines (as shown below), click Finish. Do one of your screen). Mac ...
User's Guide
Page 76
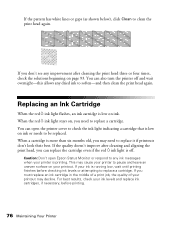
... your ink is off and wait overnight-this allows any ink messages when your printer is low on ink. If you don't see any improvement after cleaning and aligning the print head, you need to be replaced. Replacing an Ink Cartridge When the red H ink light flashes, an ink ...cartridge is printing. You can open Epson Status Monitor or respond to replace a cartridge. If the quality doesn't improve after cleaning the print head three or four times, check the solutions beginning on page 93. This may cause your printer to clean the print head again. If the pattern has white ...
... your ink is off and wait overnight-this allows any ink messages when your printer is low on ink. If you don't see any improvement after cleaning and aligning the print head, you need to be replaced. Replacing an Ink Cartridge When the red H ink light flashes, an ink ...cartridge is printing. You can open Epson Status Monitor or respond to replace a cartridge. If the quality doesn't improve after cleaning the print head three or four times, check the solutions beginning on page 93. This may cause your printer to clean the print head again. If the pattern has white ...

User's Guide
Page 78
...not flashing). Press the H ink button. Press in the tab on (the green P power light should be replaced. 3. Caution: To avoid damaging the printer, never move the print head by hand. Leave the expended cartridge installed in your hands, wash them thoroughly with soap and water. The print...the back of the cartridge, lift it carefully. 78 Maintaining Your Printer Otherwise the ink remaining in one session. If ink gets on . 1. Once you start replacing a cartridge, you must complete all the steps in the print head nozzles may dry out. You cannot print if an ink cartridge ...
...not flashing). Press the H ink button. Press in the tab on (the green P power light should be replaced. 3. Caution: To avoid damaging the printer, never move the print head by hand. Leave the expended cartridge installed in your hands, wash them thoroughly with soap and water. The print...the back of the cartridge, lift it carefully. 78 Maintaining Your Printer Otherwise the ink remaining in one session. If ink gets on . 1. Once you start replacing a cartridge, you must complete all the steps in the print head nozzles may dry out. You cannot print if an ink cartridge ...

User's Guide
Page 80
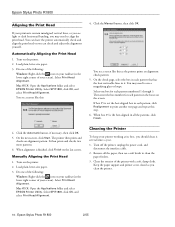
... the next screen, click Start. When alignment is finished, click Finish on EPSON Stylus Photo R1800, and select Printing Preferences. Load letter-size Epson Presentation Paper Matte. 3. Mac OS X: Open the Applications folder and select EPSON Printer Utility. Select the Maintenance tab and click Print Head Alignment. Click the Automatic button, if necessary, then click OK. 5. Turn on...
... the next screen, click Start. When alignment is finished, click Finish on EPSON Stylus Photo R1800, and select Printing Preferences. Load letter-size Epson Presentation Paper Matte. 3. Mac OS X: Open the Applications folder and select EPSON Printer Utility. Select the Maintenance tab and click Print Head Alignment. Click the Automatic button, if necessary, then click OK. 5. Turn on...

User's Guide
Page 81
...Head Alignment. Note: If the icon does not appear, click Start > Printer (and Faxes), right-click on the screen. You may need to print another test page and repeat this as the printer prints an alignment check pattern: 5. When box #5 is not the best-aligned box in the boxes on EPSON Stylus Photo R1800..., and select Printing Preferences. Maintaining Your Printer 81 Mac OS X: Open the Applications folder and select EPSON Printer Utility. Then enter the box number for each pattern, click Realignment ...
...Head Alignment. Note: If the icon does not appear, click Start > Printer (and Faxes), right-click on the screen. You may need to print another test page and repeat this as the printer prints an alignment check pattern: 5. When box #5 is not the best-aligned box in the boxes on EPSON Stylus Photo R1800..., and select Printing Preferences. Maintaining Your Printer 81 Mac OS X: Open the Applications folder and select EPSON Printer Utility. Then enter the box number for each pattern, click Realignment ...
User's Guide
Page 83
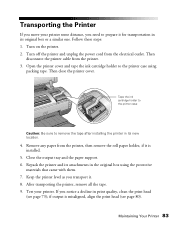
...in print quality, clean the print head (see page 80). Maintaining Your Printer 83 Follow these steps: 1. Then disconnect the printer cable from the printer, then remove the roll paper holder, if it is misaligned, align the print head (see page 73); Keep the printer level as you transport it for ...transportation in the original box using packing tape. Test your printer some distance, you need to the printer case using the protective materials that came with them. ...
...in print quality, clean the print head (see page 80). Maintaining Your Printer 83 Follow these steps: 1. Then disconnect the printer cable from the printer, then remove the roll paper holder, if it is misaligned, align the print head (see page 73); Keep the printer level as you transport it for ...transportation in the original box using packing tape. Test your printer some distance, you need to the printer case using the protective materials that came with them. ...
User's Guide
Page 87
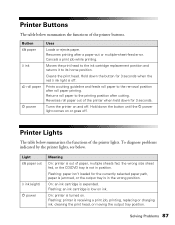
...a print job, printing, replacing or charging ink, cleaning the print head, or moving the output tray position. On: an ink cartridge is turned on and off . Printer Lights The table below summarizes the functions of the printer when held down for the currently selected paper path, paper is jammed..., or the output tray is low on or goes off . Flashing: printer is off. Cleans the print head. To diagnose problems indicated by the printer lights, see below. Hold down the button until the P power light comes on ink. Flashing: an ink...
...a print job, printing, replacing or charging ink, cleaning the print head, or moving the output tray position. On: an ink cartridge is turned on and off . Printer Lights The table below summarizes the functions of the printer when held down for the currently selected paper path, paper is jammed..., or the output tray is low on or goes off . Flashing: printer is off. Cleans the print head. To diagnose problems indicated by the printer lights, see below. Hold down the button until the P power light comes on ink. Flashing: an ink...
User's Guide
Page 88
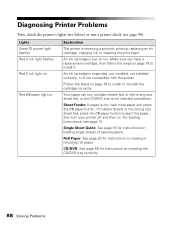
... paper button to eject the paper, then turn your printer off and then on ink. Roll Paper: See page 20 for instructions on Explanation The printer is out, load more paper and press the )...on page 78 to install or reinstall the cartridge correctly. Diagnosing Printer Problems First, check the printer's lights (see below) or run a printer check (see page 12. Follow the steps on loading single ...fed, or the wrong size sheet fed, or the CD/DVD tray is not compatible with the printer. An ink cartridge is expended, not installed, not installed correctly, or is not inserted completely....
... paper button to eject the paper, then turn your printer off and then on ink. Roll Paper: See page 20 for instructions on Explanation The printer is out, load more paper and press the )...on page 78 to install or reinstall the cartridge correctly. Diagnosing Printer Problems First, check the printer's lights (see below) or run a printer check (see page 12. Follow the steps on loading single ...fed, or the wrong size sheet fed, or the CD/DVD tray is not compatible with the printer. An ink cartridge is expended, not installed, not installed correctly, or is not inserted completely....
User's Guide
Page 89
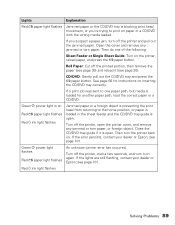
... object is preventing the print head from returning to the home position, or paper is loaded in the sheet feeder and the CD/DVD tray guide is open . If the error persists, contact your dealer or Epson; see page 101. Roll Paper: Cut off the printer, open the printer cover, and remove any jammed... Epson; Turn off the printed portion, then remove the paper (see page 39) and reload it (see page 20). see page 101. Close the CD/DVD tray guide if it on again. Then do one paper path, but media is blocking print head movement, or you suspect a paper jam, turn off the printer...
... object is preventing the print head from returning to the home position, or paper is loaded in the sheet feeder and the CD/DVD tray guide is open . If the error persists, contact your dealer or Epson; see page 101. Roll Paper: Cut off the printer, open the printer cover, and remove any jammed... Epson; Turn off the printed portion, then remove the paper (see page 39) and reload it (see page 20). see page 101. Close the CD/DVD tray guide if it on again. Then do one paper path, but media is blocking print head movement, or you suspect a paper jam, turn off the printer...


