Operation Guide - EasyMP Monitor v4.53
Page 2
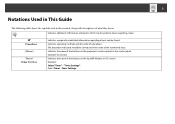
..., along with descriptions of the buttons on the EasyMP Monitor or OS screens. Indicates operating methods and the order of the buttons on the projector's remote control or the control panel.
..., along with descriptions of the buttons on the EasyMP Monitor or OS screens. Indicates operating methods and the order of the buttons on the projector's remote control or the control panel.
Operation Guide - EasyMP Network Projection
Page 17
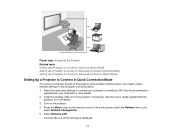
... connect a computer directly to the projector using wireless communication, you need to select network settings on the computer and the projector. 1. Turn on the remote control or the control panel, select the Network menu, and select Network Configuration. 5. Press the Menu button on the projector. 4. See the User's Guide supplied with your computer...
... connect a computer directly to the projector using wireless communication, you need to select network settings on the computer and the projector. 1. Turn on the remote control or the control panel, select the Network menu, and select Network Configuration. 5. Press the Menu button on the projector. 4. See the User's Guide supplied with your computer...

Operation Guide - EasyMP Network Projection
Page 19
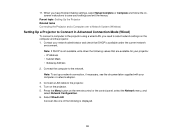
... Connect the computer to the network. Select Advanced for more details. 4. Install the wireless LAN unit in the projector, if necessary. Turn on the remote control or the control panel, select the Network menu, and select Network Configuration. 6. See the User's Guide supplied with the projector for your network. Select On for more...
... Connect the computer to the network. Select Advanced for more details. 4. Install the wireless LAN unit in the projector, if necessary. Turn on the remote control or the control panel, select the Network menu, and select Network Configuration. 6. See the User's Guide supplied with the projector for your network. Select On for more...
Operation Guide - EasyMP Network Projection
Page 20
... need to save your computer or network adapter. 3. Press the Menu button on the projector. 5. Connect the computer to the projector. 4. Turn on the remote control or the control panel, select the Network menu, and select Network Configuration. 6. Select Wired LAN. Parent topic: Setting Up the Projector Related tasks Connecting the Projector and...
... need to save your computer or network adapter. 3. Press the Menu button on the projector. 5. Connect the computer to the projector. 4. Turn on the remote control or the control panel, select the Network menu, and select Network Configuration. 6. Select Wired LAN. Parent topic: Setting Up the Projector Related tasks Connecting the Projector and...

Operation Guide - EasyMP Network Projection
Page 23
Start EasyMP Network Projection. • Windows XP, Windows Vista, and Windows 7: Click Start, select Programs (or All Programs), EPSON Projector, EasyMP Network Projection, and then click EasyMP Network Projection Ver.X.XX. • Windows 8: Navigate to the Start screen and select EasyMP Network Projection Ver.X.XX. • Mac OS X: Double-click EasyMP Network Projection from the Applications folder. 23 1. The LAN standby screen is projected. 2. Press the LAN button on the remote control.
Start EasyMP Network Projection. • Windows XP, Windows Vista, and Windows 7: Click Start, select Programs (or All Programs), EPSON Projector, EasyMP Network Projection, and then click EasyMP Network Projection Ver.X.XX. • Windows 8: Navigate to the Start screen and select EasyMP Network Projection Ver.X.XX. • Mac OS X: Double-click EasyMP Network Projection from the Applications folder. 23 1. The LAN standby screen is projected. 2. Press the LAN button on the remote control.

Operation Guide - EasyMP Network Projection
Page 26
... Searching for Network Projectors Automatically Searching for the projector automatically switches to the LAN source, press the LAN button. Press the LAN button on the remote control. The LAN standby screen is being input.
... Searching for Network Projectors Automatically Searching for the projector automatically switches to the LAN source, press the LAN button. Press the LAN button on the remote control. The LAN standby screen is being input.

Operation Guide - EasyMP Network Projection
Page 29
Note: Make sure you connect a computer to the Start screen and select EasyMP Network Projection Ver.X.XX. • Mac OS X: Double-click EasyMP Network Projection from the Applications folder. 29 The LAN standby screen is projected. 2. Start EasyMP Network Projection. • Windows XP, Windows Vista, and Windows 7: Click Start, select Programs (or All Programs), EPSON Projector, EasyMP Network Projection, and then click EasyMP Network Projection Ver.X.XX. • Windows 8: Navigate to the network. 1. Press the LAN button on the remote control.
Note: Make sure you connect a computer to the Start screen and select EasyMP Network Projection Ver.X.XX. • Mac OS X: Double-click EasyMP Network Projection from the Applications folder. 29 The LAN standby screen is projected. 2. Start EasyMP Network Projection. • Windows XP, Windows Vista, and Windows 7: Click Start, select Programs (or All Programs), EPSON Projector, EasyMP Network Projection, and then click EasyMP Network Projection Ver.X.XX. • Windows 8: Navigate to the network. 1. Press the LAN button on the remote control.
User Manual
Page 3
Front/Top ...16 Projector Parts - Remote Control 22 Setting Up the Projector ...24 Projector Placement...24 Projector Setup and Installation Options 24 Projection Distance...26 Projector Connections...28 Connecting to ...Video Source 33 Connecting to Go for Additional Information 15 Projector Part Locations ...16 Projector Parts - Base...19 Projector Parts - Control Panel ...20 Projector Parts - Rear ...18 Projector Parts - Contents EX3220/EX5220/EX5230/EX6220/EX7220/ VS230/VS330/VS335W User's Guide 9 Introduction to Your Projector ...10 Projector Features...10 Product Box Contents...
Front/Top ...16 Projector Parts - Remote Control 22 Setting Up the Projector ...24 Projector Placement...24 Projector Setup and Installation Options 24 Projection Distance...26 Projector Connections...28 Connecting to ...Video Source 33 Connecting to Go for Additional Information 15 Projector Part Locations ...16 Projector Parts - Base...19 Projector Parts - Control Panel ...20 Projector Parts - Rear ...18 Projector Parts - Contents EX3220/EX5220/EX5230/EX6220/EX7220/ VS230/VS330/VS335W User's Guide 9 Introduction to Your Projector ...10 Projector Features...10 Product Box Contents...
User Manual
Page 4
... USB Source 38 Disconnecting a USB Device or Camera From the Projector 38 Connecting to a Document Camera 38 Installing Batteries in the Remote Control 39 Opening the Lens Cover ...40 Using the Projector on a Network ...42 Wireless Network Projection ...42 Installing the Wireless LAN Module... Menu Settings 52 Setting Up Projector Network E-Mail Alerts 54 Network Projector E-mail Alert Messages 55 Setting Up Monitoring Using SNMP 55 Controlling a Networked Projector Using a Web Browser 56 Using Basic Projector Features ...59 Turning On the Projector ...59 Turning Off the Projector ...
... USB Source 38 Disconnecting a USB Device or Camera From the Projector 38 Connecting to a Document Camera 38 Installing Batteries in the Remote Control 39 Opening the Lens Cover ...40 Using the Projector on a Network ...42 Wireless Network Projection ...42 Installing the Wireless LAN Module... Menu Settings 52 Setting Up Projector Network E-Mail Alerts 54 Network Projector E-mail Alert Messages 55 Setting Up Monitoring Using SNMP 55 Controlling a Networked Projector Using a Web Browser 56 Using Basic Projector Features ...59 Turning On the Projector ...59 Turning Off the Projector ...

User Manual
Page 5
... Resizing the Image...70 Focusing the Image Using the Focus Ring 71 Remote Control Operation ...71 Using the Remote Control as a Wireless Mouse 72 Using the Remote Control as a Pointer 73 Selecting an Image Source ...74 Projection Modes ...76 Changing the Projection Mode Using the Remote Control 76 Changing the Projection Mode Using the Menus 77 Image Aspect...
... Resizing the Image...70 Focusing the Image Using the Focus Ring 71 Remote Control Operation ...71 Using the Remote Control as a Wireless Mouse 72 Using the Remote Control as a Pointer 73 Selecting an Image Source ...74 Projection Modes ...76 Changing the Projection Mode Using the Remote Control 76 Changing the Projection Mode Using the Menus 77 Image Aspect...
User Manual
Page 6
... Air Filter and Vents 118 Replacing the Air Filter...119 Projector Lamp Maintenance...121 Replacing the Lamp ...121 Resetting the Lamp Timer...125 Replacing the Remote Control Batteries 126 Transporting the Projector...128 Solving Problems ...129 Projection Problem Tips ...129 Projector Light Status ...129 Using the Projector Help Displays ...132 Solving Image...
... Air Filter and Vents 118 Replacing the Air Filter...119 Projector Lamp Maintenance...121 Replacing the Lamp ...121 Resetting the Lamp Timer...125 Replacing the Remote Control Batteries 126 Transporting the Projector...128 Solving Problems ...129 Projection Problem Tips ...129 Projector Light Status ...129 Using the Projector Help Displays ...132 Solving Image...
User Manual
Page 7
...139 Solutions to Sound Problems ...140 Solving Projector or Remote Control Operation Problems 140 Solutions to Projector Power or Shut-Off Problems 141 Solutions to Problems with the Remote Control 141 Solutions to Password Problems 142 Solving Network Problems ... 143 Where to Get Help...143 Technical Specifications ...145 General Projector Specifications ...145 Projector Lamp Specifications...148 Remote Control Specifications ...149 Projector Dimension Specifications 149 Projector Electrical Specifications ...149 Projector Environmental Specifications 150 Projector Safety and Approvals...
...139 Solutions to Sound Problems ...140 Solving Projector or Remote Control Operation Problems 140 Solutions to Projector Power or Shut-Off Problems 141 Solutions to Problems with the Remote Control 141 Solutions to Password Problems 142 Solving Network Problems ... 143 Where to Get Help...143 Technical Specifications ...145 General Projector Specifications ...145 Projector Lamp Specifications...148 Remote Control Specifications ...149 Projector Dimension Specifications 149 Projector Electrical Specifications ...149 Projector Environmental Specifications 150 Projector Safety and Approvals...
User Manual
Page 12
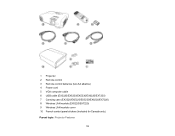
1 Projector 2 Remote control 3 Remote control batteries (two AA alkaline) 4 Power cord 5 VGA computer cable 6 USB cable (EX3220/EX5220/EX5230/EX6220/EX7220) 7 Carrying case (EX3220/EX5220/EX5230/EX6220/EX7220) 8 Wireless LAN module (EX5220/EX7220) 9 Wireless LAN module cover 10 French control panel stickers (included for Canada only) Parent topic: Projector Features 12
1 Projector 2 Remote control 3 Remote control batteries (two AA alkaline) 4 Power cord 5 VGA computer cable 6 USB cable (EX3220/EX5220/EX5230/EX6220/EX7220) 7 Carrying case (EX3220/EX5220/EX5230/EX6220/EX7220) 8 Wireless LAN module (EX5220/EX7220) 9 Wireless LAN module cover 10 French control panel stickers (included for Canada only) Parent topic: Projector Features 12

User Manual
Page 15
... avoid damage to your equipment. • Notes contain important information about your projector in a network environment (Windows only), see "Where to Epson technical support 24 hours a day. • For detailed instructions on using your projector in a network environment, see the EasyMP Network Projection ...webreg. Registering also lets you a replacement unit anywhere in help system Press the Help button on the remote control or projector to Go for details. Instead, Epson will ship you receive special updates on using the projector CD or at this manual and the sources ...
... avoid damage to your equipment. • Notes contain important information about your projector in a network environment (Windows only), see "Where to Epson technical support 24 hours a day. • For detailed instructions on using your projector in a network environment, see the EasyMP Network Projection ...webreg. Registering also lets you a replacement unit anywhere in help system Press the Help button on the remote control or projector to Go for details. Instead, Epson will ship you receive special updates on using the projector CD or at this manual and the sources ...

User Manual
Page 16
Base Projector Parts - Remote Control Parent topic: Introduction to learn about the parts on your projector. Front/Top Note: Your product may look different from the illustrations in this guide, but the instructions are the same. 16 Control Panel Projector Parts - Parent topic: Introduction to Your Projector Related references Where to Get Help Related tasks Using the Projector Help Displays Projector Part Locations Check the projector part illustrations to Your Projector Projector Parts - Rear Projector Parts - Projector Parts - Front/Top Projector Parts -
Base Projector Parts - Remote Control Parent topic: Introduction to learn about the parts on your projector. Front/Top Note: Your product may look different from the illustrations in this guide, but the instructions are the same. 16 Control Panel Projector Parts - Parent topic: Introduction to Your Projector Related references Where to Get Help Related tasks Using the Projector Help Displays Projector Part Locations Check the projector part illustrations to Your Projector Projector Parts - Rear Projector Parts - Projector Parts - Front/Top Projector Parts -
User Manual
Page 24
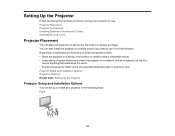
... it on almost any flat surface to set up your projector in the following ways: Front 24 Projector Placement Projector Connections Installing Batteries in the Remote Control Opening the Lens Cover Projector Placement You can set up or install your projector for use it in a fixed location. Setting Up the Projector Follow...
... it on almost any flat surface to set up your projector in the following ways: Front 24 Projector Placement Projector Connections Installing Batteries in the Remote Control Opening the Lens Cover Projector Placement You can set up or install your projector for use it in a fixed location. Setting Up the Projector Follow...
User Manual
Page 31
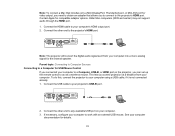
... and earlier) may not support audio through the HDMI port. 1. Parent topic: Connecting to Computer Sources Connecting to a Computer for USB Mouse Control If you control projection at a distance from your computer using a USB cable, if it is not connected already. 1. See your computer to work with an...a Mini DisplayPort, Thunderbolt port, or Mini-DVI port for video output, you need to obtain an adapter that allows you can set up the remote control to act as a wireless mouse. This lets you connected your computer to the projector's HDMI port. Connect the other end to your computer. ...
... and earlier) may not support audio through the HDMI port. 1. Parent topic: Connecting to Computer Sources Connecting to a Computer for USB Mouse Control If you control projection at a distance from your computer using a USB cable, if it is not connected already. 1. See your computer to work with an...a Mini DisplayPort, Thunderbolt port, or Mini-DVI port for video output, you need to obtain an adapter that allows you can set up the remote control to act as a wireless mouse. This lets you connected your computer to the projector's HDMI port. Connect the other end to your computer. ...
User Manual
Page 32
... computer presentation includes sound and you did not connect it to the projector's Audio ports. Parent topic: Connecting to Computer Sources Related tasks Using the Remote Control as a Wireless Mouse Connecting to the projector. Connecting to an HDMI Video Source Connecting to a Component-to-VGA Video Source Connecting to an S-Video Video...
... computer presentation includes sound and you did not connect it to the projector's Audio ports. Parent topic: Connecting to Computer Sources Related tasks Using the Remote Control as a Wireless Mouse Connecting to the projector. Connecting to an HDMI Video Source Connecting to a Component-to-VGA Video Source Connecting to an S-Video Video...
User Manual
Page 38
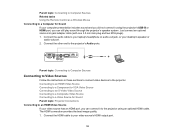
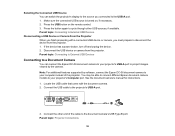
...camera, you finish presenting with the document camera. 2. Press the USB button on , if necessary. 2. You may be able to connect different Epson document camera models to cycle through other end of the projector. Note: For additional features supported by the camera. Connect the other USB sources, if... source you connected to disconnect the device from the projector. Connect the USB cable to project images viewed by software, connect the Epson DC-06 document camera to your projector's Computer port. Make sure the connected USB source is turned on the remote control. 3.
...camera, you finish presenting with the document camera. 2. Press the USB button on , if necessary. 2. You may be able to connect different Epson document camera models to cycle through other end of the projector. Note: For additional features supported by the camera. Connect the other USB sources, if... source you connected to disconnect the device from the projector. Connect the USB cable to project images viewed by software, connect the Epson DC-06 document camera to your projector's Computer port. Make sure the connected USB source is turned on the remote control. 3.

User Manual
Page 39
Insert the batteries with the projector. Caution: Use only the type of different types, or mix new and old batteries. 1. ends facing as shown. 39 Related references Optional Equipment and Replacement Parts Installing Batteries in this manual. Open the battery cover. 2. Do not install batteries of batteries specified in the Remote Control The remote control uses the two AA batteries that came with the + and -
Insert the batteries with the projector. Caution: Use only the type of different types, or mix new and old batteries. 1. ends facing as shown. 39 Related references Optional Equipment and Replacement Parts Installing Batteries in this manual. Open the battery cover. 2. Do not install batteries of batteries specified in the Remote Control The remote control uses the two AA batteries that came with the + and -


