
User Manual
Page 19
11 Wireless LAN module cover screw Parent topic: Projector Part Locations Projector Parts - Base 1 Front adjustable foot 2 Mounting bracket holes 3 Rear adjustable feet 4 Security cable attachment point Parent topic: Projector Part Locations 19
11 Wireless LAN module cover screw Parent topic: Projector Part Locations Projector Parts - Base 1 Front adjustable foot 2 Mounting bracket holes 3 Rear adjustable feet 4 Security cable attachment point Parent topic: Projector Part Locations 19
User Manual
Page 24
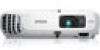
... top of or next to project an image. Projector Placement Projector Connections Installing Batteries in a ceiling mount if you select a projector location: • Place the projector on a sturdy, level surface or install it using a compatible mount. • Leave plenty of space around and under the projector for use it on almost any...
... top of or next to project an image. Projector Placement Projector Connections Installing Batteries in a ceiling mount if you select a projector location: • Place the projector on a sturdy, level surface or install it using a compatible mount. • Leave plenty of space around and under the projector for use it on almost any...
User Manual
Page 36
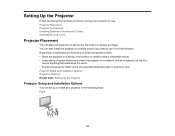
...; Digital camera or smartphone • USB hard drive • Multimedia storage viewer • USB memory card reader Note: Digital cameras or smartphones must be USB-mounted devices, not TWAIN-compliant devices, and must be USB Mass Storage Class-compliant. 36 Parent topic: Connecting to Video Sources Connecting to External USB Devices...
...; Digital camera or smartphone • USB hard drive • Multimedia storage viewer • USB memory card reader Note: Digital cameras or smartphones must be USB-mounted devices, not TWAIN-compliant devices, and must be USB Mass Storage Class-compliant. 36 Parent topic: Connecting to Video Sources Connecting to External USB Devices...

User Manual
Page 76
... to project from the ceiling and behind a translucent screen. • Rear/Ceiling flips the image over top-to-bottom. 1. Hold down from a ceiling or wall mount. • Rear flips the image horizontally to project from behind a translucent screen. 2 Video and HDMI sources 3 USB port sources (computer display and external devices) 4 Network...
... to project from the ceiling and behind a translucent screen. • Rear/Ceiling flips the image over top-to-bottom. 1. Hold down from a ceiling or wall mount. • Rear flips the image horizontally to project from behind a translucent screen. 2 Video and HDMI sources 3 USB port sources (computer display and external devices) 4 Network...
User Manual
Page 119
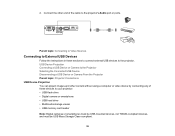
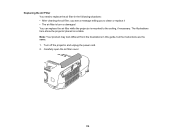
Carefully open the air filter cover. 119 Note: Your product may look different from the illustrations in the following situations: • After cleaning the air filter, you see a message telling you to clean or replace it • The air filter is torn or damaged You can replace the air filter while the projector is mounted to replace the air filter in this guide, but the instructions are the same. 1. Turn off the projector and unplug the power cord. 2. The illustrations here show the projector placed on a table. Replacing the Air Filter You need to the ceiling, if necessary.
Carefully open the air filter cover. 119 Note: Your product may look different from the illustrations in the following situations: • After cleaning the air filter, you see a message telling you to clean or replace it • The air filter is torn or damaged You can replace the air filter while the projector is mounted to replace the air filter in this guide, but the instructions are the same. 1. Turn off the projector and unplug the power cord. 2. The illustrations here show the projector placed on a table. Replacing the Air Filter You need to the ceiling, if necessary.
User Manual
Page 121
... lamp fully cool before replacing it to the ceiling, if necessary. 1. Close the air filter cover. You can replace the lamp while the projector is mounted to avoid injury. Turn off the projector and unplug the power cord. 2. Info Menu Projector Lamp Specifications Replacing the Lamp Before you to cool down...
... lamp fully cool before replacing it to the ceiling, if necessary. 1. Close the air filter cover. You can replace the lamp while the projector is mounted to avoid injury. Turn off the projector and unplug the power cord. 2. Info Menu Projector Lamp Specifications Replacing the Lamp Before you to cool down...
User Manual
Page 147
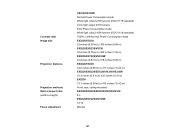
...21118 standard) Color light output 2700 lumens ECO Power Consumption mode: White light output 1890 lumens (ISO 21118 standard) 10000:1 with Normal Power Consumption mode EX3220/VS230: 23 inches (0.58 m) to 350 inches (8.89 m) EX5220/EX5230/VS330: 30 inches (0.76 m) to 300 inches (7.62 m) EX6220/EX7220.../VS335W: 33 inches (0.83 m) to 318 inches (8.08 m) EX3220/VS230: 34.6 inches (0.88 m) to 411 inches (10.44 m) EX5220/EX6220/EX7220/VS330/VS335W: 35.4 inches (0.9 m) to 425 inches (10.8 m) EX5230: 33.1...
...21118 standard) Color light output 2700 lumens ECO Power Consumption mode: White light output 1890 lumens (ISO 21118 standard) 10000:1 with Normal Power Consumption mode EX3220/VS230: 23 inches (0.58 m) to 350 inches (8.89 m) EX5220/EX5230/VS330: 30 inches (0.76 m) to 300 inches (7.62 m) EX6220/EX7220.../VS335W: 33 inches (0.83 m) to 318 inches (8.08 m) EX3220/VS230: 34.6 inches (0.88 m) to 411 inches (10.44 m) EX5220/EX6220/EX7220/VS330/VS335W: 35.4 inches (0.9 m) to 425 inches (10.8 m) EX5230: 33.1...
User Manual
Page 157
... projector so the bright light does not shine into the lens when the projector is provided. 157 If you are setting up and using mounting hardware designed for cleaning. Do not pull the power cord when disconnecting the plug; Avoid standing in cabinet unless proper ventilation is on its...not place the projector where the cord can be sure to hold the plug with this projector. • When installing or adjusting a ceiling or wall mount, do not use liquid or aerosol cleaners, any sprays containing flammable gas, or solvents such as alcohol, paint thinner, or benzine. • Do ...
... projector so the bright light does not shine into the lens when the projector is provided. 157 If you are setting up and using mounting hardware designed for cleaning. Do not pull the power cord when disconnecting the plug; Avoid standing in cabinet unless proper ventilation is on its...not place the projector where the cord can be sure to hold the plug with this projector. • When installing or adjusting a ceiling or wall mount, do not use liquid or aerosol cleaners, any sprays containing flammable gas, or solvents such as alcohol, paint thinner, or benzine. • Do ...
User Manual
Page 159
... not place anything that can damage your eyes or mouth, seek medical advise immediately. • Always lower the volume before turning off , the plug is mounted overhead and the lamp breaks, be extremely hot. Keep the power cord away from hot electrical appliances. • If the lamp breaks, ventilate the room...
... not place anything that can damage your eyes or mouth, seek medical advise immediately. • Always lower the volume before turning off , the plug is mounted overhead and the lamp breaks, be extremely hot. Keep the power cord away from hot electrical appliances. • If the lamp breaks, ventilate the room...

