User Manual
Page 24
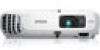
... to use . Projector Placement Projector Connections Installing Batteries in the Remote Control Opening the Lens Cover Projector Placement You can also install the projector in a ceiling mount if you select a projector location: • Place the projector on top of or next to set up or install your projector for ventilation, and do.... • Position the projector within reach of space around and under the projector for use it on a sturdy, level surface or install it using a compatible mount. • Leave plenty of a grounded electrical outlet or extension cord.
... to use . Projector Placement Projector Connections Installing Batteries in the Remote Control Opening the Lens Cover Projector Placement You can also install the projector in a ceiling mount if you select a projector location: • Place the projector on top of or next to set up or install your projector for ventilation, and do.... • Position the projector within reach of space around and under the projector for use it on a sturdy, level surface or install it using a compatible mount. • Leave plenty of a grounded electrical outlet or extension cord.

User Manual
Page 76
...Hold down from a ceiling or wall mount. • Rear flips the image horizontally to project from behind a translucent screen. You can change the projection mode to flip the image over top-to-bottom and horizontally to project from the ceiling and behind a translucent screen. • Rear/Ceiling flips the image over ... so your images project correctly. • Front (default setting) lets you project from a table in front of the screen. • Front/Ceiling flips the image over top-to-bottom to project upside-down the A/V Mute button on the projector and display an image. 2.
...Hold down from a ceiling or wall mount. • Rear flips the image horizontally to project from behind a translucent screen. You can change the projection mode to flip the image over top-to-bottom and horizontally to project from the ceiling and behind a translucent screen. • Rear/Ceiling flips the image over ... so your images project correctly. • Front (default setting) lets you project from a table in front of the screen. • Front/Ceiling flips the image over top-to-bottom to project upside-down the A/V Mute button on the projector and display an image. 2.
User Manual
Page 119
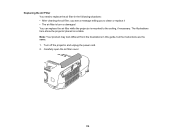
The illustrations here show the projector placed on a table. Turn off the projector and unplug the power cord. 2. Replacing the Air Filter You need to the ceiling, if necessary. Carefully open the air filter cover. 119 Note: Your product may look different from the illustrations in the following situations: • After cleaning the air filter, you see a message telling you to clean or replace it • The air filter is torn or damaged You can replace the air filter while the projector is mounted to replace the air filter in this guide, but the instructions are the same. 1.
The illustrations here show the projector placed on a table. Turn off the projector and unplug the power cord. 2. Replacing the Air Filter You need to the ceiling, if necessary. Carefully open the air filter cover. 119 Note: Your product may look different from the illustrations in the following situations: • After cleaning the air filter, you see a message telling you to clean or replace it • The air filter is torn or damaged You can replace the air filter while the projector is mounted to replace the air filter in this guide, but the instructions are the same. 1.
User Manual
Page 121
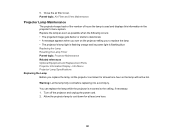
... one hour so the lamp will not be hot. You can replace the lamp while the projector is mounted to avoid injury. Warning: Let the lamp fully cool before replacing it to the ceiling, if necessary. 1. Info Menu Projector Lamp Specifications Replacing the Lamp Before you to cool down for at least...
... one hour so the lamp will not be hot. You can replace the lamp while the projector is mounted to avoid injury. Warning: Let the lamp fully cool before replacing it to the ceiling, if necessary. 1. Info Menu Projector Lamp Specifications Replacing the Lamp Before you to cool down for at least...
User Manual
Page 147
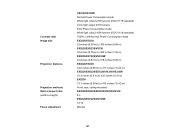
...standard) Color light output 2700 lumens ECO Power Consumption mode: White light output 1890 lumens (ISO 21118 standard) 10000:1 with Normal Power Consumption mode EX3220/VS230: 23 inches (0.58 m) to 350 inches (8.89 m) EX5220/EX5230/VS330: 30 inches (0.76 m) to 300 inches (7.62 m) EX6220/...(0.83 m) to 318 inches (8.08 m) EX3220/VS230: 34.6 inches (0.88 m) to 411 inches (10.44 m) EX5220/EX6220/EX7220/VS330/VS335W: 35.4 inches (0.9 m) to 425 inches (10.8 m) EX5230: 33.1 inches (0.84 m) to 410 inches (10.42 m) Front, rear, ceiling-mounted EX3220/EX5220/EX5230/VS230/VS330: 4:3 EX6220/EX7220/VS335W...
...standard) Color light output 2700 lumens ECO Power Consumption mode: White light output 1890 lumens (ISO 21118 standard) 10000:1 with Normal Power Consumption mode EX3220/VS230: 23 inches (0.58 m) to 350 inches (8.89 m) EX5220/EX5230/VS330: 30 inches (0.76 m) to 300 inches (7.62 m) EX6220/...(0.83 m) to 318 inches (8.08 m) EX3220/VS230: 34.6 inches (0.88 m) to 411 inches (10.44 m) EX5220/EX6220/EX7220/VS330/VS335W: 35.4 inches (0.9 m) to 425 inches (10.8 m) EX5230: 33.1 inches (0.84 m) to 410 inches (10.42 m) Front, rear, ceiling-mounted EX3220/EX5220/EX5230/VS230/VS330: 4:3 EX6220/EX7220/VS335W...
User Manual
Page 157
... operate the projector on a sofa, rug, or other soft surface, or set it on its side, or while tilted to prevent the screws from its ceiling mount. Do not tilt the projector more than 30° forward or back. • If the projector is... mounted on . Do not cover the projector with this projector. • When installing or adjusting a ceiling or wall mount, do not use adhesives to one side. Use of space between the wall and the air exhaust vent...
... operate the projector on a sofa, rug, or other soft surface, or set it on its side, or while tilted to prevent the screws from its ceiling mount. Do not tilt the projector more than 30° forward or back. • If the projector is... mounted on . Do not cover the projector with this projector. • When installing or adjusting a ceiling or wall mount, do not use adhesives to one side. Use of space between the wall and the air exhaust vent...


