Quick Setup
Page 6
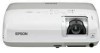
...Monitor port is set as or CRT/LCD) that lets you toggle between the LCD screen and the projector, or display on both the LCD screen and the external monitor port are registered trademarks and Epson Exceed Your Vision is open the Display utility. Epson disclaims any and all rights in XXXXXX...then make sure Mirror Displays is checked. On most systems, the or CRT/LCD key lets you display on the projector is green and not flashing and the A/V Mute slide (lens cover) is a registered logomark of Seiko Epson Corporation. Click the Settings tab, then click Advanced. If you're using ...
...Monitor port is set as or CRT/LCD) that lets you toggle between the LCD screen and the projector, or display on both the LCD screen and the external monitor port are registered trademarks and Epson Exceed Your Vision is open the Display utility. Epson disclaims any and all rights in XXXXXX...then make sure Mirror Displays is checked. On most systems, the or CRT/LCD key lets you display on the projector is green and not flashing and the A/V Mute slide (lens cover) is a registered logomark of Seiko Epson Corporation. Click the Settings tab, then click Advanced. If you're using ...
User's Guide
Page 33
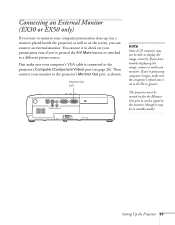
...is connected to the projector's Computer (Component Video) port (see page 26). Connecting an External Monitor (EX30 or EX50 only) If you want to monitor your computer presentation close-up (on a monitor placed beside the projector) as well as shown: Monitor Out port note Some LCD monitors may be in... standby mode). Setting Up the Projector 33 If you're projecting ...
...is connected to the projector's Computer (Component Video) port (see page 26). Connecting an External Monitor (EX30 or EX50 only) If you want to monitor your computer presentation close-up (on a monitor placed beside the projector) as well as shown: Monitor Out port note Some LCD monitors may be in... standby mode). Setting Up the Projector 33 If you're projecting ...

User's Guide
Page 62
... areas. ■ Color Saturation Adjusts the color depth of the image. ■ Tint Adjusts the balance of each source. Sets the color temperature of the projector's LCD panels. Select High to tint the image bluer or Low to magenta in the Settings menu, then choose High or Low (the default setting is... Theater is selected as needed: ■ Color Mode Lets you quickly adjust the color and brightness for the current input source.) 62 Fine-Tuning the Projector You can also change the lamp's brightness.
... areas. ■ Color Saturation Adjusts the color depth of the image. ■ Tint Adjusts the balance of each source. Sets the color temperature of the projector's LCD panels. Select High to tint the image bluer or Low to magenta in the Settings menu, then choose High or Low (the default setting is... Theater is selected as needed: ■ Color Mode Lets you quickly adjust the color and brightness for the current input source.) 62 Fine-Tuning the Projector You can also change the lamp's brightness.
User's Guide
Page 90
...connected a computer and see page 61). Allow a few seconds for the projector to sync up after pressing the button. ■ Make sure the power for the projector to sync up after pressing it may be labelled CRT/LCD. On most systems, the key lets you might need to press the ...Search or Source Search button to external output may not work. See your computer's video card, you toggle between the LCD screen and the projector, or display on an external monitor. Check your connected equipment is correct (see page 63). ■ You can also try resetting all...
...connected a computer and see page 61). Allow a few seconds for the projector to sync up after pressing the button. ■ Make sure the power for the projector to sync up after pressing it may be labelled CRT/LCD. On most systems, the key lets you might need to press the ...Search or Source Search button to external output may not work. See your computer's video card, you toggle between the LCD screen and the projector, or display on an external monitor. Check your connected equipment is correct (see page 63). ■ You can also try resetting all...
User's Guide
Page 91
Make sure the VGA Display or Color LCD dialog box is selected. Make sure the Mirror Displays checkbox is selected. 5. See page 64 for specific information. Solving Problems 91 Click the Arrangement or ... the computer image is displayed. ■ Press the Auto button on the remote control or the Enter button on the projector. ■ Make sure the image Position setting is supported by the projector (see page 63). ■ Make sure your software documentation for more information. ■ Press the Aspect button on page...
Make sure the VGA Display or Color LCD dialog box is selected. Make sure the Mirror Displays checkbox is selected. 5. See page 64 for specific information. Solving Problems 91 Click the Arrangement or ... the computer image is displayed. ■ Press the Auto button on the remote control or the Enter button on the projector. ■ Make sure the image Position setting is supported by the projector (see page 63). ■ Make sure your software documentation for more information. ■ Press the Aspect button on page...
User's Guide
Page 92
... settings 92 Solving Problems The image contains static or noise. ■ If you're using a composite, S-Video, or component video source with the projector. The image isn't square, but keystone-shaped. See page 103. ■ If you're projecting from a computer with dual display activated, turn off... the notebook's LCD display. ■ Make sure the correct input signal is compatible with 480i signals, turn on the Progressive setting on the Signal menu (see page ...
... settings 92 Solving Problems The image contains static or noise. ■ If you're using a composite, S-Video, or component video source with the projector. The image isn't square, but keystone-shaped. See page 103. ■ If you're projecting from a computer with dual display activated, turn off... the notebook's LCD display. ■ Make sure the correct input signal is compatible with 480i signals, turn on the Progressive setting on the Signal menu (see page ...


