
User Manual
Page 3
...Parts - Remote Control 25 Setting Up the Projector ...27 Projector Placement...27 Projector Setup and Installation Options 27 Projection Distance...29 Installing the Projector Feet...33 Removing and Attaching the Cable Cover 33 Projector Connections...34 Connecting to Computer... Projector Parts - Front/Top ...18 Projector Parts - Side...19 Projector Parts - Interactive Pens 24 Projector Parts - Contents BrightLink 475Wi/480i/485Wi User's Guide 11 Introduction to Your Projector ...12 Projector Features...12 Product Box Contents...13 Additional Components ...15 Optional Equipment ...
...Parts - Remote Control 25 Setting Up the Projector ...27 Projector Placement...27 Projector Setup and Installation Options 27 Projection Distance...29 Installing the Projector Feet...33 Removing and Attaching the Cable Cover 33 Projector Connections...34 Connecting to Computer... Projector Parts - Front/Top ...18 Projector Parts - Side...19 Projector Parts - Interactive Pens 24 Projector Parts - Contents BrightLink 475Wi/480i/485Wi User's Guide 11 Introduction to Your Projector ...12 Projector Features...12 Product Box Contents...13 Additional Components ...15 Optional Equipment ...

User Manual
Page 4
... USB Source 46 Disconnecting a USB Device or Camera From the Projector 46 Connecting to a Document Camera 47 Installing Batteries in the Remote Control 47 Installing Batteries in the Pens ...49 Using the Projector on a Network ...51 Wired Network Projection...51 Connecting to ...a Wired Network ...52 Selecting Wired Network Settings 52 Wireless Network Projection ...55 Installing the Wireless LAN Module 56 Using Quick Wireless Connection (Windows Only 57 Selecting Wireless Network Settings Manually 58 Wireless LAN Menu Settings...
... USB Source 46 Disconnecting a USB Device or Camera From the Projector 46 Connecting to a Document Camera 47 Installing Batteries in the Remote Control 47 Installing Batteries in the Pens ...49 Using the Projector on a Network ...51 Wired Network Projection...51 Connecting to ...a Wired Network ...52 Selecting Wired Network Settings 52 Wireless Network Projection ...55 Installing the Wireless LAN Module 56 Using Quick Wireless Connection (Windows Only 57 Selecting Wireless Network Settings Manually 58 Wireless LAN Menu Settings...

User Manual
Page 6
...the Projector 104 Saving a User's Logo Image to Display 106 Locking the Projector's Buttons 107 Unlocking the Projector's Buttons 108 Installing a Security Cable ...108 Creating a User Pattern to Display 109 Using the Interactive Pens...110 Using the Pens ...110 Calibrating ...Automatically ...112 Calibrating Manually ...114 Using BrightLink With a Computer 117 Adjusting the Pen Operation Area 118 Easy Interactive Tools ...120 Easy Interactive Tools System Requirements 120 Installing Easy Interactive Tools 121 Starting and Exiting Easy Interactive Tools...
...the Projector 104 Saving a User's Logo Image to Display 106 Locking the Projector's Buttons 107 Unlocking the Projector's Buttons 108 Installing a Security Cable ...108 Creating a User Pattern to Display 109 Using the Interactive Pens...110 Using the Pens ...110 Calibrating ...Automatically ...112 Calibrating Manually ...114 Using BrightLink With a Computer 117 Adjusting the Pen Operation Area 118 Easy Interactive Tools ...120 Easy Interactive Tools System Requirements 120 Installing Easy Interactive Tools 121 Starting and Exiting Easy Interactive Tools...
User Manual
Page 12
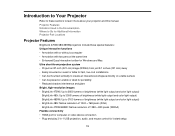
...(221-cm) image (WXGA) from just 9.1 inches (231 mm) away • Easily mounted on a wall or table for fast, low-cost installations • Can be mounted vertically to create an interactive workspace directly on a table surface • Can be placed on a table or desk for ...shadow interference and glare Bright, high-resolution images • BrightLink 475Wi: Up to 2600 lumens of brightness (white light output and color light output) BrightLink 480i: Up to 3000 lumens of brightness (white light output and color light output) BrightLink 485Wi: Up to learn more about your projector and this ...
...(221-cm) image (WXGA) from just 9.1 inches (231 mm) away • Easily mounted on a wall or table for fast, low-cost installations • Can be mounted vertically to create an interactive workspace directly on a table surface • Can be placed on a table or desk for ...shadow interference and glare Bright, high-resolution images • BrightLink 475Wi: Up to 2600 lumens of brightness (white light output and color light output) BrightLink 480i: Up to 3000 lumens of brightness (white light output and color light output) BrightLink 485Wi: Up to learn more about your projector and this ...

User Manual
Page 20
1 Filter cover switch 2 Security cable installation slot 3 Wireless LAN light 4 Interactive pen receiver 5 Obstacle sensor 6 Remote receiver 7 Projection window 8 Security lock port 9 Air filter cover 10 Air intake vent (air filter) 11 Focus lever Parent topic: Projector Part Locations Projector Parts - Interface Panel 1 Optional wireless LAN unit slot 2 Audio1 port 3 Audio2 port 4 Computer1 port 20
1 Filter cover switch 2 Security cable installation slot 3 Wireless LAN light 4 Interactive pen receiver 5 Obstacle sensor 6 Remote receiver 7 Projection window 8 Security lock port 9 Air filter cover 10 Air intake vent (air filter) 11 Focus lever Parent topic: Projector Part Locations Projector Parts - Interface Panel 1 Optional wireless LAN unit slot 2 Audio1 port 3 Audio2 port 4 Computer1 port 20

User Manual
Page 27
... could block the vents. • Position the projector within reach of a grounded electrical outlet or extension cord. • If the projector is designed to be installed on a wall or vertically on a flat surface such as you select a projector location: • Follow the instructions in the... projector using the included mounting equipment. • Leave plenty of space around and under the projector for use. You can set up or install your projector for ventilation, and do not place it on the wall or ceiling 27 Keep these sections to set up your projector to view ...
... could block the vents. • Position the projector within reach of a grounded electrical outlet or extension cord. • If the projector is designed to be installed on a wall or vertically on a flat surface such as you select a projector location: • Follow the instructions in the... projector using the included mounting equipment. • Leave plenty of space around and under the projector for use. You can set up or install your projector for ventilation, and do not place it on the wall or ceiling 27 Keep these sections to set up your projector to view ...

User Manual
Page 29
... from the screen determines the approximate size of the image. Parent topic: Projector Placement Projection Distance The distance at www.epson.com/support (U.S.) or www.epson.ca/support (Canada). The image size increases the farther the projector is from the screen, but can also use the...from top of the projected image. (Conversion figures may have been rounded up or down.) For more detailed information and installation instructions, see the Installation Guide. BrightLink 480i 4:3 Aspect Ratio Diagonal image size 56 inches 60 inches 70 inches 77 inches 80 inches 90 inches 93 inches...
... from the screen determines the approximate size of the image. Parent topic: Projector Placement Projection Distance The distance at www.epson.com/support (U.S.) or www.epson.ca/support (Canada). The image size increases the farther the projector is from the screen, but can also use the...from top of the projected image. (Conversion figures may have been rounded up or down.) For more detailed information and installation instructions, see the Installation Guide. BrightLink 480i 4:3 Aspect Ratio Diagonal image size 56 inches 60 inches 70 inches 77 inches 80 inches 90 inches 93 inches...

User Manual
Page 33
...: Setting Up the Projector Removing and Attaching the Cable Cover Before you can then use the projector on a table or cart, you need to install the feet. Installing the Projector Feet To use the feet to adjust the image position. 1. You can connect equipment to your projector, you first need to remove...
...: Setting Up the Projector Removing and Attaching the Cable Cover Before you can then use the projector on a table or cart, you need to install the feet. Installing the Projector Feet To use the feet to adjust the image position. 1. You can connect equipment to your projector, you first need to remove...

User Manual
Page 36
...cable to any on your computer. 4. Turn on -screen instructions to install the EPSON USB Display software. • Mac OS X: The USB Display setup folder appears on your computer. 2. Select USB Display Installer and follow the on your screen. The projector displays the image from your...7/Windows Vista: Select Run EMP_UDSE.exe in the dialog box that appears to install the EPSON USB Display software. • Windows XP: Wait as messages appear on your computer screen and the projector installs the EPSON USB Display software on your computer. • Windows 2000: Select Computer, EPSON_PJ_UD...
...cable to any on your computer. 4. Turn on -screen instructions to install the EPSON USB Display software. • Mac OS X: The USB Display setup folder appears on your computer. 2. Select USB Display Installer and follow the on your screen. The projector displays the image from your...7/Windows Vista: Select Run EMP_UDSE.exe in the dialog box that appears to install the EPSON USB Display software. • Windows XP: Wait as messages appear on your computer screen and the projector installs the EPSON USB Display software on your computer. • Windows 2000: Select Computer, EPSON_PJ_UD...

User Manual
Page 47
... came with the projector. Parent topic: Projector Connections Related references Optional Equipment and Replacement Parts Installing Batteries in this manual. You may be able to connect different EPSON document camera models to your projector's USB-A port to project images viewed by software, connect... the type of the projector. See the document camera's manual for instructions. 1. Connecting to a Document Camera You can connect the EPSON DC-06 document camera to your projector's Computer port. Note: For additional features supported by the camera. Connect the USB cable to...
... came with the projector. Parent topic: Projector Connections Related references Optional Equipment and Replacement Parts Installing Batteries in this manual. You may be able to connect different EPSON document camera models to your projector's USB-A port to project images viewed by software, connect... the type of the projector. See the document camera's manual for instructions. 1. Connecting to a Document Camera You can connect the EPSON DC-06 document camera to your projector's Computer port. Note: For additional features supported by the camera. Connect the USB cable to...

User Manual
Page 49
Keep batteries out of the reach of used batteries according to heat or flame. Parent topic: Setting Up the Projector Installing Batteries in the Pens Each pen uses one AA battery. 1. Open the battery cover as shown. 49 Do not expose batteries to local regulations. they are choking hazards and are very dangerous if swallowed. 3. Warning: Dispose of children; Close the battery cover and press it down until it clicks into place.
Keep batteries out of the reach of used batteries according to heat or flame. Parent topic: Setting Up the Projector Installing Batteries in the Pens Each pen uses one AA battery. 1. Open the battery cover as shown. 49 Do not expose batteries to local regulations. they are choking hazards and are very dangerous if swallowed. 3. Warning: Dispose of children; Close the battery cover and press it down until it clicks into place.

User Manual
Page 51
... up, control, and monitor network projection: • EasyMP Network Projection software sets up the projector as described here, install the network software from the Epson Projector Software CD-ROM on your projector is connected via a LAN cable to a network that includes a wireless access ...projector and computer for use the interactive pens with your projector through a wired network. See the EasyMP Network Projection Operation Guide installed from the Epson web site. Connecting to a Wired Network Selecting Wired Network Settings Parent topic: Using the Projector on a Network 51 Using ...
... up, control, and monitor network projection: • EasyMP Network Projection software sets up the projector as described here, install the network software from the Epson Projector Software CD-ROM on your projector is connected via a LAN cable to a network that includes a wireless access ...projector and computer for use the interactive pens with your projector through a wired network. See the EasyMP Network Projection Operation Guide installed from the Epson web site. Connecting to a Wired Network Selecting Wired Network Settings Parent topic: Using the Projector on a Network 51 Using ...
User Manual
Page 55
... a wireless access point, you must install the optional EPSON 802.11b/g/n wireless LAN module, and then set up, control, and monitor wireless projection: • EasyMP Network Projection software sets up your wireless network: • Using the optional EPSON Quick Wireless Connection USB key (Windows only... Monitor software (Windows only) lets you are two ways to connect the projector to set up the projector, install the network software from the Epson web site. Parent topic: Wired Network Projection Wireless Network Projection You can use the interactive pens with your projected...
... a wireless access point, you must install the optional EPSON 802.11b/g/n wireless LAN module, and then set up, control, and monitor wireless projection: • EasyMP Network Projection software sets up your wireless network: • Using the optional EPSON Quick Wireless Connection USB key (Windows only... Monitor software (Windows only) lets you are two ways to connect the projector to set up the projector, install the network software from the Epson web site. Parent topic: Wired Network Projection Wireless Network Projection You can use the interactive pens with your projected...

User Manual
Page 56
... other type of wireless module. Parent topic: Using the Projector on a Network Related references Optional Equipment and Replacement Parts Installing the Wireless LAN Module To use the projector over a wireless network, install the EPSON 802.11b/g/n wireless module in the projector. Caution: Never remove the module while its indicator light is attached (screwdriver...
... other type of wireless module. Parent topic: Using the Projector on a Network Related references Optional Equipment and Replacement Parts Installing the Wireless LAN Module To use the projector over a wireless network, install the EPSON 802.11b/g/n wireless module in the projector. Caution: Never remove the module while its indicator light is attached (screwdriver...

User Manual
Page 58
... wireless LAN connection. You see the AutoPlay window, select Run LaunchU3.exe, then select Allow on the next screen. 5. Now connect the USB key to install the Quick Wireless Connection driver. After a few minutes, your computer or notebook. Follow the on-screen instructions to a USB port on your computer image is...
... wireless LAN connection. You see the AutoPlay window, select Run LaunchU3.exe, then select Allow on the next screen. 5. Now connect the USB key to install the Quick Wireless Connection driver. After a few minutes, your computer or notebook. Follow the on-screen instructions to a USB port on your computer image is...

User Manual
Page 66
... with a networked projector, and you selected to receive e-mail alerts, you receive an e-mail containing the following information: • EPSON Projector on the subject line • The name of the projector experiencing a problem • The IP address of the affected projector...causes a projector to three addresses. Parent topic: Setting Up Projector Network E-Mail Alerts Setting Up Monitoring Using SNMP Network administrators can install SNMP (Simple Network Management Protocol) software on -screen instructions to shut down , you finish selecting settings, select Complete and follow ...
... with a networked projector, and you selected to receive e-mail alerts, you receive an e-mail containing the following information: • EPSON Projector on the subject line • The name of the projector experiencing a problem • The IP address of the affected projector...causes a projector to three addresses. Parent topic: Setting Up Projector Network E-Mail Alerts Setting Up Monitoring Using SNMP Network administrators can install SNMP (Simple Network Management Protocol) software on -screen instructions to shut down , you finish selecting settings, select Complete and follow ...

User Manual
Page 76
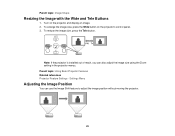
..., extend the front foot by rotating them. 3. To raise the image, extend the rear feet by rotating it. 76 Make sure the feet have been installed. Adjusting the Image Height If you are projecting from a table or other flat surface, and the image is not tilted an an angle of more...
..., extend the front foot by rotating them. 3. To raise the image, extend the rear feet by rotating it. 76 Make sure the feet have been installed. Adjusting the Image Height If you are projecting from a table or other flat surface, and the image is not tilted an an angle of more...

User Manual
Page 79
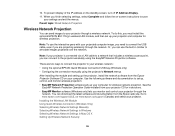
After correction, your image is installed out of reach, you can also correct the image shape using the Keystone settings in the projector menus. Parent topic: Image Shape 79 3. Note: If the projector is slightly smaller. Note: The horizontal keystone adjustment buttons are labeled Wide and Tele. Press a keystone button on the projector's control panel to adjust the image shape.
After correction, your image is installed out of reach, you can also correct the image shape using the Keystone settings in the projector menus. Parent topic: Image Shape 79 3. Note: If the projector is slightly smaller. Note: The horizontal keystone adjustment buttons are labeled Wide and Tele. Press a keystone button on the projector's control panel to adjust the image shape.
User Manual
Page 82
Note: If the projector is installed out of reach, you can use the Image Shift feature to adjust the image position without moving the projector. 82 Parent topic: Using Basic Projector ...
Note: If the projector is installed out of reach, you can use the Image Shift feature to adjust the image position without moving the projector. 82 Parent topic: Using Basic Projector ...

User Manual
Page 102
... image size, press Esc. button as necessary. • To return to Display Parent topic: Projector Security Features 102 Password Security Types Locking the Projector's Buttons Installing a Security Cable Parent topic: Adjusting Projector Features Password Security Types You can display when it turns on the control panel. • Security cabling to block...
... image size, press Esc. button as necessary. • To return to Display Parent topic: Projector Security Features 102 Password Security Types Locking the Projector's Buttons Installing a Security Cable Parent topic: Adjusting Projector Features Password Security Types You can display when it turns on the control panel. • Security cabling to block...


