User Manual
Page 12
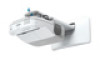
...image (WXGA) from just 9.1 inches (231 mm) away • Easily mounted on a wall or table for fast, low-cost installations • Can be mounted vertically to create an interactive workspace directly on a table surface • ...Projector Part Locations Projector Features BrightLink 475Wi/480i/485Wiprojectors include these sections to 3100 lumens of brightness (white light output and color light output) • BrightLink 480i: Native resolution of 1024 × 768 pixels (XGA) BrightLink 475Wi/485Wi: Native resolution of brightness (white light output and color light output) BrightLink 485Wi...
...image (WXGA) from just 9.1 inches (231 mm) away • Easily mounted on a wall or table for fast, low-cost installations • Can be mounted vertically to create an interactive workspace directly on a table surface • ...Projector Part Locations Projector Features BrightLink 475Wi/480i/485Wiprojectors include these sections to 3100 lumens of brightness (white light output and color light output) • BrightLink 480i: Native resolution of 1024 × 768 pixels (XGA) BrightLink 475Wi/485Wi: Native resolution of brightness (white light output and color light output) BrightLink 485Wi...
User Manual
Page 16
... set of 6 pen tips (ELPPS01) USB extension cable EPSON DC-11 document camera (ELPDC11) EPSON DC-06 document camera (ELPDC06) PowerLite Pilot (ELPCB01) Wireless Pendant Microphone (ELPMC02) Active speakers (ELPSP02) On Wall Cable Management Kit Kensington security lock 90-inch whiteboard 96-...height-adjustable cart Side laptop and keyboard tray for height-adjustable cart 16:10 Height-adjustable wall mount for ultra-short throw projectors Part number V13H134A40 V12H418P12 V12H005M08 V12H522001/V12H523001 V12H524001 V12H525001 V12H377020 V12H321005 V12H443020 V12H4430M2 V12H467020 ELPCK01 ELPSL01...
... set of 6 pen tips (ELPPS01) USB extension cable EPSON DC-11 document camera (ELPDC11) EPSON DC-06 document camera (ELPDC06) PowerLite Pilot (ELPCB01) Wireless Pendant Microphone (ELPMC02) Active speakers (ELPSP02) On Wall Cable Management Kit Kensington security lock 90-inch whiteboard 96-...height-adjustable cart Side laptop and keyboard tray for height-adjustable cart 16:10 Height-adjustable wall mount for ultra-short throw projectors Part number V13H134A40 V12H418P12 V12H005M08 V12H522001/V12H523001 V12H524001 V12H525001 V12H377020 V12H321005 V12H443020 V12H4430M2 V12H467020 ELPCK01 ELPSL01...

User Manual
Page 17
... See the Extra Care Road Service brochure for help on new accessories, products, and services. In addition, Epson offers free Extra Care Road Service. Option or part 4:3 Height-adjustable wall mount for ultra-short throw projectors 1-Year Extended Depot Repair Service Plan 1-Year Extended Exchange Warranty 2-Year Extended Depot Repair Service Plan Part number...
... See the Extra Care Road Service brochure for help on new accessories, products, and services. In addition, Epson offers free Extra Care Road Service. Option or part 4:3 Height-adjustable wall mount for ultra-short throw projectors 1-Year Extended Depot Repair Service Plan 1-Year Extended Exchange Warranty 2-Year Extended Depot Repair Service Plan Part number...
User Manual
Page 22
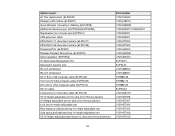
Base 1 Ceiling mount holes (3) 2 Security cable attachment point 3 Rear foot attachment holes (2) 4 Wall mount plate holes (5) 5 Front foot attachment hole Parent topic: Projector Part Locations 22 Projector Parts -
Base 1 Ceiling mount holes (3) 2 Security cable attachment point 3 Rear foot attachment holes (2) 4 Wall mount plate holes (5) 5 Front foot attachment hole Parent topic: Projector Part Locations 22 Projector Parts -

User Manual
Page 27
... to be installed on a wall or vertically on the wall or ceiling 27 You can set up or install your projector for use. Setting Up the Projector Follow the instructions in these considerations in mind as a desk or table to project in the Installation Guide to install the projector using the included mounting equipment. • Leave...
... to be installed on a wall or vertically on the wall or ceiling 27 You can set up or install your projector for use. Setting Up the Projector Follow the instructions in these considerations in mind as a desk or table to project in the Installation Guide to install the projector using the included mounting equipment. • Leave...

User Manual
Page 212
...not hold the plug when disconnecting it. Do not use the projector near the projection window. They provide ventilation and prevent the projector from the wall outlet before cleaning. Do not insert the plug into the lens when the projector is mounted on . Use a dry cloth (or, for stubborn dirt or...when setting up the projector near a wall, leave at least 7.9 inches (20 cm) of the power available, consult your hand or any object near water or sources of heat. • Use the type of this projector. • When installing or adjusting a ceiling or wall mount, do not use adhesives...
...not hold the plug when disconnecting it. Do not use the projector near the projection window. They provide ventilation and prevent the projector from the wall outlet before cleaning. Do not insert the plug into the lens when the projector is mounted on . Use a dry cloth (or, for stubborn dirt or...when setting up the projector near a wall, leave at least 7.9 inches (20 cm) of the power available, consult your hand or any object near water or sources of heat. • Use the type of this projector. • When installing or adjusting a ceiling or wall mount, do not use adhesives...

Installation Guide
Page 2
...damage. This symbol indicates related or useful information. If the wall mount falls, it could also cause the wall mount or projector to a wall. Incomplete or incorrect installation could cause damage to loosen any ...wall mount. Handle the power cord carefully. Install the wall mount so that is designed specifically for your safety, read all the instructions in this guide before using the wall mount. Epson accepts no responsibility for future reference. Vibration or shock could cause the wall mount to vibration or shock. Make sure you need to the projector or mounting...
...damage. This symbol indicates related or useful information. If the wall mount falls, it could also cause the wall mount or projector to a wall. Incomplete or incorrect installation could cause damage to loosen any ...wall mount. Handle the power cord carefully. Install the wall mount so that is designed specifically for your safety, read all the instructions in this guide before using the wall mount. Epson accepts no responsibility for future reference. Vibration or shock could cause the wall mount to vibration or shock. Make sure you need to the projector or mounting...

Installation Guide
Page 3
... EPSON wall mount. 3 This wall mount should be exceeded. Never modify the wall mount. If you find any loose screws, tighten them firmly. Install the wall mount in a location where the operating temperature for the installation location. • Install the projector away...projector and the wall mount before installation. Location • Before installing the projector, verify the power supply wiring for your projector model may damage the projector. About This Installation Guide This guide describes how to mount the ultra-short-throw projectors BrightLink 475Wi/480i/485Wi...
... EPSON wall mount. 3 This wall mount should be exceeded. Never modify the wall mount. If you find any loose screws, tighten them firmly. Install the wall mount in a location where the operating temperature for the installation location. • Install the projector away...projector and the wall mount before installation. Location • Before installing the projector, verify the power supply wiring for your projector model may damage the projector. About This Installation Guide This guide describes how to mount the ultra-short-throw projectors BrightLink 475Wi/480i/485Wi...

Installation Guide
Page 4
... the horizontal roll 6. Adjust the forward/backward slide 10. Installation worksheet for projecting on a pre-installed wall-mounted board 2. Installation worksheet for projecting on a plain wall 3. Installation measurements in millimeters s9 5 Installing the Projector 1. Install the wall plate on the projector 2. Adjust the vertical slide position of the test pattern s 34 7 Attaching the Covers 1. Turn on...
... the horizontal roll 6. Adjust the forward/backward slide 10. Installation worksheet for projecting on a pre-installed wall-mounted board 2. Installation worksheet for projecting on a plain wall 3. Installation measurements in millimeters s9 5 Installing the Projector 1. Install the wall plate on the projector 2. Adjust the vertical slide position of the test pattern s 34 7 Attaching the Covers 1. Turn on...

Installation Guide
Page 5
... washer M6 x 20 mm hexagon shoulder bolt with washer/ spring washer Quantity 6 4 4 2 1 Application For wall plate assembly For 3-axis adjustment unit/wall mount installation For slide plate/projector installation For slide plate/3-axis adjustment unit installation (secured when shipped) For wall mount/wall plate installation (secured when shipped) M6 x 20 mm cross recessed head shoulder screw 3 with...
... washer M6 x 20 mm hexagon shoulder bolt with washer/ spring washer Quantity 6 4 4 2 1 Application For wall plate assembly For 3-axis adjustment unit/wall mount installation For slide plate/projector installation For slide plate/3-axis adjustment unit installation (secured when shipped) For wall mount/wall plate installation (secured when shipped) M6 x 20 mm cross recessed head shoulder screw 3 with...

Installation Guide
Page 6
... is in . (62 mm) - Refer to the illustration below Refer to the illustration below s 36 s 37 s 37 Refer to the illustration below Wall plate The wall plate is attached to the wall mount arm. Horizontal roll adjustment range ± 3° Horizontal rotation adjustment ± 3° range Vertical tilt adjustment range ± 3° Horizontal slide... range 1.5 in. (38 mm) 1.5 in. (38 mm) 6 1.3 in. (33 mm) Use the included M4 x 12 mm bolts (x6) to attach the separate pieces together before mounting the projector.
... is in . (62 mm) - Refer to the illustration below Refer to the illustration below s 36 s 37 s 37 Refer to the illustration below Wall plate The wall plate is attached to the wall mount arm. Horizontal roll adjustment range ± 3° Horizontal rotation adjustment ± 3° range Vertical tilt adjustment range ± 3° Horizontal slide... range 1.5 in. (38 mm) 1.5 in. (38 mm) 6 1.3 in. (33 mm) Use the included M4 x 12 mm bolts (x6) to attach the separate pieces together before mounting the projector.

Installation Guide
Page 8
...for Easy Interactive Function on the projector CD or at the location where the wall mount is to the projector. Make sure you also have the power cord, computer cable, and other parts at epson.com/ support/brightlinkdownloads (U.S.) or epson.ca/support/brightlinkdownloads (Canada). Connection...EPSON DC-06) Computer USB cable (for devices, such as a document camera or microphone, that you do not need a USB cable. For details, refer to the User's Guide on BrightLink models only) Dedicated USB cable (supplied with document camera) For Interactive Use (BrightLink 475Wi/480i/485Wi...
...for Easy Interactive Function on the projector CD or at the location where the wall mount is to the projector. Make sure you also have the power cord, computer cable, and other parts at epson.com/ support/brightlinkdownloads (U.S.) or epson.ca/support/brightlinkdownloads (Canada). Connection...EPSON DC-06) Computer USB cable (for devices, such as a document camera or microphone, that you do not need a USB cable. For details, refer to the User's Guide on BrightLink models only) Dedicated USB cable (supplied with document camera) For Interactive Use (BrightLink 475Wi/480i/485Wi...

Installation Guide
Page 9
... (d) 6. Installation worksheet for an XGA image. English 4 Positioning the Projector BrightLink 475Wi/485Wi and PowerLite 475W/485W can project up to 93 inches diagonally for an XGA image. The height of image area (f) 9 Measure the distance from floor to bottom of the included wall mount determines the maximum image size and how high the image...
... (d) 6. Installation worksheet for an XGA image. English 4 Positioning the Projector BrightLink 475Wi/485Wi and PowerLite 475W/485W can project up to 93 inches diagonally for an XGA image. The height of image area (f) 9 Measure the distance from floor to bottom of the included wall mount determines the maximum image size and how high the image...

Installation Guide
Page 13
... images may decrease. Base position Stamp on plate Notch on mount arm The measurements may differ depending on the wall plate. When projecting in Tele, the quality of the projected images may decrease. 13 When using BrightLink 475Wi/485Wi or PowerLite 475W/485W to project images at a 4:3 aspect... ratio, the images are resized automatically and the quality of the stamp on the location where you place the projector. Match the notch on the wall mount to the base position, as ...
... images may decrease. Base position Stamp on plate Notch on mount arm The measurements may differ depending on the wall plate. When projecting in Tele, the quality of the projected images may decrease. 13 When using BrightLink 475Wi/485Wi or PowerLite 475W/485W to project images at a 4:3 aspect... ratio, the images are resized automatically and the quality of the stamp on the location where you place the projector. Match the notch on the wall mount to the base position, as ...

Installation Guide
Page 23
... hang the rest of the cable over the wall mount. ❏ Install the wall mount so that it can sufficiently support the weight of the projector and wall mount, and resist any damage or injury caused by lack of the wall. Nuts and bolts smaller than M8 could fall . ❏ Epson accepts no responsibility for any horizontal vibration. Warning...
... hang the rest of the cable over the wall mount. ❏ Install the wall mount so that it can sufficiently support the weight of the projector and wall mount, and resist any damage or injury caused by lack of the wall. Nuts and bolts smaller than M8 could fall . ❏ Epson accepts no responsibility for any horizontal vibration. Warning...

Installation Guide
Page 32
Tighten the M6 x 20 mm hexagon shoulder bolt to the wall mount 1. Screws (x2) Cable cover 2. Align the 3-axis adjustment unit with the slide plate's alignment mark ( ). 32 Insert the slide plate into the wall mount from the projector. M6 x 20 mm hexagon shoulder bolt H Attach the projector to secure the wall mount ( ). Loosen the two screws and remove the cable cover from the interface side of the projector ( ). 2.
Tighten the M6 x 20 mm hexagon shoulder bolt to the wall mount 1. Screws (x2) Cable cover 2. Align the 3-axis adjustment unit with the slide plate's alignment mark ( ). 32 Insert the slide plate into the wall mount from the projector. M6 x 20 mm hexagon shoulder bolt H Attach the projector to secure the wall mount ( ). Loosen the two screws and remove the cable cover from the interface side of the projector ( ). 2.

Installation Guide
Page 33
... This may cause the case to crack and the projector to the projector. Slide plate Projector interface side Bolt positions Washer Spring washer M4 x 12 mm hexagon socket head cap bolts Alignment marks Warning When installing or adjusting the wall mount, do not use adhesives to prevent the screws from... loosening and do not use a cable management system to run the cables inside the wall, make sure you are planning to keep the cables from Epson (part # ELPCK01). 33 An optional...
... This may cause the case to crack and the projector to the projector. Slide plate Projector interface side Bolt positions Washer Spring washer M4 x 12 mm hexagon socket head cap bolts Alignment marks Warning When installing or adjusting the wall mount, do not use adhesives to prevent the screws from... loosening and do not use a cable management system to run the cables inside the wall, make sure you are planning to keep the cables from Epson (part # ELPCK01). 33 An optional...

Installation Guide
Page 39
Adjust the vertical slide with the M8 hexagon bolt at the bottom of the wall mount, or the hexagonal shaft at the top of the test pattern Press the [Esc] button on the remote control or control panel to turn off ... off the display of the wall mount ( ). Tightening the hexagonal shaft raises the wall mount, and loosening the shaft lowers it . Loosen the M6 x 20 mm hexagon shoulder bolt ( ). 2. English J Adjust the vertical slide 1. Tightening the M8 hexagon bolt lowers the wall mount, and loosening the bolt raises it . Otherwise, the projector or wall mount may fall and cause...
Adjust the vertical slide with the M8 hexagon bolt at the bottom of the wall mount, or the hexagonal shaft at the top of the test pattern Press the [Esc] button on the remote control or control panel to turn off ... off the display of the wall mount ( ). Tightening the hexagonal shaft raises the wall mount, and loosening the shaft lowers it . Loosen the M6 x 20 mm hexagon shoulder bolt ( ). 2. English J Adjust the vertical slide 1. Tightening the M8 hexagon bolt lowers the wall mount, and loosening the bolt raises it . Otherwise, the projector or wall mount may fall and cause...

Installation Guide
Page 41
...the bolts and nuts after installation. If the projector or wall mount falls, it could cause personal injury or property damage. 41 Otherwise, the projector or wall mount may fall and cause personal injury or property damage. ❏ Do not hang on the wall mount or hang a heavy object on a regular basis.... Confirm that the screws have not become loose on the wall mount. If you find any loose...
...the bolts and nuts after installation. If the projector or wall mount falls, it could cause personal injury or property damage. 41 Otherwise, the projector or wall mount may fall and cause personal injury or property damage. ❏ Do not hang on the wall mount or hang a heavy object on a regular basis.... Confirm that the screws have not become loose on the wall mount. If you find any loose...
Product Brochure
Page 6
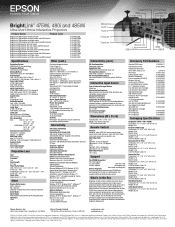
... the U.S. Epson disclaims any and all rights in these marks. L Audio R Video S-video Power Audio Out RS-232c BrightLink® 475Wi, 480i and 485Wi Ultra-short-throw Interactive Projectors Product Name Product Code BrightLink 475Wi projector with wall mount BrightLink 475Wi projector with wall mount and RM Easiteach BrightLink 475Wi projector with table mount BrightLink 475Wi projector with table mount and RM Easiteach BrightLink 480i projector with wall mount BrightLink 480i projector with wall mount and...
... the U.S. Epson disclaims any and all rights in these marks. L Audio R Video S-video Power Audio Out RS-232c BrightLink® 475Wi, 480i and 485Wi Ultra-short-throw Interactive Projectors Product Name Product Code BrightLink 475Wi projector with wall mount BrightLink 475Wi projector with wall mount and RM Easiteach BrightLink 475Wi projector with table mount BrightLink 475Wi projector with table mount and RM Easiteach BrightLink 480i projector with wall mount BrightLink 480i projector with wall mount and...


